Mikrotik LtAP LTE6 kit (RBLTAP-2HND R11E-LTE6) - User Manual
Mikrotik LtAP LTE6 kit (RBLTAP-2HND R11E-LTE6) Router – User Manual, read for free online in PDF format. We hope this helps you resolve any issues you may have. If you have further questions, please contact us through the contact form.
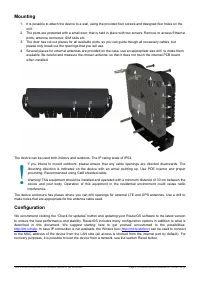
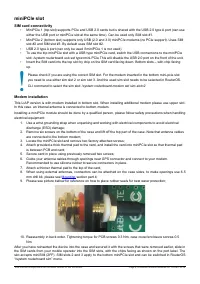


Table of Contents:
- Page 2 – Mounting; please only break out the openings that you will use.; Configuration; ) can be used to connect
- Page 3 – GPS; Attention; Powering; Ethernet port accepts passive Power over Ethernet 12-30 V DC; Front status LED behavior
- Page 4 – miniPCIe slot; SIM card connectivity; CLI command to select the sim slot:; Modem installation; are connected to the bottom modem
- Page 7 – Frequency bands terms of use
LtAP LTE6 kit
The LtAP LTE6 kit is a wireless access point with three SIM card slots for cellular data modems.
Quickstart
Please follow these quick steps to set up your device:
Unscrew two screws and remove doors to access all ports. Please see
Connect your Internet cable to the Ethernet port (this is optional if using LTE as the primary connection).
Insert the SIM card into the SIM 2 slot (middle).
Connect GPS antenna (optional),(see
).
Mount unit in your desired place (see
).
Choose your powering solution (see
).
Set your computer IP configuration to automatic (DHCP).
From your PC or smartphone, connect to the wireless network name which starts with “MikroTik”.
Once connected to the wireless network, open http://192.168.88.1 in your web browser to start
configuration, since there is no password by default, you will be logged in automatically.
We recommend clicking the “Check for updates” button and updating your RouterOS software to the latest
version to ensure the best performance and stability.
Choose your country, to apply country regulation settings and set up your password in the screen that
loads.
Extension slots and ports
•
Built-in 2 GHz wireless access point module, AP/station/bridge/p2p modes are supported. Onboard PIF
antennas built in, as well as MMCX connectors for external antennas (software selectable).
•
Two miniPCIe slots and three SIM slots.
•
Built-in GPS module with an external SMA connector.
•
Gigabit Ethernet port, supporting automatic cross/straight cable correction (Auto MDI/X). Either straight or
crossover cable can be used for connecting to other network devices. The Ethernet port accepts 12-30 V
DC powering from a passive PoE injector.
•
One DB9 RS232 serial port for serial console access. Configured as 115200 bit/s, 8 data bits, 1 stop bit, no
parity.
•
One USB 2.0 port for storage devices or cellular modems.
See mikrotik.com/products for the latest version of this document.
Page 1, Document #49495 Modified on: 19.DEC.2019
"Loading the manual" means you need to wait until the file loads and becomes available for online reading. Some manuals are very large, and the time they take to appear depends on your internet speed.
Summary
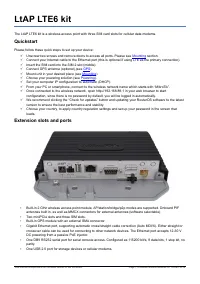
Mounting 1. It is possible to attach the device to a wall, using the provided four screws and designed four holes on the unit. 2. The ports are protected with a small door, that is held in place with two screws. Remove to access Ethernet ports, antenna connector, SIM slots etc. 3. The door has cut-o...
GPS The built-in GPS module requires an external antenna to be used (SMA connector is already mounted behind the unit door). Please see Mounting section on how to remove door. Attention the GPS uses an active antenna, only connect and disconnect the antenna, when the device is turned off! Make sure ...
miniPCIe slot SIM card connectivity • MiniPCIe 1 (top slot) supports PCIe and USB 2.0 cards but is shared with the USB 2.0 type A port (can useeither the USB port or miniPCIe slot at the same time). Can be used only SIM slot #1. • MiniPCIe 2 (bottom slot) supports only USB (2.0 and 3.0) miniPCIe mod...