Page 2 - Contents
Contents 2 Caring for the environment ........................................................................................ 6 Disposal of fluff or accessories .................................................................................... 6 Warning and Safety instructions ......................
Page 3 - Selecting the Wash2Dry function
Contents 3 Programme chart .......................................................................................................... 33 Extras ............................................................................................................................... 40 DryFresh ...................
Page 4 - Cleaning and care
Contents 4 Cleaning and care ......................................................................................................... 55 Fluff filters ........................................................................................................................ 55 Removing the fragrance f...
Page 5 - Technical data; Language
Contents 5 Changing the door hinging ............................................................................................ 81 Changing the hinging over ....................................................................................... 81 Refitting ...........................................
Page 6 - Caring for the environment; Disposing of your old appliance
Caring for the environment 6 Disposing of the packaging ma-terial The packaging material is used for hand-ling and protects the appliance fromtransport damage. The packaging ma-terial used is selected from materialswhich are environmentally friendly fordisposal and can generally be recycled.Recyclin...
Page 7 - Warning and Safety instructions; Correct application
Warning and Safety instructions 7 It is essential to read these instructions. This tumble dryer complies with all current local and nationalsafety requirements. However, inappropriate use can lead to per-sonal injury and damage to property.Read the operating instructions carefully before using the...
Page 8 - Safety with children
Warning and Safety instructions 8 Safety with children Children under 8 years of age must be kept away from the tumble dryer unless they are constantly supervised. Children 8 years and older may only use the tumble dryer unsuper- vised if they have been shown how to use it safely and recognise a...
Page 10 - Designation of refrigerant
Warning and Safety instructions 10 Damage to the tumble dryer by switching it on too soon. This can damage the heat pump.After setting up the tumble dryer wait for at least one hour beforeswitching it on. - The humming noises caused by the heat pump during the drying process are normal. They do no...
Page 11 - Correct use
Warning and Safety instructions 11 Correct use Do not install the tumble dryer in a room where there is a risk of frost occurring. At temperatures around freezing point the tumbledryer may not be able to operate properly. There is a risk of damage ifthe condensed water is allowed to freeze in the ...
Page 13 - Using a fragrance flacon (optional accessory); skin
Warning and Safety instructions 13 Condensed water is not drinking water. It can cause health problems in both people and animals if con-sumed. Always keep the area around the tumble dryer free of dust and fluff.Dust drawn into the tumble dryer can cause blockages in the heat ex-changer over tim...
Page 14 - Accessories
Warning and Safety instructions 14 Please also observe the information supplied with the fragrance flacon. Accessories Only use genuine Miele original spare parts and accessories with this appliance. If non-Miele parts are used, warranty, performanceand product liability claims will be invalidat...
Page 15 - Operating the tumble dryer; Control panel; sensor control; Touch display and sensors
Operating the tumble dryer 15 Control panel a sensor control Takes you back one level in the menu. b Touch display c Start/Stop sensor Touching the Start/Stop sensor starts the selected programme or cancels a pro- gramme that has already been started. The sensor flashes slowly as soon as it ispo...
Page 16 - Main menu
Operating the tumble dryer 16 Main menu After switching on the tumble dryer, themain menu will appear in the display.You can access all the important sub-menus from the main menu. Touch the sensor control at any time to return to the main menu. Values setpreviously are not saved. 11:02 ...
Page 17 - Lists; Programmes menu; Extras menu; OK; Moving programmes
Operating the tumble dryer 17 Examples on how to operate theappliance Lists Programmes menu 11:02 0:00 0:00 0:00 0:00 h h h h Programmes Cottons Delicates Minimum iron Help ECO You can scroll right or left by swipingyour finger across the screen. To do this,place your finger on the touch...
Page 18 - Setting numerical values; Help display
Operating the tumble dryer 18 To move the programme, swipe yourfinger in the required direction. Remove your finger when the pro-gramme reaches the new location. The programme has moved. Setting numerical values You can set numerical values in somemenus. OK 12 00 11 59 10 58 13 01 14 02 Clock di...
Page 19 - Before using for the first time; Installation; Downtime after installation; Damage to the tumble dryer by; Availability of the WiFi connection
Before using for the first time 19 Installation Before using the appliance for thefirst time, check that you have fol-lowed all the instructions under “In-stallation”.Read these operating instructions,paying particular attention to the in-formation provided under “Installa-tion”. Removing the protec...
Page 20 - Miele App; Switching on the tumble dryer; Setting up Miele@home; Via WPS; Setting the clock format
Before using for the first time 20 Miele App The Miele App is available to downloadfree of charge from the Apple AppStore ® or from the Google Play Store™. Switching on the tumble dryer Press the button. The welcome screen will light up.The display will guide you step by stepthrough the initial...
Page 21 - Setting the time of day; Confirm with the; The display shows further information.; Continuing with commissioning
Before using for the first time 21 The display will change to the next set-ting. Setting the time of day This message only appears if thetumble dryer has not yet been connec-ted to a WiFi network.The time of day is set automatically ifconnection is established with a WiFinetwork. OK 12 00 11 59 10 5...
Page 22 - Energy saving tips; - Make sure your laundry is spun at the
Energy saving tips 22 Energy saving tips This dryer with heat-pump technologyis designed for energy-saving dryingcycles. However, you can save a littlemore energy with the following meas-ures as the drying time is not extendedunnecessarily. - Make sure your laundry is spun at the maximum spin speed ...
Page 23 - Feedback; tion before the programme begins.; Energy consumption; Actual consumption; You can view the consumption data
Energy saving tips 23 Feedback You can view information about the en-ergy consumption of your tumble dryerin the pull-down menu.The following information will appear inthe display: - An estimate of the energy consump- tion before the programme begins. - The actual energy consumption during the progr...
Page 24 - Notes on correct laundry care
1. Notes on correct laundry care 24 Points to note regardingwashed laundry - When washing very heavily soiled items ensure that you use sufficientdetergent and select a high temperat-ure. If in doubt, wash the items sev-eral times. - Do not put soaking wet items into the tumble dryer. Make sure your...
Page 25 - Care symbols; Selecting the correct drying level
1. Notes on correct laundry care 25 Drying Tip: See the “Programme chart”, which contains everything you need to knowabout programmes and load sizes.- Always observe the maximum recom- mended load size for each pro-gramme. This will mean that the en-ergy consumption for the amount oflaundry is at it...
Page 26 - Load the tumble dryer; Loading the laundry; Checking the FragranceDos socket; Close the door; Shut the door with a gentle swing.
2. Load the tumble dryer 26 Loading the laundry Preventing damage to fabrics.Before loading the dryer, read “1.Notes on correct laundry care”. Open the door. Remove any items that have been leftinside the drum. Unfold the laundry and load looselyinto the drum. Do not overload the drum. Doing s...
Page 27 - Touch the; Touch the; The display will change to the
3. Selecting a programme 27 Switching on the tumble dryer Touch the sensor to switch the tumble dryer on. Tip: The condensed water can be re- cycled when certain programmes areused.See “Condensed water container –Filling the condensed water container ”.To find out when the condensed watercan be ...
Page 28 - Selecting programme settings; HygieneDry; drying level; Selecting the drying level
4. Selecting programme settings 28 Selecting the drying level Check the “Programme overview” tosee which programme you can select adrying level for and which drying levelmeets your requirements. 11:02 2:35 Overview Cottons h Timer Save Drying level Cupboard Dry Extras not selected Touch ...
Page 30 - Warm air; Selecting extras
4. Selecting programme settings 30 Selecting the running time fortime programmes You can change the duration in 10-minute increments. Programmes:Cool air: 20 min – 1:00 hWarm air: 20 min – 2:00 hBasket programme: 40 min – 2:30 h 11:02 0:20 Overview Timed drying Warm air h Timer Save Extras n...
Page 31 - Starting a programme; Starting the programme; Energy savings
5. Starting a programme 31 Starting the programme The programme can be started whenthe Start/Stop sensor control is flashing on and off. Touch the Start/Stop sensor control. The Start/Stop sensor control lights up constantly. 11:02 Status Cottons Time left Machine iron PerfectDry h 1:42 Ad...
Page 32 - ECO; Drum lighting
6. End of programme - unload the drum 32 End of programme The programme is finished when Finish/ Anti-crease or Finish/Cooling down appears in the display. The Start/Stop sensor control is no longer lit.The tumble dryer will switch off auto-matically 15 minutes after the end of theAnti-crease phase ...
Page 33 - Programme chart; Cottons; Extra dry
Programme chart 33 All weights marked with * are based on the weight of dry laundry. Cottons max. 9 kg* HygieneDry Use for - Cottons and linen fabric which will be in direct contact with the skin, e.g. underwear, baby clothes, bed linen, towelling. - Other hard-wearing fabrics with special hygiene ...
Page 36 - Automatic; Woollens handcare; Denim
Programme chart 36 Automatic max. 5 kg* Cupboard Dry plus, Cupboard Dry, Hand iron plus, Hand iron Use for Mixed load of garments suitable for the Cottons and Minimum iron programmes. Woollens handcare max. 2 kg* Use for Woollen garments and fabric containing wool blends, e.g. pullovers,cardigans, ...
Page 37 - ―min―
Programme chart 37 Steam care max. 1 kg* Cupboard Dry, Hand iron Use for - All items made of cotton or linen - For minimum iron items made of cotton, mixed fibre or synthetic fibre. For example, cotton trousers, anoraks and shirts. Tip - For dampening fabrics before ironing - For smoothing fabrics ...
Page 38 - Cupboard Dry
Programme chart 38 Proofing max. 2.5 kg* Use for Fabrics suitable for tumble drying, e.g. microfibre fabrics; skiwear;outdoor clothing; fine, close-weave cotton garments (poplin); andtablecloths. Note - With this programme, items can only be dried to the Cupboard Dry level. - This programme include...
Page 39 - Cottons hygiene; ExtraQuiet; Cupboard Dry, Hand iron
Programme chart 39 Cottons hygiene max. 4 kg* HygieneDry Use for Cottons and linen fabric which will be in direct contact with the skin,e.g. underwear, baby clothes, bed linen, towelling. Note - Use HygieneDry for hard-wearing fabrics with special hygiene re- quirements. - In this programme, the it...
Page 40 - DryFresh; PowerFresh
Extras 40 The drying programmes can be aug-mented with various extra options. Thetable lists the selection options. DryFresh The Cupboard Dry drying level can be used to freshen up clothing that is cleanand dry without wetting it.The function is slightly less effectivewhen used with fabrics made of ...
Page 41 - is not available for all drying; Gentle tumble; Robust garments with the; Saving energy; Cupboard
Extras 41 DryCare 40 This option dries fabrics gently at verylow temperature.It can be used for all fabrics that are freeof wool and are washable at temperat-ures of 40 °C and above. For the best possible drying result:Reduce the load size for the corres-ponding programme to half the max-imum load s...
Page 42 - Drying programme overview - Extras
Extras 42 Drying programme overview - Extras ECO – – – – – – – Cottons X X X X X X X Minimum iron X X X X X X X Delicates – – – – – – Bed linen – – – – – – – Automatic X X X X X X – Woollens handcare – – – – – – – Silks handcare – – – – – – Express – – – – – – – Shirts X X X X X X ...
Page 43 - Wash2Dry; Requirements for use; Wash2Dry
Wash2Dry 43 Once the programme has come to aproper end, the Miele washing ma-chine transfers the programme datavia the router to which the networkedtumble dryer is also connected, as wellas transferring it to the Miele Cloud.The tumble dryer automatically sets adrying programme tailored to the la...
Page 44 - Favourite programmes; Option 1
Favourite programmes 44 To create a Favourite pro-gramme You can save your own customisedprogrammes under names of yourchoice. There are 2 ways to create a Favouriteprogramme. Option 1 The main menu must be visible in thedisplay. Touch the Favourites sensor control. The display will change to show...
Page 46 - Timer; Setting the timer
Timer 46 The timer can be used to set the timeyou wish a programme to finish or startat. The programme start can be delayedby up to 24 hours. Setting the timer Touch the Timer sensor. Select the Finish at or Start at option. Set the hours and the minutes withthe OK sensor. Changing the timer...
Page 47 - SmartStart; Setting the time period
Timer 47 SmartStart The SmartStart function lets youdefine a time period during which yourtumble dryer will start automatically.The appliance will start on receipt of asignal, e.g. from your energy supplier,that indicates that the electricity tariffis particularly economical.This function is active ...
Page 48 - Changing the programme sequence; Cancelling a programme; Adding or removing laundry; Exceptions when adding laundry; Proofing
Changing the programme sequence 48 Changing a programme once ithas started You cannot change to another pro-gramme once a programme has started(this prevents unintentional alterations).You will need to cancel the current pro-gramme before you can select a newone. Cancelling a programme Touch the S...
Page 49 - Condensed water container; Damage to the door and the fas-
Condensed water container 49 Emptying the condensed watercontainer The condensed water is collected inthe condensate container. Emptying interval: empty the condens-ate container after every drying pro-gramme.When the maximum level in the con-densed water container is reached, thefollowing message w...
Page 50 - Filling the condensate container; Cleaning the rubber seal
Condensed water container 50 Filling the condensate container When certain programmes are beingused, condensed water generated dur-ing drying is recycled and sprayed intothe drum via a spray nozzle. The condensed water container musttherefore be filled to at least the ―min― mark. Otherwise, this cou...
Page 51 - Fragrance flacon; FragranceDos
Fragrance flacon 51 FragranceDos Fragrance flacons (optional accessor-ies) can be used to give your laundry apleasant scent.This dryer has 2 places for insertingfragrance flacons. This gives you achoice of how to use them. - You can use both positions if you wish to change from one scent to another....
Page 52 - Inserting the fragrance flacon; Open the door of the tumble dryer.
Fragrance flacon 52 Inserting the fragrance flacon Open the door of the tumble dryer. The fragrance flacon is inserted in theupper fluff filter. They can be fitted onthe left and the right hand side nextthe opener. Open the cover using the tab until thetab is right at the top as shown. To preven...
Page 53 - Turn the outer ring; Opening the fragrance flacon; Cool; Closing the fragrance flacon; is in position
Fragrance flacon 53 Turn the outer ring clockwise a little. The fragrance flacon can slip out.Turn the outer ring in such a way thatmarkers and line up. Opening the fragrance flacon Before drying, you can select the intens-ity of the fragrance. Turn the outer ring clockwise: the fur-ther y...
Page 54 - and
Fragrance flacon 54 Removing /replacing the fra-grance flacon Turn the outer ring anti-clockwise un-til the markers a and b line up. Replace the fragrance flacon with anew one. When not in use, you can store the fra-grance flacon in its original packaging.Replacement interval: replace the fr...
Page 55 - Fluff filters; To clear the message, confirm with; Removing the fragrance flacon; You can also use a vacuum cleaner
Cleaning and care 55 Fluff filters Environmental impact due to fluffwhich has been disposed of incor-rectly.To prevent microplastics fromspreading into the waste water sys-tem, fluff must not be drained awaywith the water.Dispose of the fluff collected by thefluff filters with your householdwaste. T...
Page 57 - Clean all fluff filters with water.; Cleaning the plinth filter; Removing the plinth filter; The flap will spring open.
Cleaning and care 57 Use a vacuum cleaner with a longcrevice nozzle attached to remove anyvisible fluff from the upper air flowopenings. Clean all fluff filters with water. Cleaning the fluff filters with water Wipe the smooth plastic surfaces ofthe fluff filters with a damp cloth toclean them. ...
Page 58 - Pull the handle out of the plinth filter.
Cleaning and care 58 Cleaning the plinth filter Pull the handle out of the plinth filter. Clean the plinth filter carefully andthoroughly under running water. To collect the cleaning water, place a bowl or bucket under thestopcock. Tip: To speed up the removal of residue from the surface, run ...
Page 59 - Blockages caused by a damaged; Pouring out the cleaning water
Cleaning and care 59 If a drying programme is interruptedwith a fault message after the cleanplinth filter has been refitted, the plinthfilter was too wet when it was refitted.Carefully squeeze the water out of theplinth filter again. Leave the plinth filterto air-dry.If a fault occurs again despite...
Page 60 - Damage or ineffective drying if; Cleaning the tumble dryer; Damage due to the use of unsuit-
Cleaning and care 60 Damage or ineffective drying if drying takes place without a plinth fil-ter or when the heat exchanger ac-cess panel is open.An excessive accumulation of fluffcan damage the tumble dryer. If thesystem is not leak-tight, this canmake drying ineffective.Only operate the tumble d...
Page 61 - Problem solving guide; Message
Problem solving guide 61 Many malfunctions and faults that can occur in daily operation can be easilyremedied. You can save time and money in many cases, as you do not need to callthe Miele Customer Service Department.Information to help you rectify faults yourself can be found at www.miele.com/ser-...
Page 62 - Messages in the display
Problem solving guide 62 Message Cause and remedy Clean the fluff filter.Check the airways. The system has been clogged by fluff or detergentresidue. To deactivate the message, confirm with OK . Clean the fluff filters and the plinth filter. – Please see “Cleaning and care” for notes on cleani...
Page 63 - Unsatisfactory drying results
Problem solving guide 63 Message Cause and remedy Finish/Cooling down The laundry will be cooled down at the end of the pro-gramme. Either remove the laundry and spread it out to cooldown or leave it in the tumble dryer to cool downduring the cooling phase. Clean the fluff andplinth filters. See...
Page 64 - Problem
Problem solving guide 64 Problem Cause and remedy The laundry is not suffi-ciently dry. The load consisted of different types of fabric. Finish drying using the Warm air programme. Select a more suitable programme next time. Tip: You can alter the residual moisture level for someprogrammes. See ...
Page 65 - The drying cycle duration is very long; General problems with the tumble dryer
Problem solving guide 65 The drying cycle duration is very long Problem Cause and remedy The drying process goeson too long or evenswitches off.* The room where the tumble dryer is located is toowarm. Ventilate the room thoroughly. Detergent residues, hair and fine fluff can clog the fil-ters. C...
Page 67 - Only use condensed water. Do not use mains water.
Problem solving guide 67 Problem Cause and remedy The spray jet for spray-ing condensed waterinto the drum is insuffi-cient. When certain programmes are being used, water istaken from the condensed water container andsprayed into the drum. The spray jet can sometimesstop working. The fluff filter in...
Page 68 - Replacing the plinth filter; Poor fit
Problem solving guide 68 Replacing the plinth filter The heat exchanger can clog up.Replace the plinth filter immediatelyif you see the following signs of wearbefore or after cleaning (optional ac-cessory). Poor fit The edges of the plinth filter do not sitproperly and the plinth filter is out ofsha...
Page 69 - Reactivating the plinth filter; Risk of injury from sharp cooling
Problem solving guide 69 no is longer a snug fit at the sides, evenif it appears to be perfect:fluff is getting in unfiltered at the edges.Reactivate the plinth filter. If theseresidues appear on the plinth filter againsoon after cleaning, the plinth filter mustbe replaced. Reactivating the plinth f...
Page 70 - Hold it securely with one hand.
Problem solving guide 70 Remove the condensed water con-tainer. Reach under the side lug on the spoutwith your finger. Pull out the spout. Be careful not to tug on the hose toavoid detaching it. Guide the end of the hose through theopening. Hold it securely with one hand. Use your other ...
Page 71 - Open the tumble dryer door.
Problem solving guide 71 Open the tumble dryer door. The spray jet is located in the top left ofthe door opening. Attach the tool to the spray jet. Turn the tool anti-clockwise to un-screw the spray jet. Insert the new spray jet into the tool. Turn the tool clockwise to screw thespray jet ...
Page 72 - Service; Contact in the event of a fault
Service 72 Information to help you rectify faultsyourself and about Miele spare partscan be found at www.miele.com/ser-vice. Contact in the event of a fault In the event of any faults which you can-not remedy yourself, please contactyour Miele dealer or the Miele Cus-tomer Service Department. You ca...
Page 73 - EPREL database; Dryer basket; Warranty
Service 73 EPREL database Information on energy labelling and eco-design requirements is available in theEuropean Product Database (EPREL).You can find the product database atthe following linkhttps://eprel.ec.europa.eu/. You will beasked to enter the model identifier.The model identifier can be fou...
Page 74 - Front view
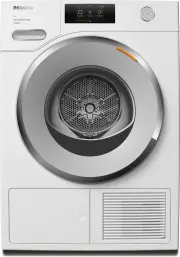
Installation *INSTALLATION* 74 Front view a Mains connection cable b Control panel c Condensed water container d Door e Plinth filter flap f 4 height-adjustable feet g Cooling air grille h Drain hose for condensed water
Page 75 - Rear view; Drain hose for condensed water; Transporting the tumble dryer; Danger of injury to people and
Installation *INSTALLATION* 75 Rear view a Protruding lid for holding when mov-ing the appliance b Drain hose for condensed water c Hook for winding up the mains con-nection cable during transport d Mains connection cable Transporting the tumble dryer Danger of injury to people and damage to prope...
Page 76 - Levelling the tumble dryer; Ventilation
Installation *INSTALLATION* 76 Installation Levelling the tumble dryer Ensure that no closeable door, slidingdoor or oppositely hinged door is in-stalled that could hinder opening ofthe tumble dryer door in any way. To ensure proper operation, the tumbledryer must stand perfectly level. Thescrew fee...
Page 77 - - Drying durations may increase slightly.; Optional accessories
Installation *INSTALLATION* 77 Additional installation require-ments Slot-in This tumble dryer is suitable for pushingunder a worktop. Appliance defect due to a build-up ofheat.Make sure there is adequate room forwarm air from the dryer to be direc-ted away. - The appliance lid cannot be removed.- T...
Page 78 - Note; Danger of condensed water
Installation *INSTALLATION* 78 External condensed water out-let Note When drying is in progress, condensedwater is pumped into the condensedwater container through the drain hosewhich is located at the back of thedryer. The condensed water can also be ex-ternally drained away via the drain hoseat th...
Page 79 - Arranging the drain hose; Damage to the drain hose; Examples
Installation *INSTALLATION* 79 Arranging the drain hose Damage to the drain hose through incorrect handling.The drain hose can suffer damageand leak.Do not pull on the drain hose and donot stretch it or allow it to becomekinked. There will be a small amount of residualwater left in the drain hose....
Page 81 - Changing the door hinging; ers; Changing the hinging over
Installation *INSTALLATION* 81 Changing the door hinging You can change the door hinging onthis tumble dryer yourself. For safety reasons the tumble dryermust be disconnected from the elec-tricity supply before changing thedoor hinging. You will need: - a Torx T20 and T30 screwdriver- a flat head sc...
Page 82 - Turn the door lock through 180°.
Installation *INSTALLATION* 82 Turn the door lock through 180°. Press the door lock into openings on the opposite side of the dooropening. Adjust the position of the door lock sothat the screw holes line up withthose in the front panel of the dryer . Secure the door lock with the two...
Page 83 - on the door
Installation *INSTALLATION* 83 Insert the lock catch into the newcover supplied with the dryer. Place this new cover to one side fornow. 4. Dismantle the door hinge from thedoor The door hinge cover must be unclippedfrom position and then removed. 1. 2. Use a screwdriver to press downgen...
Page 84 - and rotate it so it
Installation *INSTALLATION* 84 5. Change over the door hinge on thedoor The door hinge is secured to the doorwith 2 angled rods. These rods need tobe removed with a screwdriver orpointed pliers. Insert the end of the screwdriverblade under rod and rotate it so it is in an upright position. Do ...
Page 85 - Change the lock catch on the door
Installation *INSTALLATION* 85 Fit new door hinge cover and clip it into position. 6. Change the lock catch on the door You now need the new lock catch cover supplied with the dryer whichyou have already fitted with the lockcatch. Push lock catch cover with its lock catch into position...
Page 86 - Refitting; Position the door in front of the dryer.; Important; Please keep the lock catch and
Installation *INSTALLATION* 86 Refitting 7. Refit the door Press the rubber seal back into thegrove on the door. Position the door in front of the dryer. Fit the base of the door hinge with its2 pins into the openings on the dryer. The base of the door hinge must beflush with the front panel o...
Page 87 - Electrical connection; Risk of fire from overheating.
Installation *INSTALLATION* 87 Electrical connection The tumble dryer is supplied with amains cable with moulded plug readyfor connection to a suitable earthedsocket.The socket must be easily accessibleafter the tumble dryer has been in-stalled. If the socket is not easily ac-cessible, ensure that a...
Page 89 - Data sheet for household tumble driers
Technical data 89 Product data sheet in accordance with delegated regulation (EU) No. 392/2012valid until 30 June 2025 The product data sheet in accordance with delegated regulation (EU) No.392/2012 will remain valid for GB after 30 June 2025 Data sheet for household tumble driers In acc. with deleg...
Page 90 - EU Conformity declaration; UK Conformity declaration; manuals and enter the name of the product or the serial number
Technical data 90 3 If the household tumble drier is equipped with a power management system. 4 This programme is suitable for drying normal wet cotton laundry and is the most efficient programmein terms of energy consumption for cotton. 5 If the household tumble drier is a condenser tumble drier. 6...
Page 91 - This; Statement of Compliance; confirms this Miele product fully complies with the; Paul Wright
Technical data 91 This Statement of Compliance confirms this Miele product fully complies with the Product Security and Telecommunications Infrastructure (Security Requirementsfor Relevant Connectable Products) Regulations 2023. 1) Household Appliance – 2) Manufactured by: Miele & Cie KG, Carl M...
Page 92 - Consumption data; Consumption data is not valid for GB
Consumption data 92 Consumption data in accordance with Regulations 932/2012/EU and392/2012/EU valid until 30 June 2025 Consumption data is not valid for GB Load size 1 Final spin speed in washing machine Residual moisture Energy Running time kg rpm % kWh min ECO 2 9.0 4.5 1000 1000 60 60 1.47 0.78 ...
Page 94 - Consumption data is only valid for GB
Consumption data 94 Consumption data is only valid for GB Load size 1 Final spin speed in washing machine Residual moisture Energy Running time kg rpm % kWh min Cottons 2 9.0 4.5 1000 1000 60 60 1.47 0.78 220 131 Cottons Cupboard Dry 9.0 9.0 9.0 1200 1400 1600 53 50 44 1.30 1.25 1.10 199 189 168 C...
Page 95 - Accessing the Settings menu; Settings; Selecting settings; Closing the Settings menu; Clock display
Settings 95 You can alter the tumble dryer's elec-tronics to suit changing requirementswith the settings. The settings can be altered at anytime. Accessing the Settings menu Switch the tumble dryer on. Scroll to the second page in the mainmenu. Touch the Settings sensor. Selecting settings The...
Page 96 - Only 3 times after finish
Settings 96 - Clock format The clock format is set. – 24 h (factory default) – 12 h - Set The current time is set. Consumption You can display the total consumption. Options - Previous programme Energy consumption in the last pro-gramme run - Total consumption Previous total consumption - Set the co...
Page 97 - “Display” off status; button will flash; – if a programme is not selected
Settings 97 “Display” off status To save energy the display and sensorcontrols will go out after 10 minutesand the Start/Stop button will flash slowly. You can change this setting. Options - On The display will go out (after10 minutes): – if a programme is not selected after the dryer has been switc...
Page 98 - Networking; SmartGrid; Remote control
Settings 98 Networking Miele@home Control the networking of your tumbledryer with your home WiFi network. The following points may appear in thesubmenu: Set up This message only appears if the tumbledryer has not yet been connected to aWiFi network.Please refer to “Before using for the firsttime” fo...
Page 99 - RemoteUpdate; Programme sequence
Settings 99 You can switch off the Remote control setting if you do not want to operate thetumble dryer with your mobile device.If Remote control is not switched on, the app can still be used to cancel the pro-gramme.Use the Timer sensor control to set a timeframe within which you want tostart the t...
Page 100 - Drying levels; You can alter the drying levels for the
Settings 100 Cooling down temp. The laundry will be cooled down auto-matically before the end of the pro-gramme. The automatic cooling-downphase which takes place before theend of a programme can be set at acooler level for all the drying level pro-grammes. This means that the coolingphase is extend...
Page 101 - Machine parameters; Airways indicator; Operating hours
Settings 101 Machine parameters Airways indicator Fluff should be removed after drying.In addition, this indicator will remindyou to clean the filters when a certainamount of fluff has collected in them: Clean the fluff and plinth filters. See the operating instruction manual for more in-formation...
Page 102 - Legal information; Open source licences
Settings 102 Legal information Open source licences You can view information here. Copyrights and licences for operatorand control software Miele uses their own and third partysoftware which is not subject to any so-called Open Source Licence for the op-eration and control of the appliance.This soft...
Page 103 - United Kingdom
United Kingdom Miele Co. Ltd., Fairacres, Marcham Road, Abingdon, Oxon, OX14 1TWTel: 0330 160 6600, Internet: www.miele.co.uk, E-mail: [email protected] Australia Miele Australia Pty. Ltd.ACN 005 635 398ABN 96 005 635 398Level 4, 141 Camberwell RoadHawthorn East, VIC 3123Tel: 1300 464 353E-mail: [em...


 Miele WWD380 WCS PWash&Steam&9kg User Manual
 Miele W 1614 Manual
 Miele G 5266 SCVi SFP Active Plus User Manual
 Miele Classic C1 Turbo Team PowerLine - SBAN0 User Manual
![Miele PDR 307 [EL]](https://manualsarea.com/img/product/thumbs/48/ba/fd/bafde84806e8abc8b420f34eaf8fcd6e.webp) Miele PDR 307 [EL] User Manual
Miele PDR 307 [EL] User Manual Miele F 1911 Vi Manual
![Miele PDR 908 [EL MAR 3N AC 400V 50-60Hz]](https://manualsarea.com/img/product/thumbs/48/05/b7/05b705998b251f92b271e908423e1ecb.webp) Miele PDR 908 [EL MAR 3N AC 400V 50-60Hz] Installation Manual
Miele PDR 908 [EL MAR 3N AC 400V 50-60Hz] Installation Manual Miele K 9757 iD Manual
 Miele TWC640WP EcoSpeed&8kg User Manual
 Miele TWD260WP 8kg User Manual
 Miele TWD640WP EcoSpeed&9kg User Manual
 Miele TWF760WP EcoSpeed&8kg User Manual
 Miele TWH780WP EcoSpeed&9kg User Manual
 Miele TWL780WP EcoSpeed&Steam&9kg User Manual
 Miele TXD160WP User Manual
 Miele TXR860WP Eco & Steam User Manual
 Miele W404 Manual
 Miele W 412 Manual
 Miele W828 Manual
 Miele w864 Manual