Page 2 - Contents
Contents 2 Warning and Safety instructions .......................................................................... 4 Caring for the environment ................................................................................ 11 Guide to the appliance ...............................................
Page 3 - Building-in dimensions ESW 6x14
Contents 3 Building-in dimensions ESW 6x14 ..................................................................... 42 Building-in dimensions ESW 6x29 / ESW 6x29 X .............................................. 46 Installation .............................................................................
Page 4 - Warning and Safety instructions
Warning and Safety instructions 4 This drawer complies with all relevant safety requirements. Inap-propriate use can, however, lead to personal injury and damage toproperty. To avoid the risk of accidents or damage to the appliance, pleaseread these instructions carefully before installation and bef...
Page 5 - Correct application; The drawer is intended for domestic use and use in other similar
Warning and Safety instructions 5 Correct application The drawer is intended for domestic use and use in other similar environments. The drawer is not intended for outdoor use. It is intended for domestic use only as described in these operat- ing instructions. Any other usage is not supported...
Page 6 - Safety with children
Warning and Safety instructions 6 Safety with children Children must be kept away from the drawer unless they are con- stantly supervised. Children 8 years and older may only use the drawer unsupervised if they have been shown how to use it in a safe way and can recog-nise and understand the con...
Page 7 - Technical safety
Warning and Safety instructions 7 Technical safety Unauthorised installation, maintenance and repairs can cause considerable danger for the user. Installation, maintenance and re-pairs must only be carried out by a Miele authorised technician. A damaged drawer can be dangerous. Always check for ...
Page 9 - Correct use
Warning and Safety instructions 9 Correct use You could burn yourself on a hot drawer or on hot crockery. Pro- tect your hands with heat-resistant pot holders or gloves when work-ing with the hot appliance. Do not let them get wet or damp, as thiscauses heat to transfer through the material more q...
Page 10 - The Keeping food warm; Cleaning and care; Do not use a steam cleaning appliance to clean the drawer.
Warning and Safety instructions 10 The Keeping food warm function is designed to keep hot food warm and not to warm up cold food. Ensure food is really hot whenplaced inside the drawer. Bacteria can develop on the food if the temperature is too low. Make sure that you set a high enough temper...
Page 11 - Caring for the environment
Caring for the environment 11 Disposal of the packing mater-ial The packaging is designed to protectthe appliance from damage duringtransportation. The packaging materialsused are selected from materials whichare environmentally friendly for disposaland should be recycled. Recycling the packaging re...
Page 12 - Guide to the appliance; Control panel
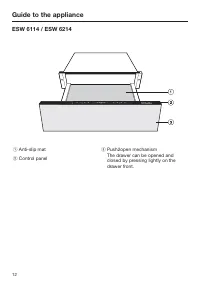
Guide to the appliance 12 ESW 6114 / ESW 6214 a Anti-slip mat b Control panel c Push2open mechanismThe drawer can be opened andclosed by pressing lightly on thedrawer front.
Page 15 - Accessories supplied; Rack
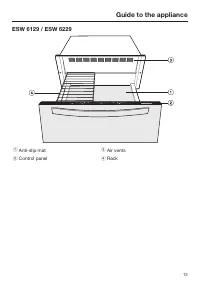
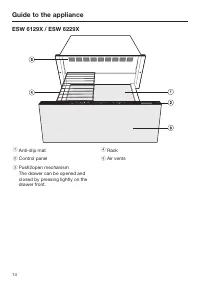
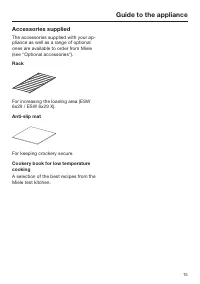
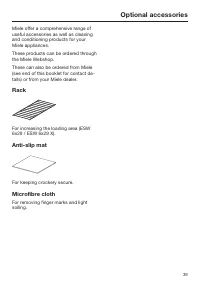
Guide to the appliance 15 Accessories supplied The accessories supplied with your ap-pliance as well as a range of optionalones are available to order from Miele(see "Optional accessories"). Rack For increasing the loading area (ESW6x29 / ESW 6x29 X). Anti-slip mat For keeping crockery secur...
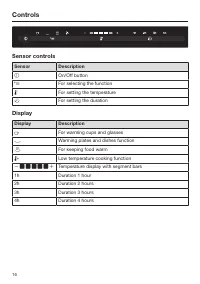
Page 16 - Controls; Sensor controls; Sensor; Display
Controls 16 Sensor controls Sensor Description On/Off button For selecting the function For setting the temperature For setting the duration Display Display Description For warming cups and glasses Warming plates and dishes function For keeping food warm Low temperature cooking funct...
Page 17 - Using for the first time
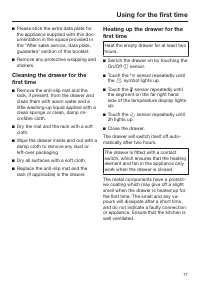
Using for the first time 17 Please stick the extra data plate forthe appliance supplied with this doc-umentation in the space provided inthe "After sales service, data plate,guarantee" section of this booklet. Remove any protective wrapping andstickers. Cleaning the drawer for thefirst t...
Page 18 - Operation
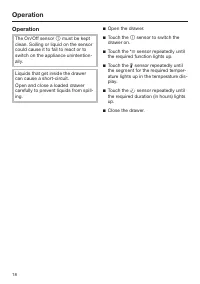
Operation 18 Operation The On/Off sensor must be kept clean. Soiling or liquid on the sensorcould cause it to fail to react or toswitch on the appliance unintention-ally. Liquids that get inside the drawercan cause a short-circuit.Open and close a loaded drawercarefully to prevent liquids from sp...
Page 19 - Functions
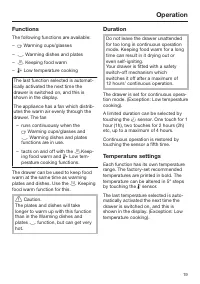
Operation 19 Functions The following functions are available: – Warming cups/glasses – Warming dishes and plates – Keeping food warm – Low temperature cooking The last function selected is automat-ically activated the next time thedrawer is switched on, and this isshown in the display. T...
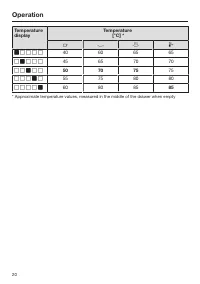
Page 20 - Temperature
Operation 20 Temperaturedisplay Temperature [°C] * 40 60 65 65 45 65 70 70 50 70 75 75 55 75 80 80 60 80 85 85 * Approximate temperature values, measured in the middle of the drawer when empty
Page 21 - Keeping food warm; Tips
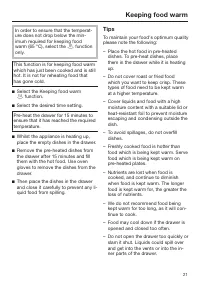
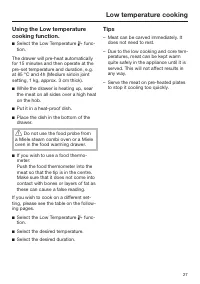
Keeping food warm 21 In order to ensure that the temperat-ure does not drop below the min-imum required for keeping foodwarm (65 °C), select the function only. This function is for keeping food warmwhich has just been cooked and is stillhot. It is not for reheating food thathas gone cold. Selec...
Page 22 - Settings
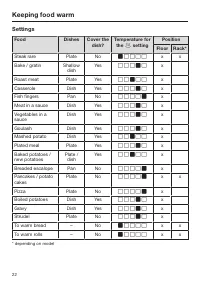
Keeping food warm 22 Settings Food Dishes Cover the dish? Temperature for the setting Position Floor Rack* Steak rare Plate No x x Bake / gratin Shallow dish Yes x Roast meat Plate Yes x Casserole Dish Yes x Fish fingers Pan No x Meat in a sauce D...
Page 23 - Warming crockery
Warming crockery 23 Tips – Distribute the crockery over the whole area of the drawer. Stacks of platesheat up more slowly than individualpieces of crockery. If large stacks ofplates are unavoidable, place them atthe front of the drawer.Use the rack (depending on model). – Do not place large serving ...
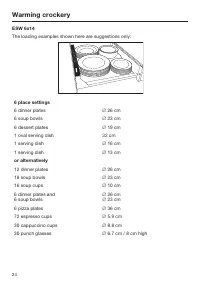
Page 24 - place settings
Warming crockery 24 ESW 6x14 The loading examples shown here are suggestions only: 6 place settings 6 dinner plates 26 cm 6 soup bowls 23 cm 6 dessert plates 19 cm 1 oval serving dish 32 cm 1 serving dish 16 cm 1 serving dish 13 cm or alternatively 12 dinner plates 26 cm 18 soup bowls ...
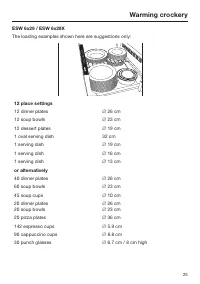
Page 25 - 2 place settings
Warming crockery 25 ESW 6x29 / ESW 6x29X The loading examples shown here are suggestions only: 12 place settings 12 dinner plates 26 cm 12 soup bowls 23 cm 12 dessert plates 19 cm 1 oval serving dish 32 cm 1 serving dish 19 cm 1 serving dish 16 cm 1 serving dish 13 cm or alternatively 40...
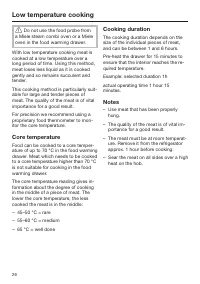
Page 26 - Low temperature cooking; Core temperature
Low temperature cooking 26 Do not use the food probe from a Miele steam combi oven or a Mieleoven in the food warming drawer. With low temperature cooking meat iscooked at a low temperature over along period of time. Using this method,meat loses less liquid as it is cookedgently and so remains suc...
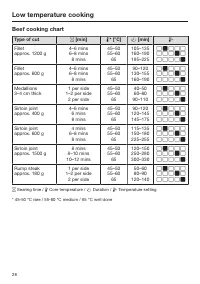
Page 28 - Beef cooking chart; Type of cut
Low temperature cooking 28 Beef cooking chart Type of cut [min] * [°C] [min] Filletapprox. 1200 g 4–6 mins6–8 mins 8 mins 45–5055–60 65 105–135160–190195–225 Filletapprox. 600 g 4–6 mins6–8 mins 8 mins 45–5055–60 65 90–120 130–155160–190 ...
Page 29 - Veal cooking chart; Poultry cooking chart
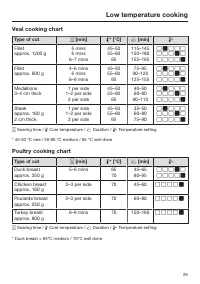
Low temperature cooking 29 Veal cooking chart Type of cut [min] * [°C] [min] Filletapprox. 1200 g 5 mins6 mins 6–7 mins 45–5055–60 65 115–145150–180155–185 Filletapprox. 600 g 4–6 mins 6 mins 6–8 mins 45–5055–60 65 75–95 90–120 125–155 ...
Page 30 - Pork cooking chart
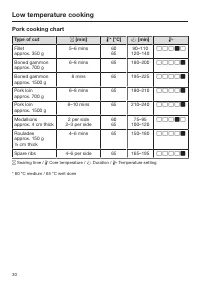
Low temperature cooking 30 Pork cooking chart Type of cut [min] * [°C] [min] Filletapprox. 350 g 5–6 mins 6065 90–110 120–140 Boned gammonapprox. 700 g 6–8 mins 65 180–200 Boned gammonapprox. 1500 g 8 mins 65 195–225 Pork loinapprox. 700 g 6–8 mins 65 180–210 ...
Page 31 - Lamb cooking chart
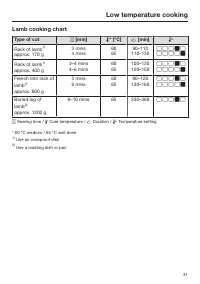
Low temperature cooking 31 Lamb cooking chart Type of cut [min] * [°C] [min] Rack of lamb 1) approx. 170 g 3 mins4 mins 6065 90–110 110–130 Rack of lamb 1) approx. 400 g 3–4 mins4–6 mins 6065 100–130120–150 French trim rack oflamb 1) approx. 600 g 3 mi...
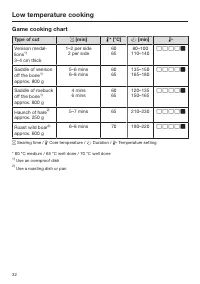
Page 32 - Game cooking chart
Low temperature cooking 32 Game cooking chart Type of cut [min] * [°C] [min] Venison medal-lions 1) 3–4 cm thick 1–2 per side 2 per side 6065 80–100 110–140 Saddle of venisonoff the bone 1) approx. 800 g 5–6 mins6–8 mins 6065 135–150165–180 Saddle of roebuckoff the bone...
Page 33 - Other uses
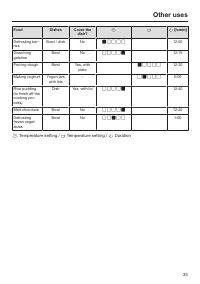
Other uses 33 Food Dishes Cover the dish? [h:min] Defrosting ber-ries Bowl / dish No 12:50 Dissolvinggelatine Bowl No 12:15 Proving dough Bowl Yes, with plate 12:30 Making yoghurt Yogurt jars with lids – 5:00 Rice pudding(to finish off thecooking pro-ces...
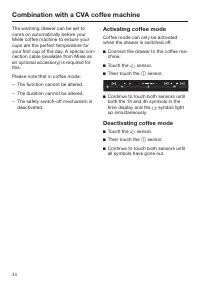
Page 34 - Combination with a CVA coffee machine; Activating coffee mode
Combination with a CVA coffee machine 34 The warming drawer can be set tocome on automatically before yourMiele coffee machine to ensure yourcups are the perfect temperature foryour first cup of the day. A special con-nection cable (available from Miele asan optional accessory) is required forthis. ...
Page 35 - Unsuitable cleaning agents
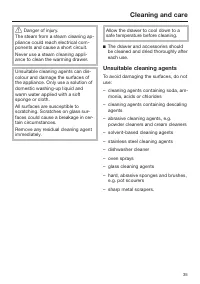
Cleaning and care 35 Danger of injury. The steam from a steam cleaning ap-pliance could reach electrical com-ponents and cause a short circuit.Never use a steam cleaning appli-ance to clean the warming drawer. Unsuitable cleaning agents can dis-colour and damage the surfaces ofthe appliance. Only ...
Page 36 - Wipe with clean water afterwards.; Cleaning the anti-slip mat
Cleaning and care 36 Cleaning the drawer front andinterior The On/Off sensor must be keptclean. Soiling and liquid on the sensorcould cause it to fail to react or toswitch the appliance on or off uninten-tionally. Remove all soiling using a solution ofhot water and washing-up liquid ap-plied with ...
Page 39 - Optional accessories; For keeping crockery secure.; Microfibre cloth
Optional accessories 39 Miele offer a comprehensive range ofuseful accessories as well as cleaningand conditioning products for yourMiele appliances. These products can be ordered throughthe Miele Webshop. These can also be ordered from Miele(see end of this booklet for contact de-tails) or from you...
Page 40 - Safety instructions for installation
Safety instructions for installation 40 Incorrect installation can result in personal injury and damage to property. Before connecting the drawer to the mains supply, ensure that the connection data on the data plate (voltage and frequency) match themains electricity supply.This data must corres...
Page 41 - Installation notes; All dimensions are given in mm.
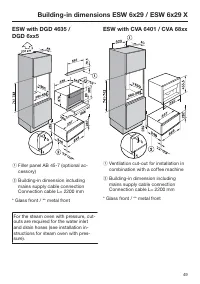
Installation notes 41 The combination appliance is placed ontop of the drawer without the need foran interim shelf. The drawer is available in two models,which differ in height. The building-indimensions for the warming drawermust be added to the building-in di-mensions for the combination appliance...
Page 44 - Cut-out for ventilation
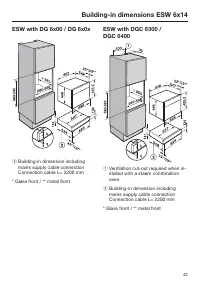
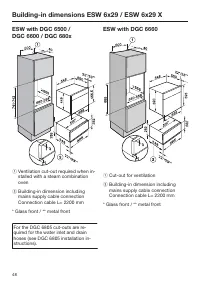
Building-in dimensions ESW 6x14 44 ESW with DGC 6500 /DGC 6600 / DGC 680x a Ventilation cut-out required when in-stalled with a steam combinationoven b Building-in dimension includingmains supply cable connection Connection cable L= 2200 mm * Glass front / ** metal front For the DGC 6805 cut-outs ar...
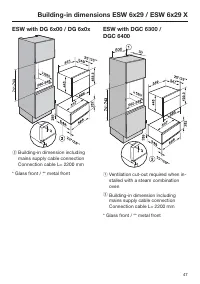
Page 46 - Building-in dimensions ESW 6x29 / ESW 6x29 X
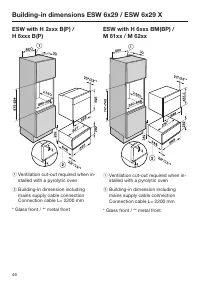
Building-in dimensions ESW 6x29 / ESW 6x29 X 46 ESW with H 2xxx B(P) /H 6xxx B(P) a Ventilation cut-out required when in-stalled with a pyrolytic oven b Building-in dimension includingmains supply cable connection Connection cable L= 2200 mm * Glass front / ** metal front ESW with H 6xxx BM(BP) /M 6...
Page 50 - Installation
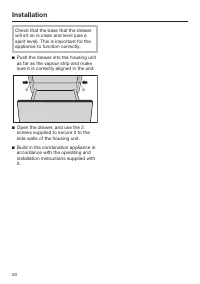
Installation 50 Check that the base that the drawerwill sit on is clean and level (use aspirit level). This is important for theappliance to function correctly. Push the drawer into the housing unitas far as the vapour strip and makesure it is correctly aligned in the unit. Open the drawer, and ...
Page 51 - Electrical connection; Total power rating; See data plate; Connection and fuse rating
Electrical connection 51 All electrical work should be carried outby a suitably qualified and competentperson in strict accordance with currentlocal and national safety regulations(e.g. BS 7671 in the UK). Connectionshould be made via a switched socket.This will make it easier for service tech-nicia...
Page 52 - Disconnecting from the mains; Danger of electric shock.
Electrical connection 52 Disconnecting from the mains Danger of electric shock. After disconnection, ensure the ap-pliance cannot be switched back onby mistake. To disconnect the appliance from themains power supply, do one of the fol-lowing depending on installation: Safety fuses Completely rem...
Page 53 - After sales service, data plate, guarantee; After sales service; – your Miele Dealer, or; Data plate; The appliance is guaranteed for 2 years from the date of purchase.; Guarantee: Other countries
After sales service, data plate, guarantee 53 After sales service In the event of any faults which you cannot easily remedy, please contact – your Miele Dealer, or – Miele Service. See end of this booklet for contact details. Please note that telephone calls may be monitored and recorded for trainin...