Maytag MGD8630HW - User Manual
Maytag MGD8630HW Dryer – User Manual, read for free online in PDF format. We hope this helps you resolve any issues you may have. If you have further questions, please contact us through the contact form.


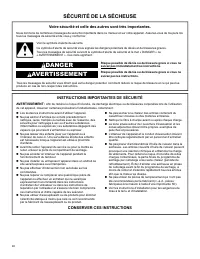
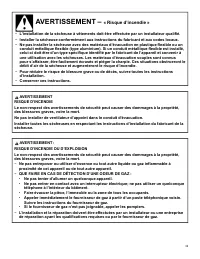
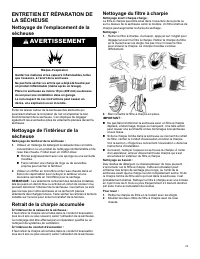
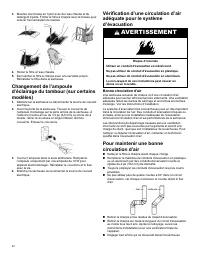
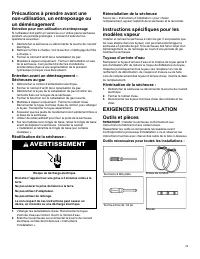
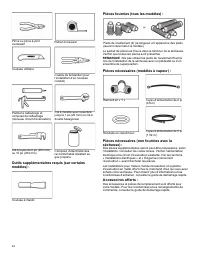
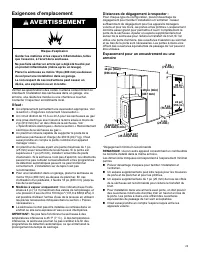
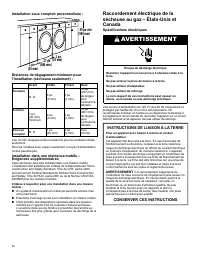
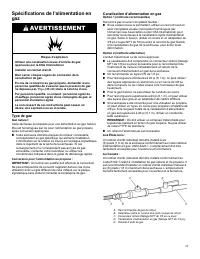
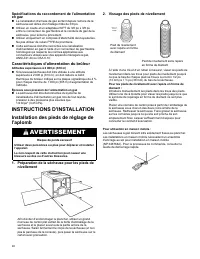
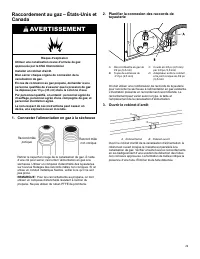
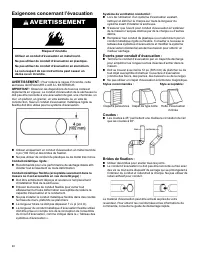
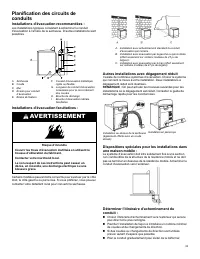
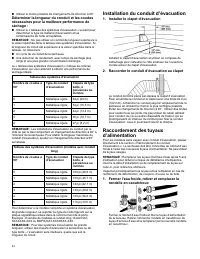
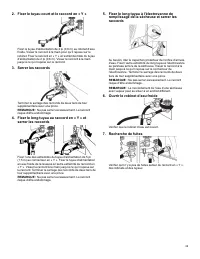
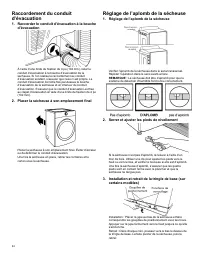
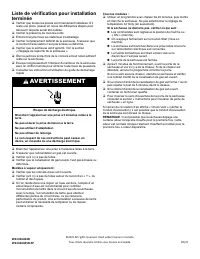
Table of Contents:
- Page 2 – DRYER SAFETY; Your safety and the safety of others are very important.; DANGER; IMPORTANT SAFETY INSTRUCTIONS
- Page 3 – WARNING —; “Risk of Fire”
- Page 4 – SAVE THESE INSTRUCTIONS
- Page 5 – Cleaning the Dryer Location; WARNING; Cleaning the Dryer Interior; Cleaning the Lint Screen
- Page 6 – Good Airflow; Maintain Good Airflow; Nonuse or Storage Care; Moving Care — Gas Models
- Page 7 – To use the dryer again:; Reinstalling the Dryer; INSTALLATION REQUIREMENTS; Tools and Parts; Tools Needed for All Installations:
- Page 8 – Available Accessories:; Location Requirements; Installation clearances:
- Page 10 – Gas Supply Requirements; Gas Type; Gas Supply Line
- Page 11 – Gas Supply Connection Requirements; Burner Input Requirements; INSTALLATION INSTRUCTIONS; Install Leveling Legs; Prepare dryer for leveling legs
- Page 12 – Connect gas supply to dryer; Plan pipe fitting connection; Open shutoff valve
- Page 13 – Venting Requirements; Plan Vent System; Recommended exhaust installations:
- Page 14 – Optional exhaust installations:; Alternate installations for close clearances; Special provisions for mobile home installations:
- Page 15 – Install Vent System
- Page 17 – Complete Installation Checklist
- Page 18 – SÉCURITÉ DE LA SÉCHEUSE; Votre sécurité et celle des autres sont très importantes.; INSTRUCTIONS IMPORTANTES DE SÉCURITÉ; CONSERVER CES INSTRUCTIONS
- Page 19 – AVERTISSEMENT –; « Risque d’incendie »
- Page 21 – AVERTISSEMENT; Retrait de la charpie accumulée
- Page 22 – Bonne circulation d’air
- Page 23 – Entretien pour non-utilisation et entreposage; Réutilisation de la sécheuse :; Réinstallation de la sécheuse; EXIGENCES D'INSTALLATION; Outils et pièces; Outils nécessaires pour toutes les installations :
- Page 24 – Accessoires offerts :
- Page 25 – Exigences d’emplacement; Distances de dégagement à respecter :
- Page 26 – Installation sous comptoir personnalisée :; Spécifications électriques; INSTRUCTIONS DE LIAISON À LA TERRE
- Page 27 – Type de gaz; Canalisation d’alimentation en gaz
- Page 28 – Caractéristiques d’alimentation du brûleur; INSTRUCTIONS D'INSTALLATION; Préparation de la sécheuse pour les pieds de
- Page 29 – Connecter l’alimentation en gaz à la sécheuse; Planifier la connexion des raccords de
- Page 30 – Exigences concernant l’évacuation; Évents pour conduit d’évacuation :
- Page 31 – Autres installations avec dégagement réduit
- Page 32 – Installation du conduit d’évacuation; Installer le clapet d’évacuation
- Page 34 – Réglage de l’aplomb de la sécheuse
GAS DRYER OWNER’S MANUAL
GUIDE D’UTILIZATION DE LA SÉCHEUSE AU GAZ
Table of Contents/Table des matières
. . . . . . . . . . . . . . . . . . . . . . . . . . . . . . . . . . . 5
Cleaning the Dryer Location . . . . . . . . . . . . . . . . . . . . . . . . . . . . . . . . . . . . . . . . . . . . . 5
Cleaning the Dryer Interior . . . . . . . . . . . . . . . . . . . . . . . . . . . . . . . . . . . . . . . . . . . . . . . 5
Removing Accumulated Lint . . . . . . . . . . . . . . . . . . . . . . . . . . . . . . . . . . . . . . . . . . . . . 5
Cleaning the Lint Screen . . . . . . . . . . . . . . . . . . . . . . . . . . . . . . . . . . . . . . . . . . . . . . . . . 5
Changing the Drum Light (on some models) . . . . . . . . . . . . . . . . . . . . . . . . 6
Check Your Vent System for Good Airflow . . . . . . . . . . . . . . . . . . . . . . . . . . . 6
Maintain Good Airflow . . . . . . . . . . . . . . . . . . . . . . . . . . . . . . . . . . . . . . . . . . . . . . . . . . . . . 6
Nonuse, Storage, and Moving Care . . . . . . . . . . . . . . . . . . . . . . . . . . . . . . . . . . . 6
Special Instructions for Steam Models . . . . . . . . . . . . . . . . . . . . . . . . . . . . . . . . 7
. . . . . . . . . . . . . . . . . . . . . . . . . . . . . . . . . . . . . . . 7
Tools and Parts . . . . . . . . . . . . . . . . . . . . . . . . . . . . . . . . . . . . . . . . . . . . . . . . . . . . . . . . . . . . . 7
Location Requirements . . . . . . . . . . . . . . . . . . . . . . . . . . . . . . . . . . . . . . . . . . . . . . . . . . . 8
Gas Dryer Power Hookup – U.S.A. and Canada . . . . . . . . . . . . . . . . . . . 9
Gas Supply Requirements . . . . . . . . . . . . . . . . . . . . . . . . . . . . . . . . . . . . . . . . . . . . . 10
. . . . . . . . . . . . . . . . . . . . . . . . . . . . . . . . . . . . . . 11
Install Leveling Legs . . . . . . . . . . . . . . . . . . . . . . . . . . . . . . . . . . . . . . . . . . . . . . . . . . . . . 11
Make Gas Connection – U.S.A. and Canada. . . . . . . . . . . . . . . . . . . . . . 12
Venting Requirements. . . . . . . . . . . . . . . . . . . . . . . . . . . . . . . . . . . . . . . . . . . . . . . . . . . 13
Plan Vent System . . . . . . . . . . . . . . . . . . . . . . . . . . . . . . . . . . . . . . . . . . . . . . . . . . . . . . . . 13
Install Vent System . . . . . . . . . . . . . . . . . . . . . . . . . . . . . . . . . . . . . . . . . . . . . . . . . . . . . . . 15
Connect Inlet Hoses . . . . . . . . . . . . . . . . . . . . . . . . . . . . . . . . . . . . . . . . . . . . . . . . . . . . . 15
Connect Vent . . . . . . . . . . . . . . . . . . . . . . . . . . . . . . . . . . . . . . . . . . . . . . . . . . . . . . . . . . . . . . 16
Level Dryer . . . . . . . . . . . . . . . . . . . . . . . . . . . . . . . . . . . . . . . . . . . . . . . . . . . . . . . . . . . . . . . . . 16
Complete Installation Checklist . . . . . . . . . . . . . . . . . . . . . . . . . . . . . . . . . . . . . . . 17
. . . . . . . . . . . . . . . . . . . . . . . . . . . . . . . . . . . . . . . . . 18
ENTRETIEN ET RÉPARATION DE LA SÉCHEUSE
. . . . . . . . . . . . . . 21
Nettoyage de l’emplacement de la sécheuse . . . . . . . . . . . . . . . . . . . . . 21
Nettoyage de l’intérieur de la sécheuse. . . . . . . . . . . . . . . . . . . . . . . . . . . . . 21
Retrait de la charpie accumulée . . . . . . . . . . . . . . . . . . . . . . . . . . . . . . . . . . . . . . 21
Nettoyage du filtre à charpie . . . . . . . . . . . . . . . . . . . . . . . . . . . . . . . . . . . . . . . . . . . 21
Changement de l’ampoule d’éclairage du tambour (sur
certains modèles) . . . . . . . . . . . . . . . . . . . . . . . . . . . . . . . . . . . . . . . . . . . . . . . . . . . . . . . . 22
Vérification d’une circulation d’air adéquate pour le système
d’évacuation . . . . . . . . . . . . . . . . . . . . . . . . . . . . . . . . . . . . . . . . . . . . . . . . . . . . . . . . . . . . . . . 22
Pour maintenir une bonne circulation d’air . . . . . . . . . . . . . . . . . . . . . . . . . 22
Précautions à prendre avant une non-utilisation, un
entreposage ou un déménagement. . . . . . . . . . . . . . . . . . . . . . . . . . . . . . . . . . 23
Instructions spécifiques pour les modèles vapeur. . . . . . . . . . . . . . . . 23
. . . . . . . . . . . . . . . . . . . . . . . . . . . . . . . . . . . . . . . . 23
Outils et pièces . . . . . . . . . . . . . . . . . . . . . . . . . . . . . . . . . . . . . . . . . . . . . . . . . . . . . . . . . . . . 23
Exigences d’emplacement . . . . . . . . . . . . . . . . . . . . . . . . . . . . . . . . . . . . . . . . . . . . . 25
Raccordement électrique de la sécheuse au gaz – États-
Unis et Canada . . . . . . . . . . . . . . . . . . . . . . . . . . . . . . . . . . . . . . . . . . . . . . . . . . . . . . . . . . . 26
Spécifications de l’alimentation en gaz . . . . . . . . . . . . . . . . . . . . . . . . . . . . . 27
. . . . . . . . . . . . . . . . . . . . . . . . . . . . . . . . . . . 28
Installation des pieds de réglage de l’aplomb . . . . . . . . . . . . . . . . . . . . . 28
Raccordement au gaz – États-Unis et Canada . . . . . . . . . . . . . . . . . . . 29
Exigences concernant l’évacuation . . . . . . . . . . . . . . . . . . . . . . . . . . . . . . . . . . 30
Planification des circuits de conduits . . . . . . . . . . . . . . . . . . . . . . . . . . . . . . . . 31
Installation du conduit d’évacuation. . . . . . . . . . . . . . . . . . . . . . . . . . . . . . . . . . 32
Raccordement des tuyaux d’alimentation . . . . . . . . . . . . . . . . . . . . . . . . . . 32
Raccordement du conduit d’évacuation . . . . . . . . . . . . . . . . . . . . . . . . . . . . 34
Réglage de l’aplomb de la sécheuse . . . . . . . . . . . . . . . . . . . . . . . . . . . . . . . . 34
Liste de vérification pour installation terminée . . . . . . . . . . . . . . . . . . . . 35
W11361424B
W11361425B-SP
"Loading the manual" means you need to wait until the file loads and becomes available for online reading. Some manuals are very large, and the time they take to appear depends on your internet speed.
Summary
2 DRYER SAFETY Your safety and the safety of others are very important. We have provided many important safety messages in this manual and on your appliance. Always read and obey all safetymessages. This is the safety alert symbol. This symbol alerts you to potential hazards that can kill or hurt yo...
3 WARNING — “Risk of Fire” − Clothes dryer installation must be performed by a qualified installer. − Install the clothes dryer according to the manufacturer's instructions and local codes. − Do not install a clothes dryer with flexible plastic venting materials or flexible metal (foiltype) duct. If...
4 WARNING: Gas leaks cannot always be detected by smell. Gas suppliers recommend that you use a gas detector approved by UL or CSA. For more information, contact your gas supplier. If a gas leak is detected, follow the “What to do if you smell gas” instructions. IMPORTANT : The gas installation must...