Page 3 - Уважаемый покупатель,; СОДЕРЖАНИЕ
3 Уважаемый покупатель, Благодарим Вас за выбор индукционной керамической варочной панели. Для того чтобы Вы могли наилучшим образом использовать приобретенное Вами устройство, рекомендуем Вам внимательно ознакомиться с содержанием данной инструкции, сохранить ее и обращаться к ней в будущем по мере...
Page 4 - БЕЗОПАСНОСТЬ; Предварительные меры предосторожности
4 БЕЗОПАСНОСТЬ Предварительные меры предосторожности • Удалите весь упаковочный материал. • Установка и подключение данного оборудования должны проводиться только квалифицированными специалистами. Производитель не несёт ответственность за ущерб, причиненный вследствие ошибок при встраивании оборудов...
Page 5 - Эксплуатация оборудования
5 Эксплуатация оборудования • Выключайте конфорки после использования оборудования. • Будьте внимательны при использовании масла или жира для приготовления пищи, поскольку они легко воспламеняются. • Будьте осторожны, чтобы не обжечься во время или после использования оборудования. • Не допускайте к...
Page 6 - Меры по сохранности оборудования
6 Меры по сохранности оборудования • Посуда с днищем из обычного металла или с повреждённым дном (к примеру, не эмалированная чугунная посуда) может повредить стеклокерамическую поверхность. • Песок или другие абразивные материалы могут повредить стеклокерамическую поверхность. • Не допускайте паден...
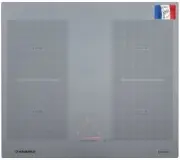
Page 8 - ОПИСАНИЕ ОБОРУДОВАНИЯ; Технические характеристики; Передняя левая pасположение конфорок; Задняя левая pасположение конфорок; Задняя правая pасположение конфорок; Передняя правая pасположение конфорок
8 ОПИСАНИЕ ОБОРУДОВАНИЯ Технические характеристики Тип MVI592FL-BK/GR/WH Полная мощность 7400 Вт Потребление энергии поверхностью EC hob ** 172.8 Втч/ кг Передняя левая pасположение конфорок 195x195 мм Минимальный обнаруживаемый диаметр Ø 100 мм Номинальная мощность* 1400 Вт Мощность в режиме быстро...
Page 9 - Панель управления; ЭКСПЛУАТАЦИЯ ОБОРУДОВАНИЯ; Дисплей
9 Панель управления ЭКСПЛУАТАЦИЯ ОБОРУДОВАНИЯ Дисплей Дисплей Назначение Функция 0 Нуль Включение конфорки. 1…9 Уровень мощности Задание уровня нагрева конфорки. U Наличие посуды Посуда отсутствует или не подходит. A Ускорение нагрева Автоматическое приготовление пищи. E Сообщение об ошибке Неисправ...
Page 10 - ЗАПУСК И КОНТРОЛЬ ОБОРУДОВАНИЯ; Перед первым включением
10 ЗАПУСК И КОНТРОЛЬ ОБОРУДОВАНИЯ Перед первым включением Тщательно очистите варочную панель сначала влажной тканью, а затем сухой. Не используйте растворители, поскольку они могут вызвать окрашивание стеклянной поверхности в синий цвет. Принцип индукции Катушка индуктивности расположена под каждой ...
Page 11 - Запуск
11 Шкала-ползунок ("слайдер") установки мощности и таймера Для выбора мощности с помощью слайдера, поставьте на него палец. Если коснуться пальцем места, соответствующего определённому уровню мощности, данный уровень задаётся сразу. Запуск Сначала необходимо включить варочную панель, затем –...
Page 12 - Опасность возгорания и пожара.; Управление мощностью:
12 Обнаружение посуды Функция обнаружения посуды служит для обеспечения безопасной работы. Индукционный нагрев не работает: • Если на конфорке нет посуды, или если посуда не предназначена для индукционных плит. В данном случае мощность не может быть увеличена или уменьшена, и на дисплее отображается...
Page 13 - Таймер
13 Таймер Таймер может использоваться одновременно со всеми конфорками, при этом время работы (от 0 до 99 минут) может быть задано отдельно для каждой конфорки. • Установка и изменение времени приготовления пищи: Пример: 16 минут, уровень мощности 7: Действие Панель управления Дисплей Выбор конфорки...
Page 14 - Автоматическое приготовление пищи
14 • Таймер обратного отсчёта: Пример: 29 минут: Действие Панель управления Дисплей Включение Нажмите [ ] на дисплее Горят контрольные индикаторы конфорки Вход в меню таймера Нажмите [ CL ] на дисплее [ 00 ] Установка минут Передвиньте слайдер на [ 9 ] [ 0 горит ] [ 9 мигает ] Подтверждение (минуты)...
Page 15 - II
15 Функция "Пауза" Данная функция полностью приостанавливает приготовление пищи и позволяет перезапустить оборудование с прежними настройками. • Активация/деактивация функции "Пауза": Действие Панель управления Дисплей Активация функции "Пауза" Нажмите и держите кнопку В меню...
Page 17 - СОВЕТЫ ПО ПРИГОТОВЛЕНИЮ ПИЩИ; Качество посуды; Допустимые материалы:; Недопустимые материалы:; Размеры посуды
17 СОВЕТЫ ПО ПРИГОТОВЛЕНИЮ ПИЩИ Качество посуды Допустимые материалы: сталь, эмалированная сталь, чугун, ферромагнитная нержавеющая сталь, алюминий с ферромагнитным дном. Недопустимые материалы: алюминий и нержавеющая сталь без ферромагнитного дна, медь, латунь, стекло, керамика, фарфор. Пригодность...
Page 18 - Примеры настройки мощности конфорок; УХОД И ОЧИСТКА; Отключение оборудования перед очисткой; УСТРАНЕНИЕ НЕИСПРАВНОСТЕЙ; Варочная панель или конфорка не включается:
18 Примеры настройки мощности конфорок (приведены ориентировочные значения) 1 - 2 Размораживание Подогрев Соусы, масло, шоколад, желе Ранее приготовленные блюда 2 - 3 Варка на медленном огне Размораживание Рис, пудинг, сахарный сироп Сушеные овощи, рыба, замороженные продукты 3 - 4 Пар Овощи, рыба, ...
Page 19 - Одна или все конфорки отключены:; ОХРАНА ОКРУЖАЮЩЕЙ СРЕДЫ
19 После отключения варочной панели система вентиляции продолжает работать: • Неисправности нет, вентилятор продолжает охлаждать электронные компоненты. • Вентилятор охлаждения остановится автоматически. Одна или все конфорки отключены: • Сработала система защиты. • Конфорка длительное время оставал...
Page 20 - ИНСТРУКЦИИ ПО УСТАНОВКЕ
20 ИНСТРУКЦИИ ПО УСТАНОВКЕ Установка должна проводиться квалифицированными специалистами. Установщик должен соблюдать действующие в стране эксплуатации правила и стандарты. Как приклеить уплотнение: Поставляемое в комплекте с варочной панелью уплотнение служит для предотвращения попадания жидкости в...
Page 21 - ЭЛЕКТРИЧЕСКОЕ ПОДКЛЮЧЕНИЕ; Подключение варочной панели
21 ЭЛЕКТРИЧЕСКОЕ ПОДКЛЮЧЕНИЕ • Установка этого оборудования и его подключение к сети электропитания должны проводиться только квалифицированными электриками, в строгом соответствии с действующими нормативными требованиями. • Защита от прикосновения к деталям, находящимся под напряжением, должна уста...
Page 22 - SUMMARY
22 Thank you for having chosen our induction hob. In order to make the best use of your appliance, we would advise you to read carefully the following notes and to keep them for a later consulting. SUMMARY SAFETY ..........................................................................................
Page 23 - SAFETY; Precautions before using
23 SAFETY Precautions before using • Unpack all the materials. • The installation and connecting of the appliance have to be done by approved specialists. The manufacturer can not be responsible for damage caused by building-in or connecting errors. • To be used, the appliance must be well-equipped ...
Page 24 - Precautions not to damage the appliance
24 • Never cover the appliance with a cloth or a protection sheet. This is supposed to become very hot and catch fire. • This appliance can be used by children aged from 8 years and above and persons with reduced physical, sensory or mental capabilities or lack of experience and knowledge if they ha...
Page 26 - DESCRIPTION OF THE APPLIANCE; Technical characteristics; Front left heating zone; Rear left heating zone; Rear right heating zone; Front right heating zone
26 DESCRIPTION OF THE APPLIANCE Technical characteristics Type MVI592FL-BK/GR/WH Total power Energy consumption for the hob EC hob ** 7400W 171.8 Wh/kg Front left heating zone 195x195 mm Minimum detection Ø 100 mm Nominal power* 1400 W Booster power* 1850 W Standardised cookware category** C Energy ...
Page 27 - Control panel; USE OF THE APPLIANCE; Display
27 Control panel USE OF THE APPLIANCE Display Display Designation Function 0 Zero The heating zone is activated. 1…9 Power level Selection of the cooking level. U Pan detection No pan or inadequate pan. A Heat accelerator Automatic cooking. E Error message Electronic failure. H Residual heat The hea...
Page 28 - STARTING-UP AND APPLIANCE MANAGEMENT; Before the first use; Sensitive touch; In the case of a general use press only one key at the same time.; Power selection zone “SLIDER” and timer setting zone; Power selection zone “SLIDER” and
28 STARTING-UP AND APPLIANCE MANAGEMENT Before the first use Clean your hob with a damp cloth, and then dry the surface thoroughly. Do not use detergent which risks causing blue-tinted colour on the glass surface. Induction principle An induction coil is located under each heating zone. When it is e...
Page 30 - Timer
30 Timer The timer is able to be used simultaneous with all 3 heating zones and this with different time settings (from 0 to 99 minutes) for each heating zone. • Setting and modification of the cooking time : Example for 16 minutes at power 7 : Action Control panel Display Zone selection press displ...
Page 32 - Control panel locking
32 Control panel locking To avoid modifying a setting of cooking zones , in particular during of cleaning the control panel can be locked (with exception to the On/Off key [ ]) • Locking : Action Control panel Display Start press on key [ ] [ 0 ] or [ H ] on the displays Hob locking press simultaneo...
Page 33 - COOKING ADVICES; Pan quality; Not adapted materials :; Pan dimension
33 COOKING ADVICES Pan quality Adapted materials : steel, enamelled steel, cast iron, ferromagnetic stainless-steel, aluminium with ferromagnetic bottom. Not adapted materials : aluminium and stainless-steel without ferromagnetic bottom, cupper, brass, glass, ceramic, porcelain. The manufacturers sp...
Page 34 - Examples of cooking power setting; MAINTENANCE AND CLEANING; Switch-off the appliance before cleaning.; WHAT TO DO IN CASE OF A PROBLEM; The hob or the cooking zone doesn’t start-up :
34 Examples of cooking power setting (the values below are indicative) 1 to 2 Melting Reheating Sauces, butter, chocolate, gelatine Dishes prepared beforehand 2 to 3 Simmering Defrosting Rice, pudding, sugar syrup Dried vegetables, fish, frozen products 3 to 4 Steam Vegetables, fish, meat 4 to 5 Wat...
Page 35 - If one of the symbols above persists, call the SAV.; ENVIRONMENT PRESERVATION
35 One or all cooking zone cut-off : • The safety system functioned. • You forgot to cut-off the cooking zone for a long time. • One or more sensitive keys are covered. • The pan is empty and its bottom overheated. • The hob also has an automatic reduction of power level and breaking Automatic overh...
Page 36 - INSTALLATION INSTRUCTIONS; How to stick the gasket:
36 INSTALLATION INSTRUCTIONS The installation comes under the exclusive responsibility of specialists. The installer is held to respect the legislation and the standards enforce in his home country. How to stick the gasket: The gasket supplied with the hob avoids all infiltration of liquids in the c...
Page 37 - ELECTRICAL CONNECTION
37 ELECTRICAL CONNECTION • The installation of this appliance and the connection to the electrical network should be entrusted only to an electrician perfectly to the fact of the normative regulations and which respects them scrupulously. • Protection against the parts under tension must be ensured ...
Page 38 - SOMMAIRE; MISE EN ROUTE ET GES
Chère cliente, cher client, Nous vous remercions de la confiance que vous nous avez accordée en choisissant notre table de cuisson vitrocéramique à induction. Afin de bien connaître cet appareil, nous vous recommandons de lire attentivement cette notice d’utilisation dans son intégralité et de la co...
Page 39 - SECURITE; Précautions avant utilisation en cuisson
39 SECURITE Précautions avant utilisation en cuisson • Retirez toutes les parties de l’emballage. • L’installation et le branchement électrique de l’appareil sont à confier à des spécialistes agrées. Le fabricant ne saurait être tenu respo nsable des dommages résultant d’une erreur d’encastrement ou...
Page 40 - Précautions pour ne pas détériorer l’appareil
40 • Assurez- vous qu’aucun câble électrique d’appareil fixe ou mobile ne vienne en contact avec la vitre ou la casserole chaude. • Les objets magnétisables (cartes de crédits, disquettes informatiques, calculatrices) ne doivent pas se trouver à proximité immédiate de l’appareil en fonction. • Ne pl...
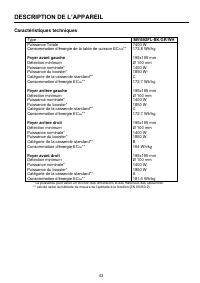
Page 43 - DESCRIPTION DE L’APPAREIL; Caractéristiques techniques; Foyer avant gauche; Foyer arrière gauche; Foyer arrière droit; Foyer avant droit
43 DESCRIPTION DE L’APPAREIL Caractéristiques techniques Type MVI592FL-BK/GR/WH Puissance Totale 7400 W Consommation d’énergie de la table de cuisson EC hob ** 172.8 Wh/kg Foyer avant gauche 195x195 mm Détection minimum Ø 100 mm Puissance nominale* 1400 W Puissance du booster* 1850 W- Catégorie de l...
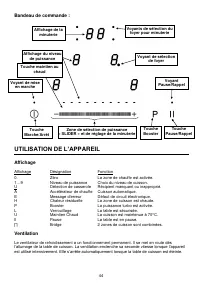
Page 44 - Bandeau de commande :; UTILISATION DE L’APPAREIL; Affichage
44 Bandeau de commande : UTILISATION DE L’APPAREIL Affichage Affichage Désignation Fonction 0. Zéro La zone de chauffe est activée. 1…9 Niveau de puissance Choix du niveau de cuisson. U Détection de casserole Récipient manquant ou inapproprié. A Accélérateur de chauffe Cuisson automatique. E Message...
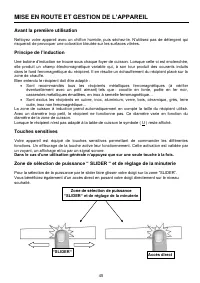
Page 45 - Avant la première utilisation; Principe de l’induction; Touches sensitives; “SLIDER“
45 MISE EN ROUTE ET GES TION DE L’APPAREIL Avant la première utilisation Nettoyez votre appareil avec un chiffon humide, puis séchez- le. N’utilisez pas de détergent qui risquerait de provoquer une coloration bleutée sur les surfaces vitrées. Principe de l’induction Une bobine d’induction se trouve ...
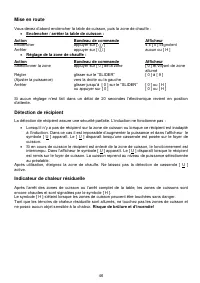
Page 48 - Programmation d’automatisme de cuisson
48 • Arrêter la fonction minuterie cuisson : Exemple pour 13 minutes restantes à puissance 7 : Action Bandeau de commande Afficheur Sélectionner la zone appuyer sur [ 7 ] de la zone [ 7 ] et voyant de zone allumé Sélectionner « Minuterie » appuyer sur [ 13 ] [ 13 ] Désactiver les unités glisser sur ...
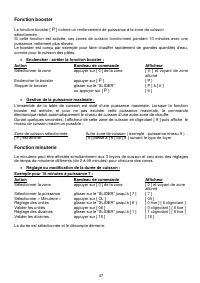
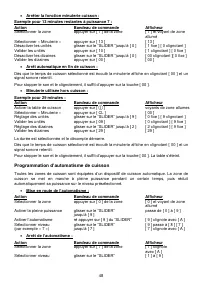
Page 49 - Fonction Pause; Fonction rappel
49 Fonction Pause Cette fonction permet d’interrompre ou de réactiver la cuisson avec les mêmes réglages de puissances. • Enclencher, déclencher la fonction : Action Bandeau de commande Afficheur Activer la pause appuyer sur la touche [ II ] pendant 2s [ II ] sur les afficheurs Stopper la pause appu...
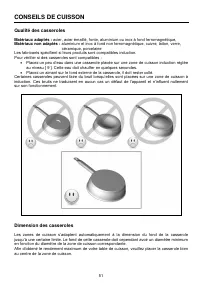
Page 51 - CONSEILS DE CUISSON; Qualité des casseroles; Matériaux non adaptés :; Dimension des casseroles
51 CONSEILS DE CUISSON Qualité des casseroles Matériaux adaptés : acier, acier émaillé, fonte, aluminium ou inox à fond ferromagnétique, Matériaux non adaptés : aluminium et inox à fond non ferromagnétique, cuivre, laiton, verre, céramique, porcelaine Les fabricants spécifient si leurs produits sont...
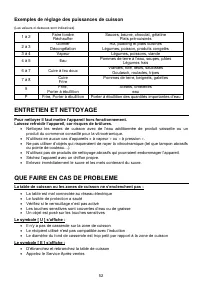
Page 52 - Exemples de réglage des puissances de cuisson; ENTRETIEN ET NETTOYAGE; Pour nettoyer il fa; QUE FAIRE EN CAS DE PROBLEME; La table de cuisson ou les zones de cuisson ne s’enclenchent pas :
52 Exemples de réglage des puissances de cuisson (Les valeurs ci-dessous sont indicatives) 1 à 2 Faire fondre Réchauffer Sauces, beurre, chocolat, gélatine Plats pré-cuisinés 2 à 3 Gonfler Décongélation Riz, pudding et plats cuisinés Légumes, poisson, produits congelés 3 à 4 Vapeur Légumes, poissons...
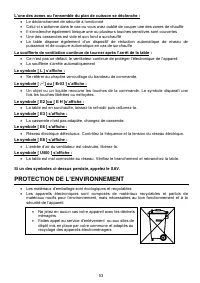
Page 53 - L’une des zones ou l’ensemble du plan de cuisson se déclenche :; PROTECTION DE L’ENVIRONNEMENT
53 L’une des zones ou l’ensemble du plan de cuisson se déclenche : • Le déclenchement de sécurité a fonctionné • Celui- ci s’actionne dans le cas ou vous avez oublié de couper une des zones de chauffe • Il s’enclenche également lorsque une ou plusieurs touches sensitives sont couvertes • Une des cas...
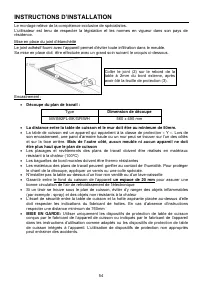
Page 54 - INSTRUCTIONS D’INSTALLATION; Découpe du plan de travail :
54 INSTRUCTIONS D’INSTALLATION Le montage relève de la compétence exclusive de spécialistes. L’utilisateur est tenu de respecter la législation et les normes en vigueur dans son pays de résidence. Mise en place du joint d’étanchéité Le joint adhésif fourni avec l’appareil permet d’éviter toute infil...
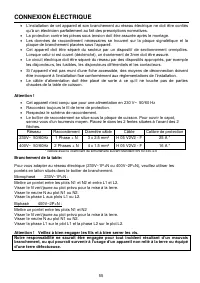
Page 55 - CONNEXION ÉLECTRIQUE; Branchement de la table:
55 CONNEXION ÉLECTRIQUE • L’installation de cet appareil et son branchement au réseau électrique ne doit être confiés qu’à un électricien parfaitement au fait des prescriptions normatives. • La protection contre les pièces sous tension doit être assurée après le montage. • Les données de raccordemen...
Page 59 - Гарантийная карта
Гарантийная карта МАРКА: ……………………………………… МОДЕЛЬ: …………………………………… СЕРИЯ: ……………………………………… Дата продажи ……………….. Печать торгующей организации ГАРАНТИЙНЫЕ ОБЯЗАТЕЛЬСТВА Гарантия на изделие – 24 месяца с даты продажи Гарантия не распространяется на изделия, имеющие механические повреждения, либо поврежден...