Page 2 - SPECIFICATIONS; WARNING Read all safety warnings and all
2 ENGLISH (Original instructions) SPECIFICATIONS Model RT0700C / RT0701C Collet chuck capacity 1/4", 3/8" No load speed (RPM) 10,000 - 30,000 /min Overall length 200 mm (7-7/8") Net weight 1.8 (3.9 lbs) • Due to our continuing program of research and development, the specifications herei...
Page 3 - TRIMMER SAFETY WARNINGS
3 Power tool use and care 17. Do not force the power tool. Use the correct power tool for your application. The correct power tool will do the job better and safer at the rate for which it was designed. 18. Do not use the power tool if the switch does not turn it on and off. Any power tool that cann...
Page 4 - Adjusting bit protrusion; Constant speed control
4 10. Before using the tool on an actual workpiece, let it run for a while. Watch for vibration or wobbling that could indicate improperly installed bit. 11. Be careful of the bit rotating direction and the feed direction. 12. Do not leave the tool running. Operate the tool only when hand-held. 13. ...
Page 5 - Speed adjusting dial; ASSEMBLY; Installing or removing trimmer bit; OPERATION
5 Speed adjusting dial 1 011835 The tool speed can be changed by turning the speed adjusting dial to a given number setting from 1 to 6. Higher speed is obtained when the dial is turned in the direction of number 6. And lower speed is obtained when it is turned in the direction of number 1. This all...
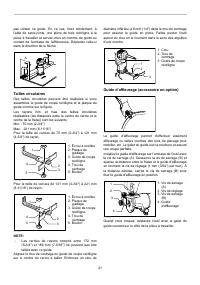
Page 7 - Circular work
7 1 23 4 001990 Attach the straight guide with the clamp screw (A). Loosen the wing nut on the straight guide and adjust the distance between the bit and the straight guide. At the desired distance, tighten the wing nut securely. 1 2 3 4 011841 When cutting, move the tool with the straight guide flu...
Page 12 - For the trimmer base
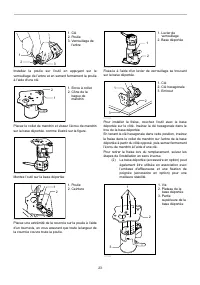
12 1 2 3 011849 To install the straight guide, insert the guide bars into the holes in the plunge base. Adjust the distance between the bit and the straight guide. At the desired distance, tighten the wing bolts to secure the straight guide in place. When cutting, move the tool with the straight gui...
Page 13 - For the plunge base; MAINTENANCE; Replacing carbon brushes; OPTIONAL ACCESSORIES
13 For the plunge base 1 2 011853 Use the dust nozzle for dust extraction. Install the dust nozzle on the tool base using the thumb screw so that protrusion on the dust nozzle fit to the notch in the tool base. Then connect a vacuum cleaner to the dust nozzle. 011854 MAINTENANCE CAUTION: • Always be...
Page 14 - MAKITA LIMITED ONE YEAR WARRANTY
14 • Templet guide • Collet cone 1/4" • Collet cone 3/8" • Wrench 13 • Wrench 22 • Dust nozzle set NOTE: • Some items in the list may be included in the tool package as standard accessories. They may differ from country to country. MAKITA LIMITED ONE YEAR WARRANTY Warranty Policy Every Makit...
Page 15 - SPÉCIFICATIONS; MISE EN GARDE Veuillez lire toutes les mises en
15 FRANÇAIS (Mode d’emploi original) SPÉCIFICATIONS Modèle RT0700C / RT0701C Capacité du mandrin à bague 1/4", 3/8" Vitesse à vide (T/MIN) 10 000 - 30 000 /min Longueur totale 200 mm (7-7/8") Poids net 1,8 (3,9 lbs) • Étant donné l'évolution constante de notre programme de recherche et d...
Page 17 - Maniez les fraises avec soin.
17 Tableau 1. Gabarit minimum du cordon Intensité nominale Volts Longueur totale du cordon en pieds Plus de Pas plus de 120V 25 pi 50 pi 100 pi 150 pi Calibre américain des fils 0 6 6 10 12 10 12 16 18 18 16 14 16 16 14 14 16 16 12 14 12 12 Non recommandé 220V - 240V 50 pi 100 pi 200 pi 300 pi 00030...
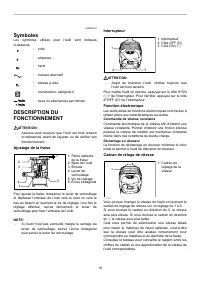
Page 18 - Symboles; Ajustage de la fraise; Commande de vitesse constante; Cadran de rélage de vitesse
18 USD201-2 Symboles Les symboles utilisés pour l'outil sont indiqués ci-dessous. ・ volts ・ ampères ・ hertz ・ courant alternatif ・ vitesse à vide ・ construction, catégorie II ・ tours ou alternances par minute DESCRIPTION DU FONCTIONNEMENT ATTENTION: • Assurez-vous toujours que l'outil est hors tensi...
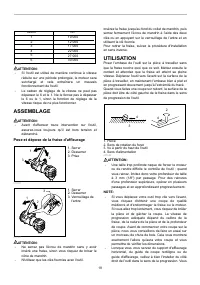
Page 19 - ASSEMBLAGE; Pose et dépose de la fraise d'affleurage; UTILISATION
19 Numéro min -1 12345 6 10 000 30 000 12 00017 00022 000 27 000 011932 ATTENTION: • Si l'outil est utilisé de manière continue à vitesse réduite sur une période prolongée, le moteur sera surchargé et cela entraînera un mauvais fonctionnement de l'outil. • Le cadran de réglage de la vitesse ne peut ...
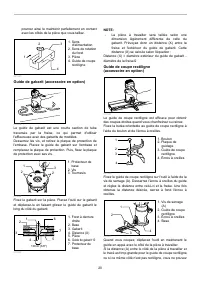
Page 27 - Raccords d’aspiration (accessoire en option); Pour l’embase de l’affleureuse; ENTRETIEN
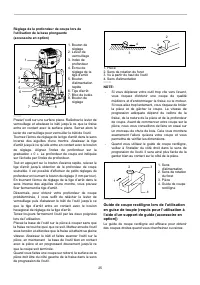
27 1 2 34 5 6 7 003695 NOTE: • La pièce sera coupée avec une taille légèrement différente du gabarit. Permet d'établir la distance (X) entre la fraise et l'extérieur du guide de gabarit. L'équation suivante permet de calculer la distance (X) : Distance (X) = (diamètre extérieur du guide de gabarit -...
Page 28 - Remplacement des charbons; ACCESSOIRES EN OPTION
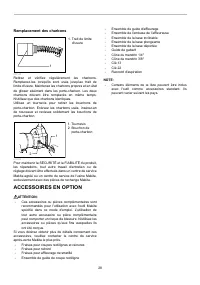
28 Remplacement des charbons 1 001145 Retirez et vérifiez régulièrement les charbons. Remplacez-les lorsqu'ils sont usés jusqu'au trait de limite d'usure. Maintenez les charbons propres et en état de glisser aisément dans les porte-charbon. Les deux charbons doivent être remplacés en même temps. N'u...
Page 29 - GARANTIE LIMITÉE D’UN AN MAKITA; Politique de garantie
29 GARANTIE LIMITÉE D’UN AN MAKITA Politique de garantie Chaque outil Makita est inspecté rigoureusement et testé avant sa sortie d’usine. Nous garantissons qu’il sera exempt de défaut de fabrication et de vice de matériau pour une période d’UN AN à partir de la date de son achat initial. Si un prob...
Page 30 - ESPECIFICACIONES; ADVERTENCIA: lea todas las advertencias de
30 ESPAÑOL (Instrucciones originales) ESPECIFICACIONES Modelo RT0700C / RT0701C Especificaciones eléctricas en México 120 V 6,5 A 50/60 Hz Diámetro de la pinza de sujeción 6,3mm 9,5mm Velocidad sin carga (r.p.m.) 10 000 r/min - 30 000 r/min Longitud total 200 mm (7-7/8") Peso neto 1,8 (3,9 lbs) ...
Page 32 - Maneje las brocas con mucho cuidado.
32 Tabla 1. Calibre mínimo para el cable Amperaje nominal Volts Longitud total del cable en metros Más de No más de 120V~ 7,6 m (25 ft) 15,2 m (50 ft) 30,4 m (100 ft) 45,7 m (150 ft) Calibre del cable (AWG) 0 A 6 A 6 A 10 A 12 A 10 A 12 A 16 A 18 18 16 14 16 16 14 14 16 16 12 14 12 12 No se recomien...
Page 33 - Símbolos; Ajuste de la saliente de la fresa; Control de velocidad constante; Control de ajuste de velocidad
33 USD201-2 Símbolos A continuación se muestran los símbolos utilizados para la herramienta. ・ volts o voltios ・ amperes ・ hertz ・ corriente alterna ・ velocidad en vacío o sin carga ・ Construcción clase II ・ revoluciones o alternaciones por minuto, frecuencia de rotación. DESCRIPCIÓN DEL FUNCIONAMIE...
Page 34 - ENSAMBLE; Instalación o desmontaje de fresa de recorte; OPERACIÓN
34 Consulte la tabla para la relación entre las configuraciones numéricas del control giratorio y la velocidad aproximada de la herramienta. Número min r/min -1 12345 6 10 000 r/min 30 000 r/min 12 000 r/min 17 000 r/min22 000 r/min 27 000 r/min 011932 PRECAUCIÓN: • Si la herramienta es utilizada co...
Page 36 - Corte circular
36 1 2 3 4 011841 Cuando corte, mueva la herramienta con la guía recta a ras del costado de la pieza de trabajo. Si la distancia (A) entre el costado de la pieza de trabajo y la posición de corte es muy ancha para la guía recta, o si el costado de la pieza de trabajo no es recto, no podrá utilizarse...
Page 37 - Base de inclinación (accesorio opcional)
37 1 2 3 4 011845 Cuando corte, mueva la herramienta desplazando el rodillo guía por el costado de la pieza de trabajo. 1 2 3 001998 Base de inclinación (accesorio opcional) La base de inclinación (accesorio opcional) es conveniente para hacer biseles. Coloque la herramienta en la base de inclinació...
Page 42 - MANTENIMIENTO
42 1 2 3 011852 Sujete la plantilla en la pieza de trabajo. Ponga la herramienta sobre la plantilla y mueva la herramienta deslizando la guía de plantilla a lo largo del costado de la plantilla. 1 2 34 5 6 7 003695 NOTA: • La pieza de trabajo será cortada con un tamaño ligeramente diferente al de la...
Page 43 - Reemplazamiento de las escobillas de carbón; ACCESORIOS OPCIONALES
43 Reemplazamiento de las escobillas de carbón 1 001145 Extraiga e inspeccione de forma periódica las escobillas de carbón. Sustitúyalas cuando se hayan gastado hasta la marca límite. Mantenga las escobillas de carbón limpias de forma que entren libremente en los portaescobillas. Ambas escobillas de...
Page 44 - Política de garantía
44 GARANTÍA LIMITADA MAKITA DE UN AÑOÉsta Garantía no aplica para México Política de garantía Cada herramienta Makita es inspeccionada y probada exhaustivamente antes de salir de fábrica. Se garantiza que va a estar libre de defectos de mano de obra y materiales por el periodo de UN AÑO a partir de ...
Page 48 - Makita Corporation
48 Some dust created by power sanding, sawing, grinding, drilling, and otherconstruction activities contains chemicals known to the State of Californiato cause cancer, birth defects or other reproducti ve harm. Some examplesof these chemicals are:• lead from lead-based paints,• crystalline silica fr...