Page 2 - TABLE OF CONTENTS
TABLE OF CONTENTS This manual may contain images or content different from the model you purchased.This manual is subject to revision by the manufacturer. SAFETY INSTRUCTIONS .................................................................4 IMPORTANT SAFETY INSTRUCTIONS ...............................
Page 4 - SAFETY INSTRUCTIONS; The following safety guidelines are intended to prevent; Children in the Household; This appliance is not intended for use by persons (including
4 SAFETY INSTRUCTIONS EN The following safety guidelines are intended to prevent unforeseen risks or damage from unsafe or incorrect operation of the appliance. The guidelines are separated into ‘WARNING’ and ‘CAUTION’ as described below. This symbol is displayed to indicate matters and operations t...
Page 5 - Installation
5 EN • If the appliance is equipped with a lock (some countries only), keep the key out of reach of children. Installation • This appliance should only be transported by two or more people holding the appliance securely. • Ensure that the outlet socket is properly earthed, and that the earth pin on ...
Page 7 - Operation
7 EN Operation • Do not use the appliance for any purpose (storage of medical or experimental materials or shipping) other than any domestic household food storage use. • In case of flood, disconnect the power plug and contact the LG Electronics customer information centre. • Unplug the power plug d...
Page 8 - Maintenance
8 EN • If there is a gas leakage (isobutane, propane, natural gas, etc.), do not touch the appliance or power plug and ventilate the area immediately. This appliance uses a very eco-friendly gas (isobutane, R600a) as the refrigerant. Although it uses a small amount of the gas, it is still combustibl...
Page 14 - INSTALLATION; Compartments
14 INSTALLATION EN Compartments Spanner Type1 Spanner Type2 Owner's Manual Water Filter Ring Sheet • The appearance or components of the appliance may differ from model to model.
Page 16 - NOTE
16 EN Dimensions and Clearances • Too small of a distance from adjacent items may result in degradation of freezing capability and increased electricity costs. Allow over 50mm clearance from each adjacent wall when installing the appliance. A C E F G B D - Size Type Type 1 Type 2 A 912 mm 912 mm B 1...
Page 17 - Removing the Door; WARNING; CAUTION
17 EN Removing the Door When it is necessary to move the appliance through a narrow opening, removing the doors is the recommended procedure. WARNING • Disconnect the power cord, house fuse or circuit breaker before installing or service the appliance. Failure to follow these instructions may result...
Page 19 - Refitting the Door
19 EN NOTE Collet Tube Insert Line • Gently insert the tube until only one of the tube’s lines is visible. (Correct) (Incorrect) • Pull on the tube to make sure that it is tightly fastened. [The Right Fridge Door] 1 Remove the top hinge cover screw (1). Lift the hook (not visible), located at the bo...
Page 20 - Door Mullion and Auto Open Door
20 EN CAUTION • When tilting the appliance backward to loosen the screen at the bottom of the appliance, two or more people should hold the handles at the bottom and rear top side of the appliance. [Method2] With the refrigerator door open, fit the spanner type2 in the nut of the height adjustment s...
Page 21 - Connecting the Water Line; Accessories; Connecting to the Appliance
21 EN Connecting the Water Line (For Plumbed models Only) Accessories Water Filter Water Tube Water Supply Requirements A cold water supply with water pressure between 138 kPa and 827 kPa (1.4-8.4 kgf/cm²) is requried to operate the water dispenser. If the refrigerator is installed in an area with l...
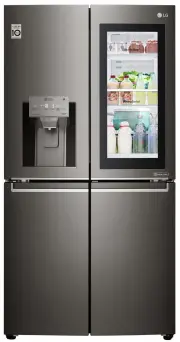
Page 22 - OPERATION; Parts and Functions
22 OPERATION EN Parts and Functions 3 Dispenser Control Panel Displays the ice maker and dispenser modes the water filter status. InstaView Door in Door TM The InstaView Door in Door TM compartment allows for easy access to commonly used food items. Door in Door Lever This lever opens Door in Door. ...
Page 26 - Notes for Operation; Suggestion for Energy Saving
26 EN Notes for Operation • Do not use the ice water dispenser tank for beverages other than drinking water. • Users should keep in mind that frost can form If the door is not closed completely, if the humidity is high during the summer, or if the freezer door is opened frequently. • Ensure there is...
Page 28 - Using Control Panel; Units and Functions
28 EN Using Control Panel Units and Functions 5 10 11 8 Express Freeze • This sets Express Freeze functions. * Ice On/Off • This sets Icemaker’s function ON or OFF. * Wi-Fi • This sets the refrigerator to connect to your home’s Wi-Fi network. Freezer Temperature • This sets the freezer target temper...
Page 29 - Setting Express Freeze
29 EN Notes for Using the Control Panel • The control panel will turn on in any of the following cases. − When the power is turned on − When a button is pressed − When the appliance door (fridge compartment, freezer compartment, door in door) is opened • The control panel will turn off automatically...
Page 30 - Setting and Resetting Lock; Extra Space (Multi collection; Door Mullion; Door in Door
30 EN Setting and Resetting Lock This locks the buttons on the control panel. • When you press the Lock button for 3 seconds, the Lock/Unlock icon on the control panel lights. The function is enabled and disabled in turn each time you press the button. • If you press a button other than lock when th...
Page 32 - Turning the Automatic Icemaker; Detaching the In-Door Ice Bin
32 EN Automatic Icemaker The automatic icemaker can automatically make 7 cubes at a time, 50-60 pieces within a 24hr period if conditions are favorable. This amount may vary according to the environment (ambient temperature around the appliance, frequency of the door being opened, amount of food sto...
Page 33 - Adjustable Moving Basket
33 EN CAUTION • Throw away the first few batches of ice (about 20 cubes and 7 cups of water). This is also necessary if the appliance has not been used for a long time. • The first ice and water dispensed may include particles or odor from the water supply line or the water tank. • Keep children awa...
Page 34 - Other Functions; Door Open Alarm
34 EN Other Functions Door Open Alarm The alarm sounds 3 times in 30 second intervals if the door (fridge compartment, freezer compartment, door in door) is left open or not completely closed for one minute. • Contact the LG Electronics customer information centre if the alarm sound continues even a...
Page 35 - SMART FUNCTIONS; Using LG SmartThinQ; Things to check before using LG; Installing LG SmartThinQ
35 SMART FUNCTIONS EN Using LG SmartThinQ Application Things to check before using LG SmartThinQ • For appliances with the or logo 1 Check the distance between the appliance and the wireless router (Wi-Fi network). • If the distance between the appliance and the wireless router is too far, the signa...
Page 36 - Smart DiagnosisTM Using a Smart
36 EN Wi-Fi Function • For appliances with the or logo Communicate with the appliance from a smart phone using the convenient smart features. Firmware Update Keep the appliance performance updated. Smart Diagnosis™ If you use the Smart Diagnosis function, you will be provided with the useful informa...
Page 37 - Using Smart DiagnosisTM; Smart DiagnosisTM Through the
37 EN Using Smart Diagnosis™ Smart Diagnosis™ Through the Customer Information Centre Use this function if you need an accurate diagnosis by an LG Electronics customer information center when the appliance malfunctions or fails. Use this function only to contact the service representative, not durin...
Page 38 - MAINTENANCE; Notes for Cleaning
38 MAINTENANCE EN Notes for Cleaning • When removing a shelf or drawer from inside the appliance, remove all stored foods from the shelf or drawer to prevent injury or damage to the appliance. − Otherwise, injury may occur due to the weight of stored foods. • If cleaning the outside air vents of the...
Page 40 - Compartment
40 EN Cleaning the Door-in-Door Compartment Removing the Door-in-Door Compartment CAUTION • Remove contents from the Door-in-Door compartment before disassembly. 1 To remove the Door-in-Door case, lift up and pull out. 2 Move the EasyLift bin to the top of the compartment. 3 Remove the screws on bot...
Page 41 - Cleaning the Shelf; Removing the Fridge Shelf; Using the Folding Shelf
41 EN Cleaning the Shelf Removing the Fridge Shelf 1 Tilt up the front of the shelf and then lift the shelf straight up. 2 Pull the shelf out. Refitting the Fridge Shelf 1 Tilt the front of the shelf up and guide the shelf hooks into the slots at a desired height. 2 Lower the front of the shelf so t...
Page 42 - Cleaning the Big Fresh Zone; Removing the Big Fresh Zone; Assembling the Big Fresh Zone
42 EN Cleaning the Big Fresh Zone Removing the Big Fresh Zone Drawer 1 Open both refrigerator doors fully. Pull the drawer out to full extension and remove all contents from the drawer. 2 Lift the front of the drawer to remove it from its guides and pull straight out. CAUTION • Always empty the draw...
Page 43 - Removing the Fresh Zone
43 EN Cleaning the Fresh Zone Compartment Removing the Fresh Zone Compartment (For Type 1) 1 Open the refrigerator doors all the way. Empty and remove the Door-in-Door case and bins. Clear off and remove all refrigerator shelves. Remove all contents from the Fresh Zone cover and drawers. 2 Lift the ...
Page 45 - Cleaning the Freezer Drawer; Removing the Freezer Drawers; Assembling the Freezer Drawer
45 EN Cleaning the Freezer Drawer The sliding freezer drawers allow easy access and convenience of use.Use the upper compartments to store packaged frozen foods and frequently-used foods.Use the lower compartment for larger frozen foods and items stored for longer periods. Removing the Freezer Drawe...
Page 46 - Cleaning the Door Bins; Removing the Door Bins; Cleaning the Water Dispenser; Cleaning the Dispenser Tray
46 EN Cleaning the Door Bins The door bins are removable for easy cleaning and adjustment. Removing the Door Bins To remove the door bins, hold the bin with both hands and lift up to remove it. Refitting the Door Bins To replace the door bin, align both sides of the bin with the guides and push the ...
Page 47 - Replacing the Water Filter
47 EN Cleaning the Door Bins The door bins are removable for easy cleaning and adjustment. Removing the Door Bins To remove the door bins, hold the bin with both hands and lift up to remove it. Refitting the Door Bins To replace the door bin, align both sides of the bin with the guides and push the ...
Page 49 - TROUBLESHOOTING
49 TROUBLESHOOTING EN Symptoms Reason Solution There is no refrigeration or freezing. Is there a power interruption? • Check the power of other appliances. If the power plug unplugged from the outlet? • Plug the power plug in the outlet properly. There is poor refrigeration or freezing. Is the fridg...
Page 57 - Memo