Page 2 - INSTALLATION GUIDE AND USER MANUAL; PROFESSIONAL GAS RANGE; Installation and Owner’s Manual; This manual contain for:; Important Safe guards; and adjustment and use of your range top.; How to Obtain Service and/or Parts; TO THE OWNER OF THE RANGE TOP: Retain this owner’s manual for
FOR MORE DETAILS AND INFORMATION, PLEASE VISIT OUR WEBSITE WWW.KUCHT.COM INSTALLATION GUIDE AND USER MANUAL PROFESSIONAL GAS RANGE TOP NG & LPG CONVERTIBLE Installation and Owner’s Manual This manual contain for: Important Safe guards Installation Use and Care Certain range tops come equipped wi...
Page 3 - Read and Save These Instructions
FOR MORE DETAILS AND INFORMATION, PLEASE VISIT OUR WEBSITE WWW.KUCHT.COM INSTALLATION GUIDE AND USER MANUAL Read and Save These Instructions
Page 4 - Table of Contents; Contents
FOR MORE DETAILS AND INFORMATION, PLEASE VISIT OUR WEBSITE WWW.KUCHT.COM INSTALLATION GUIDE AND USER MANUAL Table of Contents Contents Important Safeguards Page 1 - 5 Installation Instructions and Clearances Page 6-14 Operation of Range top Page 15 – 21 Cleaning the Range top Page 22-23 Gas Range to...
Page 5 - PLEASE READ AND SAVE THESE INSTRUCTIONS; when installing, operating and maintaining the appliance
FOR MORE DETAILS AND INFORMATION, PLEASE VISIT OUR WEBSITE WWW.KUCHT.COM INSTALLATION GUIDE AND USER MANUAL PLEASE READ AND SAVE THESE INSTRUCTIONS This manual provides specific operation in structions for your model. Use your range top only as instructed in this manual. These instructions are not m...
Page 6 - READ ALL IMPORTANT SAFE GUARDS AND; If you smell gas
FOR MORE DETAILS AND INFORMATION, PLEASE VISIT OUR WEBSITE WWW.KUCHT.COM INSTALLATION GUIDE AND USER MANUAL 2 . READ ALL IMPORTANT SAFE GUARDS AND ALL INSTRUCTIONS BEFORE USING THE APPLIANCE. If you smell gas Open windows Don’t touch electrical switches Extinguish any open flame Immediate call your ...
Page 9 - Some range top
FOR MORE DETAILS AND INFORMATION, PLEASE VISIT OUR WEBSITE WWW.KUCHT.COM INSTALLATION GUIDE AND USER MANUAL 5 These cook tops must be installed in conjunction with a suitable overhead vent hood. Due to the high capacity of these professional cook tops, attention should be paid to the hood and duct w...
Page 10 - Installation Instructions; NOT ICE TO MASSACHUSETTS APPLIANCE DEALERS:
FOR MORE DETAILS AND INFORMATION, PLEASE VISIT OUR WEBSITE WWW.KUCHT.COM INSTALLATION GUIDE AND USER MANUAL 6 Installation Instructions Be sure the range top is properly in stalled and grounded by a qualified technician.It is the responsibility of the technician to make certain that your range top i...
Page 11 - Gas line shut-off valve; CLEARANCES
FOR MORE DETAILS AND INFORMATION, PLEASE VISIT OUR WEBSITE WWW.KUCHT.COM INSTALLATION GUIDE AND USER MANUAL 7 The installation of range tops designed for recreational vehicle installation must conform with state or other codes or,in the absence of such codes,with the Standard for recreational vehicl...
Page 12 - CAN NOT; be installed directly adjacent to side walls,tall
FOR MORE DETAILS AND INFORMATION, PLEASE VISIT OUR WEBSITE WWW.KUCHT.COM INSTALLATION GUIDE AND USER MANUAL 8 It is the responsibility of the installer to make certain that the range top is properly adjusted at the time of installation Situations caused by improper adjustments or improper installati...
Page 13 - Range top to such combustible surfaces above the 36”(91.4 cm)counter; Wall Installation; :Minimum clearance for back wall
FOR MORE DETAILS AND INFORMATION, PLEASE VISIT OUR WEBSITE WWW.KUCHT.COM INSTALLATION GUIDE AND USER MANUAL 9 Range top to such combustible surfaces above the 36”(91.4 cm)counter height.Within the 6”(15.2 cm)side clearance to combustible vertical surfaces above 36”(91.4cm),the maximum wall cabinet d...
Page 14 - Island Installation; CANNOT; beinstalleddirectlyadjacenttosidewalls,tall
10 Should be installed a minimum of 30”to a maximum of 36”above the cook top surface.Recommended CFM should beg 450 cfm for the 30”range top. Do not install with a down draft ventilation system Island Installation Note: There must be a minimum of 6”(15.2 cm) clearance from rear of range top to a com...
Page 15 - range top to such combustible surfaces above the 36”(91.4 cm)counter
FOR MORE DETAILS AND INFORMATION, PLEASE VISIT OUR WEBSITE WWW.KUCHT.COM INSTALLATION GUIDE AND USER MANUAL 11 high.There must be a minimum of 6”(15.2 cm)side clearance from the range top to such combustible surfaces above the 36”(91.4 cm)counter height.Within the 6”(15.2 cm)side clearance to combus...
Page 16 - Make the counter top cut-out following the dimensions given in the; Base below range top must be of an on-combustible
FOR MORE DETAILS AND INFORMATION, PLEASE VISIT OUR WEBSITE WWW.KUCHT.COM INSTALLATION GUIDE AND USER MANUAL 12 Make the counter top cut-out following the dimensions given in the illustration above. Base below range top must be of an on-combustible material.
Page 17 - Installing the Range top; It’s shipped for use with NG.; This range top is convertible for use on
FOR MORE DETAILS AND INFORMATION, PLEASE VISIT OUR WEBSITE WWW.KUCHT.COM INSTALLATION GUIDE AND USER MANUAL 13 Installing the Range top Remove the range top from its package and set aside all burners,burner caps and grates.Gently slide in the cook top in to the cut-out,make sure your cut-outs are th...
Page 18 - the hard piping method is used,you must care fully align the pipe.
FOR MORE DETAILS AND INFORMATION, PLEASE VISIT OUR WEBSITE WWW.KUCHT.COM INSTALLATION GUIDE AND USER MANUAL 14 Piped connection.Never reuse an old connect or when installing a new range top.If the hard piping method is used,you must care fully align the pipe. To prevent gas leaks,use pipe joint comp...
Page 19 - OPERATION OF RANGE TOP
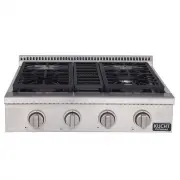
FOR MORE DETAILS AND INFORMATION, PLEASE VISIT OUR WEBSITE WWW.KUCHT.COM INSTALLATION GUIDE AND USER MANUAL 15 OPERATION OF RANGE TOP HRT3609U
Page 22 - Guidelines for using range top burners; Surface Burner Ignition
18 Guidelines for using range top burners There are dual burners have the same low turn-down setting (SIM) for gentle simmering(620 BTU/hr). Use the SIM setting for melting chocolate and butter, cooking rice anddelicate sauces, simmering soups and stews, and keeping cooked food hot. Never leave the ...
Page 23 - Any flame larger than the bottom of the cookware is wasted.
19 To light the top burners, push and turn the appropriate control knob counter clockwise tothe “HI” position. You will hear a clicking noise – the sound of the electric sparkigniting the burner. Once burner ignition has been achieved, then turn the burner controlknob to adjust the the desired heat ...
Page 25 - For the models with Griddle; Before Using the Griddle
21 For the models with Griddle Before Using the Griddle 1. Clean the griddle thoroughly with warm, soapy water to remove dust or any protectivecoating. 2. Rinse with clean water and wipe off to dry with soft, clean, lint-free cloth. 3. A stainless steel cover that is sized to fit on top of the surfa...
Page 26 - CLEANING THE RANGE TOP; Cleaning guidelines; Burner and Burner Caps; Range top Surface and Control Panel
22 CLEANING THE RANGE TOP Cleaning guidelines Read the“IMPORTANT SAFETY INSTRUCTIONS”on page 2 and these‘CARE AND CLEANING”guidelines before you start cleaning your range top. See the pages following for instructions on removing and replacing different parts of the range for cleaning and maintenance...
Page 27 - Allow all components to dry thoroughly before using the range top.; Gas Range top Conversion and Adjustment Guide; the pressure to 11”inches water column
23 FOR MORE DETAILS AND INFORMATION, PLEASE VISIT OUR WEBSITE WWW.KUCHT.COM INSTALLATION GUIDE AND USER MANUAL To protect the appliance finish,only use a sponge,soft cloth,fibrous or plastic brush,and pad for cleaning. Allow all components to dry thoroughly before using the range top. Gas Range top ...
Page 28 - Replace the cap back on the regulator.; Orifice removed; manual for future use.; Label your orifices as you remove from the range
24 FOR MORE DETAILS AND INFORMATION, PLEASE VISIT OUR WEBSITE WWW.KUCHT.COM INSTALLATION GUIDE AND USER MANUAL 4. Unscrew the plastic insert from the cap and turn it overs other shorter stem is facing downwards for NG(Fig.A).Replace insert on the cap. 5. Replace the cap back on the regulator. 6. Nex...
Page 29 - up the burners to check the minimum flame height.
25 FOR MORE DETAILS AND INFORMATION, PLEASE VISIT OUR WEBSITE WWW.KUCHT.COM INSTALLATION GUIDE AND USER MANUAL See below for rating of LPG orifices for each model LPG Left Front Left Rear Right Front Right Rear 18,000btu 12,000btu 18,000btu 12,000btu 1.24mm 1.00mm 1.24mm 1.00mm 10.Once all the orifi...
Page 30 - Notch; to; panel with the two screws earlier removed.
FOR MORE DETAILS AND INFORMATION, PLEASE VISIT OUR WEBSITE WWW.KUCHT.COM INSTALLATION GUIDE AND USER MANUAL 13.Next slide out the panel,there are notches at the top positing the panel in place. Notch 14.Using a 3/32''X3” screw driver or similar you can make the adjustment.Turn to minimumflamethenadj...
Page 31 - Trouble shooting Tips; Symptom
FOR MORE DETAILS AND INFORMATION, PLEASE VISIT OUR WEBSITE WWW.KUCHT.COM INSTALLATION GUIDE AND USER MANUAL Trouble shooting Tips Symptom Possible Cause Solution BURNERS WILL NOTLIGHT. Burner parts orIgniters maybewet,dirty or misaligned. Check that the burner parts are clean,dryAnd correctly assemb...