KitchenAid KOST100ESS - Manual
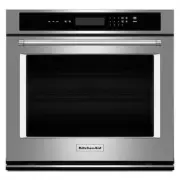
KitchenAid KOST100ESS Oven – Manual, read for free online in PDF format. We hope this helps you resolve any issues you may have. If you have further questions, please contact us through the contact form.
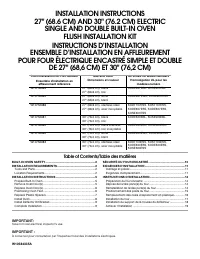


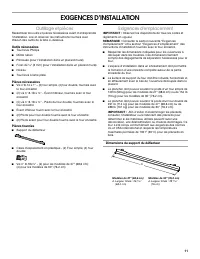
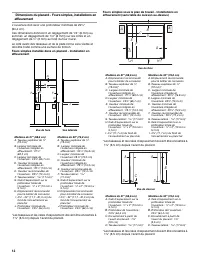
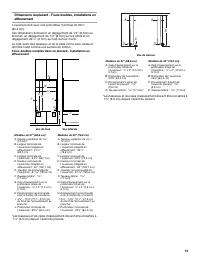
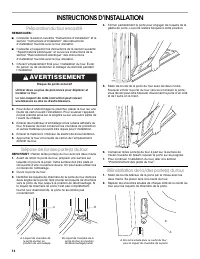
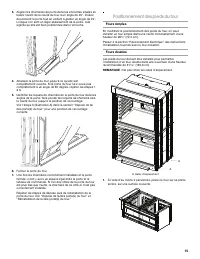
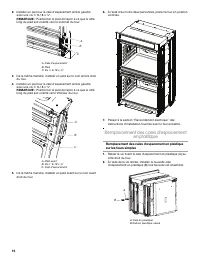

Table of Contents:
- Page 2 – INSTALLATION REQUIREMENTS; Tools and Parts; Tools Needed; Location Requirements; You; Your safety and the safety of others are very important.; DANGER
- Page 3 – Single Ovens Installed in Cabinet - Flush Installation
- Page 4 – Cabinet Dimensions - Double Ovens, Flush Installations; Double Ovens Installed in Cabinet - Flush Installations
- Page 5 – INSTALLATION INSTRUCTIONS; Prepare Built-In Oven; WARNING; Excessive Weight Hazard
- Page 6 – Using two hands, grasp side edges of door at the midpoint.; Locate the slots on each side of the oven cavity for the door; Positioning Oven Feet; Single Ovens
- Page 7 – Replace Plastic Spacers; Replace Plastic Spacers on Single Ovens
- Page 8 – Replace Plastic Spacers on Double Ovens; In the same manner, remove and replace the 2 plastic; Install Oven; Using 2 or more people, lift the oven partially into the cabinet; Push against the front frame of the microwave oven to push; Remove the tape from the black front trim piece.
- Page 9 – Check Operation of Single and Double Ovens
- Page 10 – SÉCURITÉ DU FOUR ENCASTRÉ; Votre sécurité et celle des autres est très importante.; AVERTISSEMENT
- Page 11 – EXIGENCES D’INSTALLATION; Outillage et pièces; Outils nécessaires; Exigences d’emplacement; Dimensions du support du déflecteur
- Page 14 – INSTRUCTIONS D’INSTALLATION; Préparation du four encastré; Risque du poids excessif
- Page 15 – Positionnement des pieds du four; Fours simples
- Page 16 – Remplacement des cales d’espacement
- Page 17 – De la même manière, retirer et remplacer la cale; À l’aide des 2 vis retirées, installer les 2 nouvelles cales; Installation du four; Pousser contre le châssis avant du four à micro-ondes pour
- Page 19 – Achever l’installation; Vérifier que toutes les pièces sont maintenant installées. S’il; À la première utilisation, régler l’horloge et toute autre; Après que le four a fonctionné pendant 5 minutes, vérifier; Si vous avez besoin d’assistance ou de service :
INSTALLATION INSTRUCTIONS
27" (68.6 CM) AND 30" (76.2 CM) ELECTRIC
SINGLE AND DOUBLE BUILT-IN OVEN
FLUSH INSTALLATION KIT
INSTRUCTIONS D’INSTALLATION
ENSEMBLE D’INSTALLATION EN AFFLEUREMENT
POUR FOUR ÉLECTRIQUE ENCASTRÉ SIMPLE ET DOUBLE
DE 27" (68,6 CM) ET 30" (76,2 CM)
Flush Installation Kit Part Number
Ensemble d'installation en
affleurement référence
Size and Color
Dimensions et couleur
UL Listed for Model Numbers
Homologation UL pour les
modèles numéro
W10752685
27" (68.6 cm), black
27" (66,6 cm), noir
KODE507EBL, KOSE507EBL
W10752684
27" (68.6 cm), white
27" (68,6 cm), blanc
KODE507EWH, KOSE507EWH
W10752686
27" (68.6 cm), stainless steel
27" (68,6 cm), acier inoxydable
KODT107ESS, KOST107ESS,
KODE307ESS, KODE507ESS,
KOSE507ESS
W10752681
30" (76.2 cm), black
30" (76,2 cm), noir
KODE500EBL, KOSE500EBL
W10752682
30" (76.2 cm), black stainless
30" (76,2 cm), noir inoxydable
KODE500EBS, KOSE500EBS
W10752680
30" (76.2 cm), white
30" (76,2 cm), blanc
KODE500EWH, KOSE500EWH
W10752683
30" (76.2 cm), stainless steel
30" (76,2 cm), acier inoxydable
KODT100ESS, KOST100ESS,
KODE300ESS, KODE500ESS,
KOSE500ESS
Table of Contents/Table des matières
BUILT-IN OVEN SAFETY ............................................................... 2
INSTALLATION REQUIREMENTS ................................................ 2
Tools and Parts ............................................................................ 2
Location Requirements ................................................................ 2
INSTALLATION INSTRUCTIONS .................................................. 5
Prepare Built-In Oven................................................................... 5
Remove Oven Door(s) .................................................................. 5
Replace Oven Door(s) .................................................................. 6
Positioning Oven Feet .................................................................. 6
Replace Plastic Spacers .............................................................. 7
Install Oven................................................................................... 8
Install Deflector Kit Bracket.......................................................... 9
Complete Installation ................................................................... 9
SÉCURITÉ DU FOUR ENCASTRÉ ..............................................10
EXIGENCES D’INSTALLATION ...................................................11
Outillage et pièces ......................................................................11
Exigences d’emplacement .........................................................11
INSTRUCTIONS D’INSTALLATION.............................................14
Préparation du four encastré .....................................................14
Dépose de la/des porte(s) du four .............................................14
Réinstallation de la/des porte(s) du four ....................................14
Positionnement des pieds du four .............................................15
Remplacement des cales d’espacement en plastique..............16
Installation du four ......................................................................17
Installation du support de la trousse du déflecteur ...................18
Achever l’installation ..................................................................19
W10584335A
IMPORTANT:
Save for local electrical inspector's use.
IMPORTANT :
À conserver pour consultation par l'inspecteur local des installations électriques.
"Loading the manual" means you need to wait until the file loads and becomes available for online reading. Some manuals are very large, and the time they take to appear depends on your internet speed.
Was this manual helpful?
About this manual
- Brand
- KitchenAid
- Model
- KOST100ESS
- Document type
- Manual
- Category
- Oven
- Language(s)
- English, French
- Pages
- 20
- File size
- 4.5 MB
- Format
Other Manuals for KitchenAid KOST100ESS
Summary
2 BUILT-IN OVEN SAFETY INSTALLATION REQUIREMENTS Tools and Parts Gather the required tools and parts before starting installation. Read and follow the instructions provided with any tools listed here. Tools Needed ■ Phillips screwdriver ■ Measuring tape ■ Drill (for wall cabinet installations) ■ ¹⁄₈...
3 Deflector Bracket Dimensions Cabinet Dimensions - Single Ovens, Flush Installations A 25 ³⁄₈ " (64.4 cm) minimum cutout depth is required. These dimensions will result in a ¹⁄₄ " (6 mm) reveal on the top, a ¹⁄₄ " (6 mm) reveal on the sides, and a ¹⁄₈ " (3 mm) reveal on the bottom o...
4 Cabinet Dimensions - Double Ovens, Flush Installations A 25 ³⁄₈ " (64.4 cm) minimum cutout depth is required. These dimensions will result in a ¹⁄₄ " (6 mm) reveal on the top, a ¹⁄₄ " (6 mm) reveal on the sides, and a ¹⁄₈ " (3 mm) reveal on the bottom of the wall oven. The front fa...
Ask a question
Related manuals
Popular KitchenAid Ovens
More KitchenAid Ovens models
 KitchenAid KOSE500ESS User Manual
 KitchenAid KOSE507ESS Manual
 KitchenAid KOSE900HSS Manual
 KitchenAid KOCE500EBS Manual
 KitchenAid KOCE500ESS Manual
 KitchenAid KOCE900HBS Installation Manual
 KitchenAid KODE300ESS User Manual
 KitchenAid KODE500EBS Manual
 KitchenAid KODE500ESS User Manual
 KitchenAid KODE900HSS Manual
 KitchenAid KOEC530PBS Manual
- KitchenAid KOEC530PSS Manual