KitchenAid 94700 - User Manual
KitchenAid 94700 Blender – User Manual, read for free online in PDF format. We hope this helps you resolve any issues you may have. If you have further questions, please contact us through the contact form.


Table of Contents:
- Page 2 – CORDLESS HAND BLENDER INSTRUCTIONS; TABLE OF CONTENTS
- Page 3 – English; IMPORTANT SAFEGUARDS; When using electrical appliances, basic safety precautions
- Page 4 – SAVE THESE INSTRUCTIONS
- Page 5 – ELECTRICAL REQUIREMENTS
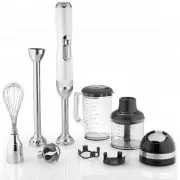
- Page 6 – PARTS AND FEATURES; Parts and accessories
- Page 8 – Attachment guide; Attachment
- Page 9 – OPERATING THE HAND BLENDER; Before
- Page 10 – Assembling the Hand Blender
- Page 11 – Using the LED display panel
- Page 12 – Using the blending arm
- Page 13 – Using the whisk attachment
- Page 14 – Using the chopper attachment
- Page 15 – Chopper processing guide; Food
- Page 16 – TIPS FOR GREAT RESULTS; Techniques for better blending and crushing; Operating tips
- Page 18 – CARE AND CLEANING; Cleaning the Hand Blender
81
Australia
Ё
䞲 ῃ
5KHB3581
Brasil
KES25
"Loading the manual" means you need to wait until the file loads and becomes available for online reading. Some manuals are very large, and the time they take to appear depends on your internet speed.
Summary
2 CORDLESS HAND BLENDER INSTRUCTIONS TABLE OF CONTENTS HAND BLENDER SAFETY Important safeguards .......................................................................................... 3 Electrical requirements ..................................................................................... 5...
English 3 HAND BLENDER SAFETY IMPORTANT SAFEGUARDS When using electrical appliances, basic safety precautions should always be followed, including the following: 1. Read all instructions. 2. To protect against risk of electrical shock, do not put motor body of Hand Blender, battery, charger, charger...
4 HAND BLENDER SAFETY 8. Do not let power cord on charger hang over edge of table or counter. Excess cord may be wrapped on the underside of the charger. 9. Do not let power cord on charger contact hot surfaces, including the stove. 10. When mixing liquids, especially hot liquids, use a tall contain...