Page 2 - FOOD PROCESSOR INSTRUCTIONS; TABLE OF CONTENTS
2 FOOD PROCESSOR INSTRUCTIONS FOOD PROCESSOR SAFETY Important safeguards ................................................................................................. 3 Electrical requirements ............................................................................................. 5 PARTS A...
Page 3 - English; FOOD PROCESSOR SAFETY; IMPORTANT SAFEGUARDS; When using electrical appliances, basic safety precautions
English 3 FOOD PROCESSOR SAFETY IMPORTANT SAFEGUARDS When using electrical appliances, basic safety precautions should always be followed, including the following:1. Read all instructions. 2. To protect against risk of electrical shock, do not put Food Processor in water or other liquid. 3. This app...
Page 4 - SAVE THESE INSTRUCTIONS
4 FOOD PROCESSOR SAFETY SAVE THESE INSTRUCTIONS 8. The use of attachments not recommended or sold by . itchenAid may cause À re, electric shock, or injury. 9. Do not use outdoors. 10. Do not let cord hang over edge of table or counter. 11. Keep hands and utensils away from moving blades or discs whi...
Page 5 - ELECTRICAL REQUIREMENTS
English 5 Voltage: 220-240 Volts Frequency: 50/60 Hertz Wattage: 650 WattsFor Brazil only: Voltage:127 Volts Frequency: 60 Hertz Wattage: 780 Watts NOTE: If the plug does not fit in the outlet, contact a qualified electrician. Do not modify the plug in any way. Do not use an adapter. ELECTRICAL REQU...
Page 6 - PARTS AND FEATURES; Parts and accessories
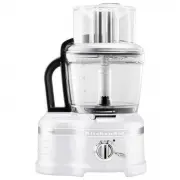
6 PARTS AND FEATURES Stainless steel multipurpose blade Dough blade Egg whip 1 L Mini-bowl and mini-blade Die-cast base 4 L Work bowl Lid with 3-in-1 feed tube 3-piece food pusher Accessory case Externally adjustable blade control Parts and accessories Spatula Ultratight Seal
Page 8 - Action; Selecting the right tools
8 PARTS AND FEATURES Action Setting Food Accessory Chop Mince Vegetables Fruit Fresh herbs Nuts Meat Multipurpose stainless steel blade OR Mini-bowl and mini multipurpose stainless steel blade Puree Mix Pesto Sauces Cake batter Pie dough Cream Knead Yeast dough Plastic dough blade Slice thick Slice ...
Page 10 - USING YOUR FOOD PROCESSOR; Before First Use; Attaching the work bowl; Attaching the lid and safety lock
10 USING YOUR FOOD PROCESSOR Before First Use Before using your Food Processor for the first time, wash the bowls and accessories as described in the “Care and Cleaning” section. Attaching the work bowl Power shaft 3 Turn work bowl to lock it on the base. 2 Place the work bowl on the base as shown. ...
Page 11 - Before Use
English 11 USING YOUR FOOD PROCESSOR Using the 3-in-1 feed tube Before Use Before operating the Food Processor, be sure the work bowl, blades, and lid are properly assembled on the Food Processor base. Max Fill line on feed tube Large food pusher 1 Use the entire feed tube and the large food pusher ...
Page 12 - Using the speed controls
12 USING YOUR FOOD PROCESSOR NOTE: If the Food Processor fails to operate, make sure the work bowl and lid are properly locked on the base. Using the speed controls 1 To turn on, Á ip the speed lever to “2” (high) or “1” (low), then turn the dial to “I” (ON). 2 To stop, turn the dial to “O” (OFF). 3...
Page 14 - USING YOUR ACCESSORIES
14 USING YOUR ACCESSORIES Preparing the dicing kit for À rst use 1 Using the handle, place the assembled dicing kit into the work bowl. 2 When placing kit in the work bowl, line up the kit’s tab with the groove in the work bowl. 3 Rotate the dicing kit lid, using the finger tabs until it unlocks. 4 ...
Page 15 - Installing/using the dicing kit
English 15 USING YOUR ACCESSORIES 4 Place the ➃ dicing kid lid onto the assembled kit with the hole facing front, and lock into place. 3 Place the ➂ dicing kit blade, making sure it is securely seated. Installing/using the dicing kit 1 Place the disc adapter onto the power shaft. 2 Place the ➁ dicin...
Page 16 - Installing/removing the multipurpose blade
16 USING YOUR ACCESSORIES IMPORTANT: Accessory blades can only be used with the work bowl. Installing/removing the multipurpose blade 2 Press down firmly on the blade. You will hear a click when the accessory locks into place. 1 Place the blade on the power shaft. 4 Remove the blade by grasping and ...
Page 17 - Installing/removing the prep bowl
English 17 USING YOUR ACCESSORIES IMPORTANT: Discs and adapters must be removed before removing bowls. Installing/removing the prep bowl 5 After processing, remove the prep bowl using the two finger grips. 1 To use the prep bowl, place into the work bowl using the two finger grips. 3 Place the desir...
Page 18 - Installing/removing the shredding, french fry, and parmesan discs
18 USING YOUR ACCESSORIES IMPORTANT: Discs and adapters must be removed before removing bowls. 5 To remove the parmesan disc after processing, carefully lift off of adapter. Finger grip Finger grip 4 To remove shredding disc and french fry disc, remove the lid and using the 2 finger grips, lift the ...
Page 19 - Installing/removing the slicing disc
English 19 USING YOUR ACCESSORIES 4 To remove slicing disc, remove lid and using the 2 finger grips, lift the disc straight up. Finger grip Finger grip Installing/removing the slicing disc 1 Place the disc on the power shaft. 2 Slightly rotate the disc until it drops into place. 3 Install the lid, a...
Page 21 - Installing/removing the citrus press
English 21 USING YOUR ACCESSORIES Installing/removing the citrus press 5 After processing, lift cone from strainer basket, turn strainer basket to unlock from the handle, as shown, and lift from the work bowl. Remove the adapter. 4 Place the cone inside the strainer basket, connecting it to the adap...
Page 22 - Installing/removing the egg whip or dough blade
22 USING YOUR ACCESSORIES Installing/removing the egg whip or dough blade 3 After processing, firmly grasp egg whip or dough blade and lift straight up. 1 Place the egg whip or dough blade onto power shaft. 2 Press down firmly on the egg whip or dough blade. You will hear a click when the accessory ...
Page 23 - CARE AND CLEANING
English 23 CARE AND CLEANING IMPORTANT: Never use abrasive cleansers or scouring pads on the Food Processor. They may scratch or cloud the work bowl and cover. 5 Store discs, shaft, and blades in the provided storage case and in a location out of the reach of children. 4 To store, push the cord back...
Page 24 - TIPS FOR GREAT RESULTS; Using the Multipurpose Blade
24 To chop fresh fruits or vegetables: Peel, core, and/or remove seeds. Cut food in 1 to 2.5-4 cm (1 1 / 2 -inch) pieces. Process food to desired size, using short pulses, 1 to 2 seconds each time. Scrape sides of bowl, if necessary. To puree cooked fruits and vegetables (except potatoes): Add 60 ml...
Page 25 - Using a Slicing or Shredding Disc
English 25 Cut food to À t feed tube vertically or horizontally, and pack feed tube securely to keep food positioned properly. Process using even pressure. Or use the small feed tube in the two-piece food pusher. Position food vertically in the tube and use the small food pusher to process food. To ...
Page 26 - Helpful Hints
26 TIPS FOR GREAT RESULTS • To avoid damage to the blade or motor, do not process food that is so hard or À rmly frozen that it cannot be pierced with the tip of a sharp knife. If a piece of hard food, such as a carrot, becomes wedged or stuck on the blade, stop the processor and remove the blade. G...
Page 27 - TROUBLESHOOTING
English 27 Food Processor doesn’t run: • Make sure that the bowl and lid are properly aligned and locked in place and the large food pusher is inserted in the feed tube. • When using the large feed tube opening, make sure that food is not above the Max. Fill line on the feed tube. • Check to make su...