Page 2 - GARDE ESTAS INSTRUCCIONES; A d v e r t e n c i a s
28 • Usar el aparato solamente como está indicado en este folleto. Estas instrucciones no pretenden abarcar todas las posibles condiciones y situaciones quepuedan presentarse. Es necesario, siempre, recurrir al buen juicio y a la prudencia en la instalación, funcionamien-to y conservación de cada el...
Page 3 - Introducción
29 Introducción El climatizador portátil es un aparato de dimensiones reducidas que permite regular la temperatura yla humedad presentes en el ambiente. Gracias a sus características extremadamente flexibles esfácilmente utilizable en cualquier ocasión y en diferentes lugares. Cuenta con funciones m...
Page 4 - Descripción
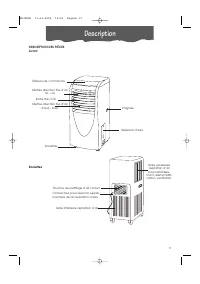
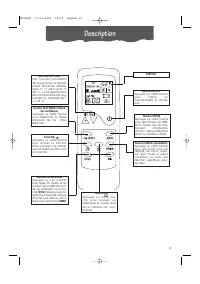
30 Descripción Panel de mandos Asa Aletas de dirección del flujo del aire (dcha. – izda.) Salida del flujo del aire Aletas de dirección del flujo del aire (abajo – arriba) Depósito del agua Ruedas Boca de salida del aire caliente Rejilla inferior de entrada aire Rejilla superiorde entradaaire para r...
Page 5 - Panel de mandos
31 Panel de mandos Todas las funciones del climatizador pueden controlarse en el panel de mandos y con el mando a distancia(solamente en algunos modelos). Botón TIMER ON/OFF Pulse este botónpara activar la fun-ción timer (encendi-do en caso de cli-matizador apaga-do o apagado encaso de climatiza-dor...
Page 7 - Funcionamiento
33 CAMPO DE FUNCIONAMIENTO El campo de funcionamiento del climatizadorestá comprendido entre un mínimo de + 17°C(62°F) y un máximo de + 35°C (95°F), con tempe-raturas preseleccionables en modo acondicio-namiento de 17°C (62°F) a + 31°C (87°F) . Para el modo de funcionamiento deshumidifica-ción, el c...
Page 8 - F u n c i o n a m i e n t o
34 FUNCIÓN TIMER Para que el aparato funcione a la hora elegi-da, con el climatizador apagado (no desen-chufado de la corriente), pulse el botón “ TIMER ON/OFF ” (la pantalla visualiza “ ”), a con- tinuación pulse el botón “ TIMER HOUR ” hasta visualizar dentro de cuantas horas quiere queel aparato ...
Page 9 - I n s t a l a c i ó n
ELECCIÓN DEL LUGAR DE INSTALACIÓN Sitúe el climatizador sobre una super ficieplana en un lugar donde las rejillas de salidadel aire no puedan ser obstruidas. Sitúe elaparato a una distancia no inferior de 50 cm(19.7”) de paredes u obstáculos. ENROLLACABLE Antes de instalar el conducto de expulsiónde...
Page 12 - M a n t e n i m e n t o
38 MANTENIMIENTO • Apague el aparato y desenchúfelo de lacorriente antes de efectuar las operacio-nes de limpieza. • Asegúrese que el aparato no reciba ten-sión antes de efectuar las operaciones demantenimiento. De esta forma, se evi-tarán eventuales accidentes causadospor descargas eléctricas. • No...
Page 13 - S i a l g o n o f u n c i o n a
39 Antes de ponerse en contacto con un Centro de Asistencia Técnica autorizado, compruebelo siguiente: Problemas Comprobar Soluciones El aparato no funciona. La refrigeración no es sati-sfactoria. • Controle que no se vuelva a repetir. • Enchufe el aparato a la corriente. • Controle el interruptor g...
Page 15 - I m p o r t a n t s a f e g u a r d s; SAVE THESE INSTRUCTIONS
2 I m p o r t a n t s a f e g u a r d s • Use this appliance only as described in this instruction manual.As with any electrical appliance, the instructions aim to cover as many eventualities as possi-ble. Caution and common sense should be used when operating and installing this air condi-tioner. •...
Page 16 - Introduction
3 Introduction The portable air conditioner is a compact unit for regulating air temperature and humidity. Its extremelyflexible characteristics make it easy to use at any time and in any room. It can be operated in multiplemodes including cooling, dehumidifying and ventilating. The appliance has be...
Page 17 - Description
4 Description Control panel Handle Air flow direction fins (right hand – left hand) Air outlet Air flow direction fins (high – low) Water tank Castors Hot air outlet Bottom air intake grill Top air intake grille for cooling, dehumidifying and ventilating. DESCRIPTION OF PARTSFront Back Connector for...
Page 18 - Control panel
5 Control panel All functions of the unit can be controlled from the control panel or the remote control unit (certain models only). TIMER ON/OFF button Press this button toactivate the timerfunction (turns theappliance off ifalready on and viceversa). SET TEMP buttons These buttons canbe used to se...
Page 20 - O p e r a t i o n
7 OPERATING RANGE The operating range of the air conditioningunit goes from a minimum of +17°C (62°F) to amaximum of +35°C (95°F), with a choice oftemperatures in cooling mode of from +17°C(62°F) to + 31°C (87°F).In dehumidifying mode, the operating rangegoes from +20°C (68°F) to + 31°C (87°F). Thet...
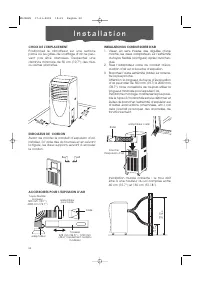
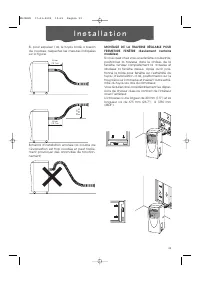
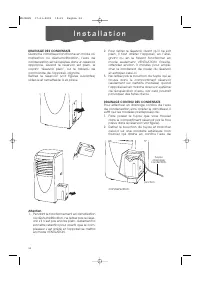
Page 22 - I n s t a l l a t i o n
CHOOSING THE INSTALLATION SITE Position the air conditioning unit on a flat sur-face where the air outlet grilles cannot beobstructed. Position the appliance at least 50cm (19.7”) away from walls or obstacles. CABLE WINDER Before installing the air exhaust hose, mountthe two cable winder brackets us...
Page 25 - M a i n t e n a n c e
12 MAINTENANCE • Turn the appliance off and unplug fromthe outlet before cleaning. • Make sure the unit is disconnected from allvoltage before proceeding with mainte-nance. This avoids the risk of electricshock. • Never use chemical solvents (such as ben-zene and alcohol) to clean the sur face ofthe...
Page 26 - T r o u b l e s h o o t i n g
13 Before contacting an authorized technical service center, check the following: Problem Check Solution The appliance does notwork. The appliance does notcool satisfactorily • Check it no longer occurs • Plug into the outlet • Check the outlet switch or turn the air conditioningunit switch on • Emp...
Page 27 - L i m i t e d W a r r a n t y
14 De’Longhi is the distributor of Kenwood home appliances. This warranty applies to all home appliances with De’Longhi or Kenwood brand names. FOR CONTIGUOUS UNITED STATES ONLY Limited Warranty We warrant each De’Longhi AIR CONDITIONER to be free from defects in material and workman-ship. From the ...
Page 28 - CONSERVEZ CES INSTRUCTIONS; A v e r t i s s e m e n t s
15 • L'appareil ne doit être utilisé que conformément aux instructions fournies dans ce mode d'em-ploi.Ces instructions ne couvrent toutefois pas toutes les conditions et situations pouvant se pré-senter.Il est toujours nécessaire d'agir avec bon sens et prudence pour l'installation, le fonctionne-m...
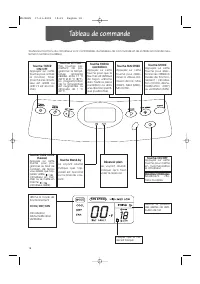
Page 31 - Tableau de commande
18 Tableau de commande Toutes les fonctions du climatiseur sont contrôlables du tableau de commande et de la télécommande (seu-lement certains modèles) Touche TIMER ON/OFF Appuyez sur cettetouche pour activerla fonction Timer(marche si le climati-seur est arrêté ouarrêt s’il est en mar-che). Touches...
Page 33 - F o n c t i o n n e m e n t
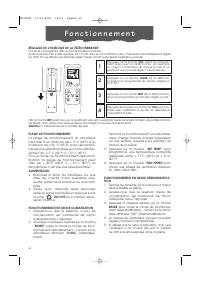
20 PLAGE DE FONCTIONNEMENT La plage de fonctionnement du climatiseurpeut aller d’un minimum de + 17°C (62°F) à unmaximum de + 35 °C (95°F), avec des tempé-ratures pré-sélectionnables en mode refroidis-sement de +17°C (62°F) à + 31°C (87°F).Pour le mode de fonctionnement déshumidi-fication, la plage ...
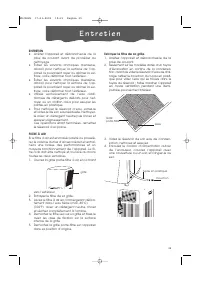
Page 38 - E n t r e t i e n
25 ENTRETIEN • Arrêter l’appareil et débranchez-le de laprise de courant avant de procéder aunettoyage • Évitez les solvants chimiques (benzène,alcool) pour nettoyer la sur face de l’ap-pareil. Ils pourraient rayer ou abîmer la sur-face, voire déformer tout l’extérieur. • Évitez les solvants chimiqu...
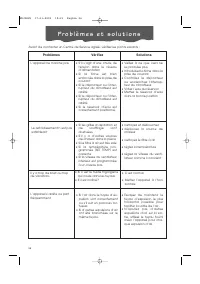
Page 39 - P r o b l è m e s e t s o l u t i o n s
26 Avant de contacter un Centre de Service agréé, vérifiez les points suivants : Problèmes Vérifiez Solutions L’appareil ne marche pas Le refroidissement n’est pas satisfaisant • Veillez à ce que cela ne se produise plus • Introduisez la fiche dans la prise de courant. • Contrôlez le disjoncteur ou ...
Page 40 - G a r a n t i e l i m i t é e
27 G a r a n t i e l i m i t é e De’Longhi est le distributeur de électroménagers de marque Kenwood. Cette garantie s’appli- que à tous les électroménagers portant les marques De’Longhi ou Kenwood. RÉSERVÉ UNIQUEMENT AUX ÉTATS-UNIS CONTIGUS Garantie limitée Nous garantissons que chaque CLIMATISEUR d...