Page 2 - INSTRUCTION BOOKLET
Page 4 - Contents; Kambrook Recommends
Contents Kambrook Recommends p4 Safety First Your Kambrook Pressure p7 Express MultiPressure Express Multi p11 Quick Start GuideUsing Your Kambrook p15 Pressure Express MultiFunctions of Your Kambrook p16 Pressure Express MultiPressure Express Multi Cooking p20 GuideTroubleshooting Guide p33 Care, C...
Page 5 - Kambrook Recommends Safety First; IMPORTANT: Please retain your; consumer product, so that you, our valued customer can confidently; Important Safeguards For Your Kambrook
4 Kambrook Recommends Safety First IMPORTANT: Please retain your instruction book for future use. At Kambrook, we believe that safe performance is the first priority in any consumer product, so that you, our valued customer can confidently use and trust our products. We ask that any electrical appli...
Page 8 - Your Kambrook Pressure Express Multi; Accessories Included
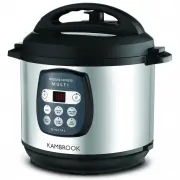
7 Your Kambrook Pressure Express Multi 1. Cool touch lid handle 2. Pressure release valve - controls the steam release from Pressure Express Multi and degree of pressure inside 3. Safety locking lid – cannot be opened during pressure cooking 4. 6 litre non-stick removable cooking bowl (Not visible) ...
Page 9 - Pressure
8 8. Pressure Release Valve: a) ‘Sealing’ – valve closed position for pressurisation when pressure cooking. b) ‘Venting’ – valve open position for fast release venting of steam (depressurisation). c) Clean any debris or residue from around the pressure release valve located on the underside of the l...
Page 10 - Lid lock
9 11. Lid Locks a) The lid lock actuator freely moves up and down until the unit is pressurised and then locks the lid, preventing the lid from being opened while under pressure. It is located beneath the removable metal basket on the underside of the lid and should be cleaned regularly. b) This lid...
Page 11 - Other Features
10 Sound What It Means Ascending Chime* With the lid sitting flat within the rim of the housing, the lid is moved to the ‘locked’ position Descending Chime* With the lid sitting flat within the rim of the housing, the lid is moved to the ‘unlocked’ position 3 Beeps Indicates that the cooking functio...
Page 12 - Pressure Express Multi Quick Start Guide
11 Before Using Any Setting on the Pressure Express Multi Place the Pressure Express Multi on a dry, level surface away from curtains and walls. Turn the lid handle counter-clockwise from ‘locked’ to ‘unlock’ position and remove lid. Ensure the unit and all parts, including the removable cooking bow...
Page 13 - The ‘SAUTÉ’ setting will
12 How to Sauté - Using the Sauté Setting With food in the cooking bowl and the lid remaining off, press the SAUTÉ button on the digital display panel. Press the START/CANCEL button to commence cooking. Three “Beeps” will be heard and the red lights on both the SAUTÉ and the START/CANCEL buttons wil...
Page 14 - The cooking time countdown will only commence once the
13 How to Pressure Cook - Using the White Rice, Brown Rice, Soup/Curry, Pot Roast Settings Lock the lid into place by turning clockwise from ‘unlock’ to ‘locked’ position. An ascending chime will be heard. Move pressure release valve to the ‘sealing’ position. Select the desired pressure cooking set...
Page 15 - done stirring – cooking will recommence.
14 How to Slow Cook - Using the Slow Cook Setting Lock the lid into place by turning clockwise from ‘unlock’ to ‘locked’ position. An ascending chime will be heard (see Note below). Press the ‘SLOW COOK’ button on the digital display panel. 8 hours will display. Press the ‘START/CANCEL’ button to co...
Page 16 - Using Your Kambrook Pressure Express Multi; Before First Use
15 Using Your Kambrook Pressure Express Multi Before First Use Remove and safely discard any packaging material and promotional labels before using the Pressure Express Multi for the first time.To eliminate a choking hazard for young children, remove and safely discard the protective cover fitted to...
Page 17 - Cooking Methods; Do not use; Functions of Your Kambrook Pressure
16 7. Remove and wash the removable cooking bowl in warm soapy water, rinse and dry thoroughly. Make sure there is no unwanted material on the exterior surface of the removable cooking bowl. Replace the bowl into the pressure cooker housing. The removable cooking bowl must sit flat on the temperatur...
Page 18 - Digital Pre-Set Settings; The Digital Control Panel has 6 settings; Setting
17 NOTE: If the pressure release valve is not manually moved to the ‘venting’ position when cooking is finished, the steam will vent slowly out of the pressure release valve automatically. This ‘slow release’ method is recommended for recipes containing larger quantities of liquid such as soups and ...
Page 19 - Using the Set Timer Function; The Set Timer must be set before the; Using the Start/Cancel
18 Using the Set Timer Function The Pressure Express Multi offers suggested pre-set cooking times against each pressure cooking setting (White Rice, Brown Rice, Soup/Curry, and Pot Roast). The Set Timer allows you to manually adjust the length of these pre-set cooking times. The Set Timer must be se...
Page 21 - Pressure Express Multi Cooking Guide; Using the Pressure Express
20 Pressure Express Multi Cooking Guide Using the Pressure Express Multi 1. Make sure that the power outlet is switched off and that the power cord is unplugged from the power outlet before starting. WARNING: Always check the pressure release valve and lid lock actuator for clogging before use and c...
Page 25 - White Rice Setting; MIN – 1 cup | MAX – 10 cups
24 White Rice Setting Pre-set cooking display time: 12min* MIN – 1 cup | MAX – 10 cups Uncooked Rice Measures Water Measures Cooked Rice Measures 1 cup 1.5 cups 2 cups 2 cups 3 cups (up to the ‘2’ marking inside the bowl) 4 cups 4 cups 5 cups (up to the ‘4’ marking inside the bowl) 8 cups 6 cups 8.5...
Page 26 - Brown Rice Setting; Do not use the
25 4. Once the selected cooking timer has counted down and the cooking process has completed, use the heat resistant serving spoon or an oven mitt to turn the pressure release valve to the ‘venting’ position. This will cause the Pressure Express Multi to release the extra steam that has built up ins...
Page 29 - Pot Roast Setting; Ensure that the minimum
28 Dried Legumes, Beans & Pulses Rather than soaking dried legumes, beans and pulses overnight, you can place them straight into the Pressure Express Multi. It is recommended that dried legumes, beans and pulses need to be cooked with the ratio 1:2 water. Legumes, beans and pulses are a perfect ...
Page 31 - Using the Sauté Setting
30 1. If sautéing is recommended before cooking on the Pot Roast setting, refer to the ‘Using the Sauté Setting’ on this page. 2. Add 250ml of stock or water to the base of the removable cooking bowl and place the ‘TRIVET’ into the centre of the bowl (refer to ‘Using the Stainless Steel Trivet’ sect...
Page 32 - Slow Cook Setting
31 4. Add the recommended ingredients as per recipe guidelines to the removable cooking bowl and stir to combine. Depending on the quantity of food to be cooked, you may have to sauté in small batches. 5. Once all the ingredients have sautéed or sealed to the required level or as per recipe guidelin...
Page 34 - Trouble Shooting Guide; Problem
33 Trouble Shooting Guide Problem Possible Reason Solution Difficulty closing the lid • Gasket not positioned properly • Lid locking pin or lid lock actuator is jammed • Ensure that gasket is in position properly (page 15) • Push the pin or actuator in and out gently and try again Leakage from the l...
Page 35 - Care, Cleaning and Storage
34 Care, Cleaning and Storage 1. Before cleaning, ensure the Pressure Express Multi is switched off at the power outlet and unplugged. Ensure the unit is fully cooled prior to commencing cleaning. 2. Wash the removable cooking bowl with warm soapy water and a clean soft cloth or sponge. Rinse with c...
Page 37 - Storage
36 IMPORTANT: All safety locking lid parts and pressure release valve and cover must be reassembled correctly to ensure safety as well as optimal performance of your Pressure Express Multi. IMPORTANT: Ensure that both the appliance electrical connector and the appliance inlet are completely dry befo...
Page 38 - Handy Hints for Pressure Cooking; Do’s
37 Handy Hints for Pressure Cooking Do’s • Always thaw frozen meat and poultry before cooking. 1. Use dry oven mitts when lifting the removable cooking bowl after cooking. • Use tongs or the plastic spoon provided to release the pressure release valve - do not use your fingers. • Always store the Pr...
Page 39 - Recipes; Times in recipes are; Honey Baked Pumpkin Risotto
38 Recipes Pressure cooking and slow cooking offer very similar results and are both great for tender results in cheaper cuts of meat. To pressure cook using a slow cooking recipe, simply drop the liquid content of the recipe somewhat as cooking under pressure creates more condensation (liquid). In ...
Page 40 - Chicken and Pesto Risotto; Vanilla Rice Pudding
39 Chicken and Pesto Risotto Serves 8 3 tbsp olive oil1 large brown onion peeled, thinly sliced2 cloves garlic peeled, minced500g chicken breast, thinly sliced6 cups chicken stock3 cups Arborio rice ½ cup basil pesto 1 ⁄ 4 cup toasted pine nuts 1 cup boiling water100g grated parmesan to serve ½ bunc...
Page 41 - Brown Rice Salad; Smoked Ham and Split Pea Soup
40 Brown Rice Salad Serves 8 4 cups brown rice2 tsp turmeric4 cups water1 cup rocket lettuce, washed, dried1 red onion, peeled, thinly sliced 1 ⁄ 4 cup toasted pine nuts 1 ⁄ 2 cup sultanas 1 red apple, quartered, thinly slicedJuice of 1 lemon2 tbsp extra virgin olive oil 1. Place the rice, turmeric ...
Page 42 - Green Curry Pumpkin Soup
41 Thai Sweet Potato Soup with Coriander Pesto Serves 6-8 400ml can coconut milk (do not shake)2 tbsp mild red curry paste1.5kg sweet potatoes, peeled and cut into 5cm pieces1 litre chicken stockLime wedges, to serve Coriander Pesto: 1 cup coriander leaves 1 ⁄ 4 cup blanched almonds 1 small red shal...
Page 43 - Thyme Stew; Satay Beef
42 Red Wine, Beef, Mushroom and Thyme Stew Serves 8 3 tbsp olive oil6 large French shallots, peeled, sliced3 cloves garlic, minced40g butter8 rindless bacon slices, thickly sliced1kg chuck steak, diced ½ cup flour 350ml dry red wine 2 tsp brown sugar2 tbsp tomato paste400g button mushrooms1 cup beef...
Page 44 - Sesame Chicken Wings
43 Sesame Chicken Wings Serves 8 1 ⁄ 2 cup soy sauce 2 tbsp honey1 tbsp sesame oil1 tbsp kecap manis2 tsp rice wine vinegar2 tbsp sweet chilli sauce2 x small Birdseye chillies, minced2 x cloves garlic, minced2kg chicken wings or chicken nibblets2 tbsp plain flour2 tbsp cold water2 tbsp sesame seeds,...
Page 45 - Massaman Curry
44 Massaman Curry Serves 8 500g diced lamb500g diced chuck steak270g can coconut cream1 cinnamon stick2 fresh kaffir lime leaves500g baby chat potatoes, halved1 tbsp brown sugar2 whole star anise2 teaspoon fish sauce, or to taste2 tsp arrowroot (only if needed)Fresh coriander, to serve Curry Paste: ...
Page 46 - Butter Chicken; Spicy Tomato Sauce and Meatballs
45 Butter Chicken Serves 6-8 2 tbsp olive oil1 tbsp ginger, minced2 cloves garlic, chopped3 small onions, sliced thinly ¼ tsp cayenne pepper, ground 2 tsp paprika, ground1 tsp ground coriander 2 tsp turmeric, ground2 tsp cumin, ground2 tsp garam masala1 cinnamon stick ¼ cup tomato paste 1.5kg chicke...
Page 49 - Corned Beef; Lamb Shanks
48 Corned Beef Serves 6 2 litres water1 tsp black peppercorns1 tbsp brown sugar1 tbsp rock salt2 tbsp white vinegar1 bay leaf1kg corned beef silverside1 cup white sauce, to serve 1. Add the water, peppercorns, sugar, salt, vinegar and bay leaf into the removable cooking bowl and stir to combine. Add...
Page 50 - Whole Chicken Stock; Beef Ragu
49 Whole Chicken Stock Makes 2 litres 3 tbsp olive oil2 brown onions, diced3 cloves garlic, peeled, thinly sliced4 sticks celery, roughly chopped4 carrots, peeled, roughly chopped1 tbsp mixed peppercorns2 tsp rock salt2 litres water1.4kg free range whole chicken 1. Select the ‘SAUTÉ’ setting on the ...
Page 51 - Moroccan Chicken; Tomato Passata
50 Moroccan Chicken Serves 8 2 tbsp olive oil1 brown onion, diced2 cloves garlic, peeled, minced1.5 kg chicken thigh fillets, trimmed340g jar roasted capsicum, cut into strips, drained360s jar green pitted olives, drained400g can chick peas, drained1 cup tomato passata3 cups vegetable stock1 bunch f...
Page 52 - Vegetable Green Curry
51 Vegetable Green Curry Serves 8 2 potatoes, diced into 2cm pieces1 cup dried chick peas (washed)270ml can coconut milk230g can bamboo shoots, drained, and sliced230g water chestnuts, drained, halved125g baby corn 1 ⁄ 2 cauliflower, florets only Cooked rice, to serveFresh coriander, to serve Curry ...