Page 2 - Table of contents
2 Dear customer! Thank you for purchasing our product. For safety, it is strongly recommended to read this manual carefullybefore connecting, operating and/or adjusting the product and keep the manual for reference in the future. Table of contents Table of contents .....................................
Page 3 - Important safeguards
3 Important safeguards Using the device at temperature below -10º may cause the breakage of the device. Before using pleaseheat up the passenger compartment to the recommended temperature!Disconnect the vehicle's negative battery terminal while mounting and connecting the unit.When replacing the fus...
Page 4 - Accessories
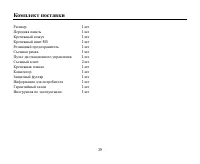
4 Accessories Receiver 1 pc Front panel 1 pc Mounting Bracket (Half Sleeve) 1 pc Mounting Screw M5 1 pc Rubber 1 pc Removable Trim Ring equipped on the unit 1 pcRemote Control 1 pc Release key 2 pcs Mounting strap 1 pc Connector 1 pc Protective case 1 pc Customer information 1 pc Warranty card 1 pc ...
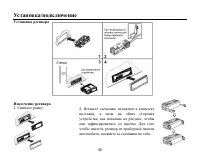
Page 5 - Installation/connection; Installation of the unit; Take out the Outer Trim Frame
5 Installation/connection Installation of the unit Detach the unit 1. Take out the Outer Trim Frame 2. Insert the keys supplied to theunit at both sides of the unituntil they click. Pulling the keysmakes it possible to remove theunit from dashboard.
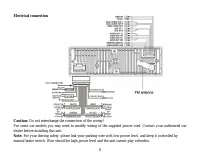
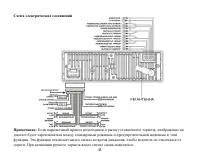
Page 6 - Electrical connection; Do not interchange the connection of the wiring!
6 Electrical connection Caution: Do not interchange the connection of the wiring! For some car models you may need to modify wiring of the supplied power cord. Contact your authorized cardealer before installing this unit. Note: For your driving safety, please link your parking wire with low power l...
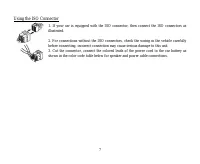
Page 7 - Using the ISO Connector
7 Using the ISO Connector 1. If your car is equipped with the ISO connector, then connect the ISO connectors asillustrated. 2. For connections without the ISO connectors, check the wiring in the vehicle carefullybefore connecting, incorrect connection may cause serious damage to this unit.3. Cut the...
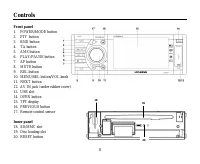
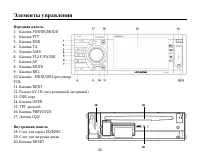
Page 8 - Controls; Front panel
8 Controls Front panel 1. POWER/MODE button2. PTY button3. BND button4. TA button5. AMS button6. PLAY/PAUSE button7. AF button8. MUTE button9. REL button10. MENU/SEL button/VOL knob11. NEXT button12. AV IN jack (under rubber cover)13. USB slot14. OPEN button15. TFT display16. PREVIOUS button17. Remo...
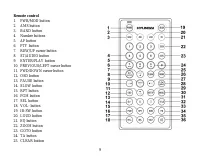
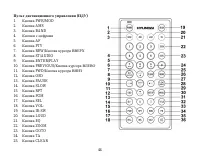
Page 9 - Remote control
9 Remote control 1. PWR/MOD button2. AMS button3. BAND button4. Number buttons5. AF button6. PTY button7. REW/UP cursor button8. ST/AUDIO button9. ENTER/PLAY button10. PREVIOUS/LEFT cursor button11. FWD/DOWN cursor button12. OSD button13. PAUSE button14. SLOW button15. RPT button16. PGM button17. SE...
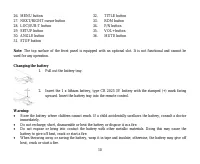
Page 10 - Changing the battery
10 26. MENU button 32. TITLE button 27. NEXT/RIGHT cursor button 33. RDM button 28. LOC/SUB-T button 34. P/N button 29. SETUP button 35. VOL+ button 30. ANGLE button 36. MUTE button 31. STOP button Note: The top surface of the front panel is equipped with an optional slot. It is not functional and c...
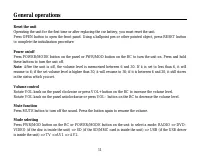
Page 11 - General operations; Reset the unit
11 General operations Reset the unit Operating the unit for the first time or after replacing the car battery, you must reset the unit.Press OPEN button to open the front panel. Using a ballpoint pen or other pointed object, press RESET buttonto complete the initialization procedure. Power on/off Pr...
Page 14 - Radio operations; Band selection; To store a station manually:
14 Radio operations Note: RDS (Radio Data System) service availability varies with areas. Please understand if RDS service is not available in your area, the following service is not available, either. Band selection Press BAND button on the RC or on the touchable screen or BND button on the panel t...
Page 15 - reception are stored automatically.; Note; and replaced with the new one.; Preset scan function
15 - Press and hold AMS button on the panel, on the RC or on the touchable screen. The stations with good reception are stored automatically. Note : If you store a station in a preset memory, which already has a station, the current station will be cleared and replaced with the new one. To recall a ...
Page 16 - Other touch screen operations; brightness while traveling at night.; RDS function
16 Other touch screen operations Press this button to turn on/off the screen backlight. The function can be used to change the screen brightness while traveling at night. Press this button to display the General Setup menu. RDS function There are the PI, PS, TP, PTY, TA, AF.PI: Program Identificatio...
Page 17 - TA function
17 CHILDREN, SOCIAL, RELIGION, PHONE IN, TRAVEL, LEISURE, JAZZ, COUNTRY, NATION M,OLDIES, FOLK M, DOCUMENT, TEST, ALARM. After selecting program type for 3 seconds, the unit will search for a station in the selected program typeautomatically.2. The radio starts to search corresponding PTY informatio...
Page 18 - TV tuner operations; Automatic/Manual store; Selecting channel
18 TV tuner operations Automatic/Manual tuningAutomatic tuning: Press PREVIOUS or NEXT buttons on the panel, PREVIOUS or NEXT buttons or the RC or SEEK+/SEEK- buttons on the touchable screen to start auto searching the channel downward or upward. Manual tuning: Press and hold repeatedly PREVIOUS or ...
Page 19 - Selecting TV system
19 Selecting TV system Press repeatedly SECAM-DK button on the touchable screen (above the channel number), BND button on theRC or BAND button on the panel to select a TV system. Note: When the TV channel picture is being broadcasted, touch the screen to return to the TV mode menu.
Page 21 - Discs for playback
21 Discs for playback This unit can play disc types: DVD/DVD±R/DVD±RW/CD/CD-R/CD-RW.Compatible with formats: DVD/SVCD/VCD/HDCD/MP3/WMA/CDDA/Picture-CD/Photo CD/JPEG.The following file types are supported:Audio files: MP3 (*.mp3) WMA (*.wma)Video files: MP4 (*.avi, DIVX3.11/4.0/5.0/6.0 and XVID) MPEG...
Page 22 - Loading a disc; a disc into before auto reloading, this can damage disc.; Inserting the SD/MMC card and USB device; This unit supports USB drivers and memory cards with up to 2 Gb.
22 Loading a disc Turn the power on, Press OPEN button on the panel to open the front panel. Insert the disc with the printed sidefacing upward into the slot. Close the front panel. The disc will play automatically.To eject the disc, first press OPEN button to open the front panel. Press EJECT ( ) b...
Page 23 - resumes normal playback.; Repeat playback
23 Stop playback During playback press STOP button on the RC to stop playback. Press PLAY/PAUSE button on the panel orENTER/PLAY button on the RC to start playback for the place where it was stopped. Press STOP button twiceto completely stop playback. Now playback will be started from the beginning ...
Page 25 - On screen display
25 Menu navigation (for DVD only) Press TITLE button on the RC to activate the disc title list on the screen. Press UP/DOWN cursor buttons toselect the desired title. Press ENTER/PLAY button to confirm the selected item and start playing. Program playing (for CD/VCD/DVD) Press PGM button on the RC t...
Page 27 - MP3 overview; Notes on creating your own CD-R or CD-RW containing MP3 files:
27 MP3 overview Notes on MP3: MP3 is short for MPEG Audio Layer 3 and refers to an audio compression technology standard.This product allows playback of MP3 files on CD-ROM, CD-R or CD-RW discs.The unit can read MP3 files written in the format compliant with ISO 9660. However it does not supportthe ...
Page 29 - System setup; Touching the item on the screen also performs same operation.; General setup page; : When the unit connects to the normal TV set, the wide-
29 System setup 1. - Press SETUP button on the RC to display the setup screen.2. - Use LEFT/RIGHT cursor buttons to select the desired menu: General setup, Audio setup, Preference setup, Password setup, Exit the menu. 3. - Press DOWN button to enter the menu.4. - Use UP/DOWN cursor buttons to select...
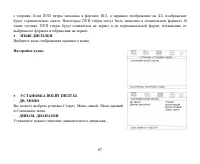
Page 30 - You can set up the Dolby digital function.; DOLBY DIGITAL SETUP; Select the provided option to change the Dynamic range setting.
30 Some DVD titles may be recorded in special formats. In such cases, the DVD titles will always appear on thescreen in their original format, regardless of which TV display selected format. OSD LANGUAGE Select on-screen display language. Audio setup page You can set up the Dolby digital function. D...
Page 32 - Select this item to exit the setup menu.
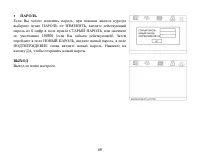
32 PASSWORD When the password mode is ON you can change the password. SelectPASSWORD => CHANGE. Use the cursor buttons to select the desiredfield. In the OLD PASSWORD field insert the old password or 136900(if you forget the old one).In NEW PASSWORD field insert the new password. Insert it again ...
Page 33 - Cleaning the cabinet and panel
33 Handling discs Dirty, scratched or warped discs may cause skip ping or noise.Handle the disc only by the edges. To keep clean do not touch its surface.Discs should be stored in their cases after use to avoid scratches.Do not expose discs to direct sunlight, high humidity, high temperature or dust...
Page 34 - Troubleshooting guide; Symptom
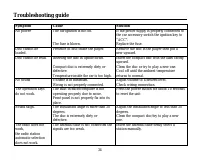
34 Troubleshooting guide Symptom Cause Solution No power The car ignition is not on. The fuse is blown. If the power supply is properly connected tothe car accessory switch the ignition key to“ACC”.Replace the fuse. Disc cannot beloaded. Presence of disc inside the player. Remove the disc in the pla...
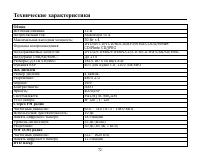
Page 35 - Specification; General; Maximum power output:; TFT display; inches; FM Stereo Radio; Preset memory stations:; DVD player
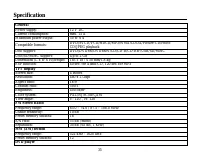
35 Specification General Power supply: 12 V DC Current consumption: max. 15 A Maximum power output: 50 W x 4 Compatible formats: DVD/SVCD/VCD/HDCD/MP3/WMA/CDDA/Picture-CD/PhotoCD/JPEG playback Disc support: DVD/DVD±R/DVD±RW/CD/CD-R/CD-RW/USB/SD/MMC USB/SD/MMC support: Up to 2 Gb Dimensions (L x W x ...
Page 36 - Line out
36 S/N ratio: More than 70 dB (1 kHz) Dynamic range: More than 70 dB (1 kHz) Distortion: Less than 0.2% Line out Output: 4 channel RCA line-out (2V) Specifications are subject to change without notice. Mass and dimension are approximate.
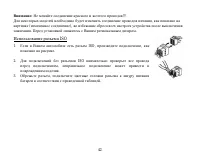
Page 42 - ISO
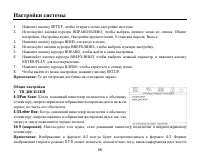
42 : !!! , ( ), . . ISO 1. ISO, , . 2. ISO , . 3. , .
Page 49 - System; “adjustment succeed” («; Exit
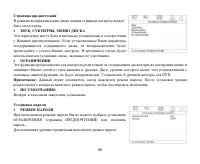
49 . , . System MENU/SEL ) : Clock Sys: (12 /24 ). Key Beep: , . Local Area: . Clock Adjust: . , - , . Touch Adjust: , . 2 ) “adjustment succeed” (« »). Bass, subwoofer, treble frequency: , . Exit .
Page 52 - RDS; AF
52 , . . . RDS : PI, PS, TP, PTY, TA, AF, DATA. PI: . PS: – . TP: – , . TA: – . AF: – , . AF ( ) AF , ( ), . “AF” . . : , . “Alarm”, .
Page 53 - PTY
53 PTY PTY , PTY. 1. NONE PREVIOUS/NEXT , : NEWS, AFFAIRS, INFO, SPORT, EDUCATE, DRAMA, CULTURE, SCIENCE, VARIED, POP, ROCK, EASY M, LIGHT M, CLASSIC, OTHER M,WEATHER, FINANCE, CHILDREN, SOCIAL, RELIGION, PHONE IN, TRAVEL, LEISURE, JAZZ,COUNTRY, NATION M, OLDIES, FOLK M, DOCUMENT, TEST, ALARM. , , ,...
Page 60 - ANGLE; DVD
60 RPT , . . ( CD/VCD/MP3) RDM, . , . ( DVD/VCD ) ZOOM . : 2X, 3X, 4X, 1/2X, 1/3X, 1/4X, . . DVD P/N , : NTSC/PAL/ . ( DVD ) DVD- , ANGLE . , . ( DVD ) DVD- , ST/AUDIO , .
Page 61 - TITLE
61 ( VCD ) ST/AUDIO, : Mono Left ( ) => Mono Right ( ) => Mix Mono ( . ) => Stereo ( ). ( DVD ) LOC/SUB-T , . DVD TITLE , . . . ENTER/PLAY, . ( CD/DVD/VCD) PGM , . , . ENTER/PLAY . . , ENTER/PLAY. CLEAR, . . , , , . ENTER/PLAY, PGM.
Page 67 - DOLBY DIGITAL
67 . DVD 16:3, 4:3, . DVD . , DVD , . . DOLBY DIGITAL - . , , . - . .
Page 72 - ESP; FM
72 : 12 : 15 : 50 4 : DVD/SVCD/VCD/HDCD/MP3/WMA/CDDA/Picture-CD/Photo CD/JPEG : DVD/DVD±R/DVD±RW/CD/CD-R/CD-RW/USB/SD/MMC USB/SD/MMC: 2 ( )/ : 183 187 50 /1,8 ESP 40 CD, 120 3 : 4 : 480 272 : 16:9 : 500:1 : 400 2 : PAL/NTSC/SECAM : : 120 0 , : 120 0 FM : 65.0 – 74.0 / 87.5 – 108.0 : 10 : 18 : 55 ( )...