Husqvarna 5521P - User Manual

Husqvarna 5521P – User Manual, read for free online in PDF format. We hope this helps you resolve any issues you may have. If you have further questions, please contact us through the contact form.


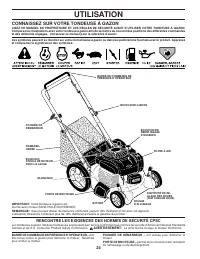
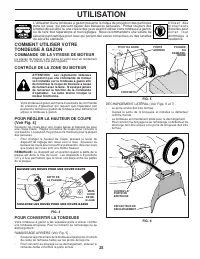
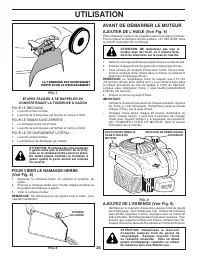
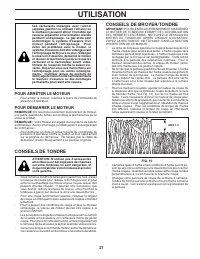
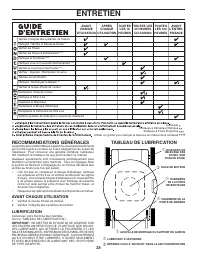
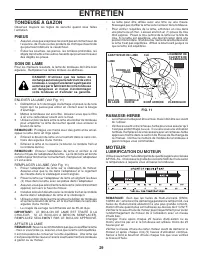
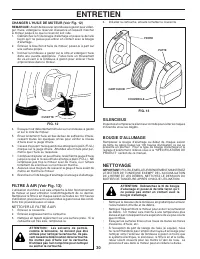
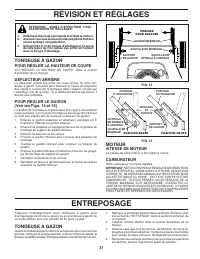
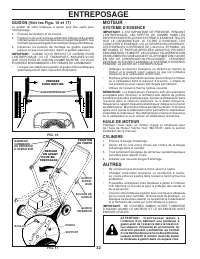
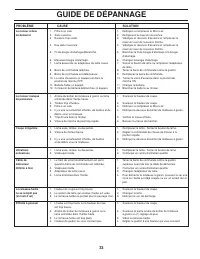


Table of Contents:
- Page 2 – SAFETY RULES; II. GENERAL OPERATION
- Page 3 – TABLE OF CONTENTS; IV. SAFE HANDLING OF GASOLINE
- Page 4 – ASSEMBLY; TO RE MOVE LAWN MOW ER FROM CAR TON; HOW TO SET UP YOUR LAWN MOW ER; IMPORTANT; CUSTOMER RESPONSIBILITIES
- Page 5 – NOTE; TO INSTALL ATTACHMENTS
- Page 6 – KNOW YOUR LAWN MOWER; OPERATOR PRESENCE CONTROL BAR –; STARTER HANDLE –; MULCHER DOOR –; OPERATION; MEETS CPSC SAFETY REQUIREMENTS
- Page 7 – TO CONVERT MOWER; HOW TO USE YOUR LAWN MOWER; ENGINE SPEED
- Page 8 – BEFORE STARTING ENGINE
- Page 9 – TO STOP ENGINE
- Page 10 – MAINTENANCE; LUBRICATION CHART; BEFORE EACH USE
- Page 11 – LAWN MOWER; TIRES; GRASS CATCHER; ENGINE; LUBRICATION
- Page 12 – MUFFLER; CLEANING
- Page 13 – TO ADJUST CUTTING HEIGHT; SERVICE AND ADJUSTMENTS; Make sure the blade and all moving parts have; STORAGE
- Page 14 – FUEL SYSTEM; ENGINE OIL; OTHER
- Page 15 – TROUBLESHOOTING POINTS
- Page 20 – II. FONCTIONNEMENT GÉNÉRAL; RÈGLES DE SÉCURITÉ
- Page 21 – SOMMAIRE; III. FONCTIONNEMENT DANS LES PEN TES; V. ENTRETIEN GÉNÉRALE
- Page 22 – MONTAGE; RESPONSABILITÉS DU CLIENT
- Page 23 – INSTALLER LES ACCESSOIRES
- Page 24 – CONNAISSEZ SUR VOTRE TONDEUSE À GAZON; UTILISATION; RENCONTRE LES EXIGENCES DES NORMES DE SÉCURITÉ CPSC
- Page 25 – COMMANDE DE LA VITESSE DE MOTEUR; POUR CONVERTIR LA TONDEUSE
- Page 26 – ÉTAPES FACILES À SE RAPPELER EN; AVANT DE DÉMARRER LE MOTEUR
- Page 27 – POUR ARRÊTER LE MOTEUR; CONSEILS DE TONDRE
- Page 28 – RECOMMANDATIONS GÉNÉRALES; AVANT CHAQUE UTILISATION; TABLEAU DE LUBRIFICATION; ENTRETIEN
- Page 29 – TONDEUSE À GAZON; PNEUS; MOTEUR; LUBRIFICATION DU MOTEUR
- Page 30 – NETTOYAGE
- Page 31 – RÉVISION ET RÉGLAGES; POUR RÉGLER LA HAUTEUR DE COUPE; VITESSE DE MOTEUR; ENTREPOSAGE
- Page 32 – SYSTÈME D’ESSENCE; HUILE DE MOTEUR; AUTRES
- Page 33 – GUIDE DE DÉPANNAGE
- Page 38 – SERVICE NOTES
- Page 39 – REMARQUES D’ENTRETIEN
English/French
115 63 38-32 Rev. 1
Operator’s Manual
Manuel de L’Opérateur
5521P / 961330021
Gasoline containing up to 10% ethanol (E10) is accept-
able for use in this machine. The use of any gasoline ex-
ceeding 10% ethanol (E10) will void the product warranty.
Vous pouvez utiliser de l’essence contenant jusqu’à
10 % d’éthanol (E10) avec cet appareil. L’utilisation
d’essence contenant plus de 10 % d’éthanol annulera
la garantie du produit.
Please read the operator's manual carefully and make sure
you understand the instructions before using the machine.
Lisez très attentivement et soyez certain de comprende
ces instructions avant d’utiliser cette machine.
"Loading the manual" means you need to wait until the file loads and becomes available for online reading. Some manuals are very large, and the time they take to appear depends on your internet speed.
Was this manual helpful?
About this manual
- Brand
- Husqvarna
- Model
- 5521P
- Document type
- User Manual
- Language(s)
- English, French
- Pages
- 40
- File size
- 954.3 KB
- Format
Summary
2 Look for this symbol to point out im- por tant safety precautions. It meansCAUTION!!! BE COME ALERT!!! YOUR SAFE TY IS IN VOLVED. WARNING: In order to prevent ac ci den- tal starting when setting up, trans port- ing, ad just ing or making repairs, always dis con nect spark plug wire and place wire...
3 TABLE OF CONTENTS SAFETY RULES ......................................................... 2-3PRODUCT SPECIFICATIONS ....................................... 4CUSTOMER RESPONSIBILITIES ................................. 4ASSEMBLY ................................................................. 4-5OPE...
4 ASSEMBLY Read these instructions and this man u al in its entirety before you attempt to assemble or operate your new lawn mow er. IMPORTANT : THIS LAWN MOWER IS SHIPPED WITH- OUT OIL OR GASOLINE IN THE ENGINE. Your new lawn mower has been as sem bled at the factory with the ex cep tion of those p...
Ask a question
Related manuals
Popular Husqvarna Other
More Husqvarna Other models
 Husqvarna 4210-GXP Manual
 Husqvarna 4421-G/GX/GXL Manual
 Husqvarna 5021 E Manual
 Husqvarna 5521 CHV 96143000106 Manual
 Husqvarna 5521BBC Manual
 Husqvarna 5521CHV Manual
 Husqvarna 5521RS Manual
 Husqvarna 5524SE Manual
 Husqvarna 5524ST Manual
 Husqvarna 5524STE Manual
 Husqvarna 5525PW Manual
 Husqvarna 6021P Manual