Page 3 - Contents
3 Contents Important warnings 4 Electrical connection 12 Introducing the appliance 13 Accessories 14 Technical specifications 15 Installation of appliance 15 Control panel 21 Using the oven 23 Using the grill 24 Using the chicken roasting 24 Program types 25 Cooking recommendations 26 Cooking table ...
Page 10 - type ‘’Y’’
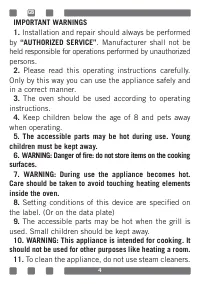
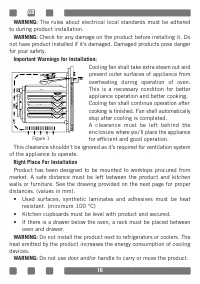
10 11. The rear surface of the oven also heats up when the oven is operated. Electrical connections shall not touch the rear surface, otherwise the connections may be damaged. 12. Do not tighten the connecting cables to the oven door and do not run them over hot surfaces. If the cord melts, this may...
Page 12 - Electrical Connection; to manufacturer instructions and by an authorized service.
12 Electrical Connection This oven must be installed and connected to its place correctly according to manufacturer instructions and by an authorized service. Appliance must be installed in an oven enclosure providing high ventilation. Electrical connections of the appliance must be made only via so...
Page 13 - INTRODUCING THE APPLIANCE
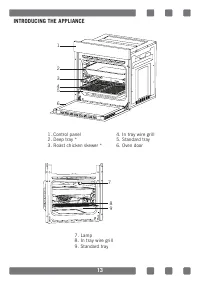
13 INTRODUCING THE APPLIANCE 1. Control panel 4. In tray wire grill 2. Deep tray * 5. Standard tray 3. Roast chicken skewer * 6. Oven door 7. Lamp8. In tray wire grill9. Standard tray 1 2 34 5 6 7 8 9
Page 15 - Technical Specifications; Specifications; INSTALLATION OF APPLIANCE; It is customer's responsibility to prepare the location the
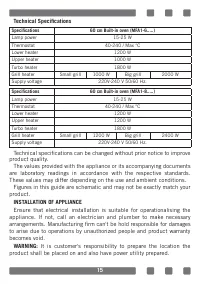
15 Technical Specifications Specifications 60 cm Built-in oven (MFA1-6.....) Lamp power 15-25 W Thermostat 40-240 / Max ° C Lower heater 1200 W Upper heater 1000 W Turbo heater 1800 W Grill heater Small grill 1000 W Big grill 2000 W Supply voltage 220V-240 V 50/60 Hz. Specifications 60 cm Built-in o...
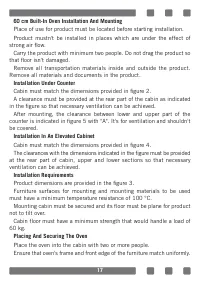
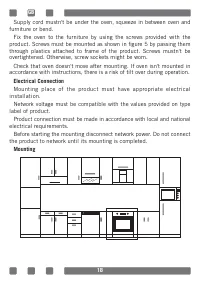
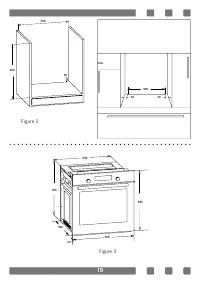
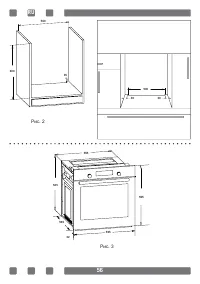
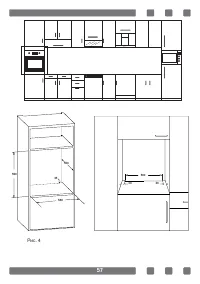
Page 17 - 0 cm Built-In Oven Installation And Mounting; Remove all materials and documents in the product.; Installation Under Counter; in the figure so that necessary ventilation can be achieved.; Installation In An Elevated Cabinet; must have a minimum temperature resistance of 100 °C.; Placing And Securing The Oven
17 60 cm Built-In Oven Installation And Mounting Place of use for product must be located before starting installation. Product mustn't be installed in places which are under the effect of strong air flow. Carry the product with minimum two people. Do not drag the product so that floor isn't damaged...
Page 21 - CONTROL PANEL; The control panel above is only for illustration purposes.
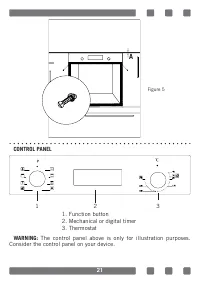
21 CONTROL PANEL WARNING: The control panel above is only for illustration purposes. Consider the control panel on your device. A Figure 5 1. Function button2. Mechanical or digital timer3. Thermostat 1 2 3
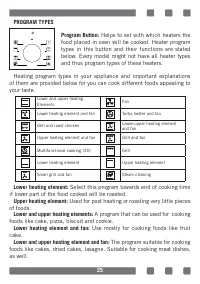
Page 26 - Turbo heater and fan:; Suitable for baking and roasting. Keep heat setting; COOKING RECOMMENDATIONS; Oven must be preheated for 7-10 minutes before placing the
26 Grill: Grill cooker is used for grilling meat like foods such as steak, sausage and fish. While grilling, tray should be placed in the lower rack and water must be placed in it. Turbo heater and fan: Suitable for baking and roasting. Keep heat setting lower than "Lower and Upper Heater" p...
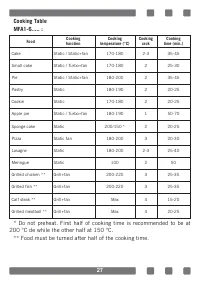
Page 27 - * Do not preheat. First half of cooking time is recommended to be at
27 Cooking Table MFA1-6..... : Food Cooking function Cooking temperature (°C) Cooking rack Cooking time (min.) Cake Static / Static+fan 170-180 2-3 35-45 Small cake Static / Turbo+fan 170-180 2 25-30 Pie Static / Static+fan 180-200 2 35-45 Pastry Static 180-190 2 20-25 Cookie Static 170-180 2 20-25 ...
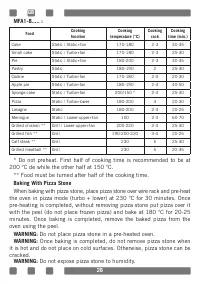
Page 28 - Baking With Pizza Stone; Do not place pizza stone in a pre-heated oven.
28 MFA1-8..... : Food Cooking function Cooking temperature (°C) Cooking rack Cooking time (min.) Cake Static / Static+fan 170-180 2-3 30-35 Small cake Static / Turbo+fan 170-180 2-3 25-30 Pie Static / Static+fan 180-200 2-3 30-35 Pastry Static 180-190 2 25-30 Cookie Static / Turbo+fan 170-180 2-3 20...
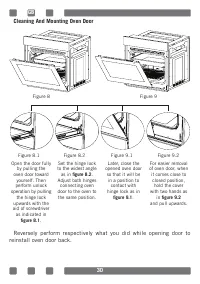
Page 30 - Cleaning And Mounting Oven Door; reinstall oven door back.
30 Cleaning And Mounting Oven Door Reversely perform respectively what you did while opening door to reinstall oven door back. Figure 8 Figure 8.1 Figure 8.2 Figure 9.1 Figure 9.2 Figure 9 Open the door fully by pulling the oven door toward yourself. Then perform unlock operation by pulling the hing...
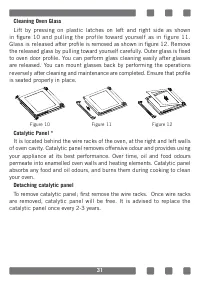
Page 31 - Cleaning Oven Glass; Lift by pressing on plastic latches on left and right side as shown; Detaching catalytic panel
31 Cleaning Oven Glass Lift by pressing on plastic latches on left and right side as shown in figure 10 and pulling the profile toward yourself as in figure 11. Glass is released after profile is removed as shown in figure 12. Remove the released glass by pulling toward yourself carefully. Outer gla...
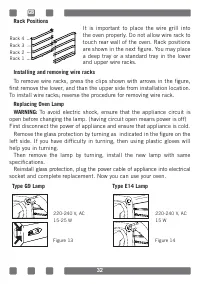
Page 32 - To avoid electric shock, ensure that the appliance circuit is; Type G9 Lamp
32 Rack Positions It is important to place the wire grill into the oven properly. Do not allow wire rack to touch rear wall of the oven. Rack positions are shown in the next figure. You may place a deep tray or a standard tray in the lower and upper wire racks. Installing and removing wire racks To ...
Page 33 - TROUBLESHOOTING; You may solve the problems you may encounter with your product by; Check Points; below and try out the suggestions.
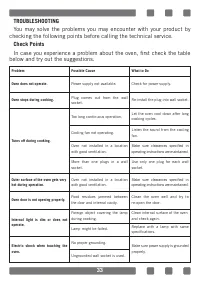
33 TROUBLESHOOTING You may solve the problems you may encounter with your product by checking the following points before calling the technical service. Check Points In case you experience a problem about the oven, first check the table below and try out the suggestions. Problem Possible Cause What ...
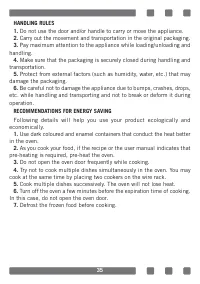
Page 35 - RECOMMENDATIONS FOR ENERGY SAVING
35 HANDLING RULES1. Do not use the door and/or handle to carry or move the appliance. 2. Carry out the movement and transportation in the original packaging. 3. Pay maximum attention to the appliance while loading/unloading and handling. 4. Make sure that the packaging is securely closed during hand...
Page 38 - Содержание
38 Содержание Важные примечания 39 Электрическое соединение (подключение) 49 Описание прибора 50 Аксессуары 51 Технические характеристики 52 Установка прибора 52 Панель управления 58 Использование утапливаемых переключателей 59 Эксплуатация 60 Использование гриля 61 Использование вертела 61 Режимы п...
Page 39 - животным приближаться к прибору, когда он работает.; ПРЕДУПРЕЖДЕНИЕ! Во время работы духовка; нагревается. Нельзя касаться внутренних элемен-
табличке. 39 ВАЖНЫЕ ПРЕДУПРЕЖДЕНИЯ 1. Установка и ремонт должны быть выполнены АВТОРИЗОВАННЫМ СЕРВИСНЫМ ЦЕНТРОМ Производитель не несет ответственности за работы, осуществляемые неофициальными сервисами. 2. Внимательно изучите данные инструкции по эксплуатации. Так вы можете безопасно и правиль-но ис...
Page 40 - приготовления без присмотра.; использовать для других целей, таких как обогрев; ПРЕДУПРЕЖДЕНИЕ! Дети до 8 лет должны
приготовления без присмотра. Дети не должны играть с обслуживание не должны без присмотра взрослых. 40 10. ПРЕДУПРЕЖДЕНИЕ: Данный прибор пред -назначен для приготовления пищи. Его нельзя использовать для других целей, таких как обогрев комнаты. 11. Не используйте пароочистители для чистки прибора. 1...
Page 42 - руками. Не тяните за шнур питания, чтобы отключить
термостойкие перчатки. воздействием лекарств и/или алкоголя. удалено или сломано. 42 26. При помещении продуктов питания в духовку или извлечении блюд из неё всегда используйте 27. Не используйте прибор в таких состояниях, Например под которые могут повлиять на вашу умственнуюдеятельность и координа...
Page 45 - Электробезопасность; эксплуатации прибора без заземления в соответствии; Если шнур питания (шнур со штепсельной вилкой); или наливания на него воды. Имеется риск поражения; ПРЕДУПРЕЖДЕНИЕ: Во избежание поражения
45 Электробезопасность 1. Подключите устройство в заземленную розетку, защищенную предохранителем, соответствующим значениям, приведенным в таблице технических характеристик. 2. Регулировка оборудования заземления должна быть выполнена квалифицированным электриком. Наша компания не несет ответственн...
Page 46 - димо обратиться к производителю, в авторизованный
- 46 8.ПРЕДУПРЕЖДЕНИЕ:Перед обслуживанием отсоедините все соединения цепи от электро- питания. 9. Не используйте порванные или поврежденные шнуры или удлинители; используйте только оригинальный шнур. 10. При подключении штепсельной вилки к розетке, убедитесь, что в розетке нет жидкости или влаги. 11...
Page 47 - типа «Y»
щему с защитой устройство к источнику нием в соответствии 47 16. Не используйте пароочистители при очистке прибора, в противном случае может возникать поражение электрическим током. 17. Прибор должен быть подключен к электросети через разделительное устройство, позволяющее отсоединить от сети все ко...
Page 48 - Целевое использование
48 Целевое использование 1. Данный прибор предназначен для использования в бытовых условиях. Коммерческое использование прибора не допускается. 2. Данный прибор можно использовать только для приготовления пищи. Его не следует использовать для других целей, таких как обогрев комнаты. 3. Данный прибор...
Page 49 - Электрическое соединение
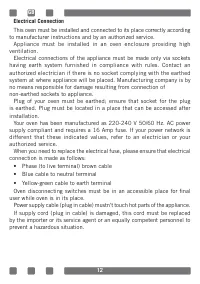
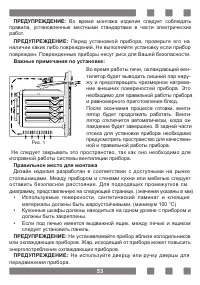
49 Электрическое соединение Установка и соединения данной печи должны выполняться уполномоченным сервисом и в соответствии с указаниями производителя. Прибор следует устанавливать в отсек для печи, обеспечивающий хорошую вентилируемость. Соединение прибора с электрической сетью следует выполнять тол...
Page 50 - ОПИСАНИЕ ПРИБОРА
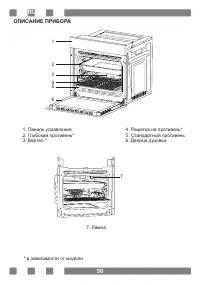
50 ОПИСАНИЕ ПРИБОРА 1. Панель управления 4. Решетка на противень* 2. Глубокий противень* 5. Стандартный противень 3. Вертел * 6. Дверца духовки 7. Лампа 1 2 3 45 6 7 RU * в зависимости от модели
Page 52 - Технические характеристики*; в целях улучшения его технических характеристик.; УСТАНОВКА ПРИБОРА; Покупатель несет ответственность за подготовку
52 Технические характеристики* Характеристики Встраиваемая духовка 60 см (до 6 функций) Мощность лампы 15-25 Вт Термостат 40-240 / Max °C Нижний нагреватель 1200 Вт Верхний нагреватель 1000 Вт Турбо нагреватель 1800 Вт Нагреватель гриля Малый гриль 1000 Вт Большой гриль 2000 Вт Напряжение 220-240 B ...
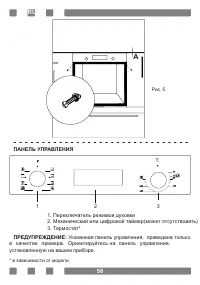
Page 58 - ПАНЕЛЬ УПРАВЛЕНИЯ; Указанная панель управления, приведена только
58 ПАНЕЛЬ УПРАВЛЕНИЯ ПРЕДУПРЕЖДЕНИЕ: Указанная панель управления, приведена только в качестве примера. Ориентируйтесь на панель управления, установленную на вашем приборе. A Рис. 5 1. Переключатель режимов духовки2. Механический или цифровой таймер(может отсутствовать)3. Термостат* 1 2 3 RU * в зави...
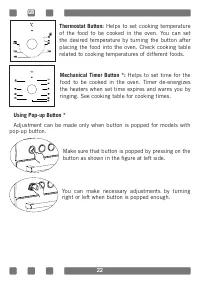
Page 59 - осуществляться; Использование утапливаемых переключателей; В моделях с выдвигающимися переключателями настройка может
осуществляться 59 Использование утапливаемых переключателей В моделях с выдвигающимися переключателями настройка может только когда ручка выдвинута. Нажмите и отпустите ручку, чтобы она выдвинулась, как показано на рисунке слева. Когда ручка выдвинута вперед, можно осуществлять необходимые переключе...
Page 62 - Режимы приготовления
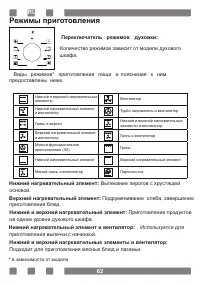
* в зависимости от модели 62 Переключатель режимов духовки: шкафа. Виды режимов* приготовления пищи и пояснения к ним предоставлены ниже. Нижний нагревательный элемент: Выпекание пирогов с хрустящей основой. Верхний нагревательный элемент: Подрумянивание хлеба, завершение приготовления блюд. Нижний ...
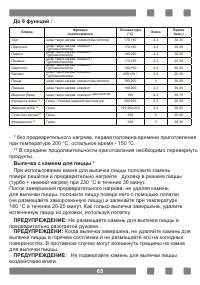
Page 65 - Выпечка с камнем для пиццы *
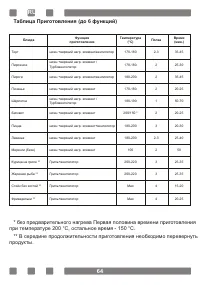
(турбо + нижний нагрев) при 230 °C в течение 30 минут. 65 До 8 функций : Блюда Функция приготовления Температура (°C) Полка Время (мин.) Торт нижн.+верх.нагрев. элемент/вентилятор 170-180 2-3 30-35 Пирожное нижн.+верх.нагрев. элемент / 170-180 2-3 25-30 Пироги 180-200 2-3 30-35 Печенье 170-180 2-3 2...
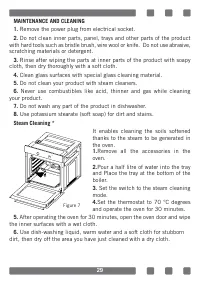
Page 66 - УХОД И ЧИСТКА; Для удаления грязи и пятен используйте мягкие моющие средства.
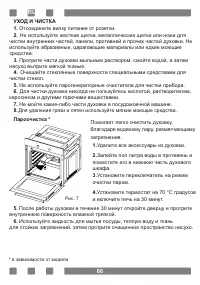
поместите его в нижнюю часть духового * в зависимости от модели 66 УХОД И ЧИСТКА 1. Отсоедините вилку питания от розетки. 2. Не используйте жесткие щетки, металлические щетки или ножи для чистки внутренних частей, панели, противней и прочих частей духовки. Не используйте абразивные, царапающие матер...
Page 67 - Чистка и установка дверцы; Для установки дверцы на место выполняйте действия, описанные для
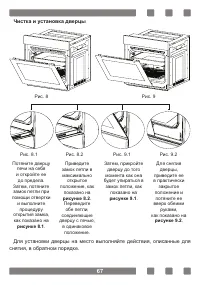
67 Чистка и установка дверцы Для установки дверцы на место выполняйте действия, описанные для снятия, в обратном порядке. Рис. 8 Рис. 8.1 Рис. 8.2 Рис. 9.1 Рис. 9.2 Рис. 9 Потяните дверцу печи на себя и откройте ее до предела. Затем, потяните замок петли при помощи отвертки и выполните процедуру отк...
Page 68 - Чистка стекла; Нажмите на пластиковые защелки с левой и правой стороны дверцы,; Каталитические экраны *; Каталитические экраны расположены в камере слева и справа под; Снятие каталитических экранов; этого они легко извлекаются. Их следует менять через 2-3 года.
68 Чистка стекла Нажмите на пластиковые защелки с левой и правой стороны дверцы, как показано на рисунке 10 и потяните планку на себя (рис.11)После снятия профиля, осторожно потяните стекло на себя (рис.12) Внешнее стекло закреплено на профиле дверцы печи. После снятия стекол, Вы можете легко их очи...
Page 69 - Чтобы снять направляющие, надавите на защелки вниз, как показано; Замена лампы; Во избежание поражения электрическим током,; Тип G9 лампы
69 Съемные направляющие противней* Соблюдайте правильность установкинаправляющих внутри духовки. Положение направляющих показано на рисунке. Установка и снятие направляющих Чтобы снять направляющие, надавите на защелки вниз, как показано стрелками на рисунке. Чтобы установить направляющие; выполните...
Page 70 - ПОИСК И УСТРАНЕНИЕ НЕИСПРАВНОСТЕЙ; Если у Вас возникла проблема с духовкой, попробуйте устранить
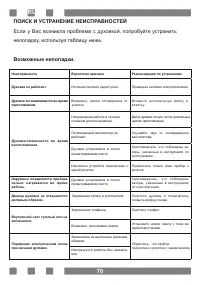
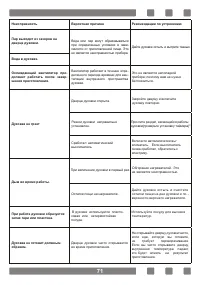
70 ПОИСК И УСТРАНЕНИЕ НЕИСПРАВНОСТЕЙ Возможные неполадки. Если у Вас возникла проблема с духовкой, попробуйте устранить неполадку, используя таблицу ниже. Неисправность Вероятная причина Рекомендации по устранению Духовка не работает. Источник питания недоступен. Проверьте наличие электропитания. Ду...