Page 2 - SAFETY DEFINITIONS; CAUTION; INSTALLER: LEAVE THIS MANUAL WITH THE OWNER OF THE APPLIANCE.
IF THE INFORMATION IN THIS MANUAL IS NOT FOLLOWED EXACTLY, A FIRE OR EXPLOSION MAY RESULT CAUSING PROPERTY DAMAGE, PERSONAL INJURY, OR DEATH. Do not store or use gasoline or other flammable vapors and liquids in the vicinity of this or any other appliance. Installation and service must be performed ...
Page 5 - TABLE OF CONTENTS
ELECTRICAL SHOCK HAZARD Disconnect power before installing or servicing appliance. Be sure the knob is in the OFF position before plugging the appliance in. Failure to do so can result in death or electrical shock. ELECTRICAL GROUNDING This appliance must be grounded. Grounding reduces the risk of e...
Page 6 - safety precautions must be followed, including the following:; TECHNICAL SAFETY; FOOD SAFETY; SAFETY PRECAUTIONS - BEFORE YOU BEGIN
GENERAL APPLIANCE SAFETY PRECAUTIONS GENERAL APPLIANCE SAFETY PRECAUTIONS Please read all instructions before using this appliance. When properly cared for, your new Warming Drawer has been designed to be a safe, reliable appliance. Read all instructions carefully before using this it. These precaut...
Page 7 - SAFETY DURING CLEANING; electrical outlet. The appliance is disconnected only if either:
• Extreme caution must be used when moving anything containing hot oil or other hot liquids. • Always turn the knob to OFF, then plug cord into the wall outlet. To disconnect, turn the knob to OFF, then remove plug from wall outlet. • Do not use appliance for other than intended use. • The inside of...
Page 8 - RATING LABEL; DESCRIPTION; REGULATORY / CODE REQUIREMENTS; local codes with the National Electrical Code; MODEL NUMBERS
RATING LABEL The rating label contains important information about your Hestan appliance such as the model number, serial number, and electrical rating.The rating label is located on the bottom of the drawer.If service is necessary, contact Hestan Customer Care with the model and serial number infor...
Page 9 - BEFORE YOU BEGIN; Before using the appliance for the first time:; USING THE WARMING DRAWER
OPENING THE SOFT CLOSING DRAWER OPENING THE SOFT CLOSING DRAWER To open the drawer grasp the handle and pull the drawer. CLOSING THE DRAWER CLOSING THE DRAWER To close the drawer, gently push the drawer back, until the soft closing system engage. BEFORE YOU BEGIN BEFORE YOU BEGIN Before using the ap...
Page 10 - To turn off the appliance, turn the knob to the OFF position.; Mode Selector
CONTROLS AND INDICATORS CONTROLS AND INDICATORS A single knob (Mode Selector) controls the warming drawer. It has positions for OFF, Proofing, and Defrost, plus a continuous range from WARM to MAX.This manual will use MED to designate a setting halfway between WARM and MAX.The interior lights come o...
Page 11 - SLOW COOKING
PROOFING PROOFING The proofing function maintains the drawer temperature between 77 and 95° F [25-35° C].PROCEDURE 1. Preheat the drawer for 5 minutes by turning the knob to proofing. 2. Place the dough, wrapped in a slightly damp cloth, in the middle of the drawer. FOOD WARMING FOOD WARMING Food re...
Page 12 - DISH EXAMPLE; Small slices of meat
TIPS FOR SLOW COOKING TIPS FOR SLOW COOKING• Only use fresh meat in perfect condition.• Trim off any excess fat.• The pieces of meat do not necessarily have to be turned.• Once cooked, the meat can be carved immediately; it does not have to rest.• Meat that is slow cooked is not as hot as meat cooke...
Page 13 - CLEANING AND MAINTENANCE; DRAWER SLIDES
CLEANING AND MAINTENANCE DRAWER SLIDES DRAWER SLIDES The drawer slides allow you to fully extend the drawer for cleaning. The drawer can be removed for cleaning or to replace the interior lights.NOTE: Load capacity for the drawer is 80 lbs [36 kg].Remove all items from inside the warming drawer, and...
Page 14 - CLEANING; FRONT SURFACE AND CONTROL PANEL; REPLACING A WARMING DRAWER LIGHT BULB; Customer Care for more information.
CLEANING AND MAINTENANCE (CONT.) CLEANING CLEANING The only recommended maintenance for the Warming Drawer is cleaning. Before you begin cleaning, turn the appliance OFF and disconnect the appliance from the outlet or shut off the breaker. Allow the appliance to cool before cleaning it. Do not use h...
Page 15 - Retaining
TO REPLACE A LIGHT BULB TO REPLACE A LIGHT BULB 1. MAKE SURE POWER IS OFF! Unplug the unit or turn off power at the breaker. 2. You may wish to remove the drawer before changing the bulb. 3. Remove the lens retaining screw. Use a small flat-blade screwdriver to carefully pry off the glass lens and s...
Page 16 - TROUBLESHOOTING; THE DRAWER IS NOT HOT ENOUGH
TROUBLESHOOTING Repairs must only be performed by specialized and qualified personnel. Any repair work not performed by professional personnel may cause damage to the appliance for which Hestan will not be liable. The following problems can be checked by the consumer without the assistance of the Se...
Page 17 - INSTALLATION; TOOLS YOU WILL NEED
INSTALLATION BEFORE YOU BEGIN BEFORE YOU BEGIN IMPORTANT: Save these instructions for the local electrical inspector use.INSTALLER: Please leave this manual with owner for future reference.OWNER: Please keep this manual for future reference. If the information in this manual is not followed exactly,...
Page 18 - POWER REQUIREMENTS
INSTALLATION (CONT.) POWER REQUIREMENTS POWER REQUIREMENTS The warming drawer must be supplied with the proper voltage and frequency. The drawer is equipped with a 3-prong, grounding type plug which must be plugged into a grounded, 3-prong 120V receptacle. Do not under any circumstances cut or remov...
Page 19 - CUSTOM PANEL REQUIREMENTS:; DIMENSIONS
INSTALLATION [CONT.] CUSTOM DRAWER FRONT (-OV MODELS) CUSTOM DRAWER FRONT (-OV MODELS) CUSTOM PANEL REQUIREMENTS: CUSTOM PANEL REQUIREMENTS: • Have a minimum thickness of 3/4” [19 mm].• Have all edges finished.• If using wood, the back must be sealed to prevent moisture damage.• Be capable of withst...
Page 20 - ATTACHING CUSTOM DRAWER FRONT
INSTALLATION (CONT.) ATTACHING CUSTOM DRAWER FRONT ATTACHING CUSTOM DRAWER FRONT 1. Remove the three screws from the top profile and four from the bottom (see figures A, B, C). 2. Fix the two brackets using eight screws 1/2” (12.7 mm) long and dia. 1/8” (3.5mm). 3. Attach custom panel front with the...
Page 21 - OVERALL DIMENSIONS
PLACING THE DRAWER PLACING THE DRAWER • Unit is heavy and requires at least two people or proper equipment to move. • Verify there is room to run the cord before placing the drawer without pinching it. 1. If the plug will not be accessible after placing the unit, turn power OFF at the service panel....
Page 23 - Hestan Commercial Corporation; PARTS LIST; WHAT THIS LIMITED WARRANTY COVERS:
SERVICE DATA RECORD The location of the serial tag on the product can be seen when the drawer is opened. It is located on bottom of the drawer. See “RATING LABEL” on page 6. Now is a good time to write this information in the space below provided. Keep your invoice for warranty validation.Model Numb...
Page 24 - LIMITED WARRANTY
Purchaser is responsible for making the Product reasonably accessible for service or for paying the cost to make the Product reasonably accessible for service. Service is to be provided during normal business hours of the authorized Hestan Commercial Service Provider. To the extent Purchaser request...
Page 25 - INTERACTION OF LAWS WITH THIS LIMITED WARRANTY:
LIMITED WARRANTY (CONT.) BENEFITS, OR ANY OTHER SPECIAL, INCIDENTAL OR CONSEQUENTIAL DAMAGES CAUSED BY THE USE, MISUSE OR INABILITY TO USE THE PRODUCT, REGARDLESS OF THE LEGAL THEORY ON WHICH THE CLAIM IS BASED, AND EVEN IF HCC HAS BEEN ADVISED OF THE POSSIBILITY OF SUCH DAMAGES. NO RECOVERY OF ANY ...
Page 26 - DÉFINITIONS DE SÉCURITÉ; INSTALLATEUR: LAISSER CE MANUEL AVEC LE PROPRIÉTAIRE
DÉFINITIONS DE SÉCURITÉ CECI INDIQUE QUE L’INOBSERVATION DE CET AVERTISSEMENT PEUT ENTRAÎNER DES BLESSURES GRAVES VOIRE MORTELLES. LISEZ ATTENTIVEMENT ET COMPLÈTEMENT CES INSTRUCTIONS AVANT D’INSTALLER OU D’UTILISER VOTRE APPAREIL AFIN DE RÉDUIRE LES RISQUES D’INCENDIE, DE BRÛLURE OU D’AUTRES BLESSU...
Page 27 - Un message de Hestan
©2021 Hestan Commercial Corporation 1 FR Un message de Hestan Un message de Hestan Les innovations culinaires primées de Hestan et les caractéristiques spéciales ont réinventé la cuisine du restaurant et redéfini l’expérience culinaire dans certains des restaurants les plus acclamés de l’Amérique. H...
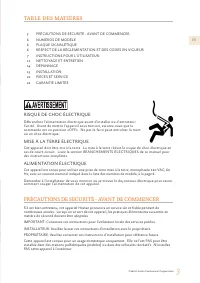
Page 29 - TABLE DES MATIÈRES; PRÉCAUTIONS DE SÉCURITÉ - AVANT DE COMMENCER; RISQUE DE CHOC ÉLECTRIQUE
TABLE DES MATIÈRES 3 PRÉCAUTIONS DE SÉCURITÉ - AVANT DE COMMENCER 6 NUMÉROS DE MODÈLE 6 PLAQUE SIGNALÉTIQUE 6 RESPECT DE LA RÉGLEMENTATION ET DES CODES EN VIGUEUR 7 INSTRUCTIONS POUR L’UTILISATEUR: 11 NETTOYAGE ET ENTRETIEN 14 DÉPANNAGE15 INSTALLATION21 PIÈCES ET SERVICE 21 GARANTIE LIMITÉE ©2021 He...
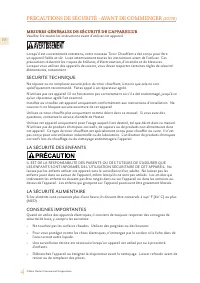
Page 30 - SECURITE TECHNIQUE; sécurité de base, y compris les suivantes:
MESURES GÉNÉRALES DE SÉCURITÉ DE L’APPAREILUR MESURES GÉNÉRALES DE SÉCURITÉ DE L’APPAREILUR Veuillez lire toutes les instructions avant d’utiliser cet appareil. Lorsqu’il est correctement entretenu, votre nouveau Tiroir Chauffant a été conçu pour être un appareil fiable et sûr. Lisez attentivement t...
Page 32 - NUMÉROS DE MODÈLE; le modèle et le numéro de série figurant sur la plaque.; RESPECT DE LA RÉGLEMENTATION ET DES CODES EN VIGUEUR
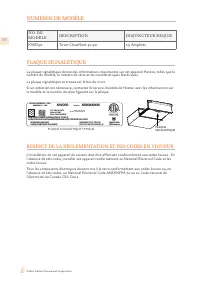
©2021 Hestan Commercial Corporation 6 FR NUMÉROS DE MODÈLE PLAQUE SIGNALÉTIQUE La plaque signalétique donne des informations importantes sur cet appareil Hestan, telles que le numéro de modèle, le numéro de série et les caractéristiques électriques. La plaque signalétique se trouve sur le bas du tir...
Page 33 - INSTRUCTIONS POUR L’UTILISATEUR; OUVERTURE DU TIROIR À FERMETURE DOUCE; AVANT L’UTILISATION; SYSTÈME DE CHAUFFAGE
©2021 Hestan Commercial Corporation 7 FR INSTRUCTIONS POUR L’UTILISATEUR OUVERTURE DU TIROIR À FERMETURE DOUCE OUVERTURE DU TIROIR À FERMETURE DOUCE Pour ouvrir le tiroir, saisissez la poignée et tirez le tiroir. FERMER LE TIROIR FERMER LE TIROIR Pour fermer le tiroir, poussez-le doucement vers l’ar...
Page 34 - COMMANDES ET INDICATEURS; TEMPS DE CHAUFFAGE; Position du bouton
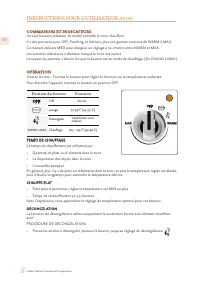
©2021 Hestan Commercial Corporation 8 FR INSTRUCTIONS POUR L’UTILISATEUR (SUITE) COMMANDES ET INDICATEURS COMMANDES ET INDICATEURS Un seul bouton (sélecteur de mode) contrôle le tiroir chauffant.Il a des positions pour OFF, Proofing, et Defrost, plus une gamme continue de WARM à MAX.Ce manuel utilis...
Page 35 - LEVAGE; CUISSON LENTE; recouvrant avec le couvercle.
©2021 Hestan Commercial Corporation 9 FR INSTRUCTIONS POUR L’UTILISATEUR (SUITE) LEVAGE LEVAGE La fonction de levage maintient la température du tiroir entre 77 et 95° F [25 et 35° C].PROCÉDURE DE LEVAGE: 1. Préchauffer le tiroir pendant 5 minutes en tournant le bouton sur la configuration de levage...
Page 36 - CONSEILS POUR LA CUISSON LENTE; EXEMPLE DE PLAT; Petites tranches de viande
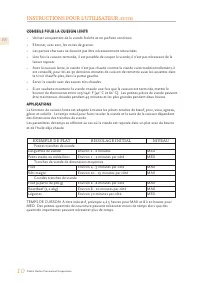
©2021 Hestan Commercial Corporation 10 FR CONSEILS POUR LA CUISSON LENTE CONSEILS POUR LA CUISSON LENTE • Utiliser uniquement de la viande fraîche et en parfaite condition. • Eliminer, avec soin, les zones de graisse. • Les parties charnues ne doivent pas être nécessairement retournées. • Une fois l...
Page 37 - NETTOYAGE ET ENTRETIEN; GLISSIÈRES DU TIROIR
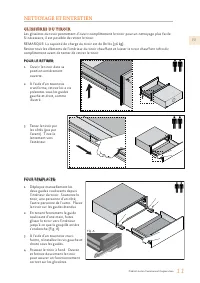
NETTOYAGE ET ENTRETIEN GLISSIÈRES DU TIROIR GLISSIÈRES DU TIROIR Les glissières du tiroir permettent d’ouvrir complètement le tiroir pour un nettoyage plus facile. Si nécessaire, il est possible de retirer le tiroir.REMARQUE: La capacité de charge du tiroir est de 80 lbs [36 kg].Retirer tous les élé...
Page 38 - NETTOYAGE; désactivez le circuit d’alimentation de l’appareil; REMPLACEMENT D’UNE AMPOULE DE TIROIR CHAUFFANT
©2021 Hestan Commercial Corporation 12 FR NETTOYAGE ET ENTRETIEN NETTOYAGE NETTOYAGE Le nettoyage représente généralement le seul type d’entretien nécessaire. Avant de commencer le nettoyage, débranchez l’appareil du réseau. Retirez la fiche des prises ou désactivez le circuit d’alimentation de l’ap...
Page 39 - POUR REMPLACER UNE AMPOULE; Vis de
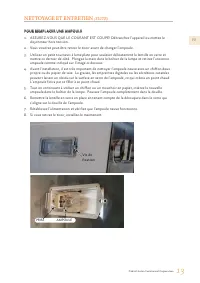
©2021 Hestan Commercial Corporation 13 FR NETTOYAGE ET ENTRETIEN (SUITE) POUR REMPLACER UNE AMPOULE POUR REMPLACER UNE AMPOULE 1. ASSUREZ-VOUS QUE LE COURANT EST COUPÉ! Débranchez l’appareil ou mettez le disjoncteur hors tension.. 2. Vous voudrez peut-être retirer le tiroir avant de changer l’ampoul...
Page 40 - DÉPANNAGE; SI LE TIROIR N’EST PAS ASSEZ CHAUD
©2021 Hestan Commercial Corporation 14 FR DÉPANNAGE Les réparations ne doivent être effectuées que par un personnel spécialisé et qualifié. Tout travail de réparation non effectué par du personnel professionnel peut causer des dommages à l’appareil pour lesquels Hestan ne sera pas responsable.Les pr...
Page 41 - AVANT DE COMMENCER; soigneusement suivis à tout moment.
©2021 Hestan Commercial Corporation 15 FR INSTALLATION AVANT DE COMMENCER AVANT DE COMMENCER IMPORTANT: Conservez ces instructions pour l’utilisation de l’inspecteur électrique local.INSTALLATEUR: S’il vous plaît laissez ce manuel avec le propriétaire pour référence future.PROPRIÉTAIRE: S’il vous pl...
Page 42 - EXIGENCES ÉLECTRIQUES
©2021 Hestan Commercial Corporation 16 FR INSTALLATION (SUITE) EXIGENCES ÉLECTRIQUES EXIGENCES ÉLECTRIQUES Le tiroir est équipé d’une fiche de mise à la terre à 3 broches qui doit être branchée à une prise de courant 120V à 3 broches mise à la terre. En aucun cas, ne coupez ou ne retirez la broche d...
Page 43 - SPÉCIFICATIONS DU PANNEAU PERSONNALISÉ:
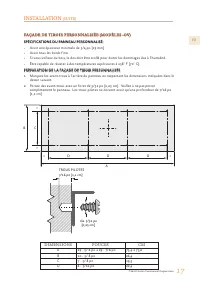
©2021 Hestan Commercial Corporation 17 FR INSTALLATION (SUITE) FAÇADE DE TIROIR PERSONNALISÉE (MODÈLES -OV) FAÇADE DE TIROIR PERSONNALISÉE (MODÈLES -OV) SPÉCIFICATIONS DU PANNEAU PERSONNALISÉ: SPÉCIFICATIONS DU PANNEAU PERSONNALISÉ: • Avoir une épaisseur minimale de 3/4 po [19 mm].• Avoir tous les b...
Page 44 - FIXATION DE LA FAÇADE DU TIROIR PERSONNALISÉ
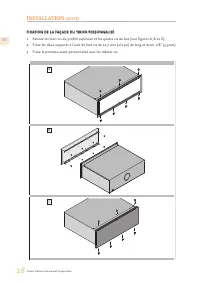
©2021 Hestan Commercial Corporation 18 FR INSTALLATION (SUITE) FIXATION DE LA FAÇADE DU TIROIR PERSONNALISÉ FIXATION DE LA FAÇADE DU TIROIR PERSONNALISÉ 1. Retirez les trois vis du profilé supérieur et les quatre vis du bas (voir figures A, B et C). 2. Fixez les deux supports à l’aide de huit vis de...
Page 45 - PLACER LE TIROIR; DIMENSIONS GÉNÉRALES
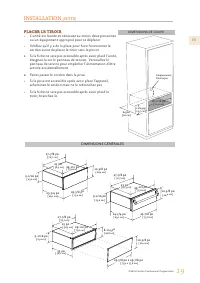
©2021 Hestan Commercial Corporation 19 FR PLACER LE TIROIR PLACER LE TIROIR • L’unité est lourde et nécessite au moins deux personnes ou un équipement approprié pour se déplacer. • Vérifiez qu’il y a de la place pour faire fonctionner le cordon avant de placer le tiroir sans le pincer. 1. Si la fich...
Page 46 - tiroir-réchaud dans la découpe jusqu’à ce qu’il affleure l’armoire.
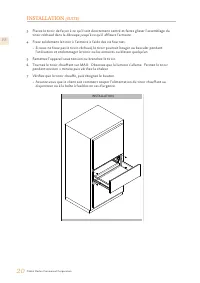
©2021 Hestan Commercial Corporation 20 FR 3. Placez le tiroir de façon à ce qu’il soit directement centré et faites glisser l’assemblage du tiroir-réchaud dans la découpe jusqu’à ce qu’il affleure l’armoire. 4. Fixez solidement le tiroir à l’armoire à l’aide des vis fournies. • Si vous ne fixez pas ...
Page 47 - SERVICE; numéros de modèle et de série à portée de la main.; LISTE DES PIÈCES; facture pour la validation de la garantie.; GARANTIE LIMITÉE; ÉLÉMENTS COUVERTS PAR LA PRÉSENTE GARANTIE LIMITÉE :
©2021 Hestan Commercial Corporation 21 FR SERVICE Toutes les réparations dans le cadre ou en dehors de la garantie doivent être effectuées par du personnel d’entretien qualifié. Pour localiser un réparateur agréé dans la région, s’adresser au concessionnaire Hestan, au représentant local ou à l’usin...
Page 48 - MARCHE À SUIVRE POUR UNE RÉPARATION AU TITRE DE LA GARANTIE :
©2021 Hestan Commercial Corporation 22 FR GARANTIE LIMITÉE (SUITE) MARCHE À SUIVRE POUR UNE RÉPARATION AU TITRE DE LA GARANTIE : En cas de défaillance du Produit pendant la Période de Garantie Limitée pour des raisons couvertes par la présente Garantie Limitée, l’Acheteur doit contacter immédiatemen...
Page 50 - Cette page a été intentionnellement laissée vierge
Page 52 - RETAIN THIS MANUAL FOR FUTURE REFERENCE
Hestan Commercial Corporation 3375 E. La Palma Ave. Anaheim, CA 92806 (888) 905-7463 RETAIN THIS MANUAL FOR FUTURE REFERENCE CONSERVEZ CE MANUEL POUR UNE RÉFÉRENCE FUTURE ©2021 Hestan Commercial Corporation P/N 021920 REV E