Page 2 - SAFETY DEFINITIONS; CAUTION; INSTALLER: LEAVE THIS MANUAL WITH THE OWNER OF THE APPLIANCE.
IF THE INFORMATION IN THIS MANUAL IS NOT FOLLOWED EXACTLY, A FIRE OR EXPLOSION MAY RESULT CAUSING PROPERTY DAMAGE, PERSONAL INJURY, OR DEATH. READ THESE INSTRUCTIONS CAREFULLY AND COMPLETELY BEFORE INSTALLING OR USING YOUR APPLIANCE TO REDUCE THE RISK OF FIRE, BURN HAZARD, OR OTHER INJURY. KEEP THIS...
Page 3 - SAFETY PRECAUTIONS - BEFORE YOU BEGIN; GENERAL SAFETY PRECAUTIONS
ELECTRICAL SHOCK HAZARD ELECTRICAL SHOCK HAZARD Disconnect power before installing or servicing appliance. Failure to do so can result in electrical shock or death. It is the responsibility of the user to have the appliance connected by a licensed electrician in accordance with all applicable codes ...
Page 4 - DESCRIPTION; IMPORTANT NOTES; UNPACKING YOUR DRAWER MICROWAVE; REGULATORY / CODE REQUIREMENTS
RATING LABEL The rating plate includes model and serial number. Open the Drawer Microwave fully. The label is beyond the back wall of the drawer facing up from the bottom surface.If service is necessary, contact Hestan Customer Care with the model and serial number information shown on the label. MO...
Page 5 - CLEARANCES AND DIMENSIONS; ABOUT DIMENSIONS
IMPORTANT NOTES TO THE CONSUMER IMPORTANT NOTES TO THE CONSUMER Keep this manual with your Use and Care Manual for future reference.• As when using any microwave oven generating heat, there are certain safety precautions you should follow. These are listed in the Use and Care Manual. Read all and fo...
Page 6 - DRAWER MICROWAVE DIMENSIONS; power cord
CLEARANCES AND DIMENSIONS (CONT.) DRAWER MICROWAVE DIMENSIONS DRAWER MICROWAVE DIMENSIONS Figure 1. Microwave dimensions KEY DESCRIPTION DIMENSION A Unit width 21-5/8 in. [54.9 cm] B Depth without door 21-7/8 in. [55.6 cm] C Height of body 14-19/32 in. [37.1 cm] D Width of door face 30-1/16 in. [76....
Page 7 - CABINET DIMENSIONS, STANDARD INSTALLATION
CLEARANCES AND DIMENSIONS (CONT.) CABINET DIMENSIONS, STANDARD INSTALLATION CABINET DIMENSIONS, STANDARD INSTALLATION Figure 2. Standard mounting under oven KEY DESCRIPTION DIMENSION A Cutout width 28-7/16 in. [72.2 cm] B Cutout depth 23-1/2 in. [59.7 cm] C Height of opening 15-9/16 in. [39.5 cm] D ...
Page 8 - Figure 3. Standard mounting under counter; FLUSH MOUNT INSTALLATION; Description
CLEARANCES AND DIMENSIONS (CONT.) Figure 3. Standard mounting under counter 36 in. [91.4 cm] countertop height 30 in. [76.2 cm] cabinet min. Suggested electrical outlet location* Anti-Tip block Floor must support 100 lbs. [45 kg] 19 in. [48.3 cm] to top of floor (recommended) D D E C B G F A 4 in. [...
Page 9 - CABINET DIMENSIONS, FLUSH INSTALLATION; Figure 4. Mounting flush under counter
CLEARANCES AND DIMENSIONS (CONT.) CABINET DIMENSIONS, FLUSH INSTALLATION CABINET DIMENSIONS, FLUSH INSTALLATION Figure 4. Mounting flush under counter Key Dimension A 6" [15.2 cm] B Suggested electrical outlet location C Anti-Tip block D 5" [12.7 cm] E 3-1/2" [8.9 cm] F 4" [10.2 cm] ...
Page 11 - MOUNTING AIR DEFLECTOR; Shelf detail showing the deflector vent during; SIDE VIEW; Figure 8
CLEARANCES AND DIMENSIONS (CONT.) Figure 7. Flush mount, side view MOUNTING AIR DEFLECTOR MOUNTING AIR DEFLECTOR Shelf detail showing the deflector vent during installation. 1) Position air deflector and mark holes. 2) Pre-drill using a 1/16" [0.16 cm] bit before mounting. shelf front face of sh...
Page 12 - INSTALLATION STEPS; ELECTRICAL; FLUSH MOUNTING
INSTALLATION STEPS ANTI-TIP BLOCK ANTI-TIP BLOCK To reduce the risk of tipping of the drawer, the Anti-Tip block must be properly installed. It must be located 14-13/16 in. [37.6 cm] above the floor on which the Drawer Microwave will sit. The 6 in. [15.2 cm] Anti-Tip block must be provided by the in...
Page 13 - Figure 10. Screws and mounting flange; TESTING OPERATION; Turn power ON to the Drawer Microwave.; CLEANING AND MAINTENANCE; Refer to the Use and Care Manual for cleaning instructions.; BEFORE YOU CALL FOR SERVICE; Mounting
INSTALLATION STEPS (CONT.) Figure 10. Screws and mounting flange TESTING OPERATION TESTING OPERATION 1. Turn power ON to the Drawer Microwave. 2. Set the clock according to the instructions in the Use and Care Manual.3. Place a microwave-safe container with a cup of water in the unit and close the d...
Page 14 - DÉFINITIONS DE SÉCURITÉ; PRÉCAUTION; AVIS; PROPRIÉTAIRE: CONSERVEZ CE MANUEL POUR RÉFÉRENCE FUTURE.
DÉFINITIONS DE SÉCURITÉ CECI INDIQUE QUE L’INOBSERVATION DE CET AVERTISSEMENT PEUT ENTRAÎNER DES BLESSURES GRAVES VOIRE MORTELLES. LISEZ ATTENTIVEMENT ET COMPLÈTEMENT CES INSTRUCTIONS AVANT D’INSTALLER OU D’UTILISER VOTRE APPAREIL AFIN DE RÉDUIRE LES RISQUES D’INCENDIE, DE BRÛLURE OU D’AUTRES BLESSU...
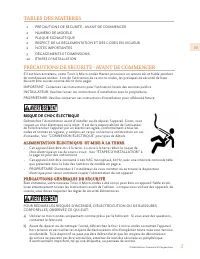
Page 15 - PRÉCAUTIONS DE SÉCURITÉ - AVANT DE COMMENCER; RISQUE DE CHOC ÉLECTRIQUE; TABLES DES MATIERES
S’il est bien entretenu, votre Tiroir à Micro-ondes Hestan procurera un service sûr et fiable pendant de nombreuses années. Lors de l’utilisation de ce micro-ondes, les pratiques de sécurité de base doivent être suivies comme décrit dans pages.IMPORTANT: Conservez ces instructions pour l’utilisation...
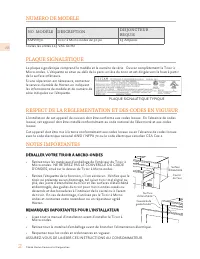
Page 16 - NO. MODÈLE DESCRIPTION; PLAQUE SIGNALÉTIQUE TYPIQUE; NOTES IMPORTANTES; DÉBALLER VOTRE TIROIR À MICRO-ONDES; RESPECT DE LA RÉGLEMENTATION ET DES CODES EN VIGUEUR
PLAQUE SIGNALÉTIQUE La plaque signalétique comprend le modèle et le numéro de série. Ouvrez complètement le Tiroir à Micro-ondes. L'étiquette se situe au-delà de la paroi arrière du tiroir et est dirigée vers le haut à partir de la surface inférieure.Si une réparation est nécessaire, contactez le se...
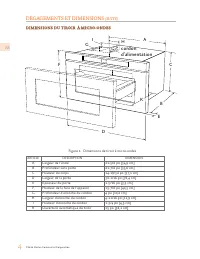
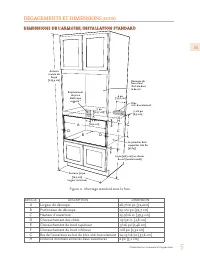
Page 17 - DÉGAGEMENTS ET DIMENSIONS; SUR LES DIMENSIONS
NOTES IMPORTANTES AU CONSOMMATEUR NOTES IMPORTANTES AU CONSOMMATEUR Conservez ce manuel avec votre Manuel d'Utilisation et d'Entretien pour référence future. • Comme lorsque vous utilisez un four à micro-ondes générant de la chaleur, vous devez respecter certaines précautions de sécurité. Celles-ci ...
Page 18 - cordon
DIMENSIONS DIMENSIONS DU TIROIR À MICRO-ONDES DU TIROIR À MICRO-ONDES Figure 1. Dimensions de tiroir à micro-ondes ARTICLE DESCRIPTION DIMENSION A Largeur de l'unité 21-5/8 po [54,9 cm] B Profondeur sans porte 21-7/8 po [55,6 cm] C Hauteur du corps 14-19/32 po [37,1 cm] D Largeur de la porte 30-1/16...
Page 19 - DIMENSIONS DE L'ARMOIRE, INSTALLATION STANDARD
DÉGAGEMENTS ET DIMENSIONS (SUITE) DIMENSIONS DE L'ARMOIRE, INSTALLATION STANDARD DIMENSIONS DE L'ARMOIRE, INSTALLATION STANDARD ARTICLE DESCRIPTION DIMENSION A Largeur de découpe 28-7/16 po [72,2cm] B Profondeur de découpe 23-1/2 po [59,7 cm] C Hauteur d'ouverture 15-9/16 in. [39,5 cm] D Chevaucheme...
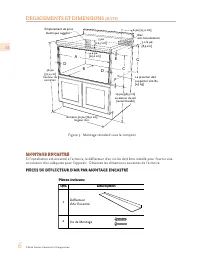
Page 20 - Figure 3. Montage standard sous le comptoir; MONTAGE ENCASTRÉ
DÉGAGEMENTS ET DIMENSIONS (SUITE) Figure 3. Montage standard sous le comptoir 36 po [91,4 cm] hauteur du comptoir D D E C B F A Emplacement de prise électrique suggéré * Le plancher doit supporter 100 lbs. [45 kg] 19 po [48,3 cm] au-dessus du sol (recommandé) Bloc anti-basculement Armoire 30 po [76,...
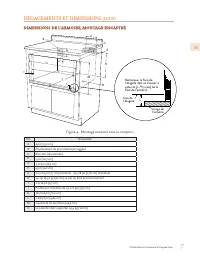
Page 21 - DIMENSIONS DE L'ARMOIRE, MONTAGE ENCASTRÉ; Figure 4. Montage encastré sous le comptoir
DÉGAGEMENTS ET DIMENSIONS (SUITE) DIMENSIONS DE L'ARMOIRE, MONTAGE ENCASTRÉ DIMENSIONS DE L'ARMOIRE, MONTAGE ENCASTRÉ Figure 4. Montage encastré sous le comptoir Art. Dimension A 6 po [15,2 cm] B Emplacement de prise électrique suggéré C Bloc anti-basculement D 5 po [12,7 cm] E 3-1/2 po [8,9 cm] F 4...
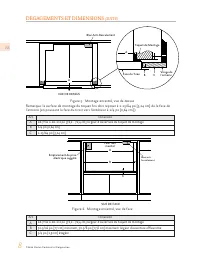
Page 22 - Figure 5. Montage encastré, vue de dessus
DÉGAGEMENTS ET DIMENSIONS (SUITE) A B C C L A Bloc Anti-Basculement Taquet de Montage Face du Tiroir Visage de l’armoire VUE DE DESSUS Figure 5. Montage encastré, vue de dessus Remarque: la surface de montage du taquet fini doit reposer à 1-15/64 po [3,14 cm] de la face de l'armoire (en poussant la ...
Page 23 - MONTAGE DU DÉFLECTEUR; Détail de l'étagère montrant le déflecteur lors de; étagère; VUE DE CÔTÉ; po
DÉGAGEMENTS ET DIMENSIONS (SUITE) Figure 7. Montage encastré, vue de côté MONTAGE DU DÉFLECTEUR MONTAGE DU DÉFLECTEUR Détail de l'étagère montrant le déflecteur lors de l'installation. 1) Positionner le déflecteur et marquer les trous. 2) Pré percer avec un foret de 1/16 po [0,16 cm] avant le montag...
Page 24 - ÉTAPES D'INSTALLATION; BLOC ANTI-BASCULEMENT
ÉTAPES D'INSTALLATION BLOC ANTI-BASCULEMENT BLOC ANTI-BASCULEMENT Pour réduire le risque de basculement du tiroir, le bloc anti-basculement doit être correctement installé. Il doit être situé à 37,6 cm [14-13/16 po] du sol sur lequel le Tiroir à Micro-ondes sera assis. Le bloc anti-basculement de 15...
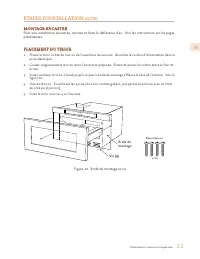
Page 25 - Fixez le tiroir avec les 4 vis fournies.; Figure 10. Bride de montage et vis
ÉTAPES D'INSTALLATION (SUITE) MONTAGE ENCASTRÉ MONTAGE ENCASTRÉ Pour une installation encastrée, montez et fixez le déflecteur d'air. Voir les instructions sur les pages précédentes. PLACEMENT DU TIROIR PLACEMENT DU TIROIR 1. Placez le tiroir à côté du mur ou de l’ouverture du armoire. Branchez le c...
Page 26 - NETTOYAGE ET ENTRETIEN
ÉTAPES D'INSTALLATION (SUITE) OPÉRATION D'ESSAI OPÉRATION D'ESSAI 1. Allumer l'appareil. 2. Réglez l'horologe en suivant les instructions du manuel d'utilisation et d'entretien. 3. Placez un récipient allant au micro-ondes avec une tasse d’eau dans l’appareil et fermez le tiroir. 4. Appuyez sur STAR...
Page 28 - Hestan Commercial Corporation; RETAIN THIS MANUAL FOR FUTURE REFERENCE
Hestan Commercial Corporation 3375 E. La Palma Ave. Anaheim, CA 92806 (888) 905-7463 RETAIN THIS MANUAL FOR FUTURE REFERENCE CONSERVEZ CE MANUEL POUR UNE RÉFÉRENCE FUTURE ©2020 Hestan Commercial Corporation P/N 027836 REV C TINSKB272MRR0