Page 3 - Welcome to Hestan Outdoor
Message from Hestan: Outdoor cooking is a perfectionist’s pursuit, and with your new investment, you’ve now taken the ultimate step forward. We sincerely welcome you to the Hestan Family. We’ve engineered and built our products so that your guests will rave about your meal, but deep down, our custom...
Page 4 - DANGER; READ THIS MANUAL CAREFULLY AND COMPLETELY BEFORE USING YOUR
©2019 Hestan Commercial Corporation 2 EN IF THE INFORMATION IN THIS MANUAL IS NOT FOLLOWED EXACTLY, A FIRE OR EXPLOSION MAY RESULT CAUSING PROPERTY DAMAGE, PERSONAL INJURY, OR DEATH. Do not try lighting this appliance without reading the LIGHTING INSTRUCTIONS section of this manual. For outdoor use ...
Page 5 - TABLE OF CONTENTS
©2019 Hestan Commercial Corporation 3 EN 4 MODEL NUMBERS 7 RATING LABELS 7 PRECAUTIONS 10 REGULATORY / CODE REQUIREMENTS 10 PORTABLE LP CYLINDERS 11 LOCATION AND ASSEMBLY 13 INSTALLATION 16 GAS CONNECTIONS 23 ELECTRICAL CONNECTIONS 26 LIGHTING INSTRUCTIONS 29 USING YOUR GRILL 30 CLEANING AND MAINTEN...
Page 6 - Description; MODEL NUMBERS
©2019 Hestan Commercial Corporation 4 EN BUILT-IN MODELS Model No. Description GABR30-NG / -LP 30” BUILT-IN (ALL TRELLIS BURNERS) GMBR30-NG / -LP 30” BUILT-IN (SEAR AND TRELLIS BURNERS) GSBR30-NG / -LP 30” BUILT-IN (ALL SEAR BURNERS) GABR36-NG / -LP 36” BUILT-IN (ALL TRELLIS BURNERS) GMBR36-NG / -LP...
Page 7 - DELUXE CART MODELS
©2019 Hestan Commercial Corporation 5 EN DELUXE CART MODELS Model No. Description GABR36CX2-NG / -LP 36” FREESTANDING (ALL TRELLIS BURNERS) DELUXE CART WITH DOUBLE SIDE BURNER GMBR36CX2-NG / -LP 36” FREESTANDING (SEAR AND TRELLIS BURNERS) DELUXE CART WITH DOUBLE SIDE BURNER GSBR36CX2-NG / -LP 36” FR...
Page 8 - GRILLING IS A PERFECTIONIST’S PURSUIT.
Page 9 - RATING LABEL; minimum installation clearances.; PRECAUTIONS - BEFORE YOU USE YOUR GRILL; GAS CONNECTIONS section of this manual.
©2019 Hestan Commercial Corporation 7 EN RATING LABEL The rating label contains important information about your Hestan appliance such as the model and serial number, gas type and manifold pressure, the BTU rating for each burner type, and the minimum installation clearances. PRECAUTIONS - BEFORE YO...
Page 10 - section of this manual for details.
©2019 Hestan Commercial Corporation 8 EN 8. Check the regulator, hoses, burner ports, air shutter, and venturi / valve section carefully. Always turn off gas at the source (tank or supply line) prior to inspecting parts. 9. When lighting a burner, always pay close attention to what you are doing. Be...
Page 12 - REGULATORY / CODE REQUIREMENTS
©2019 Hestan Commercial Corporation 10 EN REGULATORY / CODE REQUIREMENTS Installation of this cooking appliance must be made in accordance with local codes. In the absence of local codes, this unit should be installed in accordance with the National Fuel Gas Code ANSI Z223.1/NFPA 54, Natural Gas and...
Page 13 - LOCATING AND ASSEMBLING THE GRILL; engage the brakes on the casters to prevent movement of the cart.
©2019 Hestan Commercial Corporation 11 EN LOCATING AND ASSEMBLING THE GRILL When determining a suitable location for your grill, take into account concerns such as exposure to wind, rain, sprinklers, proximity to traffic paths, and keeping any gas supply line runs as short as possible. Locate the gr...
Page 14 - Above each Trellis Burner
©2019 Hestan Commercial Corporation 12 EN Ensure that the burners are positioned correctly on their orifices, and are fully seated onto their rear hanger brackets (see Fig. 2). The burners should not move side-to-side or front-to-back if properly seated. Above each Trellis Burner ™ is a stainless st...
Page 15 - INSTALLATION; TO NON-COMBUSTIBLE CONSTRUCTION; LAYOUT FOR
©2019 Hestan Commercial Corporation 13 EN INSTALLATION CLEARANCES: TO NON-COMBUSTIBLE CONSTRUCTION A minimum of 4” [10 cm] clearance from the back of the grill to non-combustible construction is required to allow the hood to be opened fully. TO COMBUSTIBLE CONSTRUCTION This appliance should NOT be i...
Page 16 - FRONT VIEW
©2019 Hestan Commercial Corporation 14 EN W 2.5 6.4 MIN. 18.8 47.8 36.0 91.4 REF. 4.5 11.4 MIN. H 30.0 76.2 10 in² (64.5 cm²) MIN. VENTILATION OPENING ON BOTH SIDES AND REAR 2 OPENINGS FOR GAS & ELECTRICAL OPENING FOR ACCESS DOORS FINISHED COUNTERTOP 4.2 10.6 3.1 7.9 3.8 9.7 1.5 3.8 D TOP VIEW 3...
Page 17 - SUPPLEMENTARY VENTILATION; GAS CONNECTIONS; GAS SUPPLY; necessary amount of gas supply and pressure to operate the unit(s).
©2019 Hestan Commercial Corporation 15 EN INSTALLATION (continued) In certain installations, such as an island up against a house or other structure, or perhaps a short roof overhang above your grill; a “range-hood” style ventilation unit may be desirable to direct smoke and grease away from those s...
Page 18 - CONVERSION KITS; purchased as an accessory for LP units.
©2019 Hestan Commercial Corporation 16 EN (BTU per hour) for each burner type is shown on the rating label affixed to the underside of the drip tray. Installation of this cooking appliance must be made in accordance with local codes. In the absence of local codes, this unit should be installed in ac...
Page 19 - as well as the connectors must comply with the
©2019 Hestan Commercial Corporation 17 EN GAS CONNECTION - NATURAL GAS (NG) NOTE: To ensure proper heating performance of this appliance, verify that the gas line supply pressure is adequate. Use only the gas pressure regulator supplied with this appliance. This regulator is set for a supply (inlet)...
Page 20 - To connect the regulator / hose assembly follow these steps:; GAS CONNECTION - LP PIPED SYSTEMS; Standard
©2019 Hestan Commercial Corporation 18 EN GAS CONNECTION - LIQUID PROPANE (LP) CYLINDER Your Hestan grill for use with LP gas is supplied with a two-stage regulator/hose assembly for connection to a standard 20 lb. LP gas cylinder. This assembly must be used WITHOUT alteration. If this assembly need...
Page 21 - LP TANK RESTRAINT; over or stretch the hose which could cause a gas leak.; LEAK TESTING; TANK
©2019 Hestan Commercial Corporation 19 EN LP TANK RESTRAINT If you purchased a Hestan Grill on a cart, be sure to restrain the LP cylinder by securing it with the retention bolt on the slide-out tray as shown below. It is important the tank does not fall over or stretch the hose which could cause a ...
Page 22 - TO TEST; BURNER ADJUSTMENTS
©2019 Hestan Commercial Corporation 20 EN TO TEST • Make sure all control valves are in the “OFF” position.• Apply the soap solution described above to all fittings.• Turn the gas supply on.• Check all connections from the supply line, or LP cylinder up to and including the manifold pipe assembly. •...
Page 23 - AIR SHUTTER ADJUSTMENT
©2019 Hestan Commercial Corporation 21 EN AIR SHUTTER ADJUSTMENT Remove the control panel to gain access to the orifice area and air shutters on the burners. A metal cap at the inlet of the burner called the “AIR SHUTTER” regulates the amount of air that enters into the burner for combustion (see Fi...
Page 24 - VALVE ADJUSTMENTS; adjust the Rotisserie or Sear Burner valves.; NEVER ADJUST THE BURNER SO LOW THAT IT MAY GO OUT DURING USE.; preheat for 10 minutes.
©2019 Hestan Commercial Corporation 22 EN VALVE ADJUSTMENTS The valves on your Hestan grill are preset at the factory for optimum performance. However, the low setting on these valves are adjustable if altitude, low-heat performance, converting from one gas to another, or other factors indicate an a...
Page 25 - INFRARED BURNER FLAME ADJUSTMENT; as described above for Trellis Burner; NEVER ADJUST THE SIDE BURNER SO LOW THAT IT MAY GO OUT DURING; absence of local codes with the National Electrical Code,
©2019 Hestan Commercial Corporation 23 EN INFRARED BURNER FLAME ADJUSTMENT Infrared burners do not require adjustment and need only be checked visually for proper performance. On HIGH, an infrared burner should glow red evenly over its entire surface. A diminished red glow and/or a large blue “halo”...
Page 26 - ELECTRICAL SUPPLY; ELECTRICAL BOX; personal injury. Wear gloves when handling.; cooking gas appliance.
©2019 Hestan Commercial Corporation 24 EN ELECTRICAL SUPPLY (continued) ELECTRICAL BOX IMPORTANT - READ ALL INSTRUCTIONS BEFORE YOU BEGINSome parts have sharp edges. Care must be taken when handling the various components to avoid personal injury. Wear gloves when handling. 1. If you are installing ...
Page 28 - LIGHTING INSTRUCTIONS; , and infrared Rotisserie and Sear; CONTROL KNOB LAYOUT; possible when lighting.; LIGHTING ROTISSERIE BURNER
©2019 Hestan Commercial Corporation 26 EN LIGHTING INSTRUCTIONS Hestan Grills feature hot-surface igniters for all Trellis Burners ™ , and infrared Rotisserie and Sear Burners. The hot-surface igniters feature a “time-extender” function which maintain the hot glow of the igniter for a longer period ...
Page 29 - LIGHTING SIDE BURNERS; conditions is usually the cause of this nuisance sparking.; MATCH LIGHTING INSTRUCTIONS
©2019 Hestan Commercial Corporation 27 EN LIGHTING SIDE BURNERS 1. Read Use & Care Manual before lighting. Remove cover during lighting. 2. Stand as far away as possible when lighting.3. Push and turn selected knob to “HIGH” position. Igniter will spark until flame is established.4. Once lit, tu...
Page 31 - USING YOUR GRILL
©2019 Hestan Commercial Corporation 29 EN USING YOUR GRILL Your Hestan Grill is a powerful and versatile cooking tool. Traditional grilling requires high heat for searing and proper browning. Many meats are initially cooked on “HIGH” to sear / brown the meat and lock in juices. After that, the tempe...
Page 32 - THE ROTISSERIE BURNER; CLEANING AND MAINTENANCE; STAINLESS STEEL CARE
©2019 Hestan Commercial Corporation 30 EN THE SPIT & FORKS The rotisserie can handle large food items up to 50 lbs. You should prepare your food items and first mount it on the spit, then mount the forks. Push the pointed end of the spit through the food and center on the spit. Push on one fork ...
Page 34 - To clean your powder coated surface:; CARE & MAINTENANCE OF GRILL COMPONENTS; by pulling it out of the grill. After cleaning, reinstall the tray.
©2019 Hestan Commercial Corporation 32 EN To clean your powder coated surface: 1. Carefully remove any loose deposits with a wet sponge.2. Use a soft brush (non abrasive) or cloth, and a mild household detergent solution to remove dust, salt and other deposits. Never use any solvent-based cleaners, ...
Page 35 - turn on the sear burner to burn everything off.
©2019 Hestan Commercial Corporation 33 EN to fall on an unused (not lit) Sear Burner, you can remove the mesh screen and brush the screen and tiles with a stiff brush. Be sure to do this only when completely cooled down. DO NOT use a metal scraper on the tiles, or put a lot of pressure on the tile f...
Page 36 - the lamp assembly, being careful not to drop the glass lens.
©2019 Hestan Commercial Corporation 34 EN Figure 10 Figure 11 LIGHT BULB REPLACEMENT1. Disconnect the power to your grill before any service or light bulb replacement. Be sure the grill and the lights are completely cool. Halogen lights get extremely hot. 2. Open hood and remove the small screw hold...
Page 37 - TROUBLESHOOTING GUIDE; Symptom
©2019 Hestan Commercial Corporation 35 EN TROUBLESHOOTING GUIDE Symptom Check Burner will not light Gas supply not on / shutoff valve closed LP gas cylinder empty Power cord not plugged in, or no power to receptacle, or blown fuse Low gas pressure to unit Burner ports near igniter are obstructed or ...
Page 38 - WIRING SCHEMATIC
©2019 Hestan Commercial Corporation 36 EN WIRING SCHEMATIC NO 6 2 1 COM NO 6 2 1 COM NO 6 2 1 COM NO 6 2 1 COM 12VDC OUT 120VAC IN LED DRIVER + - 12VAC, 4.17A XFMR 50VA N (WHT) L (BLK) 120VAC 12VAC, 4.17A XFMR 50VA N (WHT) L (BLK) 120VAC 1 2 3 4 5 6 7 8 9 10 1 2 3 4 5 6 7 8 L(BLK or BRN) N(WHT or BL...
Page 39 - HARNESS
©2019 Hestan Commercial Corporation 37 EN WIRING SCHEMATIC (continued) 1 2 3 4 5 6 7 8 1 2 3 4 5 6 7 8 9 10 TO ROTISS VALVE TO VALVE #1 TO VALVE #2 C NO NO C NO C TO LED SWITCH TO ROTISS SWITCH 2-PIN FEMALE CONNECTOR 1 2 (-) (+) BLK WHT BLK WHT GRN WHT BLK TAN STRIP END 1/4" WHT BLK BLK WHT WHT ...
Page 42 - SERVICE; and does not extend to Products used in commercial applications.
©2019 Hestan Commercial Corporation 40 EN SERVICE All warranty and non-warranty repairs should be performed by qualified service personnel. To locate an authorized service agent in your area, contact your Hestan dealer, local representative, or the manufacturer. Before you call, please have the mode...
Page 43 - warranty coverage as specifically set forth below:; LIMITED WARRANTY
©2019 Hestan Commercial Corporation 41 EN EXTENSIONS TO ONE YEAR LIMITED WARRANTY PERIOD:In addition to the One-Year Limited Warranty, the following components have extended warranty coverage as specifically set forth below: 1. The Product’s stainless steel grill body, DiamondCut cooking grates and ...
Page 44 - PRODUCT, REGARDLESS OF THE LEGAL THEORY ON WHICH THE CLAIM IS BASED,
©2019 Hestan Commercial Corporation 42 EN CONSEQUENTIAL DAMAGES CAUSED BY THE USE, MISUSE OR INABILITY TO USE THE PRODUCT, REGARDLESS OF THE LEGAL THEORY ON WHICH THE CLAIM IS BASED, AND EVEN IF HCC HAS BEEN ADVISED OF THE POSSIBILITY OF SUCH DAMAGES. NO RECOVERY OF ANY KIND AGAINST HCC SHALL BE GRE...
Page 47 - LIRE CE MANUEL ATTENTIVEMENT ET ENTIÈREMENT AVANT D’UTILISER LE
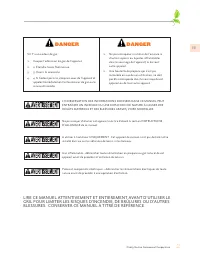
FR ©2019 Hestan Commercial Corporation 2 L’INOBSERVATION DES INFORMATIONS DONNÉES DANS CE MANUEL PEUT ENTRAÎNER UN INCENDIE OU UNE EXPLOSION DE NATURE À CAUSER DES DÉGÂTS MATÉRIELS ET DES BLESSURES GRAVES, VOIRE MORTELLES. Ne pas essayer d’allumer cet appareil sans lire d’abord la section INSTRUCTIO...
Page 48 - TABLE DES MATIÈRES
FR ©2019 Hestan Commercial Corporation 3 4 NUMÉROS DE MODÈLE 7 PLAQUE SIGNALÉTIQUE 7 PRÉCAUTIONS 10 RESPECT DE LA RÉGLEMENTATION ET DES CODES EN VIGUEUR 10 BOUTEILLES DE GPL PORTATIVES 11 IMPLANTATION ET ASSEMBLAGE 13 INSTALLATION 16 BRANCHEMENTS POUR LE GAZ 23 BRANCHEMENTS POUR L’ÉLECTRICITÉ 26 INS...
Page 49 - MODÈLES ENCASTRÉS; MODÈLES AMOVIBLES; Numéro de Modèle; NUMÉROS DE MODÈLE
FR ©2019 Hestan Commercial Corporation 4 MODÈLES ENCASTRÉS Numéro de Modèle Description GABR30-NG / -LP 30 po ENCASTRÉ (TOUS TRELLIS BURNERS) GMBR30-NG / -LP 30 po ENCASTRÉ (BRÛLEURS DE SAISIE ET TRELLIS BURNERS) GSBR30-NG / -LP 30 po ENCASTRÉ (TOUS BRÛLEURS DE SAISIE) GABR36-NG / -LP 36 po ENCASTRÉ...
Page 50 - MODÈLES POUR CHARIOT DE QUALITÉ SUPÉRIEUR
FR ©2019 Hestan Commercial Corporation 5 MODÈLES POUR CHARIOT DE QUALITÉ SUPÉRIEUR Numéro de Modèle Description GABR36CX2-NG / -LP 36 po AUTOSTABLE (TOUS TRELLIS BURNERS), CHARIOT DE QUALITÉ SUPÉRIEURE AVEC DOUBLE BRÛLEUR LATÉRAL GMBR36CX2-NG / -LP 36 po AUTOSTABLE (BRÛLEURS DE SAISIE ET TRELLIS BUR...
Page 52 - PLAQUE SIGNALÉTIQUE; type de brûleur et les dégagements minima d’installation.; PRÉCAUTIONS À PRENDRE AVANT D’UTILISER CE GRIL; matière de sécurité doivent être adoptées.; NE JAMAIS LAISSER LE GRIL SANS SURVEILLANCE PENDANT LA CUISSON.
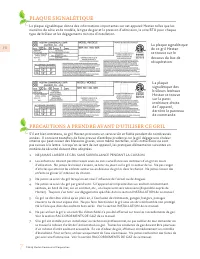
FR ©2019 Hestan Commercial Corporation 7 PLAQUE SIGNALÉTIQUE La plaque signalétique donne des informations importantes sur cet appareil Hestan telles que les numéros de série et de modèle, le type de gaz et la pression d’admission, la cote BTU pour chaque type de brûleur et les dégagements minima d’...
Page 53 - etc. Ne pas bloquer les ouïes d’aération du chariot.
FR ©2019 Hestan Commercial Corporation 8 8. Vérifier soigneusement le détendeur, les tuyaux, les orifices de combustion, l’obturateur d’air et la section venturi / clapet. Toujours couper le gaz à la source (bouteille ou conduite d’alimentation) avant d’examiner ces pièces. 9. Lorsqu’on allume un br...
Page 54 - explosion de la boîte.
FR ©2019 Hestan Commercial Corporation 9 21. Ne jamais toucher les grilles de cuisson, le couvercle ni les surfaces métalliques aux environs immédiats avec les mains nues quand on grille, car ces zones deviennent très chaudes et pourraient causer des blessures. Utiliser les poignées et boutons prévu...
Page 55 - RESPECT DE LA RÉGLEMENTATION ET DES CODES EN VIGUEUR; COMMUNAUTÉ DE MASSACHUSETTS; PROPOSITION 65 DE CALIFORNIE – AVERTISSEMENT; Ce produit peut vous exposer à des produits chimiques, y compris le; BOUTEILLES DE GPL PORTATIVES; hors de portée des enfants.
FR ©2019 Hestan Commercial Corporation 10 RESPECT DE LA RÉGLEMENTATION ET DES CODES EN VIGUEUR L’installation de cet appareil de cuisson doit être effectuée conformément aux codes locaux. En l’absence de tels codes, installer cet appareil conformément au National Fuel Gas Code ANSI Z223.1/NFPA 54, a...
Page 56 - IMPLANTATION ET ASSEMBLAGE DU GRIL; est disponible chez Hestan. Voir la Fig. 1 pour plus de détails.
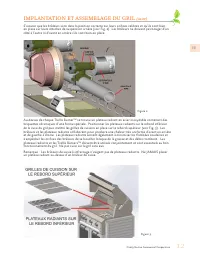
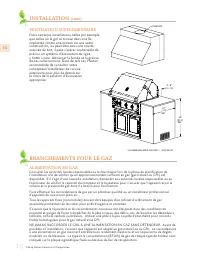
FR ©2019 Hestan Commercial Corporation 11 IMPLANTATION ET ASSEMBLAGE DU GRIL Lors de la détermination d’un emplacement approprié pour le gril, tenir compte des préoccupations que représentent l’exposition au vent, la pluie, les arroseurs, la proximité par rapport aux voies de circulation et veiller ...
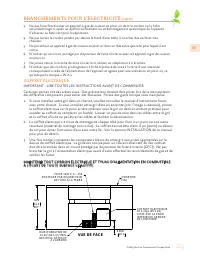
Page 58 - CONFIGURATION; DIMENSIONS EN CAS D’ENCASTREMENT :
FR ©2019 Hestan Commercial Corporation 13 INSTALLATION DÉGAGEMENTS : PAR RAPPORT À UNE CONSTRUCTION NON COMBUSTIBLEUn dégagement minimum de 4 po [10 cm] entre l’arrière du gril et une construction non combustible est nécessaire pour permettre l’ouverture complète du couvercle.PAR RAPPORT À UNE CONST...
Page 59 - CONFIGURATION POUR
FR ©2019 Hestan Commercial Corporation 14 W 2,5 6,4 MIN. 18,8 47,8 36,0 91,4 RÉF. 4,5 11,4 MIN. H 30,0 76,2 4,2 10,6 3,1 7,9 3,8 9,7 1,5 3,8 D VUE DE DESSUS ENVELOPPE DE PROTECTION ISOLANTE 2 OUVERTURES POUR GAZ ET ELECTRICITÉ COMPTOIR FINI OUÏE D'AÉRATION DE 10 po² (64,5 cm²) MIN. DES DEUX CÔTES ET...
Page 60 - VENTILATION SUPPLÉMENTAIRE; BRANCHEMENTS POUR LE GAZ; ALIMENTATION EN GAZ
FR ©2019 Hestan Commercial Corporation 15 INSTALLATION (suite) Dans certaines installations, telles par exemple que celles où le gril se trouve dans une île implantée contre une maison ou une autre construction, ou peut-être sous une courte avancée de toit; il peut s’avérer souhaitable de prévoir un...
Page 61 - KITS DE CONVERSION; conversion d’un appareil du GPL au gaz naturel, ou vice versa.; KITS POUR HAUTES ALTITUDES
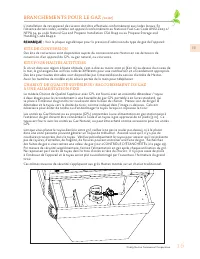
FR ©2019 Hestan Commercial Corporation 16 L’installation de cet appareil de cuisson doit être effectuée conformément aux codes locaux. En l’absence de tels codes, installer cet appareil conformément au National Fuel Gas Code ANSI Z223.1/ NFPA 54, au code Natural Gas and Propane Installation CSA B149...
Page 62 - RACCORDEMENT DE GAZ – GAZ NATUREL; la norme
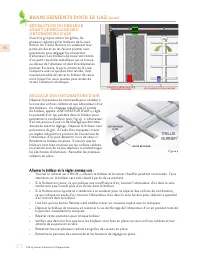
FR ©2019 Hestan Commercial Corporation 17 RACCORDEMENT DE GAZ – GAZ NATUREL REMARQUE : Pour faire en sorte que cet appareil chauffe bien, vérifier que la pression dans la conduite d’alimentation en gaz est suffisante. Utiliser uniquement le détendeur de pression de gaz fourni avec cet appareil. Ce d...
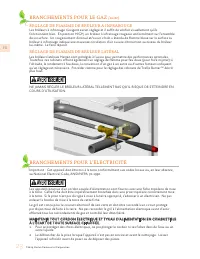
Page 63 - RACCORDEMENT DE GAZ – BOUTEILLE DE PROPANE LIQUIDE (GPL); Passer à la section CONTRÔLE D’ÉTANCHÉITÉ.; RACCORDEMENT DE GAZ – SYSTÈMES DE CONDUITES DE GPL
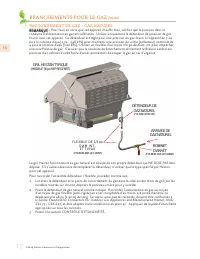
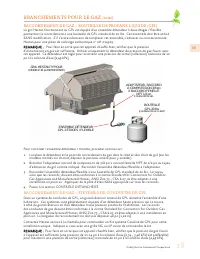
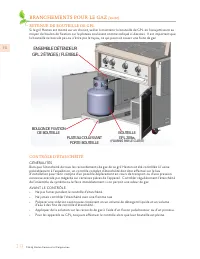
FR ©2019 Hestan Commercial Corporation 18 RACCORDEMENT DE GAZ – BOUTEILLE DE PROPANE LIQUIDE (GPL) Le gril Hestan fonctionnant au GPL est équipé d’un ensemble détendeur à deux étages / flexible permettant le raccordement à une bouteille de GPL standard de 20 lbs. Cet ensemble doit être utilisé SANS ...
Page 64 - RETENUE DE BOUTEILLE DE GPL; GÉNÉRALITÉS; d’eau à des fins de contrôle d’étanchéité.; ENSEMBLE DÉTENDEUR; BOULON DE FIXATION
FR ©2019 Hestan Commercial Corporation 19 RETENUE DE BOUTEILLE DE GPL Si le gril Hestan est monté sur un chariot, veiller à maintenir la bouteille de GPL en l’assujettissant au moyen du boulon de fixation sur le plateau coulissant comme indiqué ci-dessous. Il est important que la bouteille ne bascul...
Page 65 - POUR EFFECTUER LE CONTRÔLE; CHANGEMENT DE BOUTEILLE DE GPL.; RÉGLAGES DES BRÛLEURS; RÉGLAGE DE LA FLAMME DES TRELLIS BURNERS
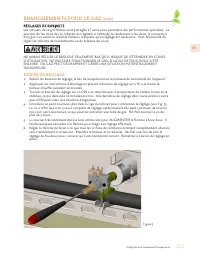
FR ©2019 Hestan Commercial Corporation 20 POUR EFFECTUER LE CONTRÔLE • S’assurer que tous les robinets de réglage sont en position « OFF ».• Appliquer de la solution savonneuse décrite plus haut sur tous les raccords.• Ouvrir l’arrivée de gaz.• Contrôler tous les raccordements depuis la conduite d’a...
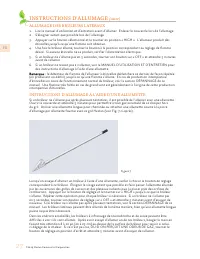
Page 66 - RÉGLAGE DES OBTURATEURS D’AIR; Allumer le brûleur et le régler comme suit :
FR ©2019 Hestan Commercial Corporation 21 RÉGLAGE DES OBTURATEURS D’AIR Déposer le panneau de commande pour accéder à la zone des orifices calibrés et aux obturateurs d’air des brûleurs. Un chapeau métallique à l’entrée du brûleur, appelé «OBTURATEUR D’AIR », règle la quantité d’air qui pénètre dans...
Page 67 - RÉGLAGES DE ROBINETS; régler les robinets de tournebroche ou de brûleurs de saisie.
FR ©2019 Hestan Commercial Corporation 22 RÉGLAGES DE ROBINETS Les robinets de ce gril Hestan sont préréglés à l’usine pour permettre des performances optimales. La position de feu doux de ces robinets est réglable si l’altitude, le rendement à feu doux, la conversion d’un gaz à un autre ou d’autres...
Page 68 - RÉGLAGE DE FLAMME DE BRÛLEUR À INFRAROUGE; décrit; À L’ÉCART DE TOUTE SURFACE CHAUFFÉE.; l’appareil refroidir avant de poser ou de déposer des pièces.
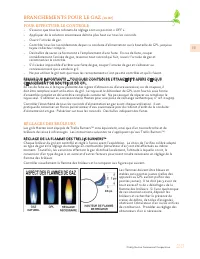
FR ©2019 Hestan Commercial Corporation 23 RÉGLAGE DE FLAMME DE BRÛLEUR À INFRAROUGE Les brûleurs à infrarouge n’exigent aucun réglage et il suffit de vérifier visuellement qu’ils fonctionnent bien. En position HIGH, un brûleur à infrarouge rougeoie uniformément sur l’ensemble de sa surface. Un rouge...
Page 69 - BRANCHEMENTS POUR L’ÉLECTRICITÉ; S’adresser au fabricant pour la réparation.; COFFRET ÉLECTRIQUE; pour plus de détails.
FR ©2019 Hestan Commercial Corporation 24 BRANCHEMENTS POUR L’ÉLECTRICITÉ (suite) 3. Ne pas faire fonctionner un appareil à gaz de cuisson en plein air dont le cordon ou la fiche est endommagé ni après un dysfonctionnement ou endommagement quelconque de l’appareil. S’adresser au fabricant pour la ré...
Page 71 - INSTRUCTIONS D’ALLUMAGE; DISPOSITION DES BOUTONS DE RÉGLAGE; OU BRÛLEUR; l’allumage. S’éloigner autant que possible lors de l’allumage.; ALLUMAGE DU BRÛLEUR DE TOURNEBROCHE; des instructions d’allumage à l’aide d’une allumette.
FR ©2019 Hestan Commercial Corporation 26 INSTRUCTIONS D’ALLUMAGE Les grils Hestan sont équipés d’allumeurs à incandescence pour tous les Trellis Burners TM , ainsi que pour le tournebroche et les brûleurs de saisie. Les allumeurs à incandescence offrent une fonction de « prolongation de délai » qui...
Page 72 - ALLUMAGE DES BRÛLEURS LATÉRAUX; étincelles jusqu’à ce qu’une flamme soit obtenue.; INSTRUCTIONS D’ALLUMAGE À L’AIDE D’UNE ALLUMETTE
FR ©2019 Hestan Commercial Corporation 27 ALLUMAGE DES BRÛLEURS LATÉRAUX 1. Lire le manuel d’utilisation et d’entretien avant d’allumer. Enlever le couvercle lors de l’allumage. 2. S’éloigner autant que possible lors de l’allumage.3. Appuyer sur le bouton sélectionné et le tourner en position « HIGH...
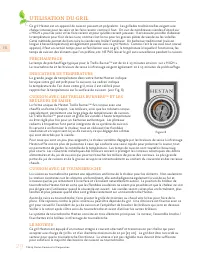
Page 74 - UTILISATION DU GRIL; La grande jauge de température dans votre hotte Hestan indique
FR ©2019 Hestan Commercial Corporation 29 UTILISATION DU GRIL Ce gril Hestan est un appareil de cuisson puissant et polyvalent. Les grillades traditionnelles exigent une chaleur intense pour les saisir et les faire revenir comme il faut. On cuit de nombreuses viandes d’abord sur « HIGH » pour les sa...
Page 75 - L’ENSEMBLE BROCHE / FOURCHETTES; les réglages nécessaires.; LE BRÛLEUR DE TOURNEBROCHE; conçu pour enregistrer la chaleur infrarouge directe.; FUMOIR À COPEAUX DE BOIS; remplir de nouveau de copeaux.; NETTOYAGE ET ENTRETIEN; ENTRETIEN DE L’ACIER INOXYDABLE; garantir une longue durée de service du gril.
FR ©2019 Hestan Commercial Corporation 30 L’ENSEMBLE BROCHE / FOURCHETTES Le tournebroche peut accepter de grosses pièces de viande pesant jusqu’à 50 lbs. Préparer la viande et la monter sur la broche puis monter les fourchettes. Enfoncer le côté pointu de la broche dans la viande et centrer celle-c...
Page 76 - métalliques, sauf s’ils sont en acier inoxydable.; MARQUES DE ROUILLE BRUNE; ENTRETIEN DES SURFACES PEINTES (LE CAS ÉCHÉANT)
FR ©2019 Hestan Commercial Corporation 31 Afin de maintenir l’aspect initial de ce gril Hestan, il convient de le nettoyer régulièrement en procédant comme suit : 1. Après avoir utilisé le gril et pris les mesures de sécurité décrites en détail plus haut dans ce manuel, l’essuyer avec un chiffon dou...
Page 77 - Rincer à l’eau douce propre et sécher avec un chiffon propre.; ENTRETIEN DES ÉLÉMENTS DU GRIL; GRILLES DE CUISSON ET DE MAINTIEN AU CHAUD; on laisse d’abord le gril refroidir.; BAC DE RÉCUPÉRATION; NETTOYAGE DU BRÛLEUR DE TOURNEBROCHE; pas couverts par la garantie.; NETTOYAGE DES BRÛLEUR DE SAISIE
FR ©2019 Hestan Commercial Corporation 32 Pour nettoyer la surface à revêtement de peinture en poudre : 1. Éliminer avec précaution tous les dépôts avec une éponge humide.2. Utiliser une brosse (non abrasive) ou un chiffon doux et une solution de détergent ménager doux pour enlever la poussière, le ...
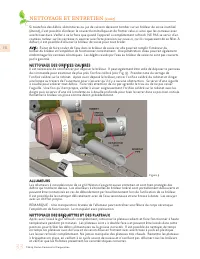
Page 78 - NETTOYAGE DES ORIFICES CALIBRÉS; Remettre le brûleur en place comme décrit précédemment.; ALLUMEURS; l’empêchant de fonctionner. Le manipuler avec précaution.; NETTOYAGE DES BRIQUETTES ET DES PLATEAUX
FR ©2019 Hestan Commercial Corporation 33 Si toutefois des débris alimentaires ou jus de cuisson devaient tomber sur un brûleur de saisie inutilisé (éteint), il est possible d’enlever le couvercle métallique et de frotter celui-ci ainsi que les carreaux avec une brosse dure. Veiller à ne le faire qu...
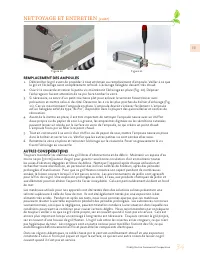
Page 79 - REMPLACEMENT DES AMPOULES; l’éclairage en faisant attention de ne pas faire tomber le verre.; AUTRES CONSIDÉRATIONS; couvert quand il n’est pas en service.
FR ©2019 Hestan Commercial Corporation 34 Figure 10 Figure 11 REMPLACEMENT DES AMPOULES 1. Débrancher le gril avant de procéder à tout entretien ou remplacement d’ampoule. Veiller à ce que le gril et l’éclairage aient complètement refroidi. L’éclairage halogène devient très chaud. 2. Ouvrir le couve...
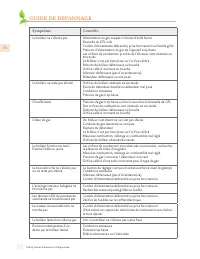
Page 80 - GUIDE DE DÉPANNAGE; Symptôme
FR ©2019 Hestan Commercial Corporation 35 GUIDE DE DÉPANNAGE Symptôme Contrôle Le brûleur ne s’allume pas Alimentation en gaz coupée / robinet d’arrêt fermé Bouteille de GPL vide Cordon d’alimentation débranché, prise hors tension ou fusible grillé Pression d’alimentation en gaz de l’appareil trop b...
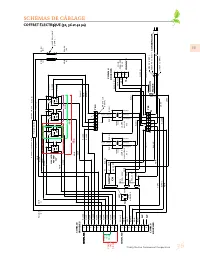
Page 81 - SCHÉMAS DE CÂBLAGE
FR ©2019 Hestan Commercial Corporation 36 SCHÉMAS DE CÂBLAGE NO 6 2 1 COM NO 6 2 1 COM NO 6 2 1 COM NO 6 2 1 COM 12VDC SORTIE ENTRÉE 120 V CA Pilote de DEL + - 12VAC, 4.17A TRANS. 50VA N (BLANC) L (NOIR) 120VAC 12VAC, 4.17A TRANS. 50VA N (BLANC) L (NOIR) 120VAC 1 2 3 4 5 6 7 8 9 10 1 2 3 4 5 6 7 8 L...
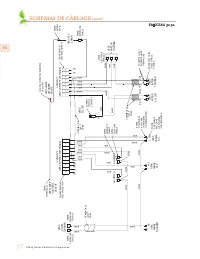
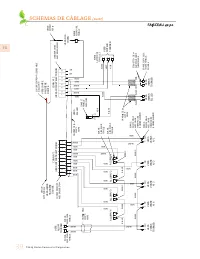
Page 82 - FAISCEAU
FR ©2019 Hestan Commercial Corporation 37 SCHÉMAS DE CÂBLAGE (suite) 1 2 3 4 5 6 7 8 123456789 10 VERS VANNE TOURNEB VERS VANNE N° 1 VERS VANNE N° 2 C N/O N/OC N/OC VERS INTERR ÉCL LED VERS INTERR TOURNEB CONNECT FEMELLE 2 BROCHES 1 2 (-) (+) NOIR BLANC NOIR BLANC VERT BLANC NOIR OCRE DÉNUD EXTRÉM 1...
Page 85 - ÉLÉMENTS COUVERTS PAR LA PRÉSENTE GARANTIE LIMITÉE
FR ©2019 Hestan Commercial Corporation 40 SERVICE Toutes les réparations dans le cadre ou en dehors de la garantie doivent être effectuées par du personnel d’entretien qualifié. Pour localiser un réparateur agréé dans la région, s’adresser au concessionnaire Hestan, au représentant local ou à l’usin...
Page 86 - ALLONGEMENTS AU-DELÀ DE LA PÉRIODE DE GARANTIE LIMITÉE D’UN AN:; garantie comme indiqué expressément ci-après :; Dia; manutention le cas échéant, étant à la charge de l’Acheteur.; ÉLÉMENTS NON COUVERTS PAR LA PRÉSENTE GARANTIE LIMITÉE; GARANTIE LIMITÉE
FR ©2019 Hestan Commercial Corporation 41 ALLONGEMENTS AU-DELÀ DE LA PÉRIODE DE GARANTIE LIMITÉE D’UN AN: En plus de la Garantie limitée d’un an, les composants qui suivent bénéficient d’un prolongement de la garantie comme indiqué expressément ci-après : 1. Le corps de gril en acier inoxydable, les...
Page 87 - d’autres qui varient selon le lieu.
FR ©2019 Hestan Commercial Corporation 42 PARTICULIER, DIRECT OU INDIRECT CAUSÉ PAR L’UTILISATION, L’USAGE ABUSIF OU L’INCAPACITÉ D’UTILISER CE PRODUIT, QUELLE QUE SOIT LA THÉORIE JURIDIQUE SUR LAQUELLE LA DEMANDE SE FONDE, MÊME SI HCC EST INFORMÉ DE LA POSSIBILITÉ DE TELS DOMMAGES. AUCUN RECOUVREME...
Page 88 - Hestan Commercial Corporation; RETAIN THIS MANUAL FOR FUTURE REFERENCE
Hestan Commercial Corporation 3375 E. La Palma Ave. Anaheim, CA 92806 (888) 905-7463 RETAIN THIS MANUAL FOR FUTURE REFERENCE CONSERVEZ CE MANUEL POUR UNE RÉFÉRENCE FUTURE ©2019 Hestan Commercial Corporation P/N 008980 REV F