Page 3 - TABLE OF CONTENTS
49-1000564 Rev. 0 3 TABLE OF CONTENTS ENGLISH SAFETY INFORMATION . . . . . . . . . . . . . . . . . . . . . . . . . . . . . . . . . . . . . . . . . . . . . . . . . . . . . . . . . . . . . . . . . . . . . . . . . . . . . . . . . . . . . . . . . . . . . . . . . 3 USING THE APPLIANCE Controls and Featur...
Page 4 - SAFETY INFORMATION; CAUTION
4 49-1000564 Rev. 0 SAFETY INFORMATION ENGLISH CAUTION To reduce the risk of injury when using your appliance, follow these basic safety precautions . • Keep fingers out of the “pinch point” areas; clearances between the doors and between the doors and cabinet are necessarily small. Be careful closi...
Page 5 - CONNECTING ELECTRICITY; Electrical Shock Hazard.; INSTALLATION; WARNING; EXPLOSION HAZARD; WARNING; FIRE OR EXPLOSION HAZARD Flammable Refrigerant
49-1000564 Rev. 0 5 SAFETY INFORMATION ENGLISH READ AND SAVE THESE INSTRUCTIONS Do not, under any circumstances, cut or remove the third (ground) prong from the power cord. For personal safety, this appliance must be properly grounded. The power cord of this appliance is equipped with a 3-prong (gro...
Page 6 - SUFFOCATION AND ENTRAPMENT HAZARD; Refrigerant and Foam Disposal:; PROPER DISPOSAL OF THE WINE CHILLER
6 49-1000564 Rev. 0 SAFETY INFORMATION ENGLISH READ AND SAVE THESE INSTRUCTIONS WARNING SUFFOCATION AND ENTRAPMENT HAZARD Failure to follow these disposal instructions can result in death or serious injury IMPORTANT: Child entrapment and suffocation are not problems of the past. Junked or abandoned ...
Page 7 - USING THE APPLIANCE; ÌØ×ÝÛØÕÜÊ×ÍÏÎÊÝÞÛÎÜ ́àÒ×ÎÌÎ×ÝÎÛ; Ì1ÏÌØ×ßÎÛÜÒØ×
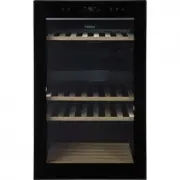
49-1000564 Rev. 0 7 ENGLISH USING THE APPLIANCE ÌØ×ÝÛØÕÜÊ×ÍÏÎÊÝÞÛÎÜ´àÒ×ÎÌÎ×ÝÎÛ The wine chiller has two zones. The operating temperature of both zones is from 41°F (5°C) to 61°F (16°C). This product is designed for storing and cooling wine. It is not intended for storage of perishable foods. As with...
Page 8 - ÌØ×ÝÛØÕÜÊ×ÍÏÎÊÝÞÛÎÜ·; STACKING WINE BOTTLES
8 49-1000564 Rev. 0 USING THE APPLIANCE ENGLISH LOADING WINE BOTTLES ON THE TOP THREE WOOD SHELVES The wine chiller has three slide out wood shelves. These shelves can hold two bottles deep, with bottle necks alternating front to back. LOADING WINE BOTTLES ON THE BOTTOM SHELF Store bottles on the bo...
Page 9 - CARE AND CLEANING; Directions for Cleaning Outside Surfaces,; CLEANING THE OUTSIDE; IN THE EVENT OF A POWER FAILURE
49-1000564 Rev. 0 9 CARE AND CLEANING ENGLISH Directions for Cleaning Outside Surfaces, Door Handles, and Trim DO USE DO NOT USE Soft, clean cloth or sponge Abrasive cloths, scrubbing sponges, scouring or steel wool pads Mild detergent mixed with warm water Abrasive powders or spraysWindow Sprays or...
Page 10 - INSTALLATION INSTRUCTIONS; IMPORTANT –; Note to Installer –; PRODUCT CLEARANCES; TOOLS REQUIRED
10 49-1000564 Rev. 0 ENGLISH INSTALLATION INSTRUCTIONS BEFORE YOU BEGIN Read these instructions completely and carefully. • IMPORTANT – Save these instructions for local inspector’s use. • IMPORTANT – Observe all governing codes and ordinances. • Note to Installer – Be sure to leave these instructio...
Page 11 - INSTALLATION SPACE; REMOVE PACKAGING
49-1000564 Rev. 0 11 DOOR REVERSAL INSTRUCTIONS • Open the door and unsnap the front trim on the cabinet. Find the insert on the left side of the trim and move it to the gap on the right side of the trim. INSTALL GASKET • Push gasket into center rail. The gasket helps with temperature performance. U...
Page 12 - PULL OUT UPPER DOOR GASKET
12 49-1000564 Rev. 0 ENGLISH INSTALLATION INSTRUCTIONS PULL OUT UPPER DOOR GASKET Pull-out the upper part of the door gasket, and unsnap the trim on the back side of the door. (Remove from the left side opening) REMOVE THE DOOR CAM AND BRACKET Remove the door cam and door bracket from the bottom of ...
Page 13 - INSTALL LOWER HINGE ASSEMBLY; ROUTE THE DOOR WIRES; INSERT TOP HINGE
49-1000564 Rev. 0 13 ENGLISH INSTALLATION INSTRUCTIONS INSTALL LOWER HINGE ASSEMBLY Install the lower hinge assembly on the left side of the cabinet. Lubricate the hinge cam. Install the other adjustable foot on the opposite side. ATTACH TOP HINGE Attach the top hinge with two screws to the cabinet....
Page 14 - CHECK DOOR FOR PROPER CLOSURE; LEVEL
14 49-1000564 Rev. 0 INSTALLATION INSTRUCTIONS ENGLISH MOVE MAGNETIC SWITCH AND CONNECT DOOR WIRING Move the magnetic switch to the right mounting slot, connect the door wiring and fasten the front trim of the cabinet. (Remove from the left side opening) CHECK DOOR FOR PROPER CLOSURE Make sure the d...
Page 15 - TROUBLE SHOOTING; CRACKS and CHIRPS; WATER SOUNDS; NORMAL OPERATING SOUNDS
49-1000564 Rev. 0 15 ENGLISH TROUBLE SHOOTING HUMMM... WHOOSH... Ŷ The new high efficiency compressor may run faster and longer than your old appliance and you may hear a high-pitched hum or pulsating sound while it is operating. Ŷ 6RPHWLPHVWKH appliance runs for an extended period, especially when ...
Page 16 - PROBLEM
16 49-1000564 Rev. 0 TROUBLE SHOOTING ENGLISH PROBLEM POSSIBLE CAUSES WHAT TO DO Appliance does not operate Appliance may be in defrost cycle. This is normal. Compressor does not operate for at least 40 minutes when in defrost cycle. Appliance is unplugged. Push the plug completely into the outlet. ...
Page 17 - Problem
49-1000564 Rev. 0 17 ENGLISH TROUBLE SHOOTING Problem Possible Causes What To Do Moisture forms on outside of appliance Not unusual during periods of high humidity. If bothersome, wipe surface dry; otherwise, moisture will evaporate in time. Door left open. Always make sure that the door is closed a...
Page 18 - NOTES
Page 19 - LIMITED WARRANTY
12 Months on Parts and Labor Ïòõ!"ðòñ÷ëöéõòð÷ëèçä÷èòéòõìêìñäïõè÷äìïóøõæëäöèÐÎ Appliances will replace any part of the refrigerator that fails çøè÷òäçèéèæ÷ìñðä÷èõìäïöòõúòõîðäñöëìóÐÎÊóóïìäñæèö will choose, at its discretion, to replace or service the çèéèæ÷ìùèøñì÷ÜëòøïçÐÎÊóóïìäñæèöçèæìçè÷òöèõùìæè÷...
Page 20 - RECORD KEEPING
20 49-1000564 Rev. 0 ENGLISH RECORD KEEPING Thank you for purchasing this Haier product. This user manual will help you get the best performance from your new refrigerator. For future reference, record the model number, serial number, and the date of purchase. The model/serial number plate is locate...
Page 23 - TABLE DES MATIÈRES
49-1000564 Rev. 0 3 FRANÇAIS TABLE DES MATIÈRES INFORMATION DE SÉCURITÉ . . . . . . . . . . . . . . . . . . . . . . . . . . . . . . . . . . . . . . . . . . . . . . . . . . . . . . . . . . . . . . . . . . . . . . . . . . . . . . . . . . . . . . . . . . . 3 UTILISATION DE L’APPAREIL Contrôles et carac...
Page 24 - CONSIGNES DE SÉCURITÉ; ATTENTION CONSOMMATEUR!
4 49-1000564 Rev. 0 FRANÇAIS CONSIGNES DE SÉCURITÉ LIRE ET CONSERVER CES INSTRUCTIONS ATTENTION CONSOMMATEUR! Cet appareil a été conçu pour entreposer et refroidir le vin. Ne stockez pas d’aliments périssables dans cet appareil. ATTENTION Pour réduire le risque de blessures lorsque vous utilisez vot...
Page 25 - Risque de choc électrique.; Risque d’explosion; RISQUE D’INCENDIE OU D’EXPLOSION Réfrigérant inflammable
49-1000564 Rev. 0 5 FRANÇAIS CONSIGNES DE SÉCURITÉ LIRE ET CONSERVER CES INSTRUCTIONS INSTALLATION Ne coupez pas ou n’enlevez pas, sous aucun prétexte, la troisième broche de mise à la terre du cordon d’alimentation. Pour des raisons de sécurité, cet appareil doit être correctement mis à la terre. C...
Page 26 - MISE AUX REBUTS SÉCURITAIRE DU REFROIDISSEUR À VIN; RISQUE DE SUFFOQUER OU D’Y ÊTRE EMPRISONNÉ; Mise au rebut des produits réfrigérants et en mousse
6 49-1000564 Rev. 0 FRANÇAIS CONSIGNES DE SÉCURITÉ LIRE ET CONSERVER CES INSTRUCTIONS MISE AUX REBUTS SÉCURITAIRE DU REFROIDISSEUR À VIN AVERTISSEMENT RISQUE DE SUFFOQUER OU D’Y ÊTRE EMPRISONNÉ Le non-respect de ces instructions d'élimination peut entraîner la mort ou des blessures graves. IMPORTANT...
Page 27 - UTILISATION DE L’APPAREIL; COMMANDES ET CARACTÉRISTIQUES; ÌØ×ßÎÛÜÒØ×Ì1Ï; ßÎÛÛØÞÒÕÕÊÐÎ1ÍŰßÎÛÛØÞÒÕÕÊÐÎÍÞ
49-1000564 Rev. 0 7 FRANÇAIS UTILISATION DE L’APPAREIL COMMANDES ET CARACTÉRISTIQUES ´ÛÎÏÛØÒÍÒÜÜÎÞÛƑßÒ× Ce refroidisseur à vin comporte deux zones. La plage de températures de service des deux zones se situe entre 41 °F (5 °C) à 61 °F (16 °C). Cet appareil a été conçu pour entreposer et refroidir le...
Page 28 - COMMANDES ET; EMPILAGE DES BOUTEILLES DE VIN
8 49-1000564 Rev. 0 FRANÇAIS UTILISATION DE L’APPAREIL ENTREPOSAGE DE BOUTEILLES DE VIN SUR LES TROIS TABLETTES SUPÉRIEURES EN BOIS Le refroidisseur à vin comporte trois tablettes coulissantes en bois. Ces tablettes peuvent contenir deux bouteilles de profondeur en alternant les cols de bouteilles d...
Page 29 - ENTRETIEN ET NETTOYAGE; Directives pour nettoyer les surfaces extérieures,; NETTOYAGE DE L’EXTÉRIEUR; DANS LE CAS D’UNE PANNE D’ÉLECTRICITÉ
49-1000564 Rev. 0 9 FRANÇAIS ENTRETIEN ET NETTOYAGE Directives pour nettoyer les surfaces extérieures, les poignées de porte et les garnitures UTILISER NE PAS UTILISER Linge ou éponge doux et propres Linges abrasifs, éponges à récurer, tampons à récurer ou en laine d’acier. Détergent doux mélangé à ...
Page 30 - INSTRUCTIONS D’INSTALLATION; OUTILS REQUIS; PIÈCES FOURNIES; AVANT DE COMMENCER; Remarque à l’intention de l’installateur –
10 49-1000564 Rev. 0 FRANÇAIS INSTRUCTIONS D’INSTALLATION DÉGAGEMENT REQUIS POUR OUVERTURE DE PORTE L’ouverture de porte du refroidisseur à vin est réglée en usine sur 105°. Pour une installation en coin: • Laissez un espace minimum de 1 po (2,5 cm) du côté de la charnière pour que la porte s’ouvre ...
Page 31 - ESPACE D’INSTALLATION; DÉBALLAG
49-1000564 Rev. 0 11 FRANÇAIS INSTRUCTIONS POUR INVERSER LA PORTE • Øøùõèýïäóòõ÷èè÷çƀ÷äæëèýïäêäõñì÷øõèéõòñ÷äïèçèïä carrosserie. Trouvez la fiche sur le côté gauche de la garniture et déplacez-la dans le jeu du côté droit de la garniture. DÉBRANCHEMENT DU FIL DE RACCORDEMENT • Débranchez le fil de ra...
Page 32 - RETRAIT DES VIS DE LA CHARNIÈRE
12 49-1000564 Rev. 0 FRANÇAIS INSTRUCTIONS D’INSTALLATION SÉPARATION DU JOINT D’ÉTANCHÉITÉ DE PORTE SUPÉRIEUR Séparez la partie supérieure du joint d’étanchéité de la porte, détachez la garniture située derrière la porte. (Retrait depuis l’ouverture du côté gauche). RETRAIT DE L’EXCENTRIQUE DE PORTE...
Page 34 - RACCORDEMENT DE L’ALIMENTATION; NIVEAU
14 49-1000564 Rev. 0 FRANÇAIS INSTRUCTIONS D’INSTALLATION DÉPLACEMENT DE L’INTERRUPTEUR MAGNÉTIQUE ET RACCORDEMENT DU CÂBLAGE DE PORTE Déplacez l’interrupteur magnétique de la fente de montage droite, raccordez le câblage de porte et fixez la garniture frontale sur la carrosserie. (Retirer depuis l’...
Page 35 - DÉPANNAGE; CRAQUEMENTS et SIFFLEMENTS; BRUITS D’EAU; SONS NORMAUX DE FONCTIONNEMENT
49-1000564 Rev. 0 15 FRANÇAIS DÉPANNAGE HUMMM... WHOOSH... • Le nouveau compresseur à haut rendement peut tourner plus vite et plus longtemps que celui de votre ancien appareil et peut émettre des sons et vibrations plus aigus lorsqu’il fonctionne. • L’appareil peut fonctionner pour de longues pério...
Page 39 - GARANTIE LIMITÉE
12 mois sur les pièces et la main-d’œuvre Íøõäñ÷ïèö!"ðòìööøìùäñ÷ïäçä÷èçđäæëä÷çđòõìêìñèäøçƀ÷äìïÐÎ Appliances remplacera toute pièce du réfrigérateur présentant une défectuosité en raison d’un vice de matière ou de fabrication. Le choix entre le remplacement ou la réparation de l’appareil çƀéèæ÷øè...
Page 40 - DOCUMENTS À CONSERVER
20 49-1000564 Rev. 0 FRANÇAIS DOCUMENTS À CONSERVER Öèõæìçđäùòìõäæëè÷ƀæèóõòçøì÷ÑäìèõÌèðäñøèïçđø÷ìïìöä÷ìòñùòøöäìçèõäƘ obtenir la meilleure performance possible de votre nouveau réfrigérateur. Pour référence ultérieure, inscrire le numéro de plaque signalétique et la date d’achat. La plaque signalétiq...
Page 43 - ÍNDICE
49-1000564 Rev. 0 3 ESP AÑOL ÍNDICE INFORMACIÓN DE SEGURIDAD . . . . . . . . . . . . . . . . . . . . . . . . . . . . . . . . . . . . . . . . . . . . . . . . . . . . . . . . . . . . . . . . . . . . . . . . . . . . . . . . . . . . . . . . . 3 USO DEL ELECTRODOMÉSTICO Controles y Funciones: Refrigerado...
Page 44 - INFORMACIÓN DE SEGURIDAD; PRECAUCIÓN; ADVERTENCIA
4 49-1000564 Rev. 0 ESP AÑOL INFORMACIÓN DE SEGURIDAD LEA Y GUARDE ESTAS INSTRUCCIONES ATENCIÓN CONSUMIDOR! Este electrodoméstico fue diseñado para guardar y enfriar vino. No guarde comidas perecederas en esta unidad. PRECAUCIÓN A fin de reducir el riesgo de lesiones al usar el refrigerador, siga es...
Page 45 - CONEXIÓN DE LA ELECTRICIDAD; Riesgo de Explosión; RIESGO DE INCENDIO O EXPLOSIÓN Refrigerantes Inflamables
49-1000564 Rev. 0 5 ESP AÑOL INFORMACIÓN DE SEGURIDAD LEA Y GUARDE ESTAS INSTRUCCIONES CONEXIÓN DE LA ELECTRICIDAD Nunca, bajo ninguna circunstancia, corte o elimine el tercer cable (tierra) del cable de corriente. Para su seguridad personal, este electrodoméstico debe estar adecuadamente conectado ...
Page 46 - DESCARTE CORRECTO DEL REFRIGERADOR DE VINO; Cómo Eliminar Refrigerantes y Gomaespumas:
6 49-1000564 Rev. 0 ESP AÑOL INFORMACIÓN DE SEGURIDAD LEA Y GUARDE ESTAS INSTRUCCIONES DESCARTE CORRECTO DEL REFRIGERADOR DE VINO ADVERTENCIA P ELIGRO DE SUFFOCATION Y ENTRAPMENT El incumplimiento de estas instrucciones de eliminación puede causar la muerte o lesiones graves. IMPORTANTE: Que un niño...
Page 47 - USO DEL ELECTRODOMÉSTICO; ÌØ×ÝÛØÕÎÜâÏÞ×ÌÒØ×ÎÜμÛÎÏÛÒÐÎÛÊÍØÛÍÎßÒ×Ø; ÌØ×ßÎÛÜÒŵ×ÍÎÌ1Ï; ËÕØÚÞÎØ1ÍÎÜËÕØÚÞÎØÍÎÕÙÊ×ÎÕÍÎ
49-1000564 Rev. 0 7 ESP AÑOL USO DEL ELECTRODOMÉSTICO ÌØ×ÝÛØÕÎÜâÏÞ×ÌÒØ×ÎܵÛÎÏÛÒÐÎÛÊÍØÛÍÎßÒ×Ø El refrigerador de vino cuenta con dos zonas. La temperatura de funcionamiento de ambas zonas se encuentra entre 41°F (5°C) y 61°F (16°C). Este producto fue diseñado para guardar y enfriar vino. No fue diseñ...
Page 48 - CONTROLES Y FUNCIONES; ·ÌØ×Ý ̧
8 49-1000564 Rev. 0 ESP AÑOL USO DEL ELECTRODOMÉSTICO CARGA DE BOTELLAS DE VINO EN LAS TRES REPISAS SUPERIORES DE MADERA El refrigerador de vino cuenta con tres repisas de madera deslizables. Estas repisas permiten colocar dos botellas hasta llegar a la parte más profunda, con los cuellos de las bot...
Page 49 - CUIDADO Y LIMPIEZA; Exteriores, Manijas de Puertas y Marcos; LIMPIEZA DE LA PARTE EXTERIOR; EN CASO DE CORTE DE CORRIENTE
49-1000564 Rev. 0 9 ESP AÑOL CUIDADO Y LIMPIEZA ,QVWUXFFLRQHVSDUDOD/LPSLH]DGH6XSHU¿FLHV Exteriores, Manijas de Puertas y Marcos USE NO USE Telas suaves y limpias o esponjas Telas abrasivas, esponjas de fregar, almohadillas de estropajo o de lana de acero Detergente suave mezclado con agua caliente P...
Page 50 - • IMPORTANTE –; • Nota para el Instalador –; ESPACIOS LIBRES DEL PRODUCTO; HERRAMIENTAS REQUERIDAS
10 49-1000564 Rev. 0 ESP AÑOL INFORMACIÓN DE SEGURIDAD ANTES DE COMENZAR Lea estas instrucciones en su totalidad y atentamente. • IMPORTANTE – Guarde estas instrucciones para uso del inspector local. • IMPORTANTE – Cumpla con todos los códigos y ordenanzas gubernamentales. • Nota para el Instalador ...
Page 51 - ESPACIO DE INSTALACIÓN; RETIRE EL EMBALAJE; INSTALE LA JUNTA
49-1000564 Rev. 0 11 ESP AÑOL INSTRUCCIONES DE INVERSIÓN DE LA PUERTA • Abra la puerta y desmonte el marco frontal del êäåìñè÷èËøöôøèïäìñöèõæìƅñçèïïäçòìýôøìèõçòçèï marco y muévala hacia el espacio libre del lado derecho del marco. DESENCHUFE LA CONEXIÓN DEL CABLE • Desenchufe el cable de conexión en...
Page 52 - INVERSIÓN DE LA BISAGRA SUPERIOR
12 49-1000564 Rev. 0 ESP AÑOL INFORMACIÓN DE SEGURIDAD RETIRE LA JUNTA SUPERIOR DE LA PUERTA Retire la parte superior de la junta de la puerta, y desensamble el marco desde el lado trasero de la puerta. (Retire el mismo de la abertura del lado izquierdo.) RETIRE LA LEVA Y EL SOPORTE DE LA PUERTA Ret...
Page 53 - ADHIERA LA BISAGRA SUPERIOR; INSERTE LA BISAGRA SUPERIOR
49-1000564 Rev. 0 13 ESP AÑOL INFORMACIÓN DE SEGURIDAD INSTALE EL ENSAMBLE DE LA BISAGRA INFERIOR Instale el ensamble de la bisagra inferior sobre el lado izquierdo del gabinete. Lubrique la leva de la bisagra. Instale el otro pie ajustable sobre el lado opuesto. ADHIERA LA BISAGRA SUPERIOR Adhiera ...
Page 54 - CONECTE LA CORRIENTE; NIVEL
14 49-1000564 Rev. 0 ESP AÑOL INFORMACIÓN DE SEGURIDAD MUEVA EL INTERRUPTOR IMANTADO Y CONECTE EL CABLEADO DE LA PUERTA Mueva el interruptor imantado hacia la ranura de montaje derecha, conecte el cableado de la puerta y ajuste el marco frontal del gabinete. (Retire el mismo de la abertura del lado ...
Page 55 - SOLUCIÓN DE PROBLEMAS; CRACK y CHIRP; SONIDOS DE FUNCIONAMIENTO NORMALES
49-1000564 Rev. 0 15 ESP AÑOL SOLUCIÓN DE PROBLEMAS HUMMM... WHOOSH... • El nuevo compresor de alta eficacia puede funcionar a mayor velocidad y durante más tiempo que su antiguo aparato, y podría escuchar un zumbido de tono alto o un sonido de vibración mientras está en funcionamiento. • A veces el...
Page 56 - Problema
16 49-1000564 Rev. 0 ESP AÑOL SOLUCIÓN DE PROBLEMAS Problema Causas posibles Qué hacer El aparato no funciona Puede que el aparato esté en el ciclo de descongelado. Esto es normal. El compresor no funciona durante por lo menos 40 minutos al usar el ciclo de descongelación. El aparato está desconecta...
Page 58 - NOTAS
Page 59 - GARANTÍA LIMITADA
12 Meses para Piezas y Trabajos Durante 12 meses desde la fecha de compra minorista original, GE Appliances reemplazará cualquier pieza del refrigerador que falle debido a un defecto en los materiales o la fabricación. GE Appliances podrá, a su criterio, reemplazar o realizar la reparación de la uni...
Page 60 - INFORMACIÓN A TENER EN CUENTA
20 49-1000564 Rev. 0 ESP AÑOL INFORMACIÓN A TENER EN CUENTA _______________________________________ Número de modelo _______________________________________ Número de serie _______________________________________ Fecha de compra Le agradecemos la compra de este producto de marca Haier. Este manual p...