Page 2 - CONTENTS; Installation & adjustment; Operation and Wash Cycles
CONTENTS Product overviewSafety precautions Installation & adjustment Before washing Operation Cleaning and Maintenance Packing listSpecification Trouble-shooting 1 2 2 2 4 4 5 5 6 7 889 16 7 8 1415 17 Description of symbolsSafety warnings Installing the bottom plate Balancing the washing machin...
Page 3 - Product overview
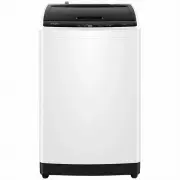
Product overview Outer tub cover Top lid Inner tub Pulsator Detergent tray (Not applicable for HWT60AA1 model ) Base frame Screw cover Adjustable feet (2 pieces) Top deck Cabinet Cold water inlet valve Fixed feet (2 pieces) Handle Power cord Back cover Please understand the shapes of the washing mac...
Page 4 - Description of symbols; Warning sign; Safety precautions; Warning
Description of symbols Warning sign Forbidden sign Contents marked with this symbol are related to the safe use of the product and the personal safety of the user. Please operate in acc ordance with the contents of this manual to avoid harm to the user or damage to the machine. Contents marked with ...
Page 5 - Forbidden
Safety precautions Forbidden 60 If you are using an extension cord or a portable electrical outlet device (not recommended), ensure that it is positioned so that it does not come into contact with water or moisture. Do not install this appliance in a damp or wet environment. Do not leave wet laundry...
Page 7 - Installation & Adjustment; Balancing the washing machine
Installation & Adjustment Drain hose 5 2. First connect the drain hose to the connection point on the lower right side of the cabinet, and fasten with drain hose clamp (provided). 3. Connect drain hose guide on to the outside of drain hose. To guide the drain hose over the tub or standpipe, the ...
Page 8 - Connection between the water inlet hose and; Check the inlet hose connections
Installation & Adjustment Connection between the water inlet hose and the washer 1.Do not take off the water absorption cushion. Please check if the cushion has dropped off or is damaged before attaching to the washing machine. If this happens please contact our after-sale department 2.Put the n...
Page 9 - Preparation before washing; Check the following before washing; Before washing; b. Divide the laundry into colour fast and non-colour fast items.
Preparation before washing 1.Connect the water inlet hose. Open the water faucet. 2.Insert the power plug into the wall power socket. 3.Ensure the drain hose is mounted at the correct height. 4.When the water pressure in the user's home is too low, it may not be able to wash detergents and softeners...
Page 10 - Adding washing power; Operation; Loading your laundry; Close the lid
Adding washing power The rated washing capacity refers to the largest dry weight of a load that can be washed. Before washing, please make sure that the water level covers the clothes. Adjust the number of clothes according to the actual situation. The clothes load should not exceed the height of th...
Page 11 - Key Lock function; Indicator display; Explanation of buttons; Delay
Operation P ush the Power button, set the desired washing program, after setting, press the “Start/Pause” button, then hold the “Delay” button and “Cycle” button at the same time for more than 1 second.The digital display “CL” , the child lock. All of the buttons are locked, and will not function. K...
Page 12 - Start
Operation After the power is switched on, press it to start the machine. To pause the wash cycle, press the “start/pause” button.To restart a wash cycle, press the “start/pause” button again . Start Pause F "Start/Pause" button 10 Page 15 During the wash cycle, the digital display will show ...
Page 14 - After the power is turned on, the default is Cotton cycle.; Press the button to switch power on/off; Operating Method of Delay Procedure; The wash will finish
Operation and Wash Cycles 12 After the power is turned on, the default is Cotton cycle. To select other fully-auto cycles, For example, when you want to wash lightly soiled clothes quickly, use a Express cycle. All of the cycles except Drum clean , Rinse & spin and spin cycles have fuzzy functio...
Page 15 - Press the button to start the cycle
Operation and Wash Cycles 13 6 Press the button to start the cycle Name of program for energy efficiency labelling used in warm wash tests - Eco, Water Level High, Please use low suds/high efficiency detergent. Note: This washer has a 2-step water fill to achieve the required water level and tempera...
Page 16 - Cleaning and Maintenance; Maintenance
Remove Both lint filters must be used during washing. Must be cleaned after each use. Clean the detergent box and set it on the control panel seat. 1.The method of dismantling: Tilt upward pull out and gently. 2.The method of cleaning: Use a brush and duster cloth to clean it, then flush it with wat...
Page 17 - Problem
Is the water inlet hose loose? The water tap leaks. Redistribute the load evenly. Push the Start/Pause button once. Level the machine. Push the Start/Pause button once. The display shows E4. . Is the water tap closed or has the water supply been interrupted? Is the water inlet valve blocked? Is the ...
Page 18 - Common occurrences; Packing list
The display shows F2. Overflow Error Trouble-shooting Common occurrences The display shows FC2. The spinning is intermittent after it starts. 16 Packing list Problem Possible causes What to do Redistribute the load evenly.Close the top lid. Select spin program, but it does not work. There maybe wate...
Page 19 - Specification
17 TOP LOAD FULL-AUTOMATIC WASHING MACHINE Specification TypeModelRated voltage/frequencyRated washing powerRated spinning powerNet weightGross weightDimensions(mm)Water inlet pressureRated Washing capacity 220-240V/50Hz385W345W32kg38kg 6kg W 520 D 540 H 9050.03MPa-1.0MPa HWT60AA1 220-240V/50Hz400W3...