Page 3 - CONTENTS; SAVE THESE INSTRUCTIONS; Registration
1 CONTENTS IMPORTANT! SAVE THESE INSTRUCTIONS The models shown in this user guide may not be available in all markets and are subject to change at any time. For current details about model and specification availability in your country, please go to our website fisherpaykel.com or contact your local...
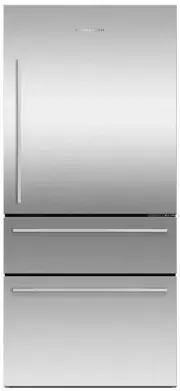
Page 5 - INTRODUCTION; Thank you for buying a Fisher & Paykel ActiveSmartTM refrigerator.
3 INTRODUCTION Thank you for buying a Fisher & Paykel ActiveSmart™ refrigerator. At Fisher & Paykel, we are very proud of this refrigerator. This refrigerator combines size and storage space with the latest features and functions. Thousands of hours of food care research and refrigeration ex...
Page 6 - SAFETY AND WARNINGS; IMPORTANT SAFETY INSTRUCTIONS
4 SAFETY AND WARNINGS ! WARNING! Electric Shock Hazard Read and follow the safety and warnings outlined in this User guide before operating this appliance. Failure to do so can result in death, electric shock, fire or injury to persons. ! WARNING! This appliance is top-heavy and must be secured to p...
Page 8 - Electrical
6 SAFETY AND WARNINGS Electrical • This appliance must be installed in accordance with the installation instructions before use. • To allow disconnection of the appliance from the supply after installation, incorporate a switch in the fixed wiring in accordance with the wiring rules • Never unplug y...
Page 9 - Cleaning
7 SAFETY AND WARNINGS All electrical repairs must be carried out by an adequately trained service technician or qualified electrician. Cleaning • Many commercially available cleaning products contain solvents that may attack the plastic components of your refrigerator and cause them to crack. • Avoi...
Page 10 - Storing food and drinks
8 SAFETY AND WARNINGS Storing food and drinks • Do not store explosive substances such as aerosol cans with a flammable propellant in this appliance. • Never store volatile or flammable materials in your refrigerator as they may explode. • Never freeze liquids in glass containers. Liquid expands dur...
Page 11 - INSTALLATION INSTRUCTIONS; Before installation; Power
9 INSTALLATION INSTRUCTIONS Please follow the installation steps below to ensure your appliance operates correctly. Before installation Power ● ● Install your appliance where the plug is easily accessible. ● ● Connect your refrigerator to a separate power point. Avoid sharing the power point with ot...
Page 12 - Product and cabinetry dimensions
10 INSTALLATION INSTRUCTIONS Flush with refrigerator door — full door rotation Flush with refrigerator door — 90° door rotation RF523M RF523G Flush with refrigerator chassis — full door rotation RF523GDX1 GB/SG RF172GDJX1 US PRODUCT SIZE & GAPS SOURCE: FP CAD files: Victor Tan (dimensional), Stu...
Page 13 - Flush with refrigerator chassis — full door rotation
11 INSTALLATION INSTRUCTIONS RF523G RF523M PRODUCT DIMENSIONS mm mm A Overall height of product 1790 1790 B Overall width of product 790 790 C Overall depth of product (excludes handle) 688 688 D Depth with door open — from rear of fridge — 90° rotation 1026 1426 E Depth with door open — from flush ...
Page 14 - Installing your anti tip bracket; Anti-tip bracket fittings
12 INSTALLATION INSTRUCTIONS Installing your anti tip bracket CAUTION! Failure to install the anti-tip bracket as per below instructions can result in serious injury or death. Anti-tip bracket fittings – Included with your refrigerator. Determine the location of your refrigerator Refrigerator locate...
Page 15 - When fastening with masonry plugs and/or screws:
13 INSTALLATION INSTRUCTIONS 4 Locate the two holes on the rear of the refrigerator (refer to C ). Screw in the M6 cap screws until all the thread is gone. 5 Move the refrigerator back towards the wall until the screw hits the back of the bracket (refer to D ). Note: If you want your refrigerator to...
Page 16 - Connecting water (Water dispensing and Automatic Ice models)
14 INSTALLATION INSTRUCTIONS Connecting water (Water dispensing and Automatic Ice models) 1 Ensure the refrigerator is NOT plugged into a power supply. Locate the isolation tap for water connection – cold water supply only. (Tee and tap fitting not supplied). 2 Uncoil a tubing with quick fitting fro...
Page 17 - Before you start using the Ice & Water or Automatic Ice function; For Automatic ice model
15 INSTALLATION INSTRUCTIONS Before you start using the Ice & Water or Automatic Ice function Before first use, you need to flush water through the filter to remove impurities or trapped air in the water tank and filter system. For Ice & Water ● ● Press the water dispenser pad to dispense 4L...
Page 18 - Positioning your refrigerator (all models); into its final location a simple task.; Levelling of refrigerator doors; Open the door that is out of alignment.
16 INSTALLATION INSTRUCTIONS Positioning your refrigerator (all models) Your Fisher & Paykel ActiveSmart™ refrigerator is fitted with front and rear rollers to allow you to easily move your refrigerator forward and backward. Avoid moving your refrigerator sideways to prevent damaging the rollers...
Page 19 - What to do if your product is unstable; Gently push the refrigerator back until the rear; Make small adjustments to front feet where necessary.
17 INSTALLATION INSTRUCTIONS What to do if your product is unstable A Gently push the refrigerator back until the rear rollers contact the floor. ● ● Measure the gap under the front foot, which has come off the floor. ● ● Obtain some solid packing material (hardwood, plastic, etc) which fits firmly ...
Page 20 - Before placing food in the fresh food or freezer compartments; For the most energy efficient use of your appliance:
18 INSTALLATION INSTRUCTIONS Before placing food in the fresh food or freezer compartments ● ● Remove all internal packaging. Ensure that all transit clips are removed from the refrigerator. These are small rubber stoppers located at the back of the shelves. ● ● Clean the inside of the appliance wit...
Page 21 - ACTIVESMARTTM SPECIAL FEATURES; SmartTouch control panel
19 ACTIVESMART™ SPECIAL FEATURES SmartTouch control panel The control panel is located in the inside front of the refrigerator. It enables you to view and modify all the features and options of your refrigerator. SmartTouch CONTROL PANEL FEATURES Compartment Allows you to select which compartment to...
Page 22 - External display (Water dispensing models only)
20 ACTIVESMART™ SPECIAL FEATURES External display (Water dispensing models only) This display enables you to lock the water dispenser, indicates to you when ‘Bottle Chill’ is activated and when your water filter requires changing. EXTERNAL DISPLAY FEATURES Dispenser lock button and LED light Locks/u...
Page 23 - Temperature control; – This will take between 2 – 3 hours.; Adjusting the temperature — Fresh food compartment; The fresh food compartment light will illuminate.; Adjusting the temperature — Frozen food compartment (freezer); The frozen food compartment light will illuminate.; ACTIVESMARTTM OPERATING INSTRUCTIONS
21 Temperature control ● ● Once you turn on your refrigerator for the first time, the cooling system will automatically cool all compartments to their set temperatures. – This will take between 2 – 3 hours. ● ● The internal control panel enables you to change and control the temperature of all compa...
Page 24 - Door alarms
22 ACTIVESMART™ OPERATING INSTRUCTIONS Door alarms ● ● If the fresh food compartment door is left open, the alarm will beep after 90 seconds, if the freezer door is left open the alarm will beep after 60 seconds. ● ● If either of the doors remains open, subsequent beeps will sound every 30 seconds f...
Page 25 - Once in Sabbath mode:
23 ACTIVESMART™ OPERATING INSTRUCTIONS Sabbath mode activation In Sabbath mode, alarms, lights and displays are deactivated for 80 hours. ● ● To activate Sabbath mode, press , and buttons for 4 seconds. – The icon on the internal control panel will illuminate. Once in Sabbath mode: ● ● The interior ...
Page 26 - There is a replacement indicator icon; Changing the water filter cartridge
24 ACTIVESMART™ OPERATING INSTRUCTIONS Water filter (ice & water and automatic ice models only) The water supplied to your refrigerator is filtered to remove impurities through a filter located internally at the top right corner of the refrigerator. Replace your filter cartridge every 6 months. ...
Page 27 - Using your ice maker
25 ACTIVESMART™ OPERATING INSTRUCTIONS Using your ice maker (Ice & Water and automatic ice models only) Ice On/Off Your ice maker is designed to automatically dispense ice into the ice storage bin below until it detects the bin is full. The more ice you use, the more it makes. First use ● ● Th...
Page 28 - Turn your ice maker off if:; Information about your ice maker
26 ACTIVESMART™ OPERATING INSTRUCTIONS Turn your ice maker off if: ● ● There is no water supply for several hours. ● ● You are removing the ice storage bin for a period of time. ● ● You are going on holiday/vacation. Information about your ice maker ● ● Your automatic ice maker will produce approxim...
Page 29 - Bottle Chill
27 ACTIVESMART™ OPERATING INSTRUCTIONS Bottle Chill This function allows you to rapidly chill your beverages in the freezer for a set time of 15 minutes. The time taken to chill depends on the size of your beverage. If your beverage is not cold enough after 15 minutes, return it to the freezer and r...
Page 30 - Information about your manual ice system
28 ACTIVESMART™ OPERATING INSTRUCTIONS Manual ice system (selected models only) An ice storage bin which sits inside the upper top freezer bin provides storage for and gives you access to clean, clear ice cubes. Information about your manual ice system To make ice: ● ● Take the ice tray and lid from...
Page 31 - Glass shelves; Cantilever glass shelves — half-width and full-width; Drip tray (Water dispensing models
29 ACTIVESMART™ OPERATING INSTRUCTIONS Bottle holder (where fitted) ● ● The bottle holders can be used to store a variety of bottles. ● ● To position the bottle holder in your refrigerator, slot the back edge of the bottle holder onto the back trim of any shelf in the fresh food compartment. ● ● Unu...
Page 32 - CLEANING AND CARING FOR YOUR REFRIGERATOR; Rinse with clean water and dry with a clean, lint-free cloth.
30 CLEANING AND CARING FOR YOUR REFRIGERATOR Exterior Stainless exterior doors ● ● Clean the exterior door with liquid dishwashing detergent dissolved in warm water and a soft cloth. ● ● Dry the door with a lint-free cloth. ● ● Do not use any abrasive, stainless steel cleaners or solvents on the doo...
Page 34 - Interior; Freezer bins
32 CLEANING AND CARING FOR YOUR REFRIGERATOR Interior ● ● It is important to keep the interior of the refrigerator and freezer clean to help prevent food from becoming contaminated during storage. ● ● The amount and types of food stored determines how often cleaning should be carried out in the refr...
Page 35 - How to remove shelving and bins for cleaning; Hold the shelf firmly and pull the shelf towards you (refer to; Humidity control lid; Remove the shelf directly above the bins, follow the steps above.
33 CLEANING AND CARING FOR YOUR REFRIGERATOR How to remove shelving and bins for cleaning Shelving To remove a shelf: 1 Hold the shelf firmly and pull the shelf towards you (refer to A ). 2 Lift the shelf up vertically (refer to B ). 3 Slide the shelf towards you (refer to C ). Note: Refer to ‘Opera...
Page 36 - Fixed bins
34 CLEANING AND CARING FOR YOUR REFRIGERATOR Fixed bins To remove: 1 For ease of removal, empty food from the bin first. 2 Hold the centre front of the bin handle. 3 Lift vertically to unclip from the runners and pull bin towards you to remove (refer to A ). 4 Push both runners back into refrigerato...
Page 37 - STORING FOOD IN YOUR REFRIGERATOR; General fresh food storage; Store only fresh, high quality food; Dairy foods and eggs
35 STORING FOOD IN YOUR REFRIGERATOR Your refrigerator helps to extend the storage times of fresh perishable foods. The cold temperature slows down the major causes of food spoilage, particularly the growth of bacteria, moulds and yeasts causing chemical and physical reactions. General fresh food st...
Page 38 - Keep poultry goods in the original packaging until you use them.
36 STORING FOOD IN YOUR REFRIGERATOR Red meat ● ● Ensure raw and cooked foods are stored in separate air tight containers to prevent cross contamination from the loss of raw meat juices. ● ● Ensure delicatessen meats are consumed within the recommended storage time. These can be stored in the slim s...
Page 39 - STORING FOOD IN YOUR FREEZER; General frozen food care; Recommended freezer storage times; MONTHS
37 STORING FOOD IN YOUR FREEZER Freezing and storing foods at temperatures -18°C or colder helps retain the physical quality and nutritional value of foods. Low temperatures inhibit the growth of bacteria, moulds and yeasts, thereby restricting chemical and physical reactions to extend the food’s st...
Page 40 - Ensure vegetables are sorted and damaged parts are discarded.
38 STORING FOOD IN YOUR FREEZER Red meats, poultry and game ● ● Select lean meats as opposed to fatty meats. These have a lower fat content, freeze much better and can be stored longer. ● ● When packaging meats (chops, steaks, cutlets), separate each with a sheet of plastic freezer film, then packag...
Page 41 - DEFROSTING FOOD IN YOUR REFRIGERATOR; General defrosting food care; Frozen vegetables are best cooked from their frozen state.
39 DEFROSTING FOOD IN YOUR REFRIGERATOR Your refrigerator is designed to help defrost/thaw foods in a safe manner by preventing the growth of bacteria, moulds and yeasts which are the major causes of food spoilage. General defrosting food care For best results: ● ● Ensure foods are defrosted in the ...
Page 42 - MOVING OR STORING YOUR APPLIANCE; Moving your refrigerator; Turn the adjustable feet to the right as far as they will turn.; Storing your refrigerator
40 MOVING OR STORING YOUR APPLIANCE If your refrigerator is turned off for any reason, wait 10 minutes before turning it back on. This will allow the refrigeration system pressures to equalise before restarting. Moving your refrigerator ● ● Turn off the refrigerator and unplug from the power point. ...
Page 43 - ACTIVESMARTTM SOUNDS; Normal refrigerator sounds; Normal operational sounds include:
41 ACTIVESMART™ SOUNDS Normal refrigerator sounds Your refrigerator is designed with innovative ActiveSmart™ features that can produce sounds that may be different from your old refrigerator. Normal operational sounds include: ● ● Fan air flow sound. ActiveSmart™ refrigerators have fans which change...
Page 44 - TROUBLESHOOTING; All models
42 TROUBLESHOOTING If there is a problem with your appliance, please check the following points before contacting your local Fisher & Paykel trained and supported service technician or the Customer Care Centre. Product parts and accessories can be purchased through Fisher & Paykel Customer C...
Page 45 - Minimise door openings.
43 TROUBLESHOOTING All models PROBLEM POSSIBLE CAUSES WHAT TO DO Water in the vegetable bins. Condensation is formed by the water produced by fruit and vegetables. A small amount of condensation is beneficial for fruit and vegetable storage.Wipe out water with a cloth. Exterior of cabinet is warm. T...
Page 46 - Ice & Water and Automatic Ice models only; Automatic ice
44 TROUBLESHOOTING Ice & Water and Automatic Ice models only PROBLEM POSSIBLE CAUSES WHAT TO DO Automatic ice maker does not work. Ice maker has not been turned on. Switch on ice maker. Bin is in the wrong way or there is no bin in place. Place bin so scoop is on the left side.Ice bin sits direc...
Page 48 - Ice & Water models only
46 TROUBLESHOOTING Ice & Water models only PROBLEM POSSIBLE CAUSES WHAT TO DO Water has poor taste/odour. Refrigerator not used for an extended period. Dispense 4L of water so fresh water supply is replenished. New filter installed Water dispenser does not work. Water supply turned off or not co...
Page 49 - MANUFACTURER’S SERVICE & WARRANTY; Complete and keep safe for reference:
47 MANUFACTURER’S SERVICE & WARRANTY For details of your Manufacturer’s Warranty and contacts for servicing, please refer to your separate ‘Service & Warranty’ book provided with your refrigerator. This product has been designed for use in a normal domestic (residential environment). This pr...