Page 3 - INDICE
3 www.fhiaba.com · [email protected] · Info Line 800-344222 IT INDICE 1 1.11.21.31.4 INDICAZIONI IMPORTANTI PER LA SICUREZZA E PER L’AMBIENTE Avvertenze di sicurezza e potenziale pericoloNell’impiego quotidianoRispetto per l’ambientePulizia, sanificazione e manutenzione distributore ghiaccio e/o acqu...
Page 4 - INDICAZIONI IMPORTANTI PER LA SICUREZZA E PER L’AMBIENTE
4 www.fhiaba.com · [email protected] · Info Line 800-344222 1.1 Avvertenze di sicurezza e potenziale pericolo > Se questa apparecchiatura sostituisce un’altra già esistente che deve essere messa da parte o smalti-ta, assicurarsi che essa non diventi una pericolosa trappola per i bambini, tagliand...
Page 5 - Attenzione; Collegamento alla rete idrica; Nota; Rispetto per l’ambiente
5 www.fhiaba.com · [email protected] · Info Line 800-344222 IT 2.1 Installazione Assicuratevi che l’installazione sia effettuata cor-rettamente, rispettando tutte le indicazioni riporta-te nella specifica guida di installazione fornita con l’apparecchiatura. Attenzione Eseguire l’allacciamento idraul...
Page 6 - Collegamento alla rete elettrica; Importante; Nel caso di danno al circuito refrigerante, assicu-
6 www.fhiaba.com · [email protected] · Info Line 800-344222 Attenzione L’apparecchiatura va alimentata solo con acqua potabile. Attenzione Assicuratevi che l’installazione sia effet-tuata correttamente, rispettando tutte le indicazioni riportate nello specifico ma-nuale di installazione fornito con ...
Page 7 - nostro numero verde
7 www.fhiaba.com · [email protected] · Info Line 800-344222 IT 3. PRIMA DI INIZIARE 3.2 Per la sicurezza dei bambini Se questa apparecchiatura sostituisce un’altra già esistente che deve essere messa da parte o smal-tita, assicurarsi che essa non diventi una pericolosa trappola per i bambini, taglia...
Page 9 - PREPARAZIONE ALL’INSTALLAZIONE; Allacciamento elettrico e idraulico
E W E W E W E W 9 www.fhiaba.com · [email protected] · Info Line 800-344222 IT 5.1 Trasporto nel luogo di installazionee disimballo L’apparecchiatura è molto pesante. Usare massima attenzione durante la movimentazione per evitare danni alle persone e alle cose. Trasportare l’apparecchiatura in posiz...
Page 10 - sere installato per prevenire che l’unità; TOP MOUNT; Sistemare il supporto anti-ribaltamento al top; MONTAGGIO DEI PANNELLI; Dimensione dei pannelli decorativi; CORNICE INTEGRATA
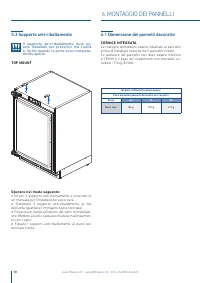
Modello TriMode Premium indoor Peso massimo pannelli decorativi per cassetto Serie 60 75 90 Peso max 8 kg 10 kg 12 kg 10 www.fhiaba.com · [email protected] · Info Line 800-344222 5.3 Supporto anti-ribaltamento Il supporto anti-ribaltamento deve es- sere installato per prevenire che l’unità si inclin...
Page 12 - Montaggio delle maniglie; Operare nel modo seguente:; Fare due buchi con il trapano nel retro del; CODICE MANIGLIA
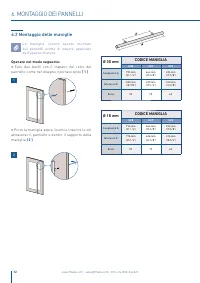
12 www.fhiaba.com · [email protected] · Info Line 800-344222 6.2 Montaggio delle maniglie Le maniglie devono essere montate sui pannelli prima di essere applicate sull’aparecchiatura. Operare nel modo seguente: > Fare due buchi con il trapano nel retro del pannello come nel disegno riportato sott...
Page 13 - Installazione dei pannelli decorativi; Misurare la distanza tra la cornice in alluminio della
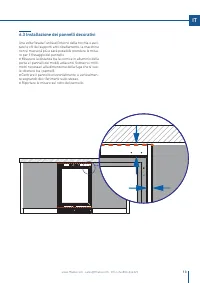
13 www.fhiaba.com · [email protected] · Info Line 800-344222 IT 6.3 Installazione dei pannelli decorativi Una volta fissata l’unità all’interno della nicchia e avvi-tate le viti dei supporti anti-ribaltamento, la macchina non si muoverà più e sarà possibile prendere le misu-re per il fissaggio del pan...
Page 14 - Fissaggio dei pannelli ai cassettoni; Prima di iniziare l’installazione assicu-; Avvitare solo parzialmente le viti inferiori ai disposi-
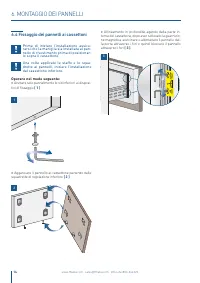
1 3 2 14 www.fhiaba.com · [email protected] · Info Line 800-344222 6. MONTAGGIO DEI PANNELLI 6.4 Fissaggio dei pannelli ai cassettoni Prima di iniziare l’installazione assicu- rarsi che la maniglia sia installata al pan- nello di rivestimento prima di posizionar- lo sopra il cassettone. Una volta ap...
Page 15 - L’entrata ed uscita dell’aria non deve; Controllo di fine installazione; INSTALLAZIONE FINALE
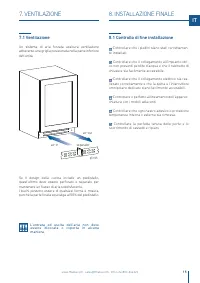
air-in air-out plinth separator 15 www.fhiaba.com · [email protected] · Info Line 800-344222 IT 7. VENTILAZIONE 7.1 Ventilazione Un sistema di aria forzata assicura ventilazione attraverso una griglia posizionata nella parte inferiore dell’unità. Se il design della cucina include un piedistallo, que...
Page 16 - principali
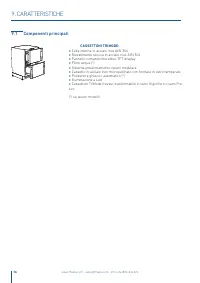
16 www.fhiaba.com · [email protected] · Info Line 800-344222 9.1 Componenti principali CASSETTONI TRIMODE: > Cella interna in acciaio inox AISI 304 > Rivestimento scocca in acciaio inox AISI 304 > Pannello comandi interattivo TFT display > Filtro acqua (*) > Sistema posizionamento rip...
Page 17 - Home; PRIMA DI INIZIARE
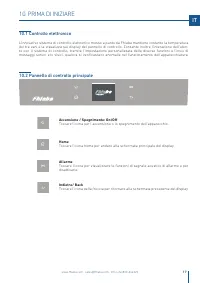
17 www.fhiaba.com · [email protected] · Info Line 800-344222 IT 10.1 Controllo elettronico L’innovativo sistema di controllo elettronico messo a punto da Fhiaba mantiene costante la temperatura dei tre vani e la visualizza sul display del pannello di controllo. Consente inoltre l’interazione dell’ut...
Page 18 - Accensione e spegnimento; Prima accensione; ACCENSIONE DELL’ APPARECCHIATURA; Initial test ...; Con il frigo spento non vi sono spie che ne; Vuoi procedere con
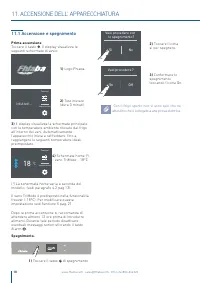
18 www.fhiaba.com · [email protected] · Info Line 800-344222 11.1 Accensione e spegnimento Prima accensione Toccare il tasto . Il display visualizza le seguenti schermate di avvio: Spegnimento. 11. ACCENSIONE DELL’ APPARECCHIATURA Impostazioni Funzioni 18 °C - Impostazioni Funzioni Initial test … (*...
Page 19 - Spegnimento per lunghi periodi
19 www.fhiaba.com · [email protected] · Info Line 800-344222 IT Se alla prima accensione non appare la scrit-ta Fhiaba, ma appaiono altre scritte, significa che l’apparecchiatura ha già iniziato la proce-dura di raffreddamento. Durante la prima accensione non sarà possibi-le utilizzare la schermata h...
Page 20 - Toccare l’icona ok; Come regolare la temperatura dei; Temperatura; OK; Scorrere verso; Modello UC2D
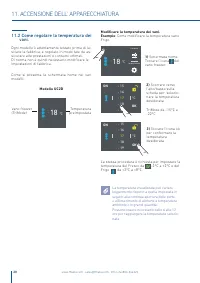
20 www.fhiaba.com · [email protected] · Info Line 800-344222 - 17 °C - 19 - 18 - 15 - 16 OK ON 3) Toccare l’icona ok per confermare la temperatura desiderata. 11.2 Come regolare la temperatura dei vani. Ogni modello è attentamente testato prima di la-sciare la fabbrica, e regolato in modo tale da as...
Page 21 - sul pannello di controllo; Segnali informativi e di anomalia
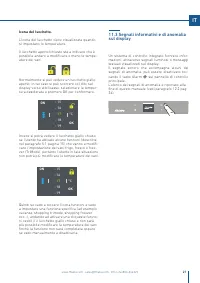
21 www.fhiaba.com · [email protected] · Info Line 800-344222 IT Un sistema di controllo integrato fornisce infor-mazioni, attraverso segnali luminosi o messaggi testuali visualizzati sul display.Il segnale sonoro che accompagna alcuni dei segnali di anomalia, può essere disattivato toc-cando il tast...
Page 22 - On; Filtro Acqua; PERSONALIZZARE FUNZIONI E IMPOSTAZIONI; INFORMAZIONI PER L’UTILIZZO DEL DISPLAY.; Toccare il tasto
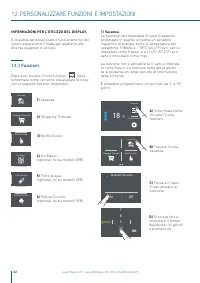
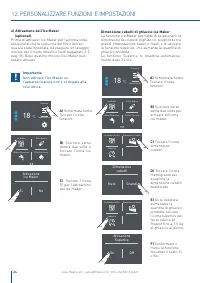
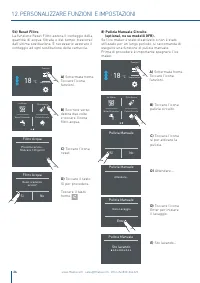
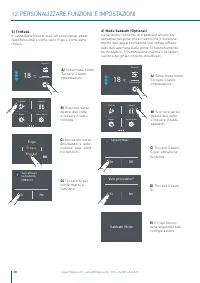
9 giorno 11 10 7 8 OK Modalità Vacanza On Off 22 www.fhiaba.com · [email protected] · Info Line 800-344222 1) Vacanza. 2) Shopping Trimode. 3) Bottle Cooler. 4) Ice Maker. (optional, no su modelli 0FR). 5) Filtro Acqua (optional, no su modelli 0FR). 6) Pulizia Circuito (optional, no su modelli 0FR)....
Page 23 - ) Shopping TriMode; ora
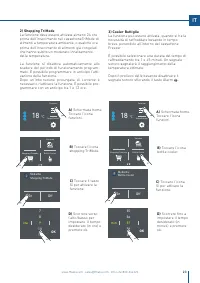
ModalitàShopping TriMode On Off 23 www.fhiaba.com · [email protected] · Info Line 800-344222 IT 2) Shopping TriMode La funzione deve essere attivata almeno 24 ore prima dell’inserimento nel cassettoneTriMode di alimenti a temperatura ambiente, o qualche ora prima dell’inserimento di alimenti già con...
Page 24 - Dimensione cubetti di ghiaccio Ice Maker
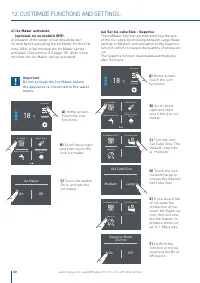
12. PERSONALIZZARE FUNZIONI E IMPOSTAZIONI 24 www.fhiaba.com · [email protected] · Info Line 800-344222 4) Attivazione dell’Ice Maker (optional). Prima di attivare l’Ice Maker per la prima volta assicurarsi che la cartuccia del filtro dell’ac-qua sia stata installata, ed eseguire un lavaggio inizial...
Page 27 - Bypass; Fine lavaggio
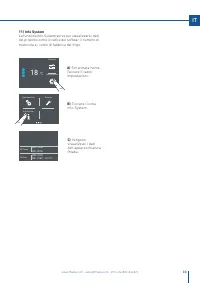
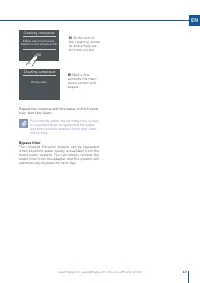
TriMode Sabbath Reset Demo Mode Manutenzioni Info System Service Data Ora °C / °F Lingua 27 www.fhiaba.com · [email protected] · Info Line 800-344222 IT Bypass Il sistema di filtraggio incluso può essere bypassato quando dal sistema idrico domestico è disponibile un'eccellente qualità dell'acqua. È ...
Page 30 - Sì
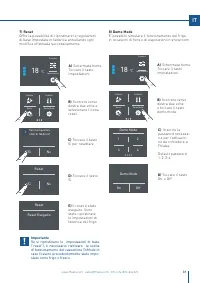
12. PERSONALIZZARE FUNZIONI E IMPOSTAZIONI Impostazioni Funzioni 18 °C - Sabbath TriMode Demo Mode Reset Vuoi attivare la modalità FRESCO? Sì No Fresco Freezer Frigo OK Impostazioni Funzioni 18 °C - Sabbath TriMode Demo Mode Reset 30 www.fhiaba.com · [email protected] · Info Line 800-344222 A) Scher...
Page 32 - Per i dettagli vedere le pagine 30 e 31.
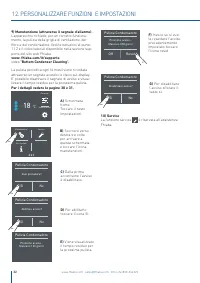
12. PERSONALIZZARE FUNZIONI E IMPOSTAZIONI Service 32 www.fhiaba.com · [email protected] · Info Line 800-344222 9) Manutenzione (attraverso il segnale d'allarme). L'apparecchio richiede, per un corretto funziona-mento, la pulizia della griglia di ventilazione, del filtro e del condensatore. Vedi le i...
Page 34 - Attivazione ed utilizzo dell’Ice; Note; ATTIVAZIONE ED UTILIZZO DELL’ICE MAKER
34 www.fhiaba.com · [email protected] · Info Line 800-344222 Il ghiaccio emette un odore insolito? Il ghiaccio è un materiale poroso in grado di assor-bire gli odori del suo ambiente. I cubetti di ghiaccio che sono rimasti a lungo nella vaschetta possono assorbire questi odori, rimanere incollati gl...
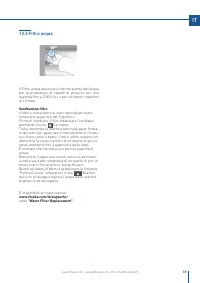
Page 35 - Sostituzione filtro; video
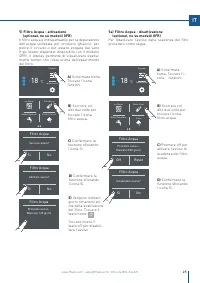
35 www.fhiaba.com · [email protected] · Info Line 800-344222 IT 13.2 Filtro acqua Il Filtro acqua assicura un’ottima qualità dell’acqua per la produzione di cubetti di ghiaccio, per una quantità fino a 3.000 litri e per un tempo massimo di 12 mesi. Sostituzione filtro Il filtro si trova dietro al vetro...
Page 36 - Indicazioni generali; INDICAZIONI GENERALI
36 www.fhiaba.com · [email protected] · Info Line 800-344222 14.1 Illuminazione Il beverage center è illuminato con led luce bian-ca. I Wine Cellar sono illuminati con barra led luce ambra e bianca. Luce ambra per illuminare du-rante l’invecchiamento dei vini e luce bianca per illuminare durante l’a...
Page 37 - tro e condensatore
37 www.fhiaba.com · [email protected] · Info Line 800-344222 IT 16. CURA E PULIZIA 16.1 Cura e pulizia Per la pulizia delle parti in acciaio usare il panno in microfibra e l’apposita spugnetta che si trova-no nel kit fornito in dotazione con l’apparecchia-tura. > Nel passare il panno e la spugnet...
Page 39 - INDEX
39 www.fhiaba.com · [email protected] · Info Line +39 0434 420162 EN 1 1.11.21.31.4 IMPORTANT DIRECTIONS FOR SAFETY AND THE ENVIRONMENT For your safetyImportant information when using the applianceCaring for the environmentCleaning, sanitisation and maintenance of the ice and/or water dispenser (if ...
Page 40 - IMPORTANT DIRECTIONS FOR SAFETY AND THE ENVIRONMENT
40 www.fhiaba.com · [email protected] · Info Line +39 0434 420162 1.1 For your safety > If this appliance is replacing an existing appliance which must be removed or disposed of, make sure that it does not become a dangerous trap for children by cutting its power supply cable and rendering it im-...
Page 41 - Attention; Connection to the water system; tips for correct use of the appliance; Important; Warnings to prevent injury to persons; Caring for the environment
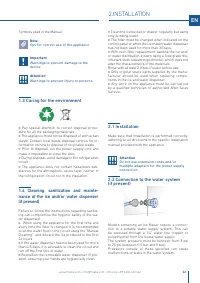
41 www.fhiaba.com · [email protected] · Info Line +39 0434 420162 EN 2.1 Installation Make sure that installation is performed correctly, adhering to all directions in the specific installation manual provided with the appliance. Attention Do not use extension cords and/or multiple adapters for the p...
Page 42 - Connection to the electrical power
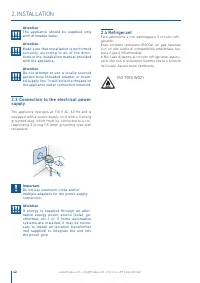
42 www.fhiaba.com · [email protected] · Info Line +39 0434 420162 Attention The appliance should be supplied only with drinkable water. Attention Make sure that installation is performed correctly, according to all of the direc-tions in the installation manual provided with the appliance. Attention ...
Page 43 - Per conoscere bene il vostro Fhiaba
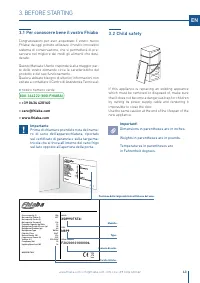
43 www.fhiaba.com · [email protected] · Info Line +39 0434 420162 EN 3. BEFORE STARTING 3.2 Child safety If this appliance is replacing an existing appliance which must be removed or disposed of, make sure that it does not become a dangerous trap for children by cutting its power supply cable and re...
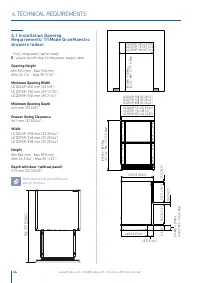
Page 44 - - area to be left clear for the power supply cable; TECHNICAL REQUIREMENTS
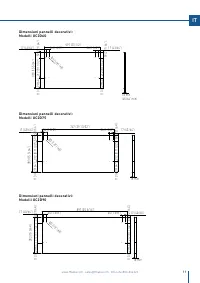
44 www.fhiaba.com · [email protected] · Info Line +39 0434 420162 961 (37 53/64”) UC2D60P: 600 (23 5/8”) UC2D75P: 750 (29 17/32”) UC2D90P: 900 (35 7/16”) UC2D60P: 598 (23 35/64”) UC2D75P: 748 (29 29/64”) UC2D90P: 898 (35 23/64”) UC2D60P: 574 (22 39/64”) UC2D75P: 724 (28 1/2”) UC2D90P: 874 (34 13/32”...
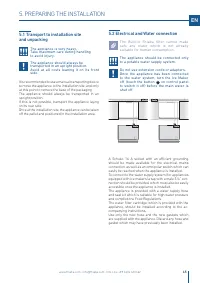
Page 45 - PREPARING THE INSTALLATION; Electrical and Water connection; suitable for human consumption.
E W E W E W E W 45 www.fhiaba.com · [email protected] · Info Line +39 0434 420162 EN 5.1 Transport to installation siteand unpacking The appliance is very heavy. Take maximum care during handlingto avoid injury. The appliance should always be transported in an upright position. Avoid at all costs le...
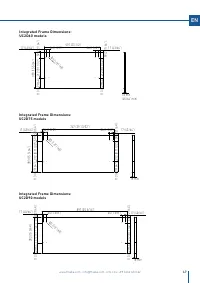
Page 46 - The anti-tip bracket must be installed to; Fix the anti-tip brackets on to the top of the unit (see; Integrated Panel Dimensions; INTEGRATED FRAME
TriMode Premium indoor model Maximum weight of decorative panels per drawer Series 60 75 90 Max weight 8 kg 10 kg 12 kg 46 www.fhiaba.com · [email protected] · Info Line +39 0434 420162 5.3 Anti-Tip Bracket The anti-tip bracket must be installed to prevent the unit from tipping when doors are fully ...
Page 48 - Mounting the handles; Drill two holes on the back of the panels; HANDLE PRODUCT CODE
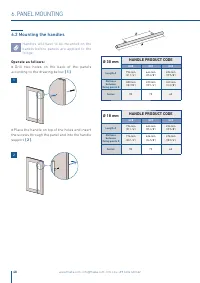
48 www.fhiaba.com · [email protected] · Info Line +39 0434 420162 6.2 Mounting the handles Handles will have to be mounted on the panels before panels are applied to the fridge. Operate as follows: > Drill two holes on the back of the panels according to the drawing below [ 1 ] . > Place the h...
Page 49 - Installation of decorative panels; Measure the distance between the aluminum frame
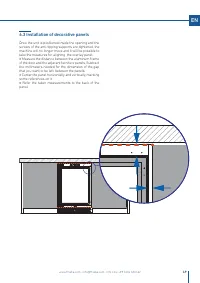
49 www.fhiaba.com · [email protected] · Info Line +39 0434 420162 EN 6.3 Installation of decorative panels Once the unit is positioned inside the opening and the screws of the anti-tipping supports are tightened, the machine will no longer move and it will be possible to take the measures for aligni...
Page 50 - Mounting panels to the drawers; Before beginning installation make sure
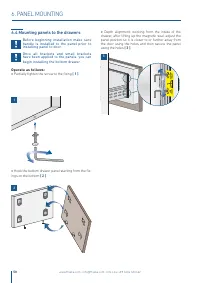
1 3 2 50 www.fhiaba.com · [email protected] · Info Line +39 0434 420162 6.4 Mounting panels to the drawers Before beginning installation make sure handle is installed to the panel prior to installing panel to door. Once all brackets and small brackets have been applied to the panels, you can begin i...
Page 51 - The air intake and outlet must not be; Post installation checklist
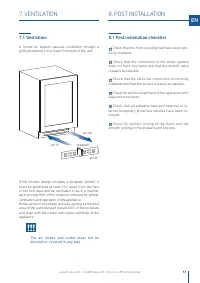
air-in air-out plinth separator 51 www.fhiaba.com · [email protected] · Info Line +39 0434 420162 EN 7. VENTILATION 7.1 Ventilation A forced air system assures ventilation through a grille positioned in the lower front part of the unit. If the kitchen design includes a kickplate (plinth), it must be...
Page 52 - components; TRIMODE SLIDING DRAWERS:
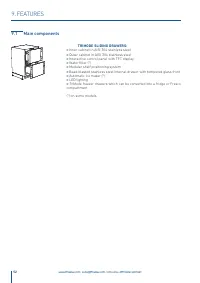
www.fhiaba.com · [email protected] · Info Line +39 0434 420160 52 www.fhiaba.com · [email protected] · Info Line +39 0434 420162 9.1 Main components TRIMODE SLIDING DRAWERS: > Inner cabinet in AISI 304 stainless steel > Outer cabinet in AISI 304 stainless steel > Interactive control panel w...
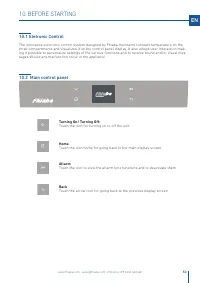
Page 53 - Touch the icon for turning on or off the unit.; Touch the icon home for going back to the main display screen.; Allarm; Touch the arrow icon for going back to the previous display screen.
www.fhiaba.com · [email protected] · Info Line +39 0434 420160 53 EN 10.2 Main control panel 10.1 Eletronic Control The innovative electronic control system designed by Fhiaba maintains constant temperature on the three compartments and visualizes it on the control panel display. It also allows user...
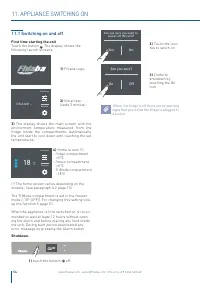
Page 54 - Yes; Switching on and off; First time starting the unit; APPLIANCE SWITCHING ON; When the fridge is off there are no warning
www.fhiaba.com · [email protected] · Info Line +39 0434 420160 Settings Functions 18 °C - Settings Functions Initial test … Are you sure you want to power off this unit? Yes No Are you sure? On Off 54 11.1 Switching on and off First time starting the unit Touch the button . The display shows the fol...
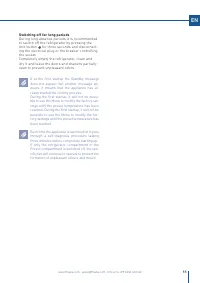
Page 55 - Switching off for long periods
www.fhiaba.com · [email protected] · Info Line +39 0434 420160 55 EN Switching off for long periods During long absence periods it is recommended to switch off the refrigerator by pressing the Unit button for three seconds and disconnect-ing the electrical plug or the breaker controlling the socket....
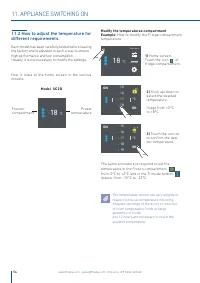
Page 56 - Model UC2D; How to adjust the temperature for
www.fhiaba.com · [email protected] · Info Line +39 0434 420160 11. APPLIANCE SWITCHING ON - 17 °C - 19 - 18 - 15 - 16 OK ON - 17 °C - 19 - 18 - 15 - 16 OK ON Settings Functions 18 °C - Model UC2D 18 °C - 56 11.2 How to adjust the temperature for different requirements. Each model has been carefully ...
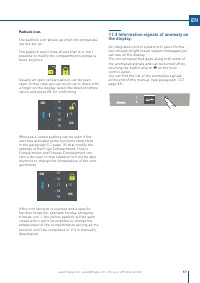
Page 57 - Information signals of anomaly on
www.fhiaba.com · [email protected] · Info Line +39 0434 420160 - 17 °C - 19 - 18 - 15 - 16 OK ON - 17 °C - 19 - 18 - 15 - 16 OK ON 57 EN Padlock icon. The padlock icon shows up when the temperatu-res are set up. The padlock open/close shows that is or isn't possible to modify the compartment's tempe...
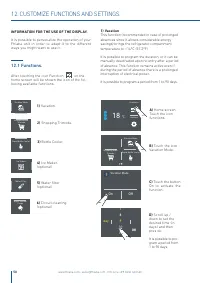
Page 58 - It is possible to program a period from 1 to 90 days.; INFORMATION FOR THE USE OF THE DISPLAY.; Water filter
www.fhiaba.com · [email protected] · Info Line +39 0434 420160 9 day 11 10 7 8 OK Vacation Mode Rapid Bottle Cooler Shopping Mode: Trimode Settings Functions 18 °C - Vacation Mode On Off Rapid Bottle Cooler Shopping Mode: Trimode Vacation Mode Ice Maker Water Filter Water System Purge 58 1) Vacation...
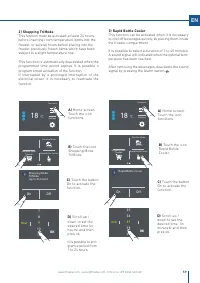
Page 59 - ) Rapid Bottle Cooler; Touch the button
www.fhiaba.com · [email protected] · Info Line +39 0434 420160 Vacation Mode Rapid Bottle Cooler Shopping Mode: Trimode Settings Functions 18 °C - 9 hour 11 10 7 8 OK Shopping ModeTriMode(up to 24 hours) On Off Vacation Mode Rapid Bottle Cooler Shopping Mode: Trimode 37 min 39 38 35 36 OK Settings F...
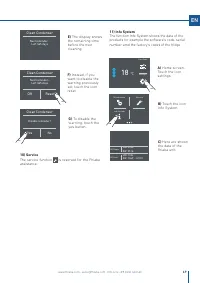
Page 61 - Water Filter Status; Scroll ones
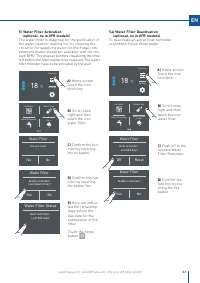
www.fhiaba.com · [email protected] · Info Line +39 0434 420160 Settings Functions 18 °C - Enable reminder countdown timer? Yes No Water Filter Ice Maker Water Dispender Water Filter Water System Flush Ice Maker Water Dispender Water Filter Water System Flush Disable reminder? Yes No Water Filter Set...
Page 62 - Push Home buttom
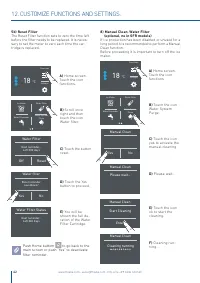
www.fhiaba.com · [email protected] · Info Line +39 0434 420160 Yes No Manual Clean Settings Functions 18 °C - Ice Maker Water Dispender Water Filter Water System Flush Enter Start Cleaning Manual Clean Manual Clean Please wait... Cleaning running Manual Clean Ice Maker Water Dispender Water Filter W...
Page 63 - Cleaning completed; Bypass filter
www.fhiaba.com · [email protected] · Info Line +39 0434 420160 Empty water from ice bin. Replace ice bin and press OK. OK Cleaning completed Please wait... Cleaning completed 63 EN G) At the end of the cleaning, press ok and empty wa-ter from ice bin. H) Wait a few seconds the main menu screen will ...
Page 64 - month; Scroll up or
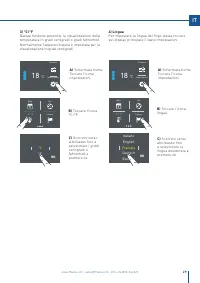
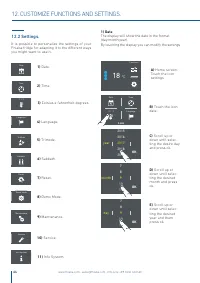
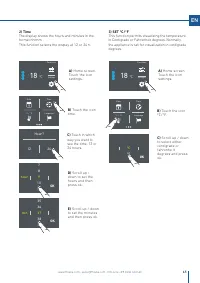
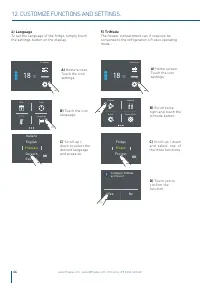
www.fhiaba.com · [email protected] · Info Line +39 0434 420160 TriMode Sabbath Reset Demo Mode Info System Service °C / °F Time Date Language °C / °F 9 month 11 10 7 8 OK 2017 year 2019 2018 2015 2016 OK Settings Functions 18 °C - 9 day 11 10 7 8 OK Date Time Language Maintenance 64 It is possible t...
Page 65 - Touch the icon
www.fhiaba.com · [email protected] · Info Line +39 0434 420160 OK °C °F Settings Functions 18 °C - Hour? 12 24 Settings Functions 18 °C - 37 min 39 38 35 36 OK Time Date Language °C / °F Time Date Language °C / °F 9 hour 11 10 7 8 OK 65 EN C) Scroll up / down to select either centigrade or fahrenhe ...
Page 68 - For details see pages 30 e 31.
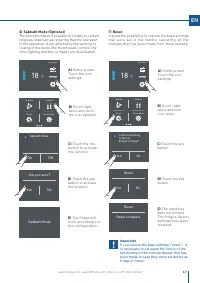
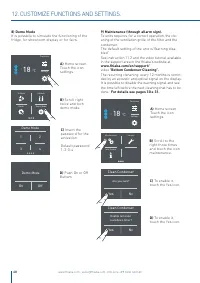
www.fhiaba.com · [email protected] · Info Line +39 0434 420160 Settings Functions 18 °C - Sabbath TriMode Demo Mode Reset Demo Mode 1 3 2 4 Maintenance Service Info System Settings Functions 18 °C - Enable reminder countdown timer? Yes No Clean Condenser Are you sure? Yes No Clean Condenser Demo Mod...
Page 69 - The display shows
www.fhiaba.com · [email protected] · Info Line +39 0434 420160 Next reminder… Left 365 days Clean Condenser Settings Functions 18 °C - Serial no. Model - SW SK Power SK User F20191016000001 M8991TST6I - 99 HW: 0504SW: 0518 HW: 1002SW: 1069 - G1011 Disable reminder? Yes No Clean Condenser Maintenance...
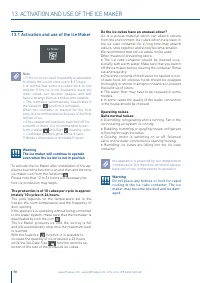
Page 70 - ACTIVATION AND USE OF THE ICE MAKER; Activation and use of the Ice Maker; Do the ice cubes have an unusual odour?
www.fhiaba.com · [email protected] · Info Line +39 0434 420160 Ice Maker 70 13. ACTIVATION AND USE OF THE ICE MAKER 13.1 Activation and use of the Ice Maker Note > If the ice is not used frequently is advisable to empty the ice bin once every 8-10 days. It is normal that some ice cubes stick to o...
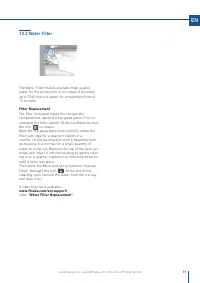
Page 71 - Filter Replacement
www.fhiaba.com · [email protected] · Info Line +39 0434 420160 71 EN 13.2 Water Filter The Water Filter makes available high-quality water for the production of ice cubes. It provides up to 3000 liters of water for a maximum time of 12 months. Filter Replacement The filter is located inside the refri...
Page 72 - General directions; GENERAL DIRECTIONS
72 www.fhiaba.com · [email protected] · Info Line +39 0434 420162 14.1 Lighting The beverage centre is lit up with white LED lights. The Wine Cellars are lit up with amber and white LED strip lights. Amber light for lighting during wine aging and white for lighting up the cellar when the door is ope...
Page 73 - CARE AND CLEANING; Care and Cleaning; Condenser cleaning
73 www.fhiaba.com · [email protected] · Info Line +39 0434 420162 EN 16. CARE AND CLEANING 16.1 Care and Cleaning To clean the parts made of steel use a microfiber cloth and the sponge provided in the kit with the appliance. Always use the cloth and sponge in the direction of the steel’s satin finis...