Fhiaba S7490FW6 - User Manual
Fhiaba S7490FW6 Wine Cabinet – User Manual, read for free online in PDF format. We hope this helps you resolve any issues you may have. If you have further questions, please contact us through the contact form.
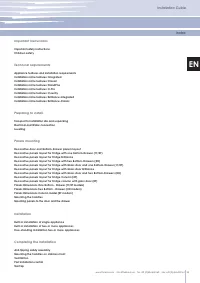

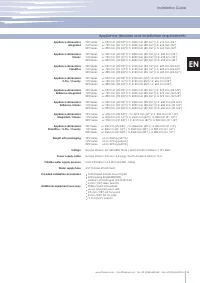
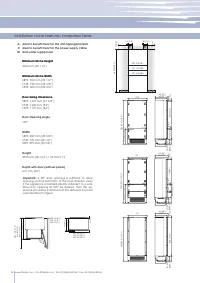
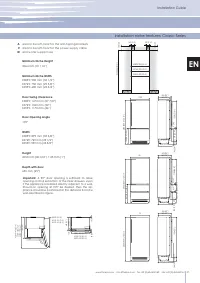
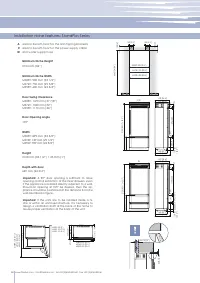

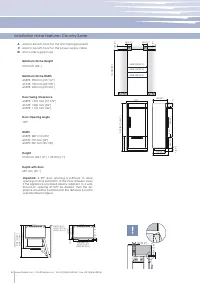
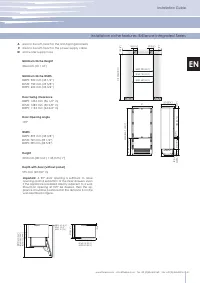

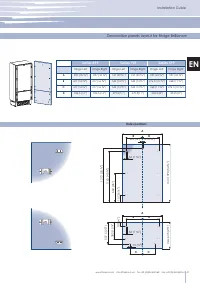
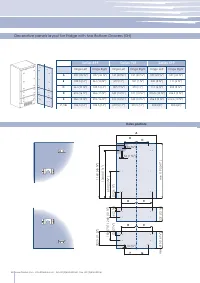

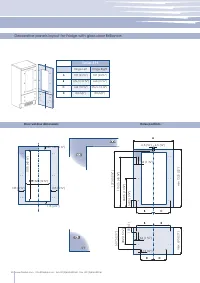
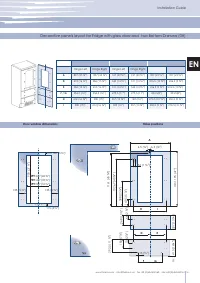
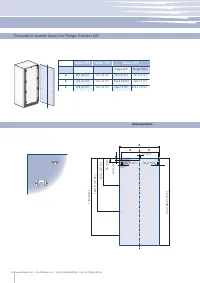
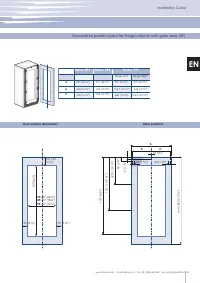
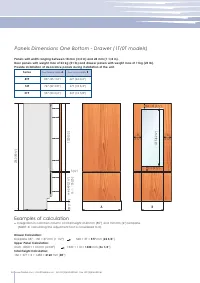
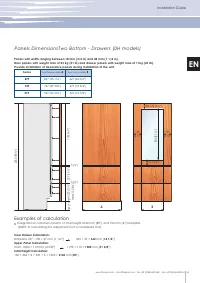
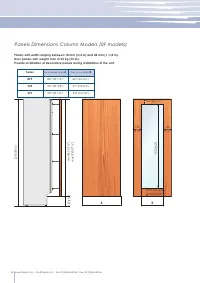
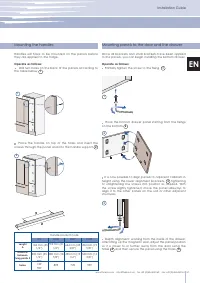
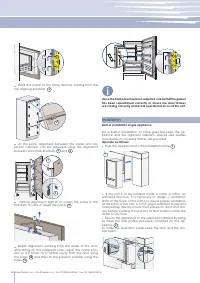
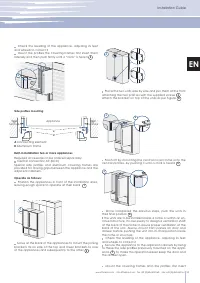
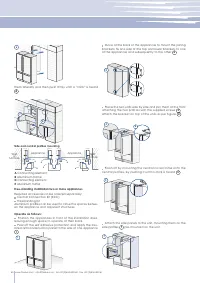
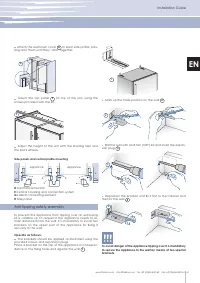

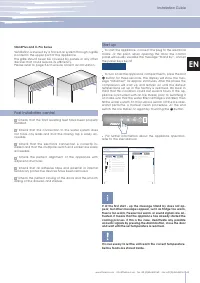

Table of Contents:
- Page 2 – Symbols used in the Guide; Important safely instruction; IMPORTANT
- Page 3 – Installation Guide; Appliance features and installation requirements
- Page 4 – Installation niche features: Integrated Series; A 90° door opening is sufficient to allow
- Page 5 – Installation niche features: Classic Series
- Page 6 – Installation niche features: StandPlus Series
- Page 7 – Installation niche features: X-Pro Series
- Page 8 – Installation niche features: Country Series
- Page 9 – Installation niche features: Brilliance-Integrated Series; Minimum Niche Height
- Page 10 – Installation niche features: Brilliance-Classic Series
- Page 11 – Preparing the installation; Remove the fixing brackets; Electrical and Water connection; A Schuko 16 A socket with an efficient grounding should; The Built-in Fhiaba filter cannot make it safe to drink any
- Page 12 – Energy: Alternatives and Home Automation; Electrical and water supply behind the unit; base of the unit, as in figure; Levelling
- Page 13 – Door Panel
- Page 14 – Holes positions
- Page 15 – Decorative panels layout for Fridge Brilliance
- Page 16 – Decorative panels layout for Fridge with two Bottom-Drawers (0H)
- Page 18 – Decorative panels layout for Fridge with glass door Brilliance; Hinge Left
- Page 20 – Decorative panels layout for Fridge Column (0F)
- Page 21 – Decorative panels layout for Fridge column with glass door (0F)
- Page 22 – Examples of calculation; Series
- Page 24 – Panels Dimensions Column Models (0F models)
- Page 25 – HV; Mounting the handles; Handle product code; Mounting panels to the door and the drawer; Partially tighten the screw to the fixing
- Page 26 – Installation; pliance and the adjacent cabinets, special side profiles; Built-in installation single appliance
- Page 27 – A Connecting element; Side profiles mounting; Built-in installation two or more appliances
- Page 28 – Side and central profiles mounting
- Page 29 – Side panels and central profile mounting; Appliance; brackets on the upper part of the appliance for fixing it; Anti-tipping safety assembly; Reposition the bracket and fix it first to the cabinet and
- Page 30 – Mounting the handles on stainless front; Insert the two handle spacers onto the supports already; Ventilation; in order to maintain a satisfactory air flow, as described in; Integrated and Classic Series
- Page 31 – CRISPER; ICE MAKER; Post installation control; panel will usually visualize the message “Stand by”, and all; If at the first start - up the message Stand by does not ap
33
www.fhiaba.com · [email protected] · Tel +39 (0)434 420160 · Fax +39 (0)434 420161
Installation Guide
EN
Index
Important Instructions
Important safety instructions
Children safety
Technical requirements
Appliance features and installation requirements
Installation niche features: Integrated
Installation niche features: Classic
Installation niche features: StandPlus
Installation niche features: X-Pro
Installation niche features: Country
Installation niche features: Brilliance-Integrated
Installation niche features: Brilliance-Classic
Preparing to install
Transport to installation site and unpacking
Electrical and Water connection
Levelling
Panels mounting
Decorative door and Bottom-Drawer panels layout
Decorative panels layout for Fridge with one Bottom-Drawer (1T/0T)
Decorative panels layout for Fridge Brilliance
Decorative panels layout for Fridge with two Bottom-Drawers (0H)
Decorative panels layout for Fridge with Glass door and one Bottom-Drawer (1T/0T)
Decorative panels layout for Fridge with Glass door Brilliance
Decorative panels layout for Fridge with Glass door and two Bottom-Drawers (0H)
Decorative panels layout for Fridge Column (0F)
Decorative panels layout for Fridge column with glass door (0F)
Panels Dimensions One Bottom - Drawer (1T/0T models)
Panels Dimensions Two Bottom - Drawers (0H models)
Panels Dimensions Column model (0F models)
Mounting the handles
Mounting panels to the door and the drawer
Installation
Built-in installation of single appliance
Built-in installation of two or more appliances
Free-standing installation two or more appliances
Completing the installation
Anti-tipping safety assembly
Mounting the handles on stainless front
Ventilation
Post installation control
Start Up
"Loading the manual" means you need to wait until the file loads and becomes available for online reading. Some manuals are very large, and the time they take to appear depends on your internet speed.
Summary
34 www.fhiaba.com · [email protected] · Tel +39 (0)434 420160 · Fax +39 (0)434 420161 Symbols used in the Guide Important safely instruction Children safety If this appliance is replacing an existing appliance which must be removed or disposed of, make sure that it does not become a dangerous trap f...
35 www.fhiaba.com · [email protected] · Tel +39 (0)434 420160 · Fax +39 (0)434 420161 Installation Guide EN Appliance features and installation requirements 599 Series w: 599 mm (23 5/8”)/ h: 2050 mm (80 3/4”)/ d: 610 mm (24”)749 Series w: 749 mm (29 1/2”)/ h: 2050 mm (80 3/4”)/ d: 610 mm (24”)899 S...
36 992 (39” ) S899: 1470 (57 7⁄8” ) S749: 1320 (52” ) S599: 1170 (46” ) 560 (22” ) 610 (24” ) S899: 899 (35 3⁄8 ”) S749: 749 (29 ½ ”) S599: 599 (23 5⁄8 ”) 10 ( 3⁄8 ”) 105° S899: 160 (6 3⁄8” ) S749: 125 (5”)S599: 90 (3 ½” ) 610 (24”) 560 (22”) 1293 (50 7⁄8” ) 474 (18 5⁄8” ) 231 (9 1⁄8” ) + 25 (1” ) 5...