Page 2 - Contents
i 1. Before You Start... 1 Personal Safety 1 Electrical Connection Safety 2 If You Smell Gas 2 Peculiar Smells 2 Cooling Fan 2 Ventilation 3Maintenance 3Grill/Glide-out Grill™ Care 5 Cooker Care 5 Cleaning 5 2. Cooker Overview 7 Hotplate Burners 7 Wok Burner 8 The Wok Cradle* (Optional) 9 The Griddl...
Page 3 - Personal Safety
1 Your cooker should give you many years of trouble-free cooking if installed and operated correctly. It is important that you read this section before you start.This User Guide covers a number of different models. Although some of the illustrations will look different to your particular model the f...
Page 6 - Oven Care
4 FRONT Rear stop Front bracket ArtNo.324-0001 Steam burst • DO NOT modify this appliance. This appliance is not intended to be operated by means of external timer or separated remote-control system. • If flammable materials are stored in the drawer, oven(s) or grill(s) it may explode and result in ...
Page 9 - Hotplate Burners
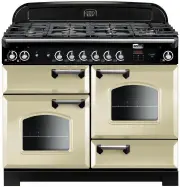
7 This User Guide covers a number of different models. Although some of the illustrations will look different to your particular model the functions will be the same.The 110 dual fuel cooker ( Fig. 2.1 ) has the following features: A. 6 hotplate burners including a wok burner B. A control panel C. A...
Page 10 - Wok Burner
8 To light a burner, press the igniter button, and push in and turn the associated control knob to the high position as indicated by the large flame symbol ( ), ( Fig. 2.2 ). The igniter should spark and light the gas. Keep holding the knob pressed in to let the gas through to the burner for about...
Page 11 - The Griddle Plate
9 ArtNo.110-0013 Positioning the griddle on hotplate (right) ArtNo.110-0014 Positioning the griddle on hotplate (wrong) ArtNo.311-0006 Correct wok sizes The Wok Cradle* (Optional) The wok cradle is designed to fit a 35 cm wok. If you use a different wok, make sure that it fits the cradle. Woks vary ...
Page 12 - The Grill
10 The Grill n CAUTION: This appliance is for cooking purposes only. It must not be used for other purposes, for example room heating. n CAUTION: Accessible parts may be hot when the grill is in use. Young children should be kept away. Open the door and pull the grill pan forward using the handle ( ...
Page 13 - The Ovens; Operating the Ovens; Main Oven Lights
11 ArtNo.235-0005 - Classic DL oven control 2 ArtNo.235-0004 - Classic DL oven 1 ArtNo.321-0002 Fan assisted oven The Ovens The clock must be set to the time of day before the ovens will work. See the following section on ‘The Clock’ for instructions on setting the time of day. References to ‘left-h...
Page 14 - Accessories; Storage
12 Accessories Oven Shelves The oven shelves ( Fig. 2.23 ) can be easily removed and refitted.Pull the shelf forward until the back of the shelf is stopped by the shelf stop bumps in the oven sides ( Fig. 2.24 ). Lift up the front of the shelf so the back of the shelf will pass under the shelf stop ...
Page 15 - Glide-out Oven Shelf
13 Fig. 2.30 Fig. 2.31 Fig. 2.32 Fig. 2.33 1 2 FRONT FRONT Rear stop Front bracket Glide-out Oven Shelf (optional) A glide-out oven shelf is available for either oven ( Fig. 2.30 ). Note: The Handyrack must be removed before fitting the glide-out shelf.The rungs on the shelf supports are in pairs. T...
Page 16 - To stop the oven at a specific time of day; OR; REMEMBER
14 1 2 1 3 1 2 1 1 1 1 1 1 Step. 1 Step. 1 Step. 2 Step. 2 Step. 3 Step. 4 1 2 3 Check how much time you have left Cancel the timer alarm 3. Rotary clock To stop the oven at a specific time of day (main oven only) You have set the required temperature and function mode and you would like the oven to...
Page 17 - Beeper tone adjustment
15 1 1 2 1 1 Check how much time you have left Beeper tone adjustment 1 1 2 1 1 B 1 1 1 1 2 To start and stop the oven automatically (main oven only) The timer allows you to automatically start and stop by a combination of the length of the cooking time and the stop time. Giving you the flexibility ...
Page 18 - Minute Minder
16 ArtNo.306-0001 - 3-button clock ArtNo.306-0001 - 3-button clock ArtNo.306-0001 - 3-button clock ArtNo.306-0001 - 3-button clock ArtNo.306-0001 - 3-button clock ArtNo.306-0001 - 3-button clock Step. 1 Step. 1 Step. 2 Step. 3 Step. 1 Step. 2 ArtNo.306-0001 - 3-button clock ArtNo.306-0001 - 3-button...
Page 20 - Tips on cooking with the timer; General oven tips
18 5. Cooking Tips Tips on cooking with the timer If you want to cook more than one dish, choose dishes that require approximately the same cooking time. However, dishes can be ‘slowed down’ slightly by using small containers and covering them with aluminium foil, or ‘speeded up’ slightly by cooking...
Page 22 - Essential Information; Cleaning your cooker
20 ArtNo.311-0032 Burner layout FSD A B C D E A B C D A – cap, B – head, C – notch, D – base , E – electrode A – inner burner cap, B – outer burner cap, C – burner head, D – wok burner base Essential Information Isolate the electricity supply before carrying out any thorough cleaning. Allow the cook...
Page 23 - The Griddle; Control Panel and Doors
21 ArtNo.331-0003 Grill frame out, no pan ArtNo.331-0004 Removing the grill frame ArtNo.331-0005 Removing the grill rail Fig. 7.5 Fig. 7.6 Fig. 7.7 The Griddle Always clean the griddle after use. Allow it to cool completely before removing. Immerse the griddle plate in hot soapy water. Use a soft cl...
Page 24 - Glass Fronted Door Panels; Ovens; Removing the Main Oven Linings
22 Glass Fronted Door Panels The oven door front panels can be taken off so that the glass panels can be cleaned. Move the cooker forward to gain access to the sides (see the ‘Moving the Cooker’ section under ‘Installation’).Open the oven door slightly and remove the front panel fixing screws from t...
Page 25 - Cleaning table
23 Cleaning table Cleaners listed are available from supermarkets or electrical retailers as stated. For enamelled surfaces use a cleaner that is approved for use on vitreous enamel.Regular cleaning is recommended. For easier cleaning, wipe up any spillages immediately. HotplatePart Finish Recommend...
Page 27 - Grill
25 Oven light is not working The bulb has probably burnt out. You can buy a replacement bulb (which is not covered under the warranty) from a good electrical shop. Ask for a 40 W – 230 V halogen lamp (G9) ( Fig. 8.1 ). Turn off the power at the circuit breaker.Before removing the existing bulb, turn...
Page 28 - If You Have a Problem; Service and Spares
INSTALLATION Check the appliance is electrically safe when you have finished. 26 Firstly, please complete the appliance details below and keep them safe for future reference – this information will enable us to accurately identify the particular appliance and help us to help you. Filling this in now...
Page 29 - Safety Requirements and Regulations; Provision of Ventilation
INSTALLATION Check the appliance is electrically safe and gas sound when you have finished. 27 10. Installation Safety Requirements and Regulations n Please read the Before you start... chapter, before you begin any installation and maintenance work on this appliance. You must be aware of the follow...
Page 31 - Positioning the Cooker
INSTALLATION Check the appliance is electrically safe and gas sound when you have finished. 29 Positioning the Cooker The diagram ( Fig. 10.2 ) shows the minimum recommended distance from the cooker to nearby surfaces as given in AS/NZS 5601.Where the appliance is installed next to cabinetry, the ca...
Page 33 - Levelling; Fitting a Stability Bracket
INSTALLATION Check the appliance is electrically safe and gas sound when you have finished. 31 ArtNo.070-0014 - Stability bracket - Wall fitting Cooker Stability bracket Floor Stability location bracket Typical floor mounting ArtNo.070-0014 - Stability bracket - Wall fitting Cooker Stability bracket...
Page 34 - Gas Connection
INSTALLATION Check the appliance is electrically safe and gas sound when you have finished. 32 Flexible hose Pipework Pipework Flexible hose 470 350 675 A 315 All dimensions in millimetres Gas inlet Gas Connection Must be in accordance with the relevant standards.The gas supply needs to terminate wi...
Page 35 - Electrical Connection
INSTALLATION Check the appliance is electrically safe and gas sound when you have finished. 33 ArtNo.132-0001 - 1 phase 240Vac 50Hz 1-phase 230 V AC 50 Hz Electrical Connection This appliance must be installed by a qualified electrician to comply with with current AS/NZS 3000 Wiring Rules and regula...
Page 36 - Connection in New Zealand; Fixed Wiring
INSTALLATION Check the appliance is electrically safe and gas sound when you have finished. 34 ArtNo.132-0002 - 3 phase 240/415Vac 50Hz 3-phase 400 V AC 50 Hz Reducer plates Reversible conduit box cover Conduit box M4 screw M5 screws Connection in New Zealand Type of cord in accordance with IEC 6022...
Page 37 - Final Checks; Final Fitting; Customer Care
INSTALLATION Check the appliance is electrically safe and gas sound when you have finished. 35 ArtNo.350-0010 - Fitting the plinth 1 (Kitchener) ArtNo.350-0011 - Fitting the plinth 2 (Kitchener) Outer plinth Outer plinth fixing screw Inner plinth Art No 215-0028 - Handrail fascia fixings ArtNo.215-0...
Page 38 - Injectors; Removing the Control Panel; Conversion to LP Gas
WARNING – SERVICING TO BE CARRIED OUT ONLY BY AN AUTHORISED PERSON Disconnect from electricity and gas before servicing. Check appliance is safe when you have finished. 36 A B ArtNo.311-0010 Injectors A – Jet, B – Jet ArtNo.0102-0011 - Screwing the control valve bypass screw Art No 215-0028 - Handra...
Page 39 - Set the Governor; Affix Label
WARNING – SERVICING TO BE CARRIED OUT ONLY BY AN AUTHORISED PERSON Disconnect from electricity and gas before servicing. Check appliance is safe when you have finished. 37 Set the Governor Unscrew the governor’s brass top. In the base of the brass top is a plastic snap-in converter device ( Fig. 11....
Page 46 - Circuit Diagram
44 13. Circuit Diagram P095199 2 P2 P1 1 P095199 2 P2 P1 1 a b e f c d 1 2 b v P095199 2 P2 P1 1 br b b b b r b b r y b b br v bk bk v v br y b y br y y br b br b br b bk b g/y v y y or or g/y r r bk br br or y b bk bk v br b r b b v b b r r r v y y y b r b r b b b br br br b b y br br b br v or y E...
Page 47 - Hotplate Ratings; Oven Efficiency
45 14. Technical Data This cooker is designed for use on Natural gas, although a conversion for LP (LPG X Propane (2.54 kPa)) gas is included. INSTALLER: Please leave these instructions with the user. DATA BADGE LOCATION: Cooker back, serial number repeater badge below oven door opening. Country of ...