Emeril Lagasse TCL-BR3A - User Manual
Emeril Lagasse TCL-BR3A Water Dispenser – User Manual, read for free online in PDF format. We hope this helps you resolve any issues you may have. If you have further questions, please contact us through the contact form.


UV
2A
2A
7
1
10
14
11
12
13
15
Control Panel Close-up
6
5
4
3
2
8
9
3
2
Self-Filtering Bottom Loading
Water Cooler
Instruction Manual
To ensure proper use and for your safety,
please read the following instructions
completely before operating this appliance.
Congratulations, you have acquired a high quality Emeril Lagasse
Water Cooler - which uses 3 or 5 gal jugs of water. This product allows
you to enjoy a cold drink or a hot beverage and has many features
that you will find convenient to use. Record the model number, serial
number (located on Energy Star label), and the manufacture date, all
of which can be found on the label on the back of the unit.
_________________________________________________________________
model number serial number purchase date manufacture date
READ ALL INSTRUCTIONS BEFORE USING!
SAVE THIS MANUAL FOR FUTURE USE!
No product registration is required for this unit. When making a customer
service call, please have the model number, manufacture date, and serial
number (7 digit number on the Energy Star Label) on hand.
CUSTOMER SERVICE: 1-888-724-4108
BUILT WITH DURABLE BPA-FREE COMPONENTS!
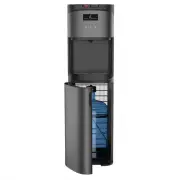
Parts and Features
1
Control Panel
(see Close-up)
2
Hot Water
Dispensing Button
2A
Child Safety Lock
3
Cold Water Dispensing
Button
4
Top Cover
5
Water Dispensing Spigot
6
Removable Drip Tray and
Insert
7
Jug Cap
8
Lower Door
9
Water Straw
(pumps water from jug
into the unit)
10
Door Switch
(controls pump operation)
11
Condenser Coils
12
Cold Water On/Off
Switch (Energy Saver)
13
Hot Water On/Off
Switch (Energy Saver)
14
Drain Valve
15
Power Cord
Important Safeguards
• When using electrical appliances, basic safety precautions should be
followed, including the following:
•
WARNING: BURN HAZARD.
The product heats water to a temperature
of approximately 95° C / 203° F. Water temperatures above 52° C / 125° F
can cause severe burns or death from scalding. Children should be
supervised by an adult when using this product.
•
WARNING: FIRE HAZARD.
Do not store or use gasoline or other
flammable vapors and liquids in the vicinity of this or any other appliance.
Do not operate the cooler with a damaged cord. Do not use with an
under rated extension cord or an extension cord without a ground.
•
WARNING: SHOCK HAZARD.
Unplug the water cooler before
cleaning or wiping up spilled water on unit. Do not attempt to service
the cooler. Do not operate cooler with a damaged cord.
•
NOTE:
The water pump system includes a special safety feature that
prevents operation when the water jug is empty. Water pump
operation is also linked to the Door Switch (see # 10 on the Parts and
Features list) mounted inside of the lower storage compartment. When
you replace the water jug, remember to close the Lower Door (see #
8 on the Parts and Features list).
• Never turn the product upside down or tilt more than 45 degrees. If the
unit has been resting on its side or upside down for a long period of
time, the unit must be put in the upright position for approximately 12
hours before turning it on.
• Never use this cooler with water that is unsafe to drink or is from an
unknown
source.
• Never use any other liquids in this cooler other than jug water.
• Install this water cooler in a dry place away from direct sunlight. For
indoor use only.
• Leave a minimum of 2” (5 cm) around the back and sides of the
cooler for proper ventilation.
Grounding Instructions
WARNING:
Modifying or defeating of the grounding plug can result in
a risk of electric shock.
• This appliance must be grounded. In the event of an electrical
short circuit, grounding reduces the risk of electric shock.
• This appliance is equipped with a power cord that has a grounding
wire with a grounding plug. The cord must be plugged into a 3
prong outlet that is properly installed and grounded.
• Consult a qualified electrician if the grounding instructions are not
completely understood, or if doubt exists as to whether the
appliance is properly grounded.
• Do not under any circumstances cut or remove the third ground
prong from the power cord.
• Do not use an extension cord or an outlet converter with this
appliance. If the power cord is too short, have a qualified electrician
install an outlet near the appliance.
• For best operation, plug the appliance securely into its own
electrical outlet on a dedicated circuit not shared with any other
appliances to prevent blowing a fuse or tripping the circuit breaker.
Getting familiar with your Emeril Lagasse
Water Cooler
Features
• Designed for home and office use.
• Fits 3 or 5 gallon water jugs.
• Two high-flow water dispensing buttons - Red for hot water, and
Blue for cold water.
• Energy Saver switches located on the back of the appliance. Switch
Red control to OFF to stop heating and Blue control to OFF to stop
cooling.
Proper Installation and Location
• This cooler is for indoor use only. Do not use outdoors.
• Place the cooler on a level surface that can support its weight
with a full water jug installed.
• To ensure that your water cooler works at the maximum
efficiency, leave at least 2 inches (5 cm) of clearance between all
sides of the cooler and any walls.
• To prevent damage to the cooler, do not plug cooler into the
power outlet until you read the instructions first!
Preparing, Loading and Operating your Water Cooler
For use with 3 and 5 gallon (12 and 19L) water jugs.
DO NOT PLUG IN POWER CORD UNTIL WATER JUG IS LOADED!
IMPORTANT:
Always wash your hands before handling water jug.
Clean the top of the water jug with a damp cloth.
1.
Make sure the Lower Door (see # 8 on the Parts and Features list)
is open. This will prevent activation of the water pump. Open the
Lower Door by pulling on the right side of the door.
Note:
The Lower Door is covered by a thin layer of plastic film used to
protect the door during shipment. Please remove the plastic layer
prior to first use.
2.
Place fresh water jug outside of the jug storage area.
3.
Set empty Jug on floor in front of any faucet. Insert one end of the
“Easy Fill Hose” into the empty 3 gallon or 5 gallon jug, and hold
the other end under the faucet directly in the stream of cold water.
Your empty water jug will fill in a few minutes. When jug is almost
full, pull the end of the Easy Fill Hose away from the stream of
water and allow all the water in the hose to drain into the jug.
4.
Clean outside of new jug with a cloth.
5.
Place the Water Straw into the water jug, lower
the straw to the bottom of the jug, and clasp the
Jug Cap (see # 7 on the Parts and Features list)
down onto the neck of the water jug so that the
Jug Cap is tightly secured to the jug (fig. 2 and fig. 3).
A Power
Light on = Power is on.
Light off = Power is off.
B Hot Water Indicator Light
Light on = Water is heating.
Light off = Hot water is ready
to dispense.
C Cold Water Indicator Light
Light on = Water is cooling.
Light off = Cold water is ready
to dispense.
D Jug Empty / Change Filter
Light on = Fill empty jug.
Light on and jug is not empty
= replace filter.
fig. 1
DO NOT PLUG IN POWER CORD UNTIL WATER JUG IS LOADED!
3
4
5
1
2
"Loading the manual" means you need to wait until the file loads and becomes available for online reading. Some manuals are very large, and the time they take to appear depends on your internet speed.