Page 2 - Table of Contents
Chapter 1 . . . . . . . . . . . . . . . . . . . . . . . . . . . . . . . . . . . . . . . . 4 Welcome . . . . . . . . . . . . . . . . . . . . . . . . . . . . . . . . . . . . . 4 Torq Overview . . . . . . . . . . . . . . . . . . . . . . . . . . . . . . . . . 4 Decks . . . . . . . . . . . . . . . . . . ...
Page 5 - CHAPTER; English; WELCOME
4 CHAPTER 1 English WELCOME Congratulations on your purchase of a Torq-based performance system, one of the finest DJ tools available today. Each qualified M-Audio hardware product works with Torq in a unique fashion, and those methods are outlined in each of their user manuals. This manual will out...
Page 6 - Chapter 1; Decks
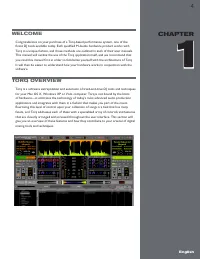
Torq 1.5 User Guide Chapter 1 5 Decks DJing begins with music, so you will get to know Torq’s Decks very well. A Deck is what Torq uses to play back a single digital music file and is analogous to the turntable or CD player used by DJs. The Deck allows you to play a track, change its speed and its k...
Page 7 - playlists for future performances.
Torq 1.5 User Guide Chapter 1 6 Mixer It’s all in the mix, or so they say, and Torq’s Mixer delivers the goods. The Mixer takes the audio from the two Decks and gives you control over what can be heard by means of volume controls, audio equalizers, and a crossfader. Two Decks and a Mixer: the essent...
Page 8 - Effect Racks
Torq 1.5 User Guide Chapter 1 7 Effect Racks Effects are a great way for you to manipulate (or mangle) your music in unique ways to enhance your mix. Torq has a collection of built-in effects that are specifically designed for DJ use: Tempo-synced delays and strobes. Shimmering phasers and flangers....
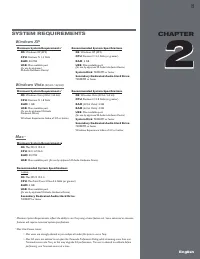
Page 9 - SYSTEM REQUIREMENTS; Windows XP; Windows Vista
8 CHAPTER 1 English 8 English CHAPTER 3 8 English CHAPTER 2 SYSTEM REQUIREMENTS Windows XP Minimum System Requirements 1 OS : Windows XP (SP3) CPU : Pentium IV 1.4 GHz RAM : 512 MB USB : One available port (for use by approved M- Audio Hardware Device) Recommended System Specifications OS : Windows ...
Page 10 - INSTALLATION; Note; Windows XP and Vista; folder, click “Choose” and make a selection.
Torq 1.5 User Guide Chapter 1 9 Torq 1.5 User Guide Chapter 2 9 INSTALLATION ✓ Note : The following directions are for installing the Torq software onto your computer. Torq will not run, however, unless an appropriate M-Audio hardware device (such as the Conectiv interface) is installed and plugged ...
Page 11 - AUTHORIZATION; Type your serial number into the dialog box and click OK.
Torq 1.5 User Guide Chapter 1 10 Torq 1.5 User Guide Chapter 2 10 AUTHORIZATION 1. Launch Torq. You will be presented with a dialog box asking for your serial number. 2. Your serial number is on a printed card (included in boxed versions of Torq) or was sent to you electronically (for on- line upgra...
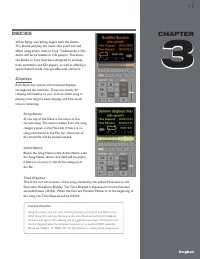
Page 12 - DECKS; Displays; Each Deck has various informational displays; Song Name
11 CHAPTER 1 English 11 English CHAPTER 3 DECKS When DJing, everything begins with the Decks. The Decks will play the music that you’ll mix and effect using all the tools in Torq. Traditionally, a DJ’s decks will be turntables or CD players. Therefore, the Decks in Torq have been designed to emulate...
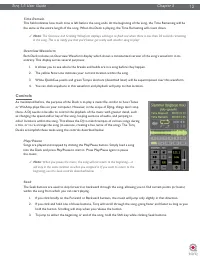
Page 13 - Time Remain; Overview Waveform; Controls; Seek; hold the button. Scrolling will stop when you release the button.
Torq 1.5 User Guide Chapter 1 12 Torq 1.5 User Guide Chapter 3 12 Time Remain This field indicates how much time is left before the song ends. At the beginning of the song, the Time Remaining will be the same as the entire length of the song. When the Deck is playing, the Time Remaining will count d...
Page 14 - Cue; the current location.; QuickCue; Setting QuickCues
Torq 1.5 User Guide Chapter 1 13 Torq 1.5 User Guide Chapter 3 13 Cue The Cue button will establish a primary Cue Point within a song. A Cue Point is a reference position within the track that you can jump to instantly, rather than having to seek through the track to find it. Typically, a DJ will se...
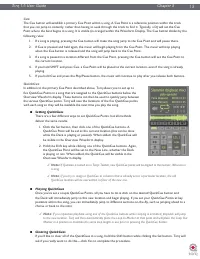
Page 15 - Deck Mode; Vinyl Mode
Torq 1.5 User Guide Chapter 1 14 Torq 1.5 User Guide Chapter 3 14 Deck Mode In order for Torq to feel familiar to all types of DJs, the Decks can be operated in one of three different modes. < Vinyl Mode Vinyl Mode will make the Deck behave as if it was a turntable. This means: 1. Pressing Play/P...
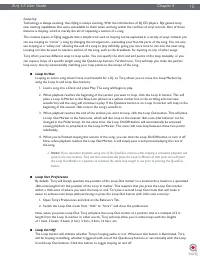
Page 16 - Looping; Load a song into a Deck and press Play. The song will begin to play.
Torq 1.5 User Guide Chapter 1 15 Torq 1.5 User Guide Chapter 3 15 Looping Technology is always evolving, thus DJing is always evolving. With the introduction of DJ CD players, DJs gained many new exciting capabilities that were unavailable to them when working within the confines of vinyl records. O...
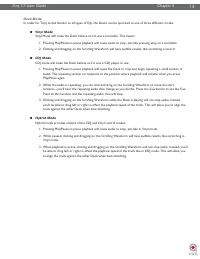
Page 17 - QuickLoop
Torq 1.5 User Guide Chapter 1 16 Torq 1.5 User Guide Chapter 3 16 < QuickLoop More often than not, a DJ will loop audio that is an even number of beats or bars. That is, they will loop a single bar (four beats) or two bars (eight beats), or may do micro-loops of only one or two beats. Instead of ...
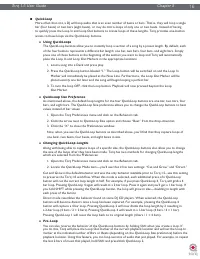
Page 18 - Speed Slider; Slider Range
Torq 1.5 User Guide Chapter 1 17 Torq 1.5 User Guide Chapter 3 17 Speed Slider Torq’s Decks are each equipped with a Speed Adjust slider for the purpose of beat-matching songs. This slider behaves just like the pitch adjusters found on DJ turntables and CD players. As you move this slider, the neigh...
Page 19 - BPM Display
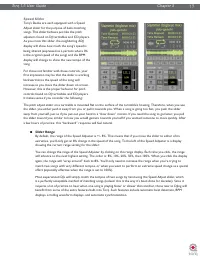
Torq 1.5 User Guide Chapter 1 18 Torq 1.5 User Guide Chapter 3 18 < BPM Display Tempo is a measurement of the speed of a song and is normally expressed as Beats Per Minute (BPM). As the BPM increases, the speed of the song increases. In order for two songs to be mixed together with their beats al...
Page 20 - » Manual Tempo Adjustment
Torq 1.5 User Guide Chapter 1 19 Torq 1.5 User Guide Chapter 3 19 » Manual Tempo Adjustment As mentioned above, Torq can determine the tempo of most dance music. Some music, however, is too complex or not repetitive enough for Torq to detect the tempo with precision. Fortunately, you can help Torq t...
Page 21 - Key; Fine Tuning
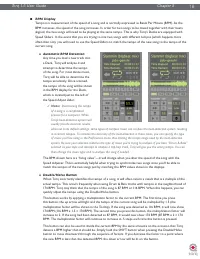
Torq 1.5 User Guide Chapter 1 20 Torq 1.5 User Guide Chapter 3 20 Key The Key Adjust is used to raise or lower the key (pitch) of a song without changing the tempo. This is useful when attempting to match the melodies of songs in both Decks during a mix, known as key-matching. You can adjust the key...
Page 22 - MIDI Keyboard Control; Sync Button
Torq 1.5 User Guide Chapter 1 21 Torq 1.5 User Guide Chapter 3 21 < MIDI Keyboard Control 1. Make sure that your MIDI keyboard or control surface has been properly installed and is configured to work with Torq. Please see chapter 6 for more information about configuring your external MIDI hardwar...
Page 23 - Nudge Buttons; Offset Buttons
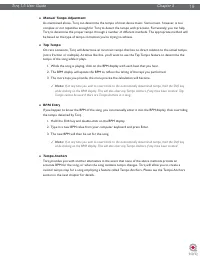
Torq 1.5 User Guide Chapter 1 22 Torq 1.5 User Guide Chapter 3 22 Nudge Buttons If you’re not taking advantage of Torq’s ability to keep tracks aligned using Sync, you can do it manually using the Nudge buttons. If you hear a song become ahead or behind the other, the Nudge buttons will allow you to...
Page 24 - WAVEFORM DISPLAY; Information Shown on Display; Waveform
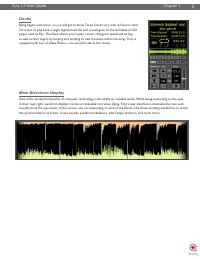
23 CHAPTER 1 English 23 English CHAPTER 4 WAVEFORM DISPLAY One of the most prominent features of the Torq user interface is the Scrolling Waveform Display, which takes up a decent amount of real estate above the Mixer and Effect Racks. Unlike the smaller Overview Waveforms found in each Deck, the Sc...
Page 25 - Zoom
Torq 1.5 User Guide Chapter 1 24 Torq 1.5 User Guide Chapter 4 24 Zoom At times, you may find yourself wanting to “zoom in” to the Scrolling Waveform Display to match beats more precisely or to “zoom out” in order to see more of each track. Use the magnifying glass icons directly above the display t...
Page 26 - Tempo Anchors; To properly add Tempo Anchors to a song:
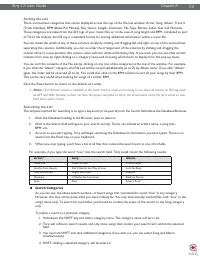
Torq 1.5 User Guide Chapter 1 25 Torq 1.5 User Guide Chapter 4 25 Tempo Anchors In addition to its automatic BPM detection features, Torq provides you with another alternative for BPM matching that becomes an indispensable tool when working with songs that include tempo changes or fluctuations (Torq...
Page 28 - Playback Manipulations; Click and hold on the waveform. The music will continue to play; CDJ Mode; nudge the music ahead or behind by a small amount.
Torq 1.5 User Guide Chapter 1 27 Torq 1.5 User Guide Chapter 4 27 Playback Manipulations The Waveform Display allows you to manipulate the song playback in a variety of ways using your mouse. The method of control differs depending on the control type you have selected for the Deck (Vinyl/CDJ/Hybrid...
Page 29 - SYNCHRONIZATION; Automatic Tempo and Phase Detection
28 CHAPTER 1 English 28 English CHAPTER 5 SYNCHRONIZATION At most of today’s dance clubs and events, the DJ will mix the songs together using a technique called beat-matching. The goal is to fade the volumes between two songs while keeping them perfectly in beat with one another. If done properly, t...
Page 30 - Adjusting with the Mouse; Adjusting with Nudge Buttons; Hold down the Shift key, then click on one of the Nudge buttons.; Adjusting with Offset Buttons; Hold down the Shift key, then click on one of the Offset buttons.
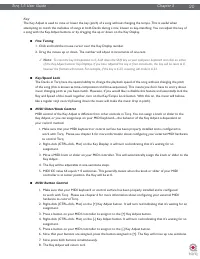
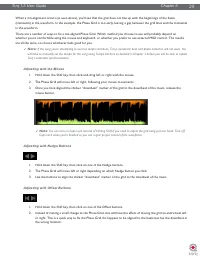
Torq 1.5 User Guide Chapter 1 29 Torq 1.5 User Guide Chapter 5 29 When a mis-alignment occurs (as seen above), you’ll see that the grid does not line up with the beginnings of the beats (transients) in the waveform. In the example, the Phase Grid is too early, leaving a gap between the grid lines an...
Page 31 - Locked Sync; Click repeatedly on the Global Tempo Display to tap a new tempo.
Torq 1.5 User Guide Chapter 1 30 Torq 1.5 User Guide Chapter 5 30 Sync Button The Sync button is an automatic method of synchronizing the beat and BPM of one Deck to another. When you engage Sync on a Deck (the Sync icon is on), it will change that Deck’s tempo to match the other Deck. Furthermore, ...
Page 32 - Global Tempo LEDs
Torq 1.5 User Guide Chapter 1 31 Torq 1.5 User Guide Chapter 5 31 Global Tempo LEDs To the left of the Global Tempo display is a horizontal arrangement of 4 lights. These will light in succession (creating a “chase” pattern) that will indicate the Global Tempo’s position within a bar. These lights w...
Page 33 - EXTERNAL CONTROL; Enabling Vinyl/CD Control; Turntable; Using Torq with only one turntable or CD player:; later in this chapter.
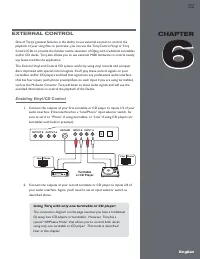
32 CHAPTER 1 English 32 English CHAPTER 6 EXTERNAL CONTROL One of Torq’s greatest features is the ability to use external sources to control the playback of your song files. In particular, you can use the Torq Control Vinyl or Torq Control CDs to provide the familiar tactile sensation of DJing with ...
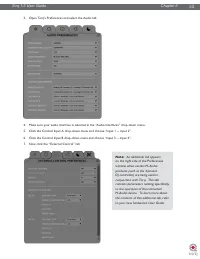
Page 34 - Open Torq’s Preferences and select the Audio tab.
Torq 1.5 User Guide Chapter 1 33 Torq 1.5 User Guide Chapter 6 33 3. Open Torq’s Preferences and select the Audio tab. 4. Make sure your audio interface is selected in the “Audio Interfaces” drop-down menu. 5. Click the Control Input A drop-down menu and choose “input 1 -- input 2”. 6. Click the Con...
Page 35 - External Control Calibration; Control Type
Torq 1.5 User Guide Chapter 1 34 Torq 1.5 User Guide Chapter 6 34 8. The first option enables External Control. Click the drop-down menu and select “Yes”. 9. The next step requires you to select the type of control signals you’ll be using for each Deck. If you’ll be using the Torq Control Vinyl reco...
Page 36 - Reversed Playback Direction
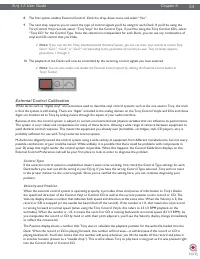
Torq 1.5 User Guide Chapter 1 35 Torq 1.5 User Guide Chapter 6 35 < Reversed Playback Direction If you find that Torq seems to be responding backwards to the Control Vinyls or CDs, take a look at the Velocity display. If the number shown is negative while the control source is playing forward, it...
Page 37 - Error Index; Standard Mode; Absolute Mode
Torq 1.5 User Guide Chapter 1 36 Torq 1.5 User Guide Chapter 6 36 Error Index If you’ve checked your audio cable connections and have also replaced your turntable’s needles yet still experience problems, take a look at the Error Index displays. These displays will be showing a number typically betwe...
Page 38 - AMPutate Mode; the process of cueing and beat-matching.; Deck Control; Open the Preferences and click on the External Control tab.
Torq 1.5 User Guide Chapter 1 37 Torq 1.5 User Guide Chapter 6 37 AMPutate Mode While exploring the depths of Torq, you will repeatedly run into scenarios that would not be possible with traditional DJ hardware—techniques that can only be achieved through the flexible power of computer technology. T...
Page 39 - BPM Matching; Runout Protection; MIDI Control
Torq 1.5 User Guide Chapter 1 38 Torq 1.5 User Guide Chapter 6 38 BPM Matching So how does one go about doing a DJ set with only one turntable? It is a little different than doing it in Standard mode, primarily due to the fact that you must use Torq’s on-screen Speed sliders to match tempos as oppos...
Page 40 - MIDI Preferences
Torq 1.5 User Guide Chapter 1 39 Torq 1.5 User Guide Chapter 6 39 < MIDI Preferences The second tab of the Preferences contains the MIDI options. At the bottom of this tab is a list of all the available MIDI input devices on your computer. Each device has a “Yes/No” option to enable or disable it...
Page 41 - Keyboard Learn
Torq 1.5 User Guide Chapter 1 40 Torq 1.5 User Guide Chapter 6 40 < Keyboard Learn You can also use your computer’s keyboard to control elements of the Torq interface using the same method as MIDI Learn above. Simply right-click (CTRL-click for Mac) on a control on screen, then press a key on you...
Page 42 - SAMPLER; Signal Source
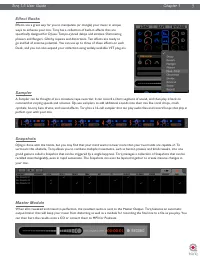
41 CHAPTER 1 English 41 English CHAPTER 7 SAMPLER When talking about music, a sampler is not a plate of hors d’oeuvres. A sampler is a device that will digitally record a sound that you can then replay at various pitches. If you’re into any kind of electronic dance music or hip-hop, you’ve undoubted...
Page 43 - Sampler Controls; Record Sample Button; Recording One-Shot Samples
Torq 1.5 User Guide Chapter 1 42 Torq 1.5 User Guide Chapter 7 42 Sampler Controls This section provides an overview of the controls within the Sampler. Record Sample Button Samples can be categorized into two groups: one-shot samples and loops. One-shot samples are sounds that play once when you tr...
Page 44 - Trigger Sample Button; Triggering One-Shot Samples; Loop Sample Button; Sample Volume Knob
Torq 1.5 User Guide Chapter 1 43 Torq 1.5 User Guide Chapter 7 43 Trigger Sample Button Pressing this button causes the associated sample to play. One-shot and looped samples exhibit slightly different behaviors: < Triggering One-Shot Samples 1. Click the Trigger button. The button icon will ligh...
Page 45 - Sample Name Window; The Sample Name window serves multiple purposes.
Torq 1.5 User Guide Chapter 1 44 Torq 1.5 User Guide Chapter 7 44 Sample Name Window The Sample Name window serves multiple purposes. 1. It will display the name of the sample file loaded into the slot. 2. The background of this window will fill from left to right as the sample plays, like a progres...
Page 46 - QuickScratch; Assigning Samples
Torq 1.5 User Guide Chapter 1 45 Torq 1.5 User Guide Chapter 7 45 QuickScratch While firing off samples using the Trigger buttons can be a lot of fun, it doesn’t always provide the level of control that you may want for the sample. Torq’s QuickScratch feature allows you to control the sample using t...
Page 47 - SNAPSHOTS; push of a button; Snapshot List; If you press the Tab key on your keyboard or click the Camera tab; Creating a Snapshot
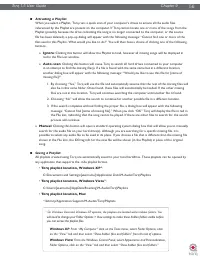
46 CHAPTER 1 English 46 English CHAPTER 8 SNAPSHOTS By now, you’ve surely noticed that Torq has many features designed to make DJing easier. Automatic tempo-detection and beat-matching allow you, the DJ, to spend your time doing other things rather than manually keeping two tracks in sync. For examp...
Page 48 - Masking a Snapshot
Torq 1.5 User Guide Chapter 1 47 Torq 1.5 User Guide Chapter 8 47 Masking a Snapshot Each Snapshot you create contains the settings of almost every component in Torq. A Snapshot will remember the Key setting of a Deck, the EQ settings in the Mixer (including the state of the EQ Kills), the channel g...
Page 49 - Swapping Snapshots
Torq 1.5 User Guide Chapter 1 48 Torq 1.5 User Guide Chapter 8 48 Swapping Snapshots Frequently, you may find that a Snapshot set up for Deck A would be useful for Deck B or vice versa. For example, you may have created a Snapshot that loads a Delay effect while also killing the Low EQ on Deck A. To...
Page 50 - Browser Pane; The Browser pane is located on the
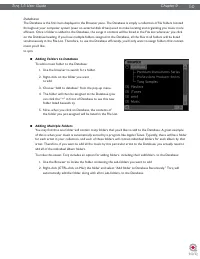
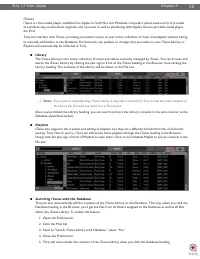
49 CHAPTER 1 English 49 English CHAPTER 9 BROWSER/DATABASE A DJ’s most important asset, beyond the gear he uses, is his collection of music. Without a wealth of top-notch tracks in his arsenal, a DJ is not equipped to dominate a dance floor. Anyone who has been DJing for even a short while will have...
Page 51 - Database; Adding Folders to Database
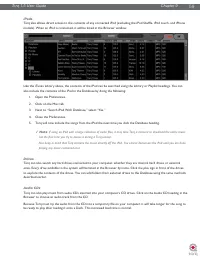
Torq 1.5 User Guide Chapter 1 50 Torq 1.5 User Guide Chapter 9 50 Database The Database is the first item displayed in the Browser pane. The Database is simply a collection of file folders located throughout your computer system (even on external disk drives) used to make locating and organizing you...
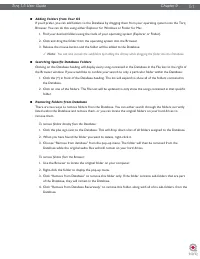
Page 52 - Adding Folders from Your OS
Torq 1.5 User Guide Chapter 1 51 Torq 1.5 User Guide Chapter 9 51 < Adding Folders from Your OS If you’d prefer, you can add folders to the Database by dragging them from your operating system into the Torq Browser. You can do this using either Explorer for Windows or Finder for Mac. 1. Find your...
Page 53 - File List; Editing Fields; Click and Drag; Unloading Songs from the Decks
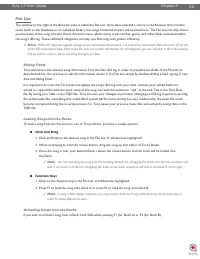
Torq 1.5 User Guide Chapter 1 52 Torq 1.5 User Guide Chapter 9 52 File List The window to the right of the Browser pane is called the File List. If you have selected a source in the Browser that contains music (such as the Database or an individual folder), the songs contained therein will be listed...
Page 54 - Sorting the List; Click the Reset button to return to the default sort order.; Searching the List; Click the Database heading in the Browser pane to select it.; Search Categories
Torq 1.5 User Guide Chapter 1 53 Torq 1.5 User Guide Chapter 9 53 Sorting the List There are fourteen categories that can be displayed across the top of the File List window: Artist, Song, Album, Track # (Track Number), BPM (Beats Per Minute), Key, Genre, Length, Comment, File Type, Bitrate, Label, ...
Page 55 - Now, only the songs with “love” in their titles are shown.; Playlists
Torq 1.5 User Guide Chapter 1 54 Torq 1.5 User Guide Chapter 9 54 Using our example above, confining the search to the Song category would yield the following results: Artist 4 Song Album Deee-Lite Power of Love World Clique Jennifer Love Hewitt Can’t Stand in the Way of Love Let’s Go Bang Madonna I...
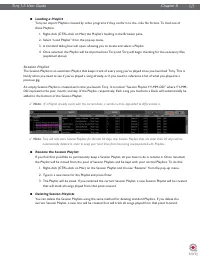
Page 57 - Activating a Playlist; Ignore; red in the File List window.; Manual; Saving a Playlist; Torq playlist location, Windows XP
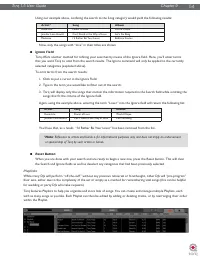
Torq 1.5 User Guide Chapter 1 56 Torq 1.5 User Guide Chapter 9 56 < Activating a Playlist When you select a Playlist, Torq runs a quick scan of your computer’s drives to ensure all the audio files referenced by the Playlist are present on the computer. If Torq cannot locate one or more of the son...
Page 58 - Loading a Playlist; Session Playlist
Torq 1.5 User Guide Chapter 1 57 Torq 1.5 User Guide Chapter 9 57 < Loading a Playlist Torq can import Playlists created by other programs if they conform to the .m3u file format. To load one of these Playlists: 1. Right-click (CTRL-click on Mac) the Playlist’s heading in the Browser pane. 2. Sel...
Page 59 - iTunes; Library
Torq 1.5 User Guide Chapter 1 58 Torq 1.5 User Guide Chapter 9 58 iTunes iTunes is a free media player available from Apple for both Mac and Windows computers (www.itunes.com). It provides an excellent way to download, organize, and rip music as well as interfacing with Apple’s famous portable media...
Page 60 - iPods; Drives
Torq 1.5 User Guide Chapter 1 59 Torq 1.5 User Guide Chapter 9 59 iPods Torq also allows direct access to the contents of any connected iPod (excluding the iPod Shuffle, iPod touch, and iPhone models). When an iPod is connected, it will be listed in the Browser window. Like the iTunes Library above,...
Page 61 - MIXER; Mixer Architecture; Channels
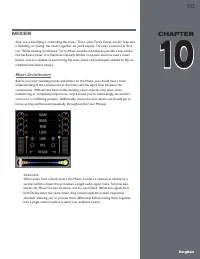
60 CHAPTER 1 English 60 English CHAPTER 10 MIXER Step one when DJing is controlling the music. That’s what Torq’s Decks are for. Step two is blending, or mixing, the music together. As you’d expect, Torq has a section for that, too. While existing in software, Torq’s Mixer sounds and behaves just li...
Page 62 - closely matches the quieter song.
Torq 1.5 User Guide Chapter 1 61 Torq 1.5 User Guide Chapter 10 61 Gain/Mute When audio from a Deck enters a channel in the Mixer, the first thing it runs into is the Gain control (seen at the top of each channel in the mixer). This knob will increase or decrease the volume of the incoming audio sig...
Page 63 - audience can or cannot hear.; Channel Volume Faders; Line Input Buttons; Crossfader
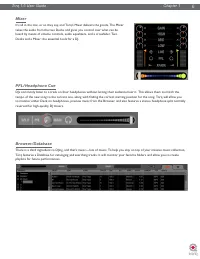
Torq 1.5 User Guide Chapter 1 62 Torq 1.5 User Guide Chapter 10 62 PFL/Headphone Cue Once the audio signal leaves the EQ, it is sent to two different locations. One location is the PFL Button, which looks like a pair of headphones. PFL stands for Pre-Fader Listen, which refers to hearing an audio si...
Page 64 - Crossfader Curve
Torq 1.5 User Guide Chapter 1 63 Torq 1.5 User Guide Chapter 10 63 < Crossfader Curve Speaking of scratching, one of the improvements to crossfader design is an adjustable Crossfader Curve. This refers to the rate at which the songs fade in and out as the crossfader is moved from one side to the ...
Page 65 - Volume Control
64 CHAPTER 1 English 64 English CHAPTER 11 PFL/HEADPHONE CUE You’ve undoubtedly seen the archetypical image of a DJ: standing behind a set of turntables and a mixer...with a pair of headphones on. If everyone is dancing to the music they hear on the speakers, what is the DJ listening to on the headp...
Page 66 - MASTER OUTPUT
65 CHAPTER 1 English 65 English CHAPTER 12 MASTER OUTPUT The Master Output is the last step in Torq’s audio signal flow before the music goes out to your audience. It contains a Master Level slider, a Master Level meter, a Master Limiter, as well as an Audio Recorder. All of these controls are locat...
Page 67 - Master Recorder; Filename; To set the filename for your recording:; Setting the Record Level; Recording; Time window begin to count the length of the recording.
Torq 1.5 User Guide Chapter 1 66 Torq 1.5 User Guide Chapter 12 66 Master Recorder The Master module also includes a Recorder which allows you to record and save your mix as an audio file as you perform it. You can then take your recorded mix and burn it onto a CD or distribute it as a Podcast, for ...
Page 68 - EFFECTS; Effects are devices that alter an audio; Effect Slot
67 CHAPTER 1 English 67 English CHAPTER 13 EFFECTS Effects are devices that alter an audio signal. These alterations can range from subtle to extreme and can be a great source of creative fun within Torq. Each Deck can be processed individually with multiple effects, and that is the purpose of the E...
Page 69 - Mix Knob; can be louder than the source audio.; Routing Button; reference in this manual.
Torq 1.5 User Guide Chapter 1 68 Torq 1.5 User Guide Chapter 13 68 Mix Knob The functionality of the Mix knob differs depending on the status of the neighboring Routing button: » When the Routing Button is set to Insert/Chain—the Mix knob will adjust the wet/dry mix of the effect. When the Mix knob ...
Page 70 - Tweak Button; Click the Load Rack button. A standard dialog box will appear.; Bypassing the Effects
Torq 1.5 User Guide Chapter 1 69 Torq 1.5 User Guide Chapter 13 69 Tweak Button The Tweak button works in the same way as the Tweak knob—it will toggle the state of a parameter in the selected effect. Like the Tweak knob, the exact function of the Tweak button will depend on which effect you’re usin...
Page 71 - The following is an explanation of the 10 built-in effects in Torq:; Delay; Enable Button
Torq 1.5 User Guide Chapter 1 70 Torq 1.5 User Guide Chapter 13 70 Built-In Effects The following is an explanation of the 10 built-in effects in Torq: Delay Delay is the technical term for what the Delay effect does, but you’ll probably like to think of this effect as an “echo.” Essentially, the De...
Page 72 - Reverb; Enable button
Torq 1.5 User Guide Chapter 1 71 Torq 1.5 User Guide Chapter 13 71 Reverb Reverb is the phenomenon in which sound bounces off the walls within a room, creating hundreds (thousands?) of echoes that cannot be individually identified by the human ear. The total result of all these echoes is a wide and ...
Page 73 - Flanger; Naturally, this button turns the Flanger on and off.; Phaser; This button will turn the effect on and off.
Torq 1.5 User Guide Chapter 1 72 Torq 1.5 User Guide Chapter 13 72 Flanger A Flanger is a common effect found in most effect processors. Flanging grew from a studio trick where engineers would play identical material on two tape decks, then make slight changes to the play speed of the two tape machi...
Page 75 - Distortion
Torq 1.5 User Guide Chapter 1 74 Torq 1.5 User Guide Chapter 13 74 Distortion Distortion, by definition, is the altering of a signal. In practical terms, it refers to feeding audio into a device so loudly that it exceeds the dynamic range of the device. The result is a fairly raunchy noise that, at ...
Page 76 - Strobe; Turns the Strobe effect on and off.; Reverse; The Tweak knob has no function.
Torq 1.5 User Guide Chapter 1 75 Torq 1.5 User Guide Chapter 13 75 Strobe Just about anyone who has been to a dance club in the last 20 years has experienced a strobe light. Those are the super-bright lights that flash really quickly. They have the effect of making everyone look like they’re in “sto...
Page 77 - Brake; This button will be on at all times—it cannot be turned off.; Repeat
Torq 1.5 User Guide Chapter 1 76 Torq 1.5 User Guide Chapter 13 76 Brake As mentioned above, turntables don’t respond instantly to changes in speed or direction. When you press Stop on a turntable, it takes a moment for the turntable to slow down and reach a complete stop. This is due the weight and...
Page 78 - VST Effects; Latency; To open the same VST interface again, click the Wrench icon again.
Torq 1.5 User Guide Chapter 1 77 Torq 1.5 User Guide Chapter 13 77 VST Effects The 10 built-in effects provided with Torq cover a wide range of effects typically used by DJs—many DJs will never need more than these built-in effects. Others, however, will want to explore the possibilities of addition...
Page 79 - Assigning Controls; Load a VST Effect. Its editor window will pop up when loaded.; VST Crash Guard
Torq 1.5 User Guide Chapter 1 78 Torq 1.5 User Guide Chapter 13 78 Assigning Controls It’s fun to tweak effects using knobs and buttons—VST effects are no exception. However, before you start messing with the Tweak knob and button, you’ll need to assign a function to them. Unlike Torq’s 10 built-in ...
Page 80 - REWIRE; enter the realm of music production.; Global Tempo
79 CHAPTER 1 English 79 English CHAPTER 14 REWIRE Now that you’ve mastered all the techniques and tricks in Torq, where do you go from here? Remixing and production. After all, Torq offers you so many tools for remixing and sound design that you can cross over the boundary of simply playing songs an...
Page 81 - Audio Routing
Torq 1.5 User Guide Chapter 1 80 Torq 1.5 User Guide Chapter 14 80 Audio Routing When using two programs together via ReWire, the audio generated by Torq will be fed to audio channels in Live (or whatever Host application you choose to use). With this system in place, you can further process the out...
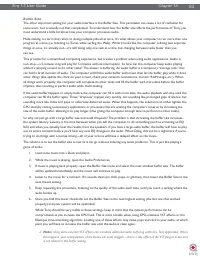
Page 82 - PREFERENCES; An additional tab appears on the right side of the; Audio Tab
81 CHAPTER 1 English 81 English CHAPTER 15 PREFERENCES This section provides a comprehensive review of the Preferences for Torq. Open the Preferences by clicking the Preferences icon. Note: An additional tab appears on the right side of the Preferences window when certain M-Audio products (such as t...
Page 83 - Torq Engine; This preference allows you to select an audio interface for Torq.; Sample Rate
Torq 1.5 User Guide Chapter 1 82 Torq 1.5 User Guide Chapter 15 82 Torq Engine This preference chooses the quality level of Torq’s audio engine. Normal is the default setting and should be used if you experience no performance problems. Economy is the second option and should only be used if using a...
Page 84 - Buffer Size; Load some music into a Deck and play it.
Torq 1.5 User Guide Chapter 1 83 Torq 1.5 User Guide Chapter 15 83 Buffer Size The other important setting for your audio interface is the Buffer Size. This parameter can cause a lot of confusion for some users, but is actually not that complicated. To understand how the buffer size affects the perf...
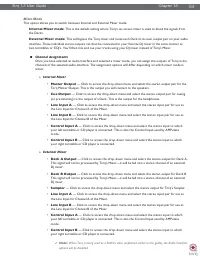
Page 85 - Mixer Mode; Channel Assignments; Master Output; External Mixer; Sampler; options will be disabled.
Torq 1.5 User Guide Chapter 1 84 Torq 1.5 User Guide Chapter 15 84 Mixer Mode This option allows you to switch between Internal and External Mixer mode. Internal Mixer mode : This is the default setting where Torq’s on-screen mixer is used to blend the signals from the Decks. External Mixer mode : T...
Page 86 - MIDI Tab; MIDI Soft Takeover
Torq 1.5 User Guide Chapter 1 85 Torq 1.5 User Guide Chapter 15 85 MIDI Tab This tab features all options pertaining to Auto-Setup and MIDI control. Auto-Detect M-Audio Devices ([On]/Off) When this option is enabled, Torq will automatically set the Audio and MIDI interface options to those of any kn...
Page 87 - Scratch Sensitivity; learn if each turntable platter is capable of sending
Torq 1.5 User Guide Chapter 1 86 Torq 1.5 User Guide Chapter 15 86 Scratch Sensitivity This option allows you to configure how rapidly a Deck will respond to messages sent from a MIDI controller (it has no effect on External Control with Vinyl or CDs). It is designed for controllers that will move t...
Page 88 - MIDI Clock; Setting up MBC Input
Torq 1.5 User Guide Chapter 1 87 Torq 1.5 User Guide Chapter 15 87 MIDI Clock Torq’s Global Tempo can be slaved to an external device that transmits MIDI Clock (called MBC in Torq). When you then enable Global Tempo, all aspects of Torq (the Sampler and synced Decks) will follow the MIDI Clock. Torq...
Page 89 - MIDI Stop Behavior; STOP; MIDI Clock Phase Offset; External Drum Machine; : Dance music is dance music thanks to the drums. You can make your DJ; External Synth/Sequencer; : Beats are easy to add, but you may want to take it to the next level; Swapping DJs
Torq 1.5 User Guide Chapter 1 88 Torq 1.5 User Guide Chapter 15 88 < MIDI Stop Behavior This preference determines what Torq will do when it receives a MIDI Stop command from an external device. • STOP : When set to Stop, Torq will stop all Decks and Samples upon receiving MIDI Stop. • FREEWHEEL ...
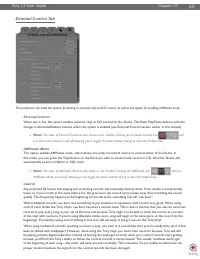
Page 90 - External Control Tab; External Control; will; tate icon; Lead In
Torq 1.5 User Guide Chapter 1 89 Torq 1.5 User Guide Chapter 15 89 External Control Tab This preference tab holds the options pertaining to external vinyl and CD control, as well as the option for enabling AMPutate mode. External Control When set to Yes, this option enables external vinyl or CD cont...
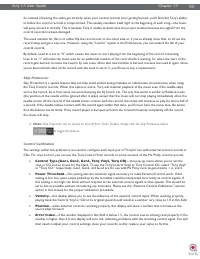
Page 91 - control records has been damaged.; Skip Protection; to toggle the feature.; Control Calibration; —this pop-up menu allows you to set the; Power Threshold; earlier in this manual for the proper calibration procedure.; Velocity; source plays forward.
Torq 1.5 User Guide Chapter 1 90 Torq 1.5 User Guide Chapter 15 90 So, instead of hearing the audio get scratchy when your control records start getting burned, you’ll find that Torq’s ability to follow the control records is compromised. This usually manifests itself right at the beginning of each ...
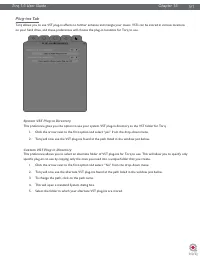
Page 92 - System VST Plug-in Directory; This will open a standard System dialog box.
Torq 1.5 User Guide Chapter 1 91 Torq 1.5 User Guide Chapter 15 91 Plug-ins Tab Torq allows you to use VST plug-in effects to further enhance and mangle your music. VSTs can be stored in various locations on your hard drive, and these preferences will choose the plug-in locations for Torq to use. Sy...
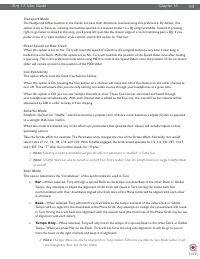
Page 93 - Miscellaneous Tab; Skin; —When selected will disable all Tooltips entirely.; Search iTunes Library with Database
Torq 1.5 User Guide Chapter 1 92 Torq 1.5 User Guide Chapter 15 92 Miscellaneous Tab This tab contains miscellaneous options that affect the behavior of certain features of Torq. Skin This option allows you to select a different “Skin” or color scheme for Torq. 1. Click to drop down the Skin menu. 2...
Page 94 - Transport Mode; This option affects how the Deck Cue buttons behave.; Schaffel Mode
Torq 1.5 User Guide Chapter 1 93 Torq 1.5 User Guide Chapter 15 93 Transport Mode The Nudge and Offset buttons in the Decks can have their directions reversed using this preference. By default, this option is set to Reverse, meaning the buttons operate in a manner similar to a DJ using turntables. I...
Page 95 - governs the creation of new QuickCues and Loops.; Loop Out Mode; This option affects how the QuickLoop buttons behave.; QuickLoop Mode; the loop can be, other than the length of the song.
Torq 1.5 User Guide Chapter 1 94 Torq 1.5 User Guide Chapter 15 94 Loop/Cue Quantize By default, Torq does not quantize actions such as creating loops or QuickCues. This gives you the freedom to set these points wherever you wish. If Quantize is set to “Yes”, Torq will force each new Loop or QuickCu...
Page 96 - Beat Detection Style; Sample Counter
Torq 1.5 User Guide Chapter 1 95 Torq 1.5 User Guide Chapter 15 95 Beat Detection Style Torq attempts to determine the tempo and phase of a song when you load it into a Deck. Coaxing a computer to “hear” the tempo of a song is partially art and science—this preference is here to assist when the scie...
Page 97 - APPENDIX; Preset Key Assignments; Global Key Commands
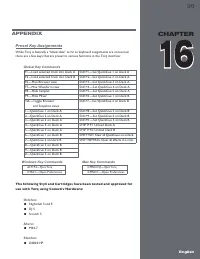
96 CHAPTER 1 English 96 English CHAPTER 10 96 English CHAPTER 16 APPENDIX Preset Key Assignments While Torq is basically a “blank slate” as far as keyboard assignments are concerned, there are a few keys that are preset to various functions in the Torq interface: Global Key Commands F1—Load selected...
Page 98 - WARRANTY; Warranty Terms
Torq 1.5 User Guide Chapter 1 97 Torq 1.5 User Guide Chapter 16 97 WARRANTY Warranty Terms M-Audio warrants products to be free from defects in materials and workmanship, under normal use and provided that the product is owned by the original, registered user. Visit www.m-audio.com/warranty for term...
Page 99 - Benelux
M-Audio USA 5795 Martin Rd., Irwindale, CA 91706 Technical Support web . . . . . . . . . . . . . . . . . . . . . . www.m-audio.com/techtel (pro products) . . . . . . . . . . . . . . . . . . .(626) 633-9055tel (consumer products) . . . . . . . . . . . . . . (626) 633-9066fax (shipping) . . . . . . . ...