Page 2 - Index
English Italiano Español Français Deutsch Polish 01 36 71 106 141 176 Index
Page 3 - Thank you for choosing this product.; English
01 electric scooter User manual Thank you for choosing this product. For information, technical support and assistance, contact your dealer or visit the website www.ducatiurbanemobility.it English
Page 4 - Contents; Safety instructions
02 Contents 1. 2. 3. 4.5. 6. 7. 8. 9. 10. 11. 12. 13. 14.15. 16. 17. 18. 19. 20. Safety instructions Quick-start Package contents Product overview Control information / Control panelAssembly and configurationFolding and carrying Battery charging and activation Brake adjustmentRangeStorage and cleani...
Page 5 - Safety instructions; manual for future reference or new users.
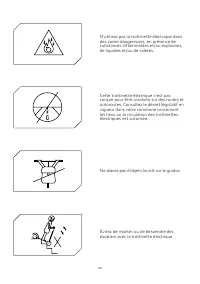
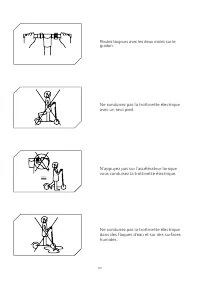
03 1. Safety instructions Please read the following instructions carefully before using the product. Save this manual for future reference or new users. • The company will not assume any liability deriving from misuse of the product or non-compliance either with road regulations or the instructions ...
Page 6 - WARNING
04 2. Quick-start • When you use it for the first time, charge the scooter to 100%.• Press the power button for a few seconds to start.• Check the battery indicator: if the battery is low, recharge it before use. The electric scooter is a device that requires periodic charging to work.• Check the ty...
Page 9 - for a few seconds.
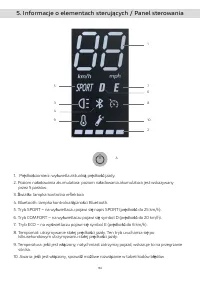
07 5. Control information / Control panel 1 7 5 3 4 9 6 8 10 2 A 1. Speedometer: displays the current speed of the scooter. 2. Battery level: the battery level is indicated by 5 bars.3. Headlights: Warning light. 4. Bluetooth: Bluetooth indicator. 5. SPORT mode - The display will show SPORT. (up to ...
Page 10 - than 33V at the same time, an acoustic warning will sound 6 times.
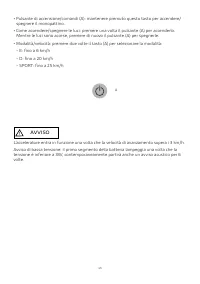
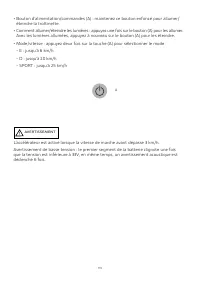
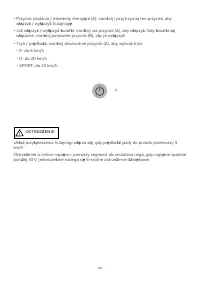
08 • Power button/controls (A): Press and hold this button to turn the scooter on/off.• How to turn the lights on/off: press button (A) once to turn them on. When the lights are on, press button (B) again to turn them off.• Mode/speed: press key (A) twice to select the mode: - E: up to 6 km/h - D: u...
Page 11 - Assembly and configuration
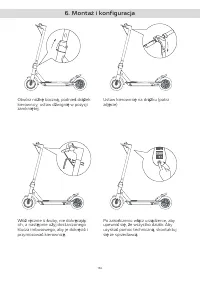
09 Open the stand, raise the rod, place the lever in the closed position. Insert the 4 screws manually without tightening them, then use the hexagonal key provided to tighten them and secure the handlebar. Install the handlebar on the rod (see image) When you have finished, turn on your device to ma...
Page 12 - the electric scooter on.; Folding and carrying
10 Loose handlebar rodIf the handlebar rod is loose, you can tighten the screws on the folding system using the key supplied. Closing: Turn off the electric scooter, release the locking mechanism: press the red hook and pull the lever outwards (see image), pull the handlebar rod inwards and make sur...
Page 13 - Battery charging and activation; CAUTION
11 1. Open the rubber cap of the charging socket located on the left side of the footplate.2. Plug the charger connector into the socket. 3. When the battery is fully charged, remove the charger connector. The red light on the power supply will turn green when charging is complete. Always carry the ...
Page 15 - Storage and cleaning
13 Maximum range depends on several variables:Terrain: range is greater when riding on a smooth surface than when riding on rough roads and slopes. User weight: the heavier the user, the shorter the range. Temperature: Riding the scooter in a very cold or hot environment affects the range.Speed and ...
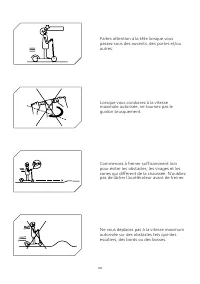
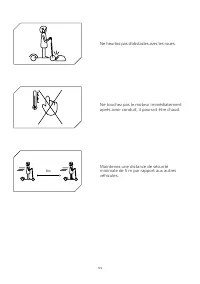
Page 16 - its structure and cause problems.; Instructions on driving behaviour; • Do not use the phone or listen to music while riding the scooter.
14 12. General warnings • Check brakes, pressure (50 PSI), condition of wheels and accelerator before each use. If you notice unusual noises or any anomalies, do not use the product and contact the Technical Assistance Service at your dealer.• The scooter should not be modified in any way, this coul...
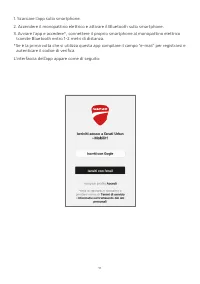
Page 17 - App configuration; • Set the Cruise Control function
15 13. App configuration What can you do with the Ducati Urban e-Mobility app?• Start a self-diagnosis• Set the driving modes• Set the speed unit of measurement (km/mph)• Set the start mode • Set the Cruise Control function • Set the LED ambient light colour (RGB)• View the partial and total kilomet...
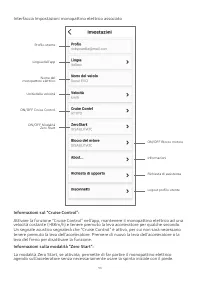
Page 19 - Main interface
17 The app’s interface with the associated electric scooter appears as follows: Main interface Associated electric scooter Electric scooter battery percentage Speed in real time Distance travelled (ODO) Distance travelled (TRIP) Record route Activate / Deactivate application Riding modes Usage time ...
Page 20 - Associated electric scooter Settings interface; Information on “Cruise Control”:; accelerator without having to push off with the feet.
18 Associated electric scooter Settings interface Information on “Cruise Control”: Activate the “Cruise Control” function in the app, keep the electric scooter at a constant speed (> 8 km/h) and hold the accelerator lever down for a few seconds. An acoustic signal will indicate that “Cruise Contr...
Page 28 - ducatiurbanemobility.it
26 What to avoid: Opening the battery or taking it apart, hitting, throwing or puncturing the battery or sticking objects on the battery. Touching any substances leaking from the battery, as it contains hazardous substances. Letting children or pets touch the battery.Over-charging, over-discharging ...
Page 29 - Daily maintenance and care; Cleaning and storage; of both the scooter and the battery.
27 17. Daily maintenance and care Cleaning and storage • If there are stains on the scooter body, wipe them off with a damp cloth. If stains persist, put toothpaste on them, brush with a toothbrush, then wipe with a damp cloth. If there are scratches on the plastic components, use sandpaper or other...
Page 30 - once fully charged it will have a life of 120-180 days.
28 Note: once fully charged it will have a life of 120-180 days. Damage caused by the battery being left uncharged for a long period is irreversible and is not covered by the limited warranty. Once the damage has occurred, the battery cannot be recharged (the battery must not be disassembled by unqu...
Page 32 - Tests to be carried out
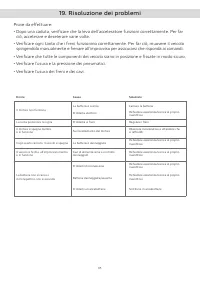
30 19. Troubleshooting Tests to be carried out • After a fall, check that the accelerator lever works properly. To do this, accelerate and decelerate several times.• Check from time to time that the brakes are working properly. To do this, move the vehicle. Push it manually and suddenly brake to mak...
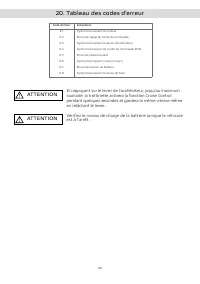
Page 33 - Error Codes Table; By pressing the accelerator lever, up to the maximum travel,
31 20. Error Codes Table Error Code E.1 E.2 E.3 E.4 E.5 E.6 E.7 E.8 Indications Motor malfunction Control unit signal error Accelerator lever malfunction Control unit MOS malfunction Phase/current error Average current malfunction Battery voltage error Brake lever malfunction By pressing the acceler...
Page 34 - prevent potential negative consequences for the environment
32 CAUTION Disposing of electrical or electronic devices at the end of their life (applicable in all European Union countries and in other European systems with separate collection systems) This symbol on the product or packaging indicates that the product should not be considered as normal househol...
Page 35 - other European systems with separate collection system); pack should not be considered normal household waste. On some
33 CAUTION Disposal of dead batteries (applicable in all countries of the European Union and in other European systems with separate collection system) This symbol on the product or packaging indicates that the battery pack should not be considered normal household waste. On some types of batteries,...
Page 36 - NOTE; • Never leave the product to charge unsupervised.
34 NOTE Read the manual and instructions below in full before using the product. Product name: Ducati PRO-I EVO Product type: Electric scooterYear of production: 2020 Note: • To recharge this electric scooter, use ONLY the supplied battery charger labelled XHK-916-42015 with the following output vol...
Page 37 - Declaration of conformity; that the design and manufacture of this product; certifies
35 Declaration of conformity The undersigned: M.T. Distribution S.r.l. Address: Via Bargellino 10, 40012 Calderara di Reno (BO), Italy that the design and manufacture of this product complies with the following directives: 2006/42/EC Machinery Directive2014/30/EU Electromagnetic Compatibility Direct...
Page 38 - Grazie per aver scelto questo prodotto.; Italiano
36 monopattino elettrico Manuale d’uso Grazie per aver scelto questo prodotto. Per informazioni, supporto tecnico ed assistenza rivolgersi al proprio rivenditore o visita il sito www.ducatiurbanemobility.it Italiano
Page 39 - Indice; Istruzioni di sicurezza
37 Indice 1. 2. 3. 4.5. 6. 7. 8. 9. 10. 11. 12. 13. 14.15. 16. 17. 18. 19. 20. Istruzioni di sicurezza Guida rapida Contenuto della confezionePanoramica del prodottoInformazioni dei comandi / Pannello di controlloAssemblaggio e configurazionePiegare e trasportareRicarica e attivazione della batteria...
Page 40 - Istruzioni di sicurezza; e gomitiere ed indossare il casco.
38 1. Istruzioni di sicurezza Leggere attentamente le seguenti istruzioni prima di utilizzare il prodotto.Salvare questo manuale per riferimenti futuri o nuovi utilizzatori.• L’azienda non si assumerà nessuna responsabilità derivata dal mal utilizzo del prodotto o inadempienze tanto relative alle no...
Page 41 - AVVISO
39 2. Guida rapida • Al primo utilizzo caricare il monopattino al 100%.• Premere il pulsante di accensione per qualche secondo per avviarlo.• Controllare l’indicatore della batteria, se la batteria è scarica, ricaricarla prima dell’uso, il monopattino elettrico è un apparecchio che richiede una rica...
Page 42 - Contenuto della confezione; • Monopattino
40 3. Contenuto della confezione • Monopattino • Accessori: - Chiave a brugola - n° 4 viti - Camera d’aria di scorta - Stickers di ricambio - Adattatore per gonfiaggio gomme• Caricabatteria Monopattino assemblato, il manubrio sarà da installare con le apposite viti.
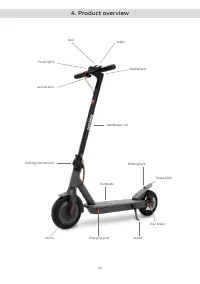
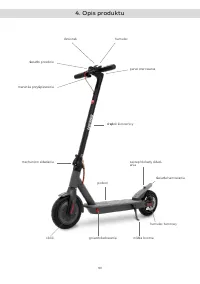
Page 43 - Panoramica del prodotto
41 4. Panoramica del prodotto pannello di controllo asta del manaubrio chiusura ripiegamento luce freno freno a disco cavalletto porta di ricarica motore pedana freno campanello luce frontale acceleratore meccanismo di ripiegamento
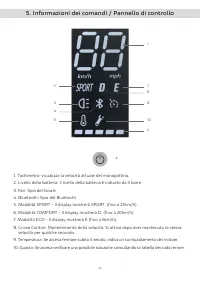
Page 44 - Informazioni dei comandi / Pannello di controllo
42 5. Informazioni dei comandi / Pannello di controllo 1 7 5 3 4 9 6 8 10 2 A 1. Tachimetro: visualizza la velocità attuale del monopattino.2. Livello della batteria: il livello della batteria è indicato da 5 barre. 3. Fari: Spia del fanale.4. Bluetooth: Spia del Bluetooth. 5. Modalità SPORT - Il di...
Page 46 - esagonale fornita per serrarle e fissare il; Assemblaggio e configurazione
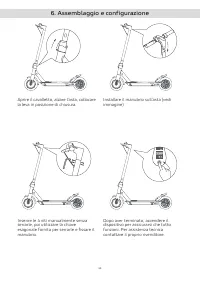
44 Aprire il cavalletto, alzare l’asta, collocare la leva in posizione di chiusura. Inserire le 4 viti manualmente senza serrarle, poi utilizzare la chiave esagonale fornita per serrarle e fissare il manubrio. Installare il manubrio sull’asta (vedi immagine) Dopo aver terminato, accendere il disposi...
Page 47 - Piegare e trasportare
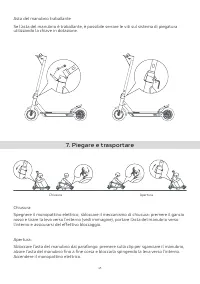
45 Asta del manubrio traballante Se l’asta del manubrio è traballante, è possibile serrare le viti sul sistema di piegatura utilizzando la chiave in dotazione. Chiusura: Spegnere il monopattino elettrico, sbloccare il meccanismo di chiusura: premere il gancio rosso e tirare la leva verso l’esterno (...
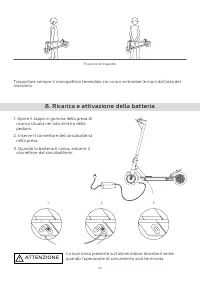
Page 48 - Ricarica e attivazione della batteria; ATTENZIONE
46 1. Aprire il tappo in gomma della presa di ricarica situata nel lato sinistro della pedana. 2. Inserire il connettore del caricabatteria nella presa. 3. Quando la batteria è carica, estrarre il connettore del caricabatterie. La luce rossa presente sull’alimentatore diventerà verde quando l’operaz...
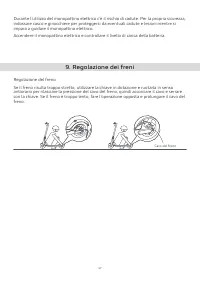
Page 49 - Regolazione dei freni
47 Durante l’utilizzo del monopattino elettrico c’è il rischio di cadute. Per la propria sicurezza, indossare casco e ginocchiere per proteggersi da eventuali cadute e lesioni mentre si impara a guidare il monopattino elettrico. Accendere il monopattino elettrico e controllare il livello di carica d...
Page 50 - guida su strade sconnesse e pendii.; Conservazione e pulizia
48 La massima autonomia dipende da diverse variabili:Terreno: la guida su pavimentazione liscia comporta un’autonomia maggiore rispetto alla guida su strade sconnesse e pendii. Peso dell’utente: più pesante è l’utente, più breve è l’autonomia. Temperatura: la guida del monopattino in un ambiente mol...
Page 51 - Avvertenze generali; Istruzioni circa il comportamento alla guida
49 12. Avvertenze generali • Controllare i freni, la pressione (50PSI), la condizione delle ruote e l’acceleratore prima ogni uso. Se si rilevano rumori insoliti o qualche anomalia, non utilizzare il prodotto e contattare il Servizio di Assistenza Tecnica presso il proprio rivenditore.• È vietato mo...
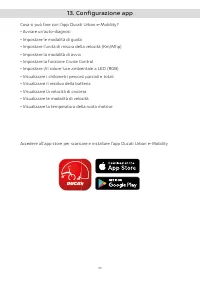
Page 52 - Configurazione app; • Impostare le modalità di guida
50 13. Configurazione app Cosa si può fare con l’app Ducati Urban e-Mobility?• Avviare un’auto-diagnosi • Impostare le modalità di guida • Impostare l’unità di misura della velocità (Km/Mhp)• Impostare la modalità di avvio• Impostare la funzione Cruise Control• Impostare i/il colore luce ambientale ...
Page 54 - L’interfaccia principale
52 L’interfaccia dell’app con monopattino elettrico associato appare come di seguito: L’interfaccia principale Monopattino elettrico associato Percentuale della batteria del monopattino elettrico Velocità in tempo reale Distanza percorsa (ODO) Distanza percorsa (TRIP) Registra percorso Attiva / Disa...
Page 55 - Interfaccia Impostazioni monopattino elettrico associato; Informazioni sul “Cruise Control”:; leva del freno per disattivare la funzione.; Informazioni sulla modalità “Zero Start”:
53 Interfaccia Impostazioni monopattino elettrico associato Informazioni sul “Cruise Control”: Attivare la funzione “Cruise Control” nell’app, mantenere il monopattino elettrico ad una velocità costante (>8Km/h) e tenere premuto la leva acceleratore per qualche secondo. Un segnale acustico segnal...
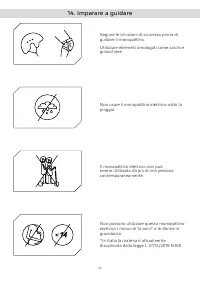
Page 56 - Imparare a guidare
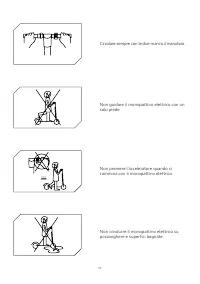
54 Seguire le istruzioni di sicurezza prima di guidare il monopattino.Utilizzare elementi omologati come caschi e ginocchiere. Non usare il monopattino elettrico sotto la pioggia. Il monopattino elettrico non può essere utilizzato da più di una persona contemporaneamente. Non possono utilizzare ques...
Page 58 - strade e autostrade. Consultare il decreto
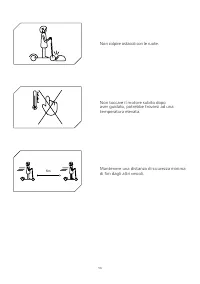
56 Non utilizzare il monopattino elettrico in zone pericolose, in presenza di sostanze infiammabili e/o esplosive, liquidi e/o sporco. Questo monopattino elettrico non è stato progettato per essere guidato in strade e autostrade. Consultare il decreto legislativo in vigore presso il suo comune rigua...
Page 60 - consentita non girare il manubrio in maniera
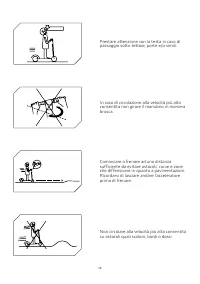
58 Prestare attenzione con la testa in caso di passaggio sotto tettoie, porte e/o simili. In caso di circolazione alla velocità più alta consentita non girare il manubrio in maniera brusca. Cominciare a frenare ad una distanza sufficiente da evitare ostacoli, curve e zone che differiscono in quanto ...
Page 62 - batteria causati da bassa tensione per un periodo prolungato.; Precauzioni per la batteria:; delle batterie in conformità con tutte le normative in vigore.
60 15. Batteria (Avvertenze) Accertarsi che il monopattino, il caricabatterie e la porta di ricarica siano asciutti.Quando il monopattino è completamente carico, la luce LED sul caricabatteria passa da rosso (in carica) a verde (carica completata).Utilizzare solo il caricabatterie originale. Altri c...
Page 63 - assistenza sul sito
61 Da non fare: Aprire o smontare la batteria o colpire, lanciare, forare o attaccare oggetti alla batteria. Toccare eventuali sostanze fuoriuscite dalla batteria, poiché contiene sostanze pericolose. Lasciare che bambini o animali tocchino la batteria.Sovraccaricare, sovrascaricare o mandare in cor...
Page 64 - Manutenzione e cura quotidiana; Pulizia e conservazione
62 17. Manutenzione e cura quotidiana Pulizia e conservazione • Se sono presenti macchie sul corpo del monopattino, pulirle con un panno umido. Se le macchie persistono, applicarvi sopra del dentifricio, spazzolarle con uno spazzolino, quindi pulire con un panno umido. Se sono presenti graffi sui co...
Page 67 - Risoluzione dei problemi
65 19. Risoluzione dei problemi Prove da effettuare:• Dopo una caduta, verificare che la leva dell’acceleratore funzioni correttamente. Per far ciò, accelerare e decelerare varie volte.• Verificare ogni tanto che i freni funzionino correttamente. Per far ciò, muovere il veicolo spingendolo manualmen...
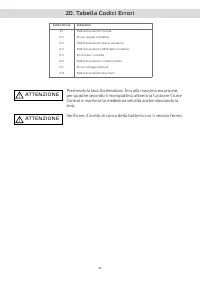
Page 68 - Tabella Codici Errori; Premendo la leva Acceleratore, fino alla massima escursione,
66 20. Tabella Codici Errori Codice Errore E.1 E.2 E.3 E.4 E.5 E.6 E.7 E.8 Indicazioni Malfunzionamento motore Errore segnale centralina Malfunzionamento leva acceleratore Malfunzionamento MOS della centralina Errore fase / corrente Malfunzionamento corrente media Errore voltaggio batteria Malfunzio...
Page 69 - Questo simbolo sul prodotto o sulla confezione indica che il
67 ATTENZIONE Trattamento del dispositivo elettrico o elettronico a fine vita (applicabile in tutti i paesi dell’unione europea ed in altri sistemi europei con sistema di raccolta differenziata) Questo simbolo sul prodotto o sulla confezione indica che il prodotto non deve essere considerato come un...
Page 70 - sistemi europei con sistema di raccolta differenziata); Questo simbolo sul prodotto o sulla confezione indica che la pila-
68 ATTENZIONE Trattamento delle pile esauste (applicabile in tutti i paesi dell’unione europea ed in altri sistemi europei con sistema di raccolta differenziata) Questo simbolo sul prodotto o sulla confezione indica che la pila- batteria non deve essere considerato un normale rifiuto domestico. Su a...
Page 71 - AVVERTENZE; lesioni personali
69 AVVERTENZE Leggere completamente il manuale e le istruzioni sottostanti prima di utilizzare il prodotto.Nome del prodotto: Ducati PRO-I EVOTipo di prodotto: Monopattino elettrico Anno di produzione: 2020 Nota: • Per ricaricare questo monopattino elettrico utilizzare SOLO il caricabatterie in dota...
Page 72 - Dichiarazione di conformità; che la progettazione e la produzione di questo prodotto; certifica; Monopattino elettrico
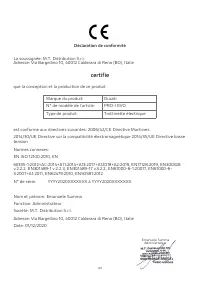
70 Dichiarazione di conformità La sottoscritta: M.T. Distribution S.r.l. Indirizzo: Via Bargellino 10, 40012 Calderara di Reno (BO), Italia che la progettazione e la produzione di questo prodotto É conforme alle seguenti direttive:2006/42/EC Machinery Directive2014/30/EU Electromagnetic Compatibilit...
Page 73 - Gracias por elegir este producto.; Español
71 patinete eléctrico Manual de uso Gracias por elegir este producto. Para obtener información, soporte técnico y asistencia, diríjase a su distribuidor o visite el sitio web www.ducatiurbanemobility.it Español
Page 74 - Índice; Instrucciones de seguridad
72 Índice 1. 2. 3. 4.5. 6. 7. 8. 9. 10. 11. 12. 13. 14.15. 16. 17. 18. 19. 20. Instrucciones de seguridad Guía de inicio rápido Contenido del embalajeVista del productoInformación de los controles/panel de controlMontaje y configuración Plegar y transportarCarga y activación de la batería Ajuste de ...
Page 75 - Instrucciones de seguridad; Reglas básicas de la conducción
73 1. Instrucciones de seguridad Lea atentamente las siguientes instrucciones antes de utilizar el producto. Guarde este manual para futuras consultas o para nuevos usuarios.• La empresa no asumirá ninguna responsabilidad derivada del mal uso del producto o del incumplimiento tanto de la normativa v...
Page 76 - arranque desde parado.; ADVERTENCIA
74 2. Guía rápida • Antes del primer uso, cargue el patinete al 100 %. • Pulse el botón de encendido durante unos segundos para iniciarlo. • Compruebe el indicador de la batería, si la batería está descargada, recárguela antes de usar el patinete eléctrico, ya que se trata de un dispositivo que requ...
Page 77 - Contenido del embalaje; - Adhesivos de repuesto
75 3. Contenido del embalaje • Patinete• Accesorios: - Llave Allen - 4 tornillos - Cámara de repuesto - Adhesivos de repuesto - Adaptador para el inflado de los neumáticos • Cargador de batería Con el patinete montado, se deberá instalar el manillar con los tornillos correspondientes.
Page 78 - Vista del producto
76 4. Vista del producto panel de control barra del manillar cierre plegable luz de freno freno de disco pie de apoyo puerto de carga motor plataforma freno timbre luz delantera acelerador mecanismo de plegado
Page 79 - Información de los controles/panel de control; sobrecalentamiento del motor.
77 5. Información de los controles/panel de control 1 7 5 3 4 9 6 8 10 2 A 1. Velocímetro: muestra la velocidad actual del patinete.2. Nivel de la batería: el nivel de la batería se indica mediante 5 barras. 3. Faros: testigo del faro.4. Bluetooth: indicador del Bluetooth. 5. Modo SPORT: la pantalla...
Page 81 - Montaje y configuración
79 Abra el caballete, levante la barra y coloque la palanca en la posición de cierre. Introduzca los 4 tornillos manualmente sin apretarlos, luego use la llave hexagonal que se proporciona para apretarlos y asegurar el manillar. Coloque el manillar sobre la barra (ver imagen) Cuando haya terminado, ...
Page 82 - Plegar y transportar
80 Barra del manillar inestableSi la barra del manillar es inestable, puede apretar los tornillos del sistema de plegado con la llave que se suministra. Cierre: Apague el patinete eléctrico y desbloquee el mecanismo de cierre: presione el gancho rojo y tire de la palanca hacia fuera (ver imagen), ll...
Page 83 - Carga y activación de la batería; ATENCIÓN
81 1. Abra la tapa de goma de la toma de carga ubicada en el lado izquierdo de la plataforma. 2. Introduzca el conector del cargador en la toma. 3. Cuando la batería esté cargada, extraiga el conector del cargador. La luz roja de la fuente de alimentación se volverá verde cuando finalice la operació...
Page 84 - Ajuste de los frenos
82 Mientras se utiliza el patinete eléctrico existe el riesgo de sufrir una caída. Por su propia seguridad, lleve casco y rodilleras para protegerse de posibles caídas y lesiones mientras aprende a conducir el patinete eléctrico. Encienda el patinete eléctrico y compruebe el nivel de carga de la bat...
Page 85 - conduce en calles irregulares y con pendientes.; Almacenamiento y limpieza
83 La autonomía máxima depende de diversas variables:Terreno: la conducción sobre un pavimento liso implica una mayor autonomía que si se conduce en calles irregulares y con pendientes. Peso del usuario: cuanto más pesado sea el usuario, menor será la autonomía. Temperatura: la conducción del patine...
Page 86 - Advertencias generales; Instrucciones sobre el comportamiento durante la conducción; chaleco reflectante.
84 12. Advertencias generales • Compruebe los frenos, la presión (50 PSI), el estado de las ruedas y el acelerador antes de cada uso. Si detecta ruidos inusuales o cualquier anomalía, no utilice el producto y póngase en contacto con el servicio de asistencia técnica de su distribuidor.• Está prohibi...
Page 87 - Configuración de la aplicación; ¿Qué se puede hacer con la aplicación Ducati Urban e-Mobility?
85 13. Configuración de la aplicación ¿Qué se puede hacer con la aplicación Ducati Urban e-Mobility? • Iniciar un autodiagnóstico• Establecer los modos de conducción • Establecer la unidad de medida de velocidad (km/mph)• Establecer el modo de arranque • Configurar la función de control de crucero •...
Page 89 - Interfaz principal
87 La interfaz de la aplicación con el patinete eléctrico emparejado se muestra del siguiente modo: Interfaz principal Patinete eléctrico emparejado Porcentaje de batería del patinete eléctrico Velocidad en tiempo real Distancia recorrida (ODO) Distancia recorrida (TRIP) Registrar recorrido Activar/...
Page 90 - Interfaz de configuración del patinete eléctrico emparejado; Información sobre el «Control de crucero»:
88 Interfaz de configuración del patinete eléctrico emparejado Información sobre el «Control de crucero»: Active la función de «Control de crucero» en la aplicación, mantenga el patinete eléctrico a una velocidad constante (> 8 km/h) y mantenga presionada la palanca del acelerador durante unos se...
Page 91 - Siga las instrucciones de seguridad antes de; Aprender a conducir
89 Siga las instrucciones de seguridad antes de conducir el patinete.Utilice elementos homologados, como cascos y rodilleras. No utilice el patinete eléctrico bajo la lluvia. El patinete eléctrico no puede ser utilizado por más de una persona al mismo tiempo. Los menores de 14 años* y las mujeres em...
Page 97 - Precauciones con la batería:; baterías de acuerdo con todas las normativas en vigor.
95 15. Batería (advertencias) Asegúrese de que el patinete, el cargador de la batería y el puerto de carga estén secos.Cuando el patinete está completamente cargado, la luz led del cargador cambia de rojo (cargando) a verde (carga completada).Utilice solo el cargador de la batería original. Otros ca...
Page 99 - Mantenimiento y cuidado diario; Limpieza y conservación; comprometen la vida útil tanto del patinete como de la batería.
97 17. Mantenimiento y cuidado diario Limpieza y conservación • Si hay manchas en el cuerpo del patinete, se deben limpiar con un paño húmedo. Si las manchas persisten, aplique pasta de dientes sobre ellas, cepille con un cepillo de dientes y luego limpie con un paño húmedo. Si hay arañazos en los e...
Page 102 - Solución de problemas
100 19. Solución de problemas Pruebas que se deben realizar• Después de una caída, verifique que la palanca del acelerador funciona correctamente. Para ello, acelere y desacelere varias veces.• Verifique que los frenos funcionan correctamente. Para ello, mueva el vehículo em pujándolo manualmente y ...
Page 103 - Tabla de códigos de error; Al presionar la palanca del acelerador, hasta el tope de su
101 20. Tabla de códigos de error Código de error E.1 E.2 E.3 E.4 E.5 E.6 E.7 E.8 Indicaciones Funcionamiento incorrecto del motor Error de señal de la centralita Funcionamiento incorrecto de la palanca del acelerador Funcionamiento incorrecto de la centralita MOS Error de fase/corriente Funcionamie...
Page 104 - Este símbolo en el producto o en el embalaje indica que no debe
102 ATENCIÓN Tratamiento del dispositivo eléctrico o electrónico al final de su vida útil (aplicable en todos los países de la Unión Europea y en otros países europeos con sistemas de recogida selectiva) Este símbolo en el producto o en el embalaje indica que no debe considerarse como un residuo dom...
Page 105 - en otros países europeos con sistemas de recogida selectiva); Este símbolo en el producto o en el embalaje indica que la
103 ATENCIÓN Tratamiento de las pilas agotadas (aplicable en todos los países de la Unión Europea y en otros países europeos con sistemas de recogida selectiva) Este símbolo en el producto o en el embalaje indica que la batería no debe considerarse como un residuo doméstico normal. En algunos tipos ...
Page 106 - ADVERTENCIAS; • No cargue nunca el producto sin supervisión.
104 ADVERTENCIAS Lea en su totalidad el siguiente manual y las instrucciones antes de utilizar el producto. Nombre del producto: Ducati PRO-I EVOTipo de producto: patinete eléctrico Año de fabricación: 2020 Nota: • Para recargar este patinete eléctrico, use ÚNICAMENTE el cargador de baterías que se ...
Page 107 - Declaración de conformidad; que el diseño y la fabricación de este producto
105 Declaración de conformidad El abajo firmante: M.T. Distribution S.r.l. Dirección: Via Bargellino 10, 40012 Calderara di Reno (BO), Italia que el diseño y la fabricación de este producto cumple con las siguientes directivas: Directiva de máquinas 2006/42/CEDirectiva de compatibilidad electromagné...
Page 108 - Merci d’avoir choisi ce produit.; Français
106 trottinette électrique Manuel de l’utilisateur Merci d’avoir choisi ce produit. Pour plus d’informations, un support technique et une assistance, contactez votre revendeur ou visitez le site internet www.ducatiurbanemobility.it Français
Page 109 - Table des matières; Contenu de l’emballage
107 Table des matières 1. 2. 3. 4.5. 6. 7. 8. 9. 10. 11. 12. 13. 14.15. 16. 17. 18. 19. 20. Consignes de sécuritéGuide rapide Contenu de l’emballage Présentation du produitInformations sur les commandes/Panneau de commandeAssemblage et configuration Plier et transporterRecharge et activation de la b...
Page 110 - Consignes de sécurité; sur le sol en tenant le guidon à la bonne hauteur.
108 1. Consignes de sécurité Veuillez lire attentivement les instructions suivantes avant d’utiliser le produit. Conservez ce manuel pour référence future ou pour de nouveaux utilisateurs.• La société n’assumera aucune responsabilité découlant d’une mauvaise utilisation du produit ou du non-respect ...
Page 111 - départs depuis une position arrêtée.
109 2. Guide rapide • Lors de la première utilisation, chargez la trottinette à 100 %.• Appuyez sur le bouton d’alimentation pendant quelques secondes pour la démarrer.• Vérifiez l’indicateur de batterie. Si la batterie est faible, rechargez-la avant utilisation. La trottinette électrique est un app...
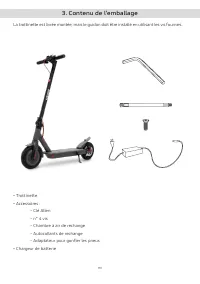
Page 112 - Contenu de l’emballage; • Trottinette
110 3. Contenu de l’emballage • Trottinette • Accessoires : - Clé Allen - n° 4 vis - Chambre à air de rechange - Autocollants de rechange - Adaptateur pour gonfler les pneus • Chargeur de batterie La trottinette est livrée montée, mais le guidon doit être installé en utilisant les vis fournies.
Page 113 - Présentation du produit
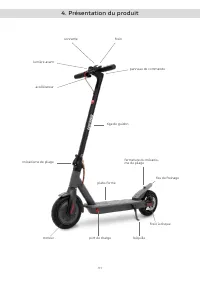
111 4. Présentation du produit panneau de commande tige de guidon fermeture du mécanis- me de pliage feu de freinage frein à disque béquille port de charge moteur plate-forme frein sonnette lumière avant accélérateur mécanisme de pliage
Page 114 - Informations sur les commandes/Panneau de commande; des codes d’erreur.
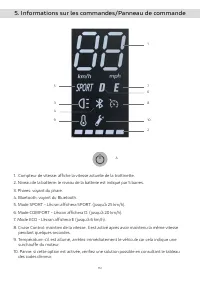
112 5. Informations sur les commandes/Panneau de commande 1 7 5 3 4 9 6 8 10 2 A 1. Compteur de vitesse: affiche la vitesse actuelle de la trottinette.2. Niveau de la batterie: le niveau de la batterie est indiqué par 5 barres.3. Phares: voyant du phare.4. Bluetooth: voyant du Bluetooth.5. Mode SPOR...
Page 116 - fournie pour les serrer et fixer le guidon.; Assemblage et configuration
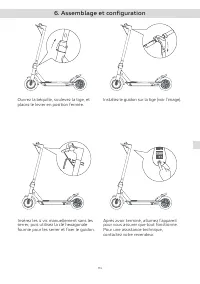
114 Ouvrez la béquille, soulevez la tige, et placez le levier en position fermée. Insérez les 4 vis manuellement sans les serrer, puis utilisez la clé hexagonale fournie pour les serrer et fixer le guidon. Installez le guidon sur la tige (voir l’image). Après avoir terminé, allumez l’appareil pour v...
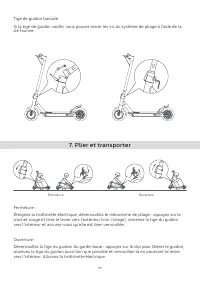
Page 117 - Plier et transporter
115 Tige de guidon bancale Si la tige de guidon vacille, vous pouvez serrer les vis du système de pliage à l’aide de la clé fournie. Fermeture : Éteignez la trottinette électrique, déverrouillez le mécanisme de pliage : appuyez sur le crochet rouge et tirez le levier vers l’extérieur (voir l’image),...
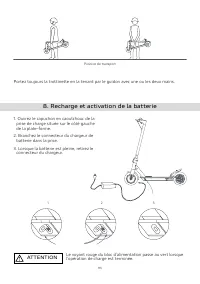
Page 118 - Recharge et activation de la batterie; ATTENTION
116 1. Ouvrez le capuchon en caoutchouc de la prise de charge située sur le côté gauche de la plate-forme. 2. Branchez le connecteur du chargeur de batterie dans la prise.3. Lorsque la batterie est pleine, retirez le connecteur du chargeur. Le voyant rouge du bloc d’alimentation passe au vert lorsqu...
Page 119 - Réglage des freins
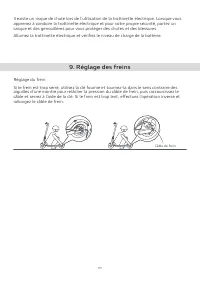
117 Il existe un risque de chute lors de l’utilisation de la trottinette électrique. Lorsque vous apprenez à conduire la trottinette électrique et pour votre propre sécurité, portez un casque et des genouillères pour vous protéger des chutes et des blessures.Allumez la trottinette électrique et véri...
Page 120 - sur des routes accidentées ou en pente.; Stockage et nettoyage
118 L’autonomie maximale dépend de plusieurs variables :Terrain : la conduite sur une chaussée lisse offre davantage d’autonomie que la conduite sur des routes accidentées ou en pente. Poids de l’utilisateur : plus l’utilisateur est lourd, plus l’autonomie diminue. Température : conduire la trottine...
Page 121 - Avertissements généraux; Instructions sur le comportement à la conduite
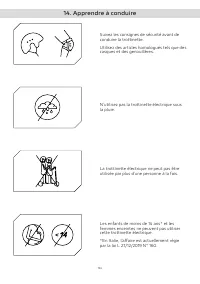
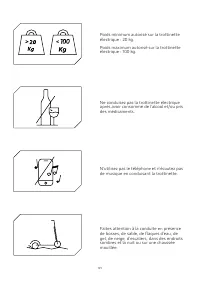
119 12. Avertissements généraux • Vérifiez les freins, la pression (50 PSI), l’état des roues et l’accélérateur avant chaque utilisation. Si vous remarquez des bruits inhabituels ou des anomalies, n’utilisez pas le produit et contactez le service d’assistance technique de votre revendeur.• Il est in...
Page 122 - Configuration de l’application; Que pouvez-vous faire avec l’application Ducati Urban e-Mobility ?
120 13. Configuration de l’application Que pouvez-vous faire avec l’application Ducati Urban e-Mobility ? • Lancer un auto-diagnostic• Définir les modes de conduite • Réglez l’unité de mesure de la vitesse (Km/Mhp) • Définir le mode de démarrage • Réglez la fonction de régulateur de vitesse• Régler ...
Page 124 - Interface principale
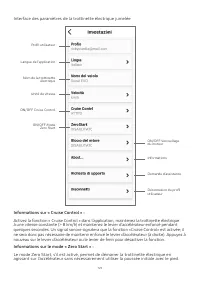
122 L’interface de l’application avec la trottinette électrique jumelée ressemble à ce qui suit : Interface principale Trottinette électrique jumelée Pourcentage de la batterie de la trottinette électrique Vitesse en temps réel Distance parcourue (ODO) Distance parcourue (TRIP) Enregistrer l’itinéra...
Page 125 - Interface des paramètres de la trottinette électrique jumelée; Informations sur « Cruise Control » :
123 Interface des paramètres de la trottinette électrique jumelée Informations sur « Cruise Control » : Activez la fonction « Cruise Control » dans l’application, maintenez la trottinette électrique à une vitesse constante (> 8 km/h) et maintenez le levier d’accélérateur enfoncé pendant quelques ...
Page 126 - Apprendre à conduire
124 Suivez les consignes de sécurité avant de conduire la trottinette.Utilisez des articles homologués tels que des casques et des genouillères. N’utilisez pas la trottinette électrique sous la pluie. La trottinette électrique ne peut pas être utilisée par plus d’une personne à la fois. Les enfants ...
Page 127 - sombres et la nuit ou sur une chaussée
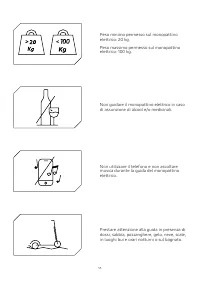
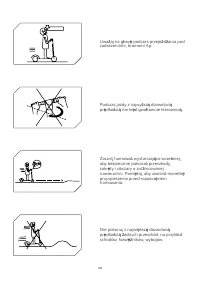
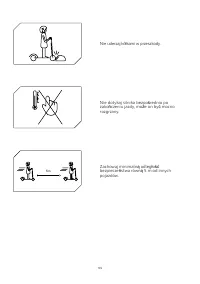
125 Poids minimum autorisé sur la trottinette électrique : 20 kg.Poids maximum autorisé sur la trottinette électrique : 100 kg. Ne conduisez pas la trottinette électrique après avoir consommé de l’alcool et/ou pris des médicaments. N’utilisez pas le téléphone et n’écoutez pas de musique en conduisan...
Page 132 - Précautions relatives à la batterie:
130 15. Batterie (Mises en garde) Assurez-vous que la trottinette, le chargeur et le port de charge sont secs.Lorsque la trottinette est complètement chargée, le voyant LED du chargeur passe du rouge (chargement) au vert (chargement terminé).Utilisez uniquement le chargeur d’origine. D’autres charge...
Page 133 - le site
131 À ne pas faire: Ouvrir ou démonter la batterie ou frapper, jeter, percer ou coller des objets sur la batterie. Toucher toute substance s’échappant de la batterie, car elle contient des substances dangereuses. Laisser les enfants ou les animaux toucher la batterie.Surcharge, décharge excessive ou...
Page 134 - Entretien et soins quotidiens; Nettoyage et conservation; pour prolonger sa durée de vie.
132 17. Entretien et soins quotidiens Nettoyage et conservation • S’il y a des taches sur le corps de la trottinette, essuyez-les avec un chiffon humide. Si les taches persistent, appliquez du dentifrice sur le dessus, brossez avec une brosse à dents, puis essuyez avec un chiffon humide. En présence...
Page 137 - Résolution des problèmes; Essais à réaliser
135 19. Résolution des problèmes Essais à réaliser • Après une chute, vérifiez que le levier de l’accélérateur fonctionne correctement. Pour ce faire, accélérez et décélérez plusieurs fois.• Vérifiez régulièrement que les freins fonctionnent correctement. Pour ce faire, faites rouler le véhicule en ...
Page 138 - Tableau des codes d’erreur; En appuyant sur le levier de l’accélérateur, jusqu’au maximum
136 20. Tableau des codes d’erreur Code d’erreur E.1 E.2 E.3 E.4 E.5 E.6 E.7 E.8 Indications Dysfonctionnement du moteur Erreur de signal de l’unité de commande Dysfonctionnement du levier d’accélérateur Dysfonctionnement de l’unité de commande MOS Erreur de phase/courant Dysfonctionnement courant m...
Page 139 - collecte séparée des déchets); Pour des informations plus détaillées sur le recyclage de ce
137 ATTENTION Traitement du dispositif électrique ou électronique en fin de vie (applicable dans tous les pays de l’Union européenne et dans d’autres systèmes européens avec système de collecte séparée des déchets) Ce symbole figurant sur le produit ou sur l’emballage indique que le produit ne doit ...
Page 140 - Ce symbole sur le produit ou sur l’emballage indique que la pile-
138 ATTENTION Traitement des piles usagées (applicable dans tous les pays de l’Union européenne et dans d’autres systèmes européens avec système de collecte séparée des déchets) Ce symbole sur le produit ou sur l’emballage indique que la pile- batterie ne doit pas être considérée comme un déchet mén...
Page 142 - Déclaration de conformité; que la conception et la production de ce produit; certifie; Trottinette électrique
140 Déclaration de conformité La soussignée: M.T. Distribution S.r.l. Adresse: Via Bargellino 10, 40012 Calderara di Reno (BO), Italie que la conception et la production de ce produit est conforme aux directives suivantes: 2006/42/CE Directive Machines2014/30/UE Directive sur la compatibilité électr...
Page 143 - Vielen Dank, dass Sie sich für dieses Produkt entschieden haben.; Deutsch
141 elektroroller Benutzerhandbuch Vielen Dank, dass Sie sich für dieses Produkt entschieden haben. Informationen, technische Unterstützung und Hilfe erhalten Sie von Ihrem Händler oder auf der Webseite www.ducatiurbanemobility.it Deutsch
Page 144 - Inhalt; Sicherheitshinweise
142 Inhalt 1. 2. 3. 4.5. 6. 7. 8. 9. 10. 11. 12. 13. 14.15. 16. 17. 18. 19. 20. Sicherheitshinweise Kurzanleitung Inhalt der VerpackungProduktübersichtBedienungsinformationen/Display Montage und KonfigurationZusammenklappen und TransportierenLaden und Aktivieren des Akkus Einstellen der BremsenReich...
Page 145 - Sicherheitshinweise; in diesem Handbuch.
143 1. Sicherheitshinweise Bitte lesen Sie die folgenden Anweisungen vor der Verwendung des Produktes sorgfältig durch. Bewahren Sie dieses Handbuch für späteres Nachschlagen oder für neue Benutzer auf. • Das Unternehmen übernimmt weder Haftung für unsachgemäße Anwendung des Produkts noch für die Ni...
Page 146 - dem Stand vermieden wird.; HINWEIS
144 2. Kurzanleitung • Laden Sie den Roller vor dem ersten Gebrauch zu 100 % auf.• Drücken Sie den Startknopf einige Sekunden lang, um ihn zu starten.• Überprüfen Sie die Akkuanzeige. Wenn der Akku leer ist, laden Sie ihn vor dem Gebrauch auf. Der E-Roller muss regelmäßig aufgeladen werden, um eine ...
Page 147 - Inhalt der Verpackung; • Roller
145 3. Inhalt der Verpackung • Roller • Zubehörteile: - Inbusschlüssel - 4 Schrauben - Ersatzschlauch - Ersatzaufkleber - Adapter zum Aufpumpen von Reifen • Batterieladegerät Nach der Montage des Rollers, muss die Lenkstange mit den entsprechenden Schrauben angeschraubt werden.
Page 151 - Montage und Konfiguration
149 Öffnen Sie den Ständer, heben Sie die Stange an und bringen Sie den Hebel in die geschlossene Position. Setzen Sie die 4 Schrauben manuell ein, ohne sie festzuziehen, schrauben Sie sie danach mit dem mitgelieferten Inbusschlüssel an, bis der Lenker fest sitzt. Bringen Sie den Lenker an der Stang...
Page 152 - mitgelieferten Schraubenschlüssel festziehen.; Zusammenklappen und Transportieren
150 Wackelige LenkerstangeWenn die Lenkerstange wackelt, können Sie die Schrauben am Klappsystem mit dem mitgelieferten Schraubenschlüssel festziehen. Verschluss:Schalten Sie den Elektroroller aus, entriegeln Sie den Verriegelungsmechanismus: Drücken Sie den roten Haken und ziehen Sie den Hebel nach...
Page 153 - Laden und Aktivieren des Akkus; WARNUNG
151 1. Öffnen Sie die Gummikappe der Ladebuchse auf der linken Seite des Trittbretts. 2. Stecken Sie den Ladestecker in die Steckdose.3. Ziehen Sie den Ladestecker heraus, wenn der Akku aufgeladen ist. Die rote LED am Netzteil leuchtet grün, wenn der Ladevorgang abgeschlossen ist. Halten Sie den Rol...
Page 154 - Einstellen der Bremse; Einstellen der Bremsen
152 Beim Fahren des Elektrorollers besteht die Gefahr, zu stürzen. Tragen Sie zu Ihrer eigenen Sicherheit einen Helm und Knieschützer, um sich vor Stürzen und Verletzungen zu schützen, während Sie das Fahren mit dem Elektroroller erlernen.Schalten Sie den Elektroroller ein und überprüfen Sie den Lad...
Page 155 - Lagerung und Reinigung
153 Die maximale Reichweite hängt von mehreren Variablen ab:Gelände: Fahren auf glatten Straßen bedeutet mehr Reichweite als Fahren auf unebenen Straßen und Hängen.Benutzergewicht: Je schwerer der Benutzer, desto kürzer die Reichweite. Temperatur: Das Fahren des Rollers in einer sehr kalten oder hei...
Page 156 - Allgemeine Hinweise; Hinweise zum Fahrverhalten; eine reflektierende Warnweste zu tragen.
154 12. Allgemeine Hinweise • Überprüfen Sie vor jedem Gebrauch die Bremsen, den Druck (50 PSI), den Zustand der Reifen und des Gashebels. Wenn Sie ungewöhnliche Geräusche oder Anomalien bemerken, verwenden Sie das Produkt nicht und wenden Sie sich an den technischen Kundendienst Ihres Händlers.• Es...
Page 157 - Konfiguration der app; • Die Fahrmodi einstellen
155 13. Konfiguration der app Was Sie mit der Ducati Urban E-Mobility App tun können.• Eine Selbstdiagnose starten • Die Fahrmodi einstellen • Die Geschwindigkeitsmaßeinheit (km/Mhp) einstellen• Den Startmodus einstellen• Die Tempomatfunktion einstellen• Das/Die LED-Umgebungslicht/er (RGB) einstelle...
Page 159 - Hauptbildschirm
157 Die App-Oberfläche mit gekoppeltem Elektroroller sieht wie folgt aus: Hauptbildschirm Elektroroller Akkustand des Elektrorol- lers in Prozent Geschwindigkeit in Echtzeit Zurückgelegte Strecke (ODO) Zurückgelegte Strecke (TRIP) Route aufzeichnenAnwendung aktivieren/ deaktivieren Fahrmodus Nutzung...
Page 160 - Informationen zu „Tempomat”:; Bremshebel erneut, um die Funktion zu deaktivieren.; Informationen zum Modus „Zero Start“:
158 Zugehörige Benutzeroberfläche für die Einstellungen für Elektroroller Informationen zu „Tempomat”: Aktivieren Sie die Funktion „Tempomat“ in der App, halten Sie den Elektroroller auf einer konstanten Geschwindigkeit (> 8 km/h) und halten Sie den Gashebel einige Sekunden lang gedrückt. Ein aku...
Page 167 - Vorsichtsmaßnahmen für den Akku:; Vorschriften verantwortlich.
165 15. Akku (Warnhinweise) Stellen Sie sicher, dass der Roller, das Ladegerät und der Ladeanschluss trocken sind. Wenn der Roller vollständig aufgeladen ist, wechselt das LED am Ladegerät von Rot (Aufladen) auf Grün (Aufladen abgeschlossen). Verwenden Sie nur das Originalladegerät. Andere Ladegerät...
Page 168 - Was Sie nicht tun sollten:; Verwenden Sie nur das Originalladegerät.
166 Was Sie nicht tun sollten: Den Akku öffnen oder darauf schlagen, ihn werfen, hineinstechen oder Gegenstände am Akku anbringen. Berühren Sie keine Substanzen, die aus dem Akku austreten, da dieser gefährliche Stoffe enthält. Erlauben Sie Kindern oder Haustieren nicht, den Akku zu berühren.Überlad...
Page 169 - Tägliche Wartung und Pflege; Reinigung und Aufbewahrung; immer auf, bevor er leer ist, um dessen Nutzungsdauer zu verlängern.
167 17. Tägliche Wartung und Pflege Reinigung und Aufbewahrung • Wenn der Elektroroller verschmutzt ist, reinigen Sie ihn mit einem feuchten Tuch. Wenn die Flecken bestehen bleiben, tragen Sie Zahnpasta auf, bürsten Sie sie mit einer Zahnbürste und wischen Sie sie mit einem feuchten Tuch ab. Wenn di...
Page 170 - oder sogar sicherheitsrelevanten Unfällen führen kann).
168 Hinweis: Sobald der Akku vollständig aufgeladen ist, hat er eine Autonomie von 120 bis 180 Tagen. Schäden, die durch längeres Fehlen der Ladevorgänge verursacht werden, sind irreversibel und fallen nicht unter die beschränkte Garantie. Sobald der Schaden aufgetreten ist, kann der Akku nicht mehr...
Page 171 - Technisches Datenblatt; Allgemeine Informationen
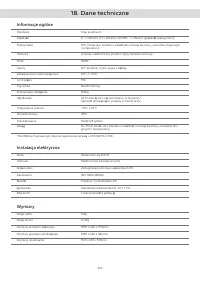
169 18. Technisches Datenblatt Rahmen Motor Nettogewicht Allgemeine Informationen Elektrisches Anlage Abmessungen Geschwindigkeit Bremse Bruttogewicht Motor Akku Produktabmessungen geschlossen Reifen Beleuchtung Verpackungsabmessungen Niederspannungsschutz Ladegerät Strombegrenzung Bluetooth Motorty...
Page 173 - Durch Drücken des Gashebels bis zur maximalen Auslenkung
171 20. Fehlercode-Tabelle Fehlercode E.1 E.2 E.3 E.4 E.5 E.6 E.7 E.8 Hinweise Motorstörung Signalfehler des Steuergeräts Fehlfunktion des Gashebels MOS-Fehlfunktion des Steuergeräts Phasen-/Stromfehler Störung Durchschnittsstrom Batteriespannungsfehler Fehlfunktion des Bremshebels Durch Drücken des...
Page 174 - Dieses Symbol auf dem Produkt oder auf der Verpackung weist
172 WARNUNG Entsorgung von elektrischen oder elektronischen Altgeräten (gilt in allen Ländern der Europäischen Union und anderen europäischen Ländern mit Abfalltrennungssystemen) Dieses Symbol auf dem Produkt oder auf der Verpackung weist darauf hin, dass das Produkt nicht als normaler Haushaltsabfa...
Page 175 - Dieses Symbol auf dem Produkt oder der Verpackung weist
173 WARNUNG Behandlung von Altbatterien (anwendbar in allen Ländern der Europäischen Union und anderen europäischen Systemen mit getrennten Abfallsammelsystemen) Dieses Symbol auf dem Produkt oder der Verpackung weist darauf hin, dass die Batterie bzw. der Akku nicht als normaler Haushaltsmüll betra...
Page 176 - WARNHINWEISE; • Laden Sie das Produkt niemals unbeaufsichtigt.
174 WARNHINWEISE Lesen Sie das Handbuch und die Anweisungen vollständig durch, bevor Sie das Produkt verwenden. Produktname: Ducati PRO-I EVO Produkttyp: Elektroroller Produktionsjahr: 2020 Hinweis: • Verwenden Sie zum Aufladen dieses Elektrorollers NUR das mitgelieferte Ladegerät mit der Bezeichnun...
Page 177 - Konformitätserklärung; Das unterzeichnende Unternehmen MT Distribution Srl; bescheinigt
175 Konformitätserklärung Das unterzeichnende Unternehmen MT Distribution Srl Adresse: Via Bargellino 10, 40012 Calderara di Reno (BO), Italien dass der Entwurf und die Fertigung dieses Produkts Er entspricht den folgenden Richtlinien: 2006/42/EG 2014/30/EU Richtlinie zur elektromagnetischen Verträg...
Page 178 - Dzi; Polish
176 hulajnoga elektryczna Instrukcja obs ł ugi Dzi ę kujemy za wybranie tego produktu. Aby uzyska ć informacje, wsparcie techniczne i pomoc, skontaktuj si ę ze sprze - dawc ą lub odwied ź stron ę internetow ą www.ducatiurbanemobility.it Polish
Page 179 - ść
177 Spis tre ś ci 1. 2. 3. 4.5. 6. 7. 8. 9. 10. 11. 12. 13. 14.15. 16. 17. 18. 19. 20. Instrukcje dotycz ą ce bezpiecze ń stwa Szybkie wprowadzenieZawarto ść opakowania Opis produktuInformacje o elementach steruj ą cych / Panel sterowania Monta ż i konfiguracja Sk ł adanie i przenoszenie Ł adowanie ...
Page 180 - ąć
178 1. Instrukcje dotycz ą ce bezpiecze ń stwa Przed rozpocz ę ciem korzystania z produktu uwa ż nie przeczytaj ę poni ż sze instrukcje. Zachowaj t ę instrukcj ę do wykorzystania w przysz ł o ś ci lub dla nowych u ż ytkowników. • Firma nie ponosi ż adnej odpowiedzialno ś ci zwi ą zanej z konsekwencj...
Page 181 - Szybkie wprowadzenie; Z uwagi na bezpiecze; OSTRZE
179 2. Szybkie wprowadzenie • Przy pierwszym u ż yciu na ł aduj akumulator hulajnogi do 100% jego pojemno ś ci. • Aby uruchomi ć hulajnog ę , naci ś nij przycisk zasilania na kilka sekund. • Sprawd ź wska ź nik na ł adowania akumulatora: je ś li akumulator jest roz ł adowany, na ł aduj go przed jazd...
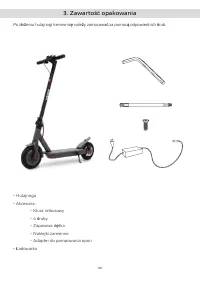
Page 182 - opakowania; Po z
180 3. Zawarto ść opakowania • Hulajnoga• Akcesoria: - Klucz imbusowy - 4 ś ruby - Zapasowa d ę tka - Naklejki zamienne - Adapter do pompowania opon • Ł adowarka Po z ł o ż eniu hulajnogi kierownic ę nale ż y zamocowa ć za pomoc ą odpowiednich ś rub.
Page 186 - i konfiguracja
184 Otwórz nó ż k ę boczn ą , podnie ś dr ąż ek kierownicy, ustaw d ź wigni ę w pozycji zamkni ę tej. W ł ó ż r ę cznie 4 ś ruby, nie dokr ę caj ą c ich, a nast ę pnie u ż yj dostarczonego klucza imbusowego, aby je dokr ę ci ć i przymocowa ć kierownic ę . Ustaw kierownic ę na dr ąż ku (patrz zdj ę c...
Page 187 - adanie i przenoszenie
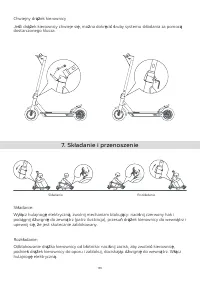
185 Chwiejny dr ąż ek kierownicy Je ś li dr ąż ek kierownicy chwieje si ę , mo ż na dokr ę ci ć ś ruby systemu sk ł adania za pomoc ą dostarczonego klucza. Sk ł adanie: Wy łą cz hulajnog ę elektryczn ą , zwolnij mechanizm blokuj ą cy: naci ś nij czerwony hak i poci ą gnij d ź wigni ę do zewn ą trz (...
Page 188 - adowanie i aktywacja akumulatora; UWAGA
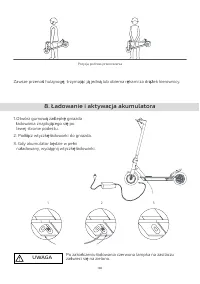
186 1. Otwórz gumow ą za ś lepk ę gniazda ł adowania znajduj ą cego si ę po lewej stronie podestu.2. Pod łą cz wtyczk ę ł adowarki do gniazda. 3. Gdy akumulator b ę dzie w pe ł ni na ł adowany, wyci ą gnij wtyczk ę ł adowarki. Po zako ń czeniu ł adowania czerwona lampka na zasilaczu za ś wieci si ę ...
Page 189 - Regulacja hamulców
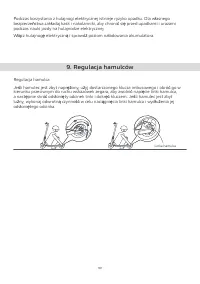
187 Podczas korzystania z hulajnogi elektrycznej istnieje ryzyko upadku. Dla w ł asnego bezpiecze ń stwa zak ł adaj kask i nakolanniki, aby chroni ć si ę przed upadkami i urazami podczas nauki jazdy na hulajnodze elektrycznej.W łą cz hulajnog ę elektryczn ą i sprawd ź poziom na ł adowania akumulator...
Page 190 - Przechowywanie i czyszczenie
188 Maksymalny zasi ę g zale ż y od kilku zmiennych. S ą to: Nawierzchnia: jazda po g ł adkiej nawierzchni pozwala pokona ć wi ę ksz ą odleg ł o ść w porównaniu do jazdy po nierównych drogach i pochy ł o ś ciach. Waga u ż ytkownika: im wi ę ksza jest masa cia ł a u ż ytkownika, tym krótsza b ę dzie ...
Page 191 - enia ogólne; Instrukcje dotycz
189 12. Ostrze ż enia ogólne • Przed ka ż dym u ż yciem sprawd ź hamulce, ci ś nienie (50PSI) i stan kó ł , oraz manetk ę przyspieszenia. Je ś li us ł yszysz nietypowe d ź wi ę ki lub zauwa ż ysz jakiekolwiek anomalie, zaprzesta ń u ż ywania produktu i skontaktuj si ę z dzia ł em pomocy technicznej ...
Page 192 - Konfiguracja aplikacji; ęś
190 13. Konfiguracja aplikacji Jakie funkcje posiada aplikacja Ducati Urban e-Mobility?• Uruchomienie autodiagnozy• Ustawienie trybu jazdy • Ustawienie jednostki miary pr ę dko ś ci (km/mph) • Ustawienie trybu uruchamiania• Ustawienie funkcji tempomatu• Ustawienie koloru ś wiat ł a pozycyjnego LED (...
Page 195 - Informacje dotycz; łą; Informacje o trybie „Zero Start”:
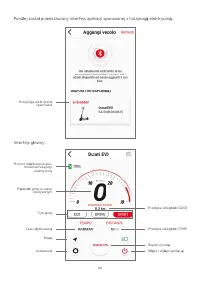
193 Interfejs ustawie ń sparowanej hulajnogi elektrycznej Informacje dotycz ą ce „Tempomatu”: W łą cz funkcj ę „Tempomat” w aplikacji, utrzymuj hulajnog ę na sta ł ej pr ę dko ś ci jazdy (> 8 km/h) i przytrzymaj wci ś ni ę t ą przez kilka sekund manetk ę przyspieszenia. Aktywacj ę „Tempomatu” ozn...
Page 196 - Nauka jazdy na hulajnodze
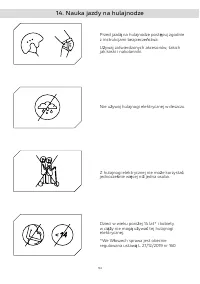
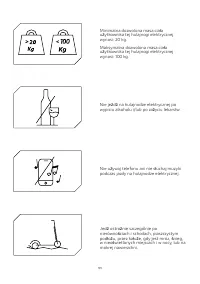
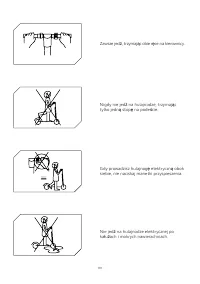
194 Przed jazd ą na hulajnodze post ę puj zgodnie z instrukcjami bezpiecze ń stwa. U ż ywaj zatwierdzonych akcesoriów, takich jak kaski i nakolanniki. Nie u ż ywaj hulajnogi elektrycznej w deszczu. Z hulajnogi elektrycznej nie mo ż e korzysta ć jednocze ś nie wi ę cej ni ż jedna osoba. Dzieci w wiek...
Page 198 - ęż
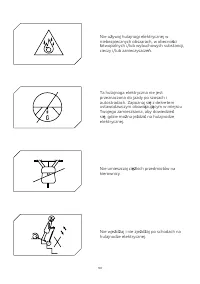
196 Nie u ż ywaj hulajnogi elektrycznej w niebezpiecznych obszarach, w obecno ś ci ł atwopalnych i/lub wybuchowych substancji, cieczy i/lub zanieczyszcze ń . Ta hulajnoga elektryczna nie jest przeznaczona do jazdy po szosach i autostradach. Zapoznaj si ę z dekretem ustawodawczym obowi ą zuj ą cym w ...
Page 202 - rodki ostro
200 15. Akumulator (ostrze ż enia) Upewnij si ę , ż e hulajnoga, ł adowarka i gniazdo ł adowania s ą suche. Gdy akumulator hulajnogi jest w pe ł ni na ł adowany, dioda LED na ł adowarce zmienia kolor z czerwonego ( ł adowanie) na zielony ( ł adowanie zako ń czone). U ż ywaj tylko oryginalnej ł adowa...
Page 204 - Czyszczenie i przechowywanie
202 17. Codzienna konserwacja i piel ę gnacja Czyszczenie i przechowywanie • Je ś li na korpusie hulajnogi widoczne s ą plamy, zetrzyj je wilgotn ą szmatk ą . Je ś li plamy si ę utrzymuj ą , na ł ó ż na nie past ę do z ę bów, nast ę pnie szczoteczk ą do z ę bów usu ń plamy, po czym wytrzyj oczyszczo...
Page 207 - zywanie problemów
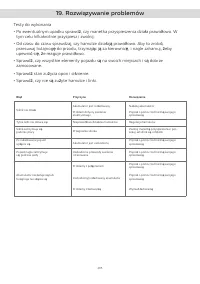
205 19. Rozwi ą zywanie problemów Testy do wykonania• Po ewentualnym upadku sprawd ź , czy manetka przyspieszenia dzia ł a prawid ł owo. W tym celu kilkakrotnie przyspiesz i zwolnij.• Od czasu do czasu sprawdzaj, czy hamulce dzia ł aj ą prawid ł owo. Aby to zrobi ć , przesuwaj hulajnog ę do przodu, ...
Page 208 - łę; dów
206 20. Tabela kodów b łę dów Kod bżżdu E.1 E.2 E.3 E.4 E.5 E.6 E.7 E.8 Wskazania Usterka silnika B łą d sygna ł u jednostki steruj ą cej Awaria manetki przyspieszenia Usterka uk ł adu pó ł przewodnikowego jednostki steruj ą cej B łą d fazy/pr ą du Usterka uk ł adu stabilizacji pr ą du B łą d napi ę...
Page 209 - Post
207 UWAGA Post ę powanie z urz ą dzeniem elektrycznym lub elektronicznym po zako ń czeniu jego eksploatacji (dotyczy wszystkich krajów Unii Europejskiej i innych europejskich systemów zbiórki selektywnej) Ten symbol na produkcie lub opakowaniu oznacza, ż e produkt nie powinien by ć traktowany jako z...
Page 212 - e projekt i realizacja niniejszego produktu; Po; Hulajnoga elektryczna
210 Deklaracja zgodno ś ci Ni ż ej podpisana spó ł ka: MT Distribution S.r.l. Adres: Via Bargellino 10, 40012 Calderara di Reno (BO), W ł ochy ż e projekt i realizacja niniejszego produktu Produkt jest zgodny z nast ę puj ą cymi dyrektywami: Dyrektywa maszynowa 2006/42/WE Dyrektywa 2014/30/UE w spra...