Page 2 - Introduction; Box Contents; PRIME GO; Support; support; Product Registration
2 Quickstart Guide ( English ) Introduction Thank you for purchasing the PRIME GO. At Denon DJ, we know how serious music is to you. That’s why we design our equipment with only one thing in mind—to make your performance the best it can be. We’re honored and excited to play a part in your musical &a...
Page 3 - Setup; To use Engine
3 Setup Items not listed under the Introduction > Box Contents are sold separately. Important: Occasionally, we may update PRIME GO’s firmware to add exciting new features and improvements. Visit denondj.com to check for available firmware updates, especially after you update your software (firmw...
Page 4 - Features; Top Panel
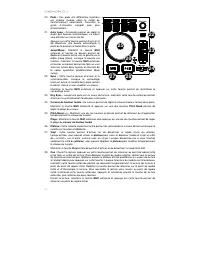
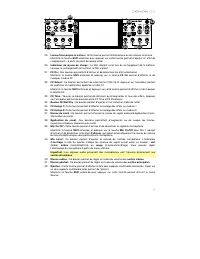
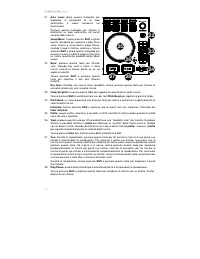
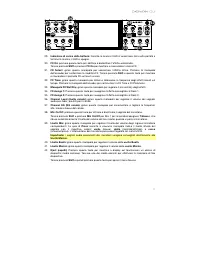
4 Features Top Panel 1. Touchscreen: This full-color, multi-touch display shows information relevant to PRIME GO's current operation. Touch the touchscreen (and use the hardware controls) to control the PRIME GO interface. 2. Browse Knob: Turn this knob to navigate through lists. Press the knob to m...
Page 8 - Front Panel; Headphones
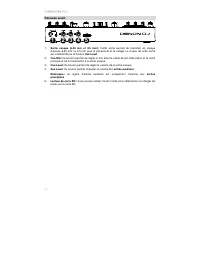
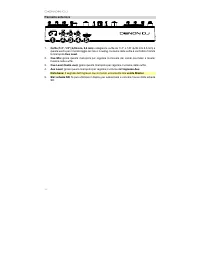
8 Front Panel 1. Headphones ( 1 / 4”, 1 / 8” ) ( 6.35 mm, 3.5 mm ) : Connect your 1/4” or 1/8” (6.35 mm or 3.5 mm) headphones to this output for cueing and mix monitoring. The headphone volume is controlled using the Cue Level knob. 2. Cue Mix: Turn this knob to adjust the blend of the pre-fader and...
Page 9 - Rear Panel
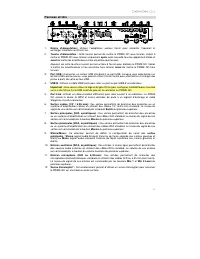
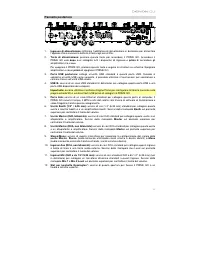
9 Rear Panel 1. Power Input: Use the included power adapter to power the unit or charge the internal lithium-ion battery. 2. Power Button: Press this button to power PRIME GO on. Power on PRIME GO only after you have connected all of your input devices and before you power on your amplifiers and lou...
Page 10 - Introducción; Contenido de la caja; Registro del producto; Iniciar sesión
10 Guía de inicio rapido ( Español ) Introducción Gracias por comprar el PRIME GO. En Denon DJ, sabemos que usted se toma la música en serio. Por eso es que diseñamos nuestros equipos con una sola cosa en mente—hacer que pueda tocar su mejor interpretación. ¡Nos sentimos muy honrados y entusiasmados...
Page 11 - Instalación; Cómo utilizar el Engine
11 Instalación Los elementos que no se enumeran en Introducción > Contenido de la caja se venden por separado. Importante: Ocasionalmente, es posible que actualicemos el firmware del PRIME GO para añadir excitantes mejoras y características. Visite denondj.com para encontrar las actualizaciones d...
Page 12 - Características; Panel superior
12 Características Panel superior 1. Pantalla táctil: Esta pantalla multitáctil a todo color muestra información relevante para el funcionamiento actual del PRIME GO. Toque la pantalla táctil (y utilice los controles de hardware) para controlar la interfaz del PRIME GO. 2. Perilla de desplazamiento:...
Page 16 - Panel frontal; Auriculares; auxiliar; salidas maestras
16 Panel frontal 1. Auriculares ( 1 / 4, 1 / 8 pulg. ) ( 6,35, 3,5 mm ) : Conecte sus auriculares de 1/4 o 1/8 pulg. (6,35 o 3,5 mm) a esta salida para búsqueda de punto inicial (cue) y monitorización de la mezcla. El volumen de los auriculares se controla con la perilla Cue Level . 2. Mezcla de cue...
Page 17 - Panel trasero
17 Panel trasero 1. Entrada de alimentación: Utilice el adaptador de corriente incluido para suministrar corriente a la unidad o cargar la batería de ion litio interna. 2. Botón de encendido: Pulse este botón para encender el PRIME GO. Encienda el PRIME GO después de haber conectado todos sus dispos...
Page 18 - Présentation; Contenu de la boîte; Important; Assistance; Enregistrement du produit; Sign In
18 Guide d’utilisation rapide ( Français ) Présentation Merci d’avoir fait l’acquisition du PRIME GO. Chez Denon DJ, nous savons à quel point la musique est importante pour vous. C’est pourquoi nous concevons nos produits avec une seule chose en tête — faire de votre performance la meilleure qui soi...
Page 19 - Démarrage; Pour utiliser Engine
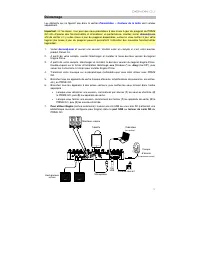
19 Démarrage Les éléments qui ne figurent pas dans la section Présentation > Contenu de la boîte sont vendus séparément. Important : À l’occasion, il se peut que nous procédions à des mises à jour du progiciel du PRIME GO afin d’ajouter des fonctionnalités et d’améliorer sa performance. Veuillez ...
Page 20 - Caractéristiques; Panneau supérieur
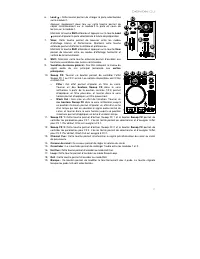
20 Caractéristiques Panneau supérieur 1. Écran tactile : Cet écran tactile multipoint couleur affiche les informations pertinentes aux opérations en cours du PRIME GO. Touchez l'écran et utilisez les commandes matérielles pour contrôler l’interface du PRIME GO. 2. Bouton Browse : Tourner ce bouton p...
Page 24 - Panneau avant; Cue Level
24 Panneau avant 1. Sortie casque (6,35 mm et 3,5 mm) : Cette sortie permet de brancher un casque d’écoute 6,35 mm ou 3,5 mm pour la pré-écoute et le calage. Le niveau de cette sortie est commandé par le bouton Cue Level . 2. Cue Mix: Ce bouton permet de régler le mix entre le canal de pré-atténuati...
Page 25 - Panneau arrière
25 Panneau arrière 1. Entrée d'alimentation : Utilisez l’adaptateur secteur fourni pour alimenter l’appareil et recharger la batterie au lithium-ion. 2. Touche d'alimentation : Cette touche permet de mettre le PRIME GO sous tension. Veillez à mettre le PRIME GO sous tension uniquement après avoir ra...
Page 26 - Introduzione; Contenuti della confezione; Importante; Assistenza; Registrazione del prodotto
26 Guida rapida ( Italiano ) Introduzione Grazie per aver acquistato l’PRIME GO. Noi di Denon DJ sappiamo che per te la musica è una cosa seria. Ecco perché progettiamo i nostri dispositivi con un unico obiettivo in mente: rendere le tue prestazioni le migliori possibili. Siamo onorati ed emozionati...
Page 27 - Configurazione; Per utilizzare Engine
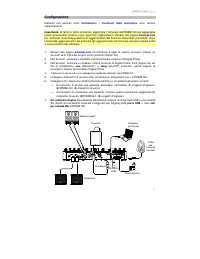
27 Configurazione Elementi non elencati sotto Introduzione > Contenuti della confezione sono venduti separatamente. Importante: di tanto in tanto potremmo aggiornare il firmware del PRIME GO per aggiungere nuove emozionanti funzioni e per apportare miglioramenti. Recarsi alla pagina denondj.com p...
Page 28 - Caratteristiche; Pannello superiore
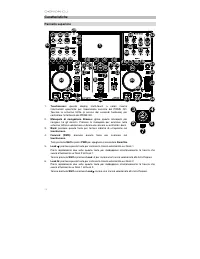
28 Caratteristiche Pannello superiore 1. Touchscreen: questo display multi-touch a colori mostra informazioni specifiche per l'operazione corrente del PRIME GO. Toccare lo schermo tattile (e servirsi dei comandi hardware) per controllare l’interfaccia del PRIME GO. 2. Manopola di navigazione Browse:...
Page 32 - Pannello anteriore; Cuffie; ingresso Aux; uscite Master
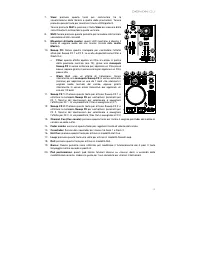
32 Pannello anteriore 1. Cuffie ( 1 / 4”, 1 / 8” ) ( 6,35 mm, 3,5 mm ) : collegare le cuffie da 1/ 4” o 1/8” (6,35 mm 3,5 mm) a questa uscita per il monitoraggio del mix e il cueing. Il volume delle cuffie è controllato tramite la manopola Cue Level . 2. Cue Mix: girare questa manopola per regolare ...
Page 33 - Pannello posteriore
33 Pannello posteriore 1. Ingresso di alimentazione: Utilizzare l’adattatore di alimentazione in dotazione per alimentare l'apparecchio o caricare la batteria interna agli ioni di litio. 2. Tasto di alimentazione: premere questo tasto per accendere il PRIME GO. Accendere il PRIME GO solo dopo aver c...
Page 34 - Einführung; Lieferumfang; Wichtig; Kundendienst; Produktregistrierung; Anmelden
34 Schnellstart-Anleitung ( Deutsch ) Einführung Vielen Dank für den Kauf des PRIME GO. Wir von Denon DJ wissen, wie wichtig Ihnen die Musik ist. Darum entwerfen wir unsere Geräte stets nur mit einem einzigen Ziel vor Augen: Ihre Performance so gut wie möglich zu unterstützen. Wir fühlen uns geehrt ...
Page 35 - exe
35 Setup Teile, die nicht unter Einführung > Lieferumfang angegeben sind, sind separat erhältlich. Wichtig: Möglicherweise werden wir die Firmware für PRIME GO gelegentlich aktualisieren, um nützliche neue Funktionen und Verbesserungen hinzuzufügen. Besuchen Sie insbesondere nach einer Aktualisie...
Page 36 - Funktionen; Oberseite
36 Funktionen Oberseite 1. Touchscreen: Dieses Vollfarb-Multi-Touch-Display zeigt Informationen, die den derzeitigen Betrieb von PRIME GO betreffen. Tippen Sie zur Bedienung der Schnittstelle von PRIME GO auf den Touchscreen (und verwenden Sie die Hardware-Steuerelemente). 2. Browse-Regler: Drehen S...
Page 40 - Vorderseite; Kopfhörer
40 Vorderseite 1. Kopfhörer ( 6,35 mm, 3,5 mm ) : Schließen Sie zum Cuing und Mix-Monitoring Ihre 6,35 mm- oder 3,5 mm-Kopfhörer an. Die Kopfhörerlautstärke wird über den Cue Level – Regler angepasst. 2. Cue-Mix: Drehen Sie diesen Regler, um die Mischung der Pre-Fader- und Master-Kanäle im Kopfhörer...
Page 41 - Rückseite
41 Rückseite 1. Netzeingang: Verwenden Sie das mitgelieferte Netzteil, um das Gerät mit Strom zu versorgen oder den internen Lithium-Ionen-Akku aufzuladen. 2. Netzschalter: Drücken Sie diese Taste, um PRIME GO einzuschalten. Schalten Sie PRIME GO erst ein, nachdem Sie all Ihre Eingabegeräte angeschl...
Page 42 - Technical Specifications
42 Appendix ( English ) Technical Specifications Frequency Response 20 Hz – 20 kHz +/- 1 dB Dynamic Range > 109 dB (A-weighted) Signal-to-Noise Ratio > 92 dB (A-weighted) Headroom Aux > 15 dB Mic > 20 dB Outputs > 15 dB Channel Separation < -88 dB (1 kHz, unity) T.H.D. Aux < 0.0...
Page 43 - Trademarks & Licenses
43 Connections Audio Outputs 2 XLR outputs (master left/right, balanced) 1 RCA output pair (master left/right, unbalanced) 2 1/4” (6.35 mm) outputs (booth left/right, balanced) 1 1/4” (6.35 mm) stereo output (headphones) 1 1/8” (3.5 mm) stereo output (headphones) Audio Inputs 1 RCA input pair (line-...