Page 2 - the DELL logo, and XPS are trademarks
------------------------------- Notes, Cautions, and Warnings NOTE: A NOTE indicates important information that helps you make better use of your computer. CAUTION: A CAUTION indicates potential damage to hardware or loss of data if instructions are not followed. WARNING: A WARNING indicates a poten...
Page 4 - Contents
Contents 1 Features . . . . . . . . . . . . . . . . . . . . . . . . . . . . . 6 2 Accessories. . . . . . . . . . . . . . . . . . . . . . . . . . 10 3 Setting Up Your Computer . . . . . . . . . . . . . . . . 12 Connect the Power Cable to the Power Adapter . . . . . . 12 Charge Your Computer . . . . ....
Page 5 - Locating Your Service Tag and Express Service Code 43
6 Powered Stand (optional) . . . . . . . . . . . . . . . . . 32 Features . . . . . . . . . . . . . . . . . . . . . . . 32 Using the Powered Stand . . . . . . . . . . . . . . . . 34 Dock Your Computer on the Powered Stand. . . . . . . . 36 Undocking Your Computer . . . . . . . . . . . . . . . 37 7 Cl...
Page 6 - Features
Features This section provides information about the features available on your computer. 1 2 3 5 6 7 4 8 10 9 11 Feature Functionality 1 Power-adapter port Connect the supplied power adapter to provide power to the computer and charge the battery. 2 USB 3.0 ports (2) Connect USB devices for transfe...
Page 10 - Your computer package includes the following accessories:; Power adapter and cable; — Provides power to your computer
Accessories Your computer package includes the following accessories: • Power adapter and cable — Provides power to your computer and charges the battery. • USB to ethernet adapter (optional) — Allows you to connect a RJ45 (network) cable to your computer using a USB port. • Powered stand (optional)...
Page 11 - controls the cursor.
• Wireless keyboard and mouse (optional) - Inputs text and controls the cursor. NOTE: The keyboard and mouse are already paired to your computer if you ordered the keyboard and mouse along with your computer. If you purchased the keyboard and mouse separately, or if you need to pair them again, see ...
Page 13 - Charge Your Computer; Connect the power adapter to your computer.
Charge Your Computer CAUTION: Charge the battery in an environmental temperature between 0 °C and 40 °C (32 °F and 104 ° F). CAUTION: Use only the supplied power adapter and power cable to charge your computer. Using unauthorized power adapters or power cables may severely damage to your computer. N...
Page 14 - Battery icon displayed on the screen:
You can check the charge/power status of your computer by checking the light on the side of your computer or the icon on the screen when your computer is turned on: Battery-charge indicator located on the right side of your computer: Power state Battery with no power adapter Power adapter and batter...
Page 15 - Push the slot cover down.
Insert an SD Card (optional) 1 Make sure the orientation of the SD card is correct so that the pins on the card are facing the rear when inserted. 2 Push the slot cover down. 3 Push the SD card into the spring-loaded slot until it is locked firmly into place. NOTE: The SD-card slot is compatible wit...
Page 16 - Turning On Your Computer; Press and release the; Enable security on the Security & Dell Updates page.
Turning On Your Computer CAUTION: Use your computer in an ambient temperature between 0 °C and 35 °C (32 °F and 95 ° F). 1 Press and release the Power and Sleep/Wake button . NOTE: After the button is pressed, there is a slight delay before your computer turns on or off. 2 Complete all steps for the...
Page 17 - Complete initial setup of Windows.
5 Complete initial setup of Windows. Your computer is ready for use when the Windows Start screen is displayed. NOTE: A lock screen may be displayed when your computer wakes up from a sleep state. NOTE: If the login screen is not enabled, the Start screen appears after you swipe-up on the lock scree...
Page 18 - Connecting to a Network; Settings; Available; Switch Networks
Enable/Disable Wi-Fi 1 Swipe from the right edge of the display to access Charms. 2 Touch Settings → Change PC settings → Wireless . 3 Move the slider to the right to enable Wi-Fi. Move the Wi-Fi slider to the left to disable Wi-Fi. Connecting to a Network 1 Swipe from the right edge of the display ...
Page 19 - Screen Orientation; Enabling/Disabling automatic screen rotation; Swipe from the right edge of the display to access Charms.
Using Your Computer Screen Orientation For optimal viewing experience, the screen orientation changes automatically to portrait or landscape format depending on your computer’s orientation. Automatic screen rotation is enabled by default. NOTE: Some applications may not support automatic screen rota...
Page 20 - Windows 8 Start Screen; Accessing the Start screen; Press the; Getting more information on Windows 8
Windows 8 Start Screen The Windows 8 Start screen displays a list of default and custom Live Tiles, which act as shortcuts to various installed applications. Live Tiles on your Start screen update in real time with information on news, sports, weather, stocks, social networks, and so on. The tile-ba...
Page 21 - Gestures; Finger gestures
Gestures Your computer has a 10-point multi-touch display. Finger gestures Touch Allows you to: Tap gently on the screen with your fingertip. • Select items on the screen including options, entries, images, icons, and so on. • Start applications. • Touch buttons on the screen. • Input text using the...
Page 24 - For more information on using Windows 8 Start screen, see
Finger gestures Allows you to: Zoom in Touch the display with two fingers Increase the zoom level of an image and then move the fingers apart. or web page. Rotate Touch the display with two or more Rotate an object by 90 degrees. fingers and then move the fingers in a clockwise or counter-clockwise ...
Page 25 - Using the Keyboard and Mouse; Pairing the wireless keyboard and mouse
Using the Keyboard and Mouse If you purchased a wireless keyboard and mouse with your computer, they will be already paired. To use the keyboard and mouse, make sure both devices have batteries installed and are powered on. Pairing the wireless keyboard and mouse If the keyboard and mouse do not wor...
Page 26 - Using Headphones/Microphones; Connect headphones to the audio port.
Using Headphones/Microphones Your computer has a headphone/microphone combo port that supports a headphone, a microphone, or a combo device to listen to music, record audio, or make voice calls. WARNING: Listening to loud music for extended periods of time can lead to hearing loss. NOTE: It is recom...
Page 27 - Removing the SD Card; Safely Remove Hardware; Eject SD Memory Card
Removing the SD Card CAUTION: To avoid data loss, ensure all read/write operations to the SD card are complete before removing it from the computer. 1 Touch the bottom left corner to enter Desktop mode. 2 Touch/click Safely Remove Hardware in the notification area at the bottom-right corner of the s...
Page 28 - Turning Off the Screen; Turning Off Your Computer
Turning Off the Screen • Using the power button: Press and release the Power and Sleep/Wake button to turn off the screen. • Using Charms: 1 Swipe from the right edge of the display to access Charms. 2 Touch Settings → Power → Sleep to turn off the screen. NOTE: If your computer is in a sleep state ...
Page 29 - Managing Computer Settings; Refreshing your computer; Resetting your computer
Managing Computer Settings Refreshing your computer Refreshing your computer restores Windows to the original factory settings without deleting any of your personal files, installed applications, or personalization settings. CAUTION: Refreshing your computer removes all third-party applications. 1 S...
Page 31 - Using a Microsoft account
• ePSA menu — Dell’s Enhanced Pre-Boot System Assessment. ePSA provides valuable configuration and diagnostic information and helps assure correct system operation. • LCD BIST menu — A diagnostic tool which utilizes Built In Self- Test capability to help users trouble shoot a no video scenario by ru...
Page 34 - Using the Powered Stand; Connect the Power Adapter to the Powered Stand; Connect the power adapter to an electrical outlet.
Using the Powered Stand Connect the Power Adapter to the Powered Stand CAUTION: Use only the supplied power adapter and power cable. Using unauthorized power adapters or power cables may cause severe damage to your computer and powered stand. 1 Connect the power adapter to the power-adapter port on ...
Page 35 - For more information on checking the battery status, see
You can check the powered stand’s status from: • The light located at the front of the powered stand: LED behavior Description Solid white color on Computer is docked in the powered stand Off Computer is not docked in the powered stand, or the power adapter is not connected to the stand. For more in...
Page 36 - Dock Your Computer on the Powered Stand; Place your computer onto the powered stand.
Dock Your Computer on the Powered Stand 1 Align the docking port on your computer to the docking connector on the powered stand. 2 Place your computer onto the powered stand. NOTE: The docking status light turns on when your computer is correctly seated on the powered stand and the powered stand is ...
Page 37 - Undocking Your Computer; Lift the computer from the powered stand.
Undocking Your Computer Lift the computer from the powered stand. Powered Stand (optional) │ 37
Page 38 - Cleaning Your Computer
Cleaning Your Computer CAUTION: Disconnect all cables from your computer before cleaning it. Clean your computer with a soft cloth dampened with water. Do not use liquid or aerosol cleaners, that may contain flammable substances. 1 Turn off your computer. For more information on turning off your com...
Page 39 - Troubleshooting; Battery Problems
Troubleshooting Battery Problems Problems Possible causes Possible solution Battery does not charge • Your computer is not properly plugged into a power source. • You are using an incorrect power adapter/cable. • The power outlet is not be working. • The power adapter/ cable is too loosely connected...
Page 40 - System problem
System problem Problems Possible causes Possible solution Computer does not turn on The battery is completely discharged. Connect your computer to a power source using the power adapter. Your computer could be in an unresponsive or locked state. Press and hold the power button for 11 seconds to perf...
Page 41 - Touchscreen problem
Computer is not responding or behaving unexpectedly Your computer could be in a hung or locked state. 1 Reboot the computer. See Turning Off Your Computer and Turning On Your Computer . 2 Refresh your computer. See Refreshing your computer. 3 Reset your computer. See Resetting your computer . 4 Cont...
Page 42 - Network problem
Network problem Problems Possible causes Possible solution No wireless connection Your computer is not able to properly access a wireless signal. 1 Check if the wireless radio is on. See Enabling/Disabling Wi-Fi . 2 Move closer to the wireless access point. 3 Reset the wireless router if using a pri...
Page 44 - Physical dimensions
Specifications Physical dimensions Height 283.70 mm (11.17 inches) Width 463.60 mm (18.25 inches) Depth 17.70 mm (0.70 inch) Weight 2.20 kg (4.85 lb) Hardware Processor 3rd Generation Intel Core i3/i5/i7 ULT Pentium Dual Core Chipset Intel Panther Point HM77 Graphics Intel HD 4000 for Core I process...
Page 46 - Environmental requirements
Environmental requirements Temperature range: Operating 0 °C to 35 °C (32 °F to 95 °F) Non-Operating -40 °C to 65 °C (-40 °F to 149 °F) Relative humidity (maximum): Operating 10% to 90% (noncondensing) Non-Operating 5% to 95% (noncondensing) Maximum Vibration (measured using a random vibration spect...


-User-Manual/webp/1.webp) Dell XPS 14Z (L412Z, Late 2011) User Manual
Dell XPS 14Z (L412Z, Late 2011) User Manual Dell XPS 15 Manual
-User-Manual/webp/1.webp) Dell XPS 15 (9530, Late 2013) User Manual
Dell XPS 15 (9530, Late 2013) User Manual-User-Manual/webp/1.webp) Dell XPS 15 (L501X, Late 2010) User Manual
Dell XPS 15 (L501X, Late 2010) User Manual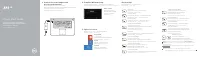 Dell XPS 15 9530 User Manual
-User-Manual/webp/1.webp) Dell XPS 17 (L701X, Late 2010) User Manual
Dell XPS 17 (L701X, Late 2010) User Manual Dell XPS 200 User Manual
 Dell XPS 210 User Manual
 Dell XPS 410 User Manual
 Dell XPS 600 Manual
 Dell XPS 630i User Manual