Page 3 - Getting Started; Démarrage avec votre système
Dell t Tower UPS 500W, 1000W, and 1920/1500W Getting Started With Your System Démarrage avec votre système Erste Schritte Mit Ihrem System Начало работы c вашей системой Inicio de su sistema 系统使用 入门指南 系統使用 入門指南 사용자의 시스템 시작하기 はじめに システムについて H900N, J715N, K788N, H914N, J716N, K789N w w w . d e l l . c ...
Page 4 - Notes and Warnings; moderate injury or in property damage incidents.; This UPS contains; LETHAL VOLTAGES; . All repairs and service should be performed by; AUTHORIZED SERVICE PERSONNEL ONLY
Notes and Warnings NOTE: A NOTE indicates important information that helps you make better use of your software. CAUTION: A CAUTION indicates a potentially hazardous situation which, if not avoided, may result in minor or moderate injury or in property damage incidents. WARNING: A WARNING indicates ...
Page 5 - System Features; increased power protection and control.
1 System Features | System Features Providing outstanding performance and reliability, the UPS's unique benefits include: S Buck and Boost voltage regulation that ensures regulated voltage to your load by correcting voltage fluctuations. S Start-on-battery capability for powering up the UPS even if ...
Page 6 - Finding Information; The; document provides important safety and; Dell UPS Disc
2 | Finding Information Finding Information CAUTION: The Safety, Environmental, and Regulatory Information document provides important safety and regulatory information. What are You Looking For? Find It Here S The user's guide for my UPS S The user's guide for the Dell Network Management Card S Del...
Page 7 - Installation and Startup; important regulatory information in your; Use caution to unpack and move the cabinet.; Unpacking the System; Unpack your system and identify each item.
3 Installation and Startup | Installation and Startup CAUTION: Before performing the procedures in this document, read and follow the safety instructions and important regulatory information in your Safety, Environmental, and Regulatory Information document. CAUTION: The cabinet is heavy [500W: 11.6...
Page 8 - Identifying the UPS; Dell Line-Interactive; Figure 1. The Dell Tower UPS
4 | Installation and Startup Identifying the UPS This section shows a front and rear panel of the Dell Tower UPS. Refer to the Dell Line-Interactive Tower UPS 500W, 1000W, and 1920/1500W User's Guide for all rear panel details. Cover Latch Cover Latch LCD Panel Scroll Button (Up or Back) Select Butt...
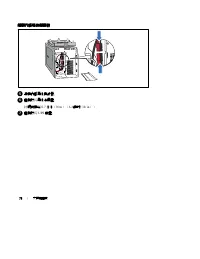
Page 9 - Removing the UPS Front Cover; Remove the UPS front cover.; Removing the Battery Cover
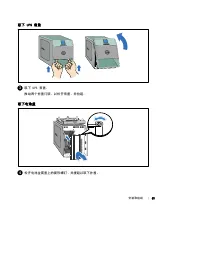
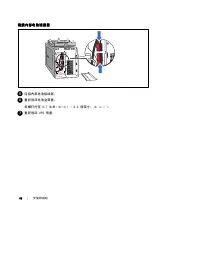
5 Installation and Startup | Removing the UPS Front Cover 3 Remove the UPS front cover. Push the two cover latches to release the front cover and pull up. Removing the Battery Cover 4 Unscrew the thumbscrew on the the metal battery cover and lift up to remove the cover.
Page 10 - Connecting the Internal Battery Connector; Connect the internal battery connector.
6 | Installation and Startup Connecting the Internal Battery Connector 5 Connect the internal battery connector. 6 Replace the metal battery cover. Torque the screw to 0.7 Nm (6.2 lb in). 7 Replace the UPS front cover.
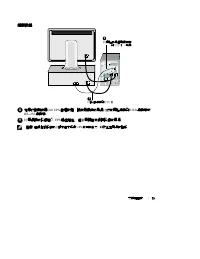
Page 11 - Connecting the Equipment
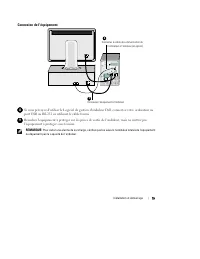
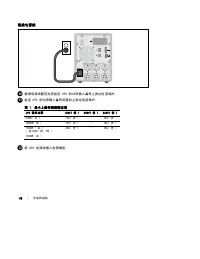
7 Installation and Startup | Connecting the Equipment 9 Connect equipment to UPS Connect communication cable from computer to UPS (optional) 8 8 If you plan to use Dell UPS Management Software, connect your computer to the USB port or RS-232 port using the supplied cable. 9 Plug the equipment to be ...
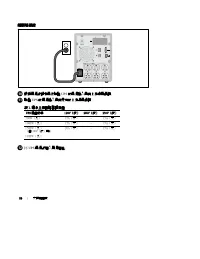
Page 12 - Connecting the Power Cord; Table 1. Minimum Upstream Circuit Breaker Rating; Plug the UPS power cord into a power outlet.
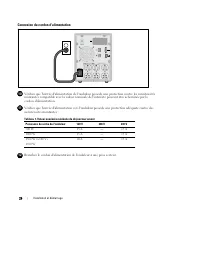
8 | Installation and Startup Connecting the Power Cord 10 Verify that the power input to the UPS has adequate upstream overcurrent protection: Table 1. Minimum Upstream Circuit Breaker Rating UPS Output Power 120V 208V 230V 500W 15A — 15A 1000W 15A — 15A 1500W (at 100V)1920W 20A — 15A 11 Plug the UP...
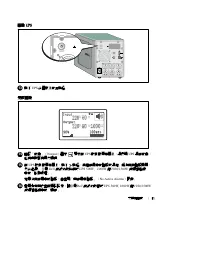
Page 13 - Starting the UPS
9 Installation and Startup | Starting the UPS 12 Press the button on the UPS rear panel. Completing the Startup 13 Verify that the Normal icon appears on the UPS status summary screen, indicating that the UPS is operating normally and any loads are powered. 14 On the UPS status summary screen, press...
Page 15 - Onduleur Tour Dell; Démarrage
Onduleur Tour Dell t 500 W, 1000 W et 1920/1500 W Démarrage avec votre système H900N, J715N, K788N, H914N, J716N, K789N w w w . d e l l . c o m | s u p p o r t . d e l l . c o m
Page 16 - Remarques et avertissements; mort ou une blessure grave.; Cet onduleur contient des; TENSIONS MORTELLES; . Toutes les réparations et tous; UNIQUEMENT PAR UN PERSONNEL; . Aucune pièce à l’intérieur de cet onduleur; NE PEUT
Remarques et avertissements REMARQUE : Une REMARQUE indique des informations importantes qui vous aident à mieux utiliser votre logiciel. DANGER : Un DANGER indique une situation dangereuse imminente qui, si elle n'est pas évitée, provoquera la mort ou une blessure grave. AVERTISSEMENT : Un AVERTISS...
Page 17 - Caractéristiques du système; corrigeant les fluctuations de tension.
13 Caractéristiques du système | Caractéristiques du système Offrant une fiabilité et des performances remarquables, les avantages uniques de l'onduleur comprennent : S La régulation de tension Buck and Boost qui assure une tension régulée à votre charge en corrigeant les fluctuations de tension. S ...
Page 18 - Trouver des informations; Le document; Disque de l'onduleur Dell
14 | Trouver des informations Trouver des informations ATTENTION! Le document Informations sur la sécurité, l'environnement et la réglementation fournit des informations importantes sur la sécurité et la réglementation. Que recherchez-vous ? Trouvez-le ici S Le guide d'utilisation de mon onduleur S ...
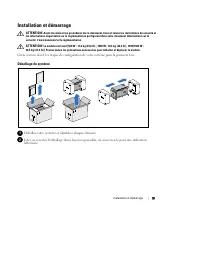
Page 19 - Installation et démarrage; Déballage du système; Déballez votre système et identifiez chaque élément.
15 Installation et démarrage | Installation et démarrage ATTENTION! Avant de réaliser les procédures de ce document, lisez et suivez les instructions de sécurité et les informations importantes sur la réglementation qui figurent dans votre document Informations sur la sécurité, l'environnement et la...
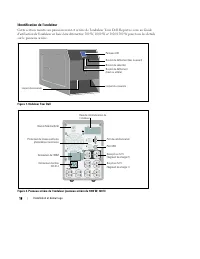
Page 20 - Identification de l'onduleur; Guide; Figure 1. Onduleur Tour Dell
16 | Installation et démarrage Identification de l'onduleur Cette section montre un panneau avant et arrière de l'onduleur Tour Dell. Reportez-vous au Guide d'utilisation de l'onduleur en baie Line-Interactive 500 W, 1000 W et 1920/1500 W pour tous les détails sur le panneau arrière. Loquet du couve...
Page 21 - Retrait du couvercle avant de l'onduleur; Retirez le couvercle avant de l'onduleur.; Retrait du couvercle des batteries
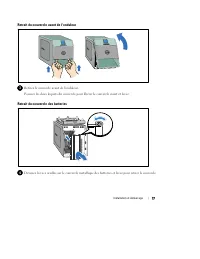
17 Installation et démarrage | Retrait du couvercle avant de l'onduleur 3 Retirez le couvercle avant de l'onduleur. Poussez les deux loquets du couvercle pour libérer le couvercle avant et levez. Retrait du couvercle des batteries 4 Dévissez la vis à oreilles sur le couvercle métallique des batterie...
Page 22 - Connexion du connecteur interne des batteries; Branchez le connecteur interne des batteries.
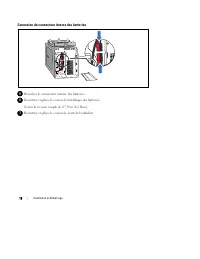
18 | Installation et démarrage Connexion du connecteur interne des batteries 5 Branchez le connecteur interne des batteries. 6 Remettez en place le couvercle métallique des batteries. Serrez la vis à un couple de 0,7 N·m (6,2 lb in). 7 Remettez en place le couvercle avant de l'onduleur.
Page 23 - Connexion de l'équipement; port USB ou RS-232 en utilisant le câble fourni.
19 Installation et démarrage | Connexion de l'équipement 9 Connectez l'équipement à l'onduleur Connectez le câble de communication de l'ordinateur à l'onduleur (en option) 8 8 Si vous prévoyez d'utiliser le Logiciel de gestion d'onduleur Dell, connectez votre ordinateur au port USB ou RS-232 en util...
Page 24 - Connexion du cordon d'alimentation; surintensités montantes :; Tableau 1. Valeur nominale minimale du disjoncteur amont
20 | Installation et démarrage Connexion du cordon d'alimentation 10 Vérifiez que l'entrée d'alimentation de l'onduleur possède une protection contre les surintensités montantes compatible avec la valeur nominale de l'intensité pouvant être acheminée par le cordon d'alimentation. 11 Vérifiez que l'e...
Page 25 - Démarrage de l'onduleur; Appuyez sur le bouton; Achèvement du démarrage; Vérifiez que l'icône Normal
21 Installation et démarrage | Démarrage de l'onduleur 13 Appuyez sur le bouton sur le panneau arrière de l'onduleur. Achèvement du démarrage 14 Vérifiez que l'icône Normal apparaît sur l'écran de résumé d'état de l'onduleur, indiquant que l'onduleur fonctionne normalement et que toutes les charges ...
Page 27 - Erste Schritte
Dell t Tower USV 500 W, 1000 W, und 1920/1500 W Erste Schritte Mit Ihrem System H900N, J715N, K788N, H914N, J716N, K789N w w w . d e l l . c o m | s u p p o r t . d e l l . c o m
Page 28 - Hinweise und Warnungen; Verletzungen führt, wenn sie nicht vermieden wird.; Diese USV führt; LEBENSGEFÄHRLICHE SPANNUNG.; und Wartungsarbeiten dürfen; NUR VON; durchgeführt werden. Im Inneren; KEINE VOM BENUTZER WARTBAREN TEILE
Hinweise und Warnungen HINWEIS: Ein HINWEIS macht auf eine wichtige Information aufmerksam, mit deren Hilfe Sie Ihre Software optimal nutzen können. GEFAHR: GEFAHR macht auf eine unmittelbar gefährliche Situation aufmerksam, die zum Tod oder schweren Verletzungen führt, wenn sie nicht vermieden wird...
Page 29 - Systemmerkmale; Netzstrom zur Verfügung steht.
25 Systemmerkmale | Systemmerkmale Die herausragende Leistung und Zuverlässigkeit sind nur einige der Vorteile der USV-Anlagen. Sie bieten zudem: S Spannungsregulierung durch das „Buck and Boost“-Verfahren. Dies gewährleistet durch die Korrektur von Unregelmäßigkeiten einen gleichbleibenden Spannung...
Page 30 - Auffinden von Informationen; Im Dokument; Die Disk für die Dell USV
26 | Auffinden von Informationen Auffinden von Informationen ACHTUNG: Im Dokument Informationen zu Sicherheit, Umweltschutz und Ordnungsvorschriften finden Sie wichtige Sicherheitshinweise und Informationen zu gesetzlichen Bestimmungen. Was suchen Sie? Hier finden Sie es S Die Benutzeranleitung für ...
Page 31 - Installation und Inbetriebnahme; und halten Sie diese unbedingt ein.; Auspacken des Systems; den späteren Gebrauch auf.
27 Installation und Inbetriebnahme | Installation und Inbetriebnahme ACHTUNG: Vor der Ausführung der Verfahren in diesem Dokument lesen Sie bitte die Sicherheitshinweise und wichtigen Informationen zu Ordnungsvorschriften in Ihrem Dokument über Informationen zu Sicherheit, Umweltschutz und Ordnungsv...
Page 32 - Beschreibung der USV; Einzelheiten zur Rückseite finden Sie in der; Abbildung 1. Die Dell Tower USV
28 | Installation und Inbetriebnahme Beschreibung der USV In diesem Abschnitt wird die Vorder- und Rückansicht der Dell Tower USV angezeigt. Alle Einzelheiten zur Rückseite finden Sie in der Dell Line-Interactive Tower USV 500 W, 1000 W, und 1920/1500 W Benutzeranleitung . Abdeckungslasche Abdeckung...
Page 33 - Entfernen der vorderen USV-Abdeckung; ziehen Sie diese hoch.; Entfernen der Batterieabdeckung
29 Installation und Inbetriebnahme | Entfernen der vorderen USV-Abdeckung 3 Entfernen Sie die vordere USV-Abdeckung. Drücken Sie auf die beiden Abdeckungslaschen, um die vordere Abdeckung zu lösen, und ziehen Sie diese hoch. Entfernen der Batterieabdeckung 4 Lösen Sie die Rändelschraube auf der meta...
Page 34 - Anklemmen des Anschlusses im Inneren der Batterie; Klemmen Sie den Anschluss im Inneren der Batterie an.
30 | Installation und Inbetriebnahme Anklemmen des Anschlusses im Inneren der Batterie 5 Klemmen Sie den Anschluss im Inneren der Batterie an. 6 Setzen Sie die die Batterieabdeckung aus Metall wieder ein. Drehen Sie die Schraube mit einem Drehmoment von 0,7 Nm (6,2 lb in) wieder ein. 7 Bringen Sie d...
Page 35 - Anschließen der Anlage; schalten Sie die geschützten Geräte noch nicht ein.
31 Installation und Inbetriebnahme | Anschließen der Anlage 9 Schließen Sie die Anlage an die USV an Schließen Sie das Kommunikationskabel vomComputer an die USV an (optional) 8 8 Sofern Sie die Benutzung der Dell USV Management Software planen, schließen Sie Ihren Computer mit dem beiliegenden Kabe...
Page 36 - Anschließen des Netzkabels; Spannungsspitzen ausgestattet ist:; Tabelle 1. Mindestnennstrom der Überstromsicherung; Stecken Sie das Netzkabel der USV in eine Netzsteckdose.
32 | Installation und Inbetriebnahme Anschließen des Netzkabels 10 Vergewissern Sie sich, dass der Stromeingang der USV entsprechend dem Nennstrom des Netzkabels mit einem Schutz gegen Spannungsspitzen ausgestattet ist. 11 Vergewissern Sie sich, dass der Stromeingang der USV mit einem angemessenen S...
Page 37 - Starten der USV; Drücken Sie die Taste; Abschluss des Startvorgangs; Vergewissern Sie sich, dass das Symbol für „Normal“
33 Installation und Inbetriebnahme | Starten der USV 13 Drücken Sie die Taste auf der Rückseite der USV. Abschluss des Startvorgangs 14 Vergewissern Sie sich, dass das Symbol für „Normal“ auf dem Bildschirm der USV-Statusübersicht angezeigt wird. Hierdurch wird angezeigt, dass die USV ordnungsgemäß ...
Page 38 - bevor Sie den Vorgang fortsetzen. Siehe „Fehlerbehebung“ in der
34 | Installation und Inbetriebnahme 15 Wählen Sie im Bildschirm mit der USV-Statusübersicht die Schaltfläche , um zu prüfen ob eine aktive Warnmeldung oder ein aktiver Hinweis vorliegt. Lösen Sie alle aktiven Warnmeldungen, bevor Sie den Vorgang fortsetzen. Siehe „Fehlerbehebung“ in der Dell Line-I...
Page 39 - ИБП башенного типа Dell; Начало работы
ИБП башенного типа Dell t 500 Вт, 1000 Вт и 1920/1500 Вт Начало работы c вашей системой w w w . d e l l . c o m | s u p p o r t . d e l l . c o m
Page 40 - Примечания и предупреждения; Пометка ОПАСНОСТЬ указывает на ситуации, в которых существует; В устройстве ИБП некоторые узлы находятся под; СМЕРТЕЛЬНО ОПАСНЫМ; . Все работы по ремонту и обслуживанию должны выполняться; ТОЛЬКО УПОЛНОМОЧЕННЫМ ОБСЛУЖИВАЮЩИМ ПЕРСОНАЛОМ
Примечания и предупреждения ПРИМЕЧАНИЕ: Пометка ПРИМЕЧАНИЕ указывает на важную информацию, которая поможет вам более эффективно использовать свое программное обеспечение. ОПАСНОСТЬ: Пометка ОПАСНОСТЬ указывает на ситуации, в которых существует непосредственная угроза, которая, если ее не избежать, п...
Page 41 - Функции системы; Утверждены международными организациями.
37 Функции системы | Функции системы Вот уникальные преимущества, обеспечивающие исключительную эффективность инадежность ИБП: S Понижающая и повышающая регулировка напряжения обеспечивает подачустабильного напряжения на нагрузку путем коррекции колебаний напряжения. S Функция запуска от батареи исп...
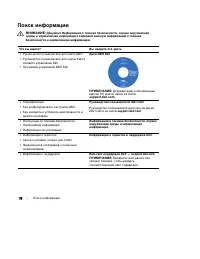
Page 42 - Поиск информации
38 | Поиск информации Поиск информации ВНИМАНИЕ: Документ Информация о технике безопасности, охране окружающей среды и нормативная информация содержит важную информацию о технике безопасности и нормативную информацию. Что вы ищите? Вы найдете это здесь S Руководство пользователя для моего ИБП S Руко...
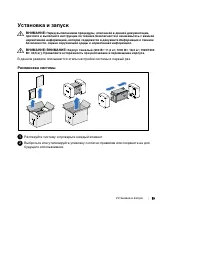
Page 43 - Установка и запуск; Перед выполнением процедуры, описанной в данной документации,; Распаковка системы; Распакуйте систему и проверьте каждый элемент.
39 Установка и запуск | Установка и запуск ВНИМАНИЕ: Перед выполнением процедуры, описанной в данной документации, прочтите и выполните инструкции по технике безопасности и ознакомьтесь с важнойнормативной информацией, которая содержится в документе Информация о технике безопасности, охране окружающ...
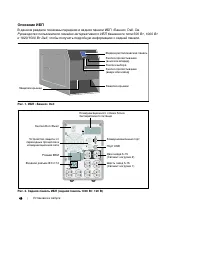
Page 44 - Описание ИБП; , чтобы получить подробную информацию о задней панели.
40 | Установка и запуск Описание ИБП В данном разделе показаны передняя и задняя панели ИБП «Башня» Dell. См. Руководство пользователя линейно-интерактивного ИБП башенного типа 500 Вт, 1000 Вти 1920/1500 Вт Dell , чтобы получить подробную информацию о задней панели. Защелка крышки Защелка крышки Жид...
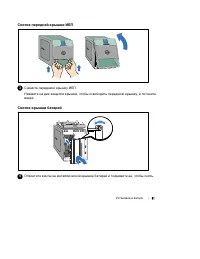
Page 45 - Снятие передней крышки ИБП; Снимите переднюю крышку ИБП.; Снятие крышки батарей
41 Установка и запуск | Снятие передней крышки ИБП 3 Снимите переднюю крышку ИБП. Нажмите на две защелки крышки, чтобы освободить переднюю крышку, и потянитевверх. Снятие крышки батарей 4 Отвинтите винты на металлической крышке батарей и поднимите ее, чтобы снять.
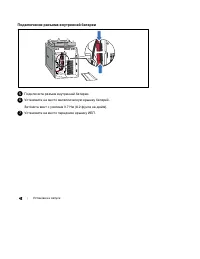
Page 46 - Подключение разъема внутренней батареи; Подключите разъем внутренней батареи.
42 | Установка и запуск Подключение разъема внутренней батареи 5 Подключите разъем внутренней батареи. 6 Установите на место металлическую крышку батарей. Затяните винт с усилием 0,7 Нм (6,2 фунта на дюйм). 7 Установите на место переднюю крышку ИБП.
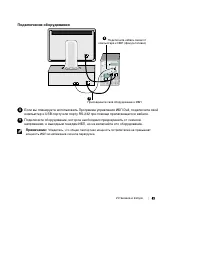
Page 47 - Подключение оборудования
43 Установка и запуск | Подключение оборудования 9 Присоедините свое оборудование к ИБП Подключите кабель связи от компьютера к ИБП (факультативно) 8 8 Если вы планируете использовать Программа управления ИБП Dell, подключите свойкомпьютер к USB-порту или порту RS-232 при помощи прилагающегося кабел...
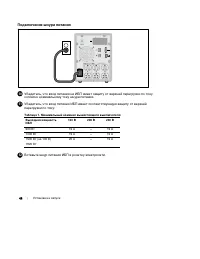
Page 48 - Подключение шнура питания; Таблица 1. Минимальный номинал вышестоящего выключателя; Вставьте шнур питания ИБП в розетку электросети.
44 | Установка и запуск Подключение шнура питания 10 Убедитесь, что вход питания на ИБП имеет защиту от верхней перегрузки по токусогласно номинальному току шнура питания. 11 Убедитесь, что вход питания ИБП имеет соответствующую защиту от верхнейперегрузки по току: Таблица 1. Минимальный номинал выш...
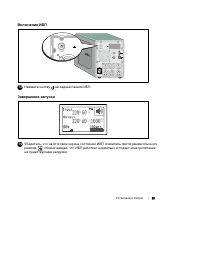
Page 49 - Включение ИБП; Нажмите кнопку; Завершение запуска; на существующие нагрузки.
45 Установка и запуск | Включение ИБП 13 Нажмите кнопку на задней панели ИБП. Завершение запуска 14 Убедитесь, что на итоговом экране состояния ИБП появилась пиктограмма обычногорежима , обозначающая, что ИБП работает нормально и подает электропитание на существующие нагрузки.
Page 50 - На итоговом экране состояния ИБП нажмите кнопку
46 | Установка и запуск 15 На итоговом экране состояния ИБП нажмите кнопку , чтобы проверить, активны ли аварийные сигналы или извещения. Отреагируйте на все активные сигналы, преждечем продолжить. См. Руководство пользователя линейно-интерактивного ИБП башенного типа 500 Вт, 1000 Вт и 1920/1500 Вт ...
Page 51 - UPS de la torre de Dell; Inicio de
UPS de la torre de Dell t 500 W, 1000 W y 1920/1500 W Inicio de su sistema H900N, J715N, K788N, H914N, J716N, K789N w w w . d e l l . c o m | s u p p o r t . d e l l . c o m
Page 52 - Notas y advertencias; muerte o una lesión grave.; Esta UPS contiene; VOLTAJES LETALES; debe realizar las reparaciones y el servicio.; SÓLO EL PERSONAL DE SERVICIO AUTORIZADO
Notas y advertencias NOTA: Una NOTA indica información importante que lo ayuda a utilizar mejor el software. PELIGRO: Un PELIGRO indica una situación inminentemente peligrosa que, si no se evita, dará como resultado la muerte o una lesión grave. AVISO: Una ADVERTENCIA indica una situación potencialm...
Page 53 - Características del sistema
49 Características del sistema | Características del sistema Al brindar rendimiento y confiabilidad sobresalientes, los beneficios exclusivos de la UPS incluyen: S Regulación del aumento y la reducción de voltaje que garantiza un voltaje constante para la carga, corrigiendo así las fluctuaciones. S ...
Page 54 - Búsqueda de información; El documento; brinda información; Disco de la UPS de Dell
50 | Búsqueda de información Búsqueda de información PRECAUCIÓN: El documento Información Ambiental, Regulatoria y de Seguridad brinda información regulatoria y sobre seguridad importante. ¿Qué está buscando? Encuéntrelo aqu S La guía del usuario para mi UPS S La guía del usuario para la Tarjeta de ...
Page 55 - Instalación y arranque; Cómo desembalar el sistema; Desembale el sistema e identifique cada elemento.
51 Instalación y arranque | Instalación y arranque PRECAUCIÓN: Antes de realizar los procedimientos que se describen en este documento, lea y cumpla con las instrucciones de seguridad y la información regulatoria importante en su documento Información Ambiental, Regulatoria y de Seguridad . PRECAUCI...
Page 56 - Identificación de la UPS; la; Figure 1. La UPS de la Torre de Dell
52 | Instalación y arranque Identificación de la UPS En la presente sección, se muestra un panel frontal y posterior de la UPS de la Torre de Dell. Consulte la Guía del usuario de la UPS de la torre de la línea interactiva de Dell 500 W, 1000 W y 1920/1500 W para obtener todos los detalles del panel...
Page 57 - Cómo retirar la cubierta frontal de la UPS; Extraiga la cubierta frontal de la UPS.; Cómo extraer la cubierta de la batería
53 Instalación y arranque | Cómo retirar la cubierta frontal de la UPS 3 Extraiga la cubierta frontal de la UPS. Empuje las dos pestillas de la cubierta para liberar la cubierta frontal y levantarla. Cómo extraer la cubierta de la batería 4 Desatornille el tornillo de apriete manual de la cubierta m...
Page 58 - Cómo conectar el conector de la batería interna; Conecte el conector de la batería interna.
54 | Instalación y arranque Cómo conectar el conector de la batería interna 5 Conecte el conector de la batería interna. 6 Vuelva a colocar la cubierta metálica de la batería. Apriete el tornillo a 0,7 N·m (6,2 lb pulg.). 7 Vuelva a colocar la cubierta frontal de la UPS.
Page 59 - Conectar el equipo; puerto RS-232 mediante el uso del cable suministrado.
55 Instalación y arranque | Conectar el equipo 9 Conecte el equipamiento a la UPS Conecte el cable de comunicación de la computadora a la UPS (opcional) 8 8 Si planea utilizar el Software de Gestión de UPS de Dell, conecte su equipo al puerto USB o el puerto RS-232 mediante el uso del cable suminist...
Page 60 - Conexión del cable de energía; Table 1. Régimen mínimo del disyuntor ascendente; Conecte el cable de alimentación de la UPS a un tomacorriente.
56 | Instalación y arranque Conexión del cable de energía 10 Verifique que la entrada de energía a la UPS tenga protección de sobrecarga de corriente ascendente de acuerdo con el régimen de corriente del cable de energía. 11 Verifique que la entrada de energía a la UPS tenga protección de sobrecarga...
Page 61 - Inicio de la UPS; Presione el botón; Cómo completar el arranque; Verifique que el ícono Normal
57 Instalación y arranque | Inicio de la UPS 13 Presione el botón del panel posterior de la UPS. Cómo completar el arranque 14 Verifique que el ícono Normal aparezca en la pantalla de resumen del estado UPS, que indica que la UPS funciona normalmente y todas las cargas están energizadas.
Page 62 - En la pantalla de resumen de estado de UPS, presione el botón
58 | Instalación y arranque 15 En la pantalla de resumen de estado de UPS, presione el botón para comprobar las notificaciones y las alarmas activas. Solucione todas las alarmas activas antes de continuar. Consulte el “Diagnóstico de fallas” en la Guía del usuario de la UPS de la torre de la línea i...
Page 64 - 注意和警告; 注意
注意和警告 注意 : “注意”表示可帮助您更好使用本软件的重要信息。 危险: “危险”表示紧急危险情况,如果不加以避免,将导致死亡或严重的伤害。 警告: “警告”表示潜在危险情况,如果不加以避免,将会导致死亡或伤害。 小心: “小心”表示潜在危险情况,如果不加以避免,可能导致轻度或中度伤害,或财产损失事故。 危险: 遵守下列须知有助于防止紧急危险情况,其若不加以避免,将导致死亡或严重的伤害: S 本 UPS 包含危险致命的电压。所有维修和服务都只能由经过授权的维修人员进行。UPS中没有用户可自行维修的部件。 本文档所含信息如有更改,恕不另行通知。 E 2009 Dell Inc. 保留所有权利...
Page 65 - 系统性能
61 系统性能 | 系统性能 该 UPS 可提供杰出的性能与可靠性,其独特优势包括: S 降压与升压调节,通过调节电压波动确保您的负荷电压稳定。 S 即使没有公用电源,电池启动功能也能给 UPS 供电。 S 对 1000–1920W UPS 型号,通过可选的外部电池模块(EBM)延长运行时间。 S 两个标准通信端口(USB 和 DB-9 串行口)。 S 为了加强电源保护和控制,可选择增强通信能力的 Dell 网络管理卡。 S 网络抗瞬变装置可保护您的网络通信设备免受电涌的损害。 S 高级电源管理,用Dell UPS 管理软件进行平滑关机和电力监控。 S 通过称为载入段的单独插座组进行顺序关机和...
Page 66 - 查找信息; 安全、环保和法规信息
62 | 查找信息 查找信息 CAUTION: 安全、环保和法规信息 文件提供了重要的安全和法规信息。 您正在寻找什么? 在此查找 S 我的 UPS 的用户指南 S Dell 网络管理卡 用户指南 S Dell UPS 管理软件 注意: 文件和软件更新可在 support.dell.com 找到。 Dell UPS 光盘 S 规格 S 如何配置 UPS 设置 S 如何排查故障和解决问题 Dell UPS 用户指南 用户指南可从 Dell UPS 光盘和 support.dell.com上找到。 S 安全操作说明 S 行政法规信息 S 回收信息 安全、环保和法规信息 S 保修信息 S 条款和条件...
Page 67 - 安装和启动; 本节描述首次安装系统的步骤。; 打开系统; 打开系统,查看每个物品项目。
63 安装和启动 | 安装和启动 CAUTION: 在进行本文件中的步骤之前,请先阅读和遵循 安全、环保和法规信息 文件中的安全操作说明和重要法规信息。 CAUTION: 小心:机箱较重 [500W: 11.6 千克(25.6 磅);1000W:18.3 千克(40.3 磅);1920/1500W: 30.5 千克 (67.2 磅)]。请在拆开包装和搬动机箱时特别小心。 本节描述首次安装系统的步骤。 打开系统 1 打开系统,查看每个物品项目。 2 以负责任的方式处理包装材料或回收循环利用,或者收起存放以备将来使用。
Page 68 - UPS 识别; 本节介绍 Dell 塔式 UPS 的前面板和后面板。后面板详细情况请参见; Dell 在线互动塔式 UPS
64 | 安装和启动 UPS 识别 本节介绍 Dell 塔式 UPS 的前面板和后面板。后面板详细情况请参见 Dell 在线互动塔式 UPS 500W, 1000W, 和 1920/1500W 用户指南 。 外盖闩锁 外盖闩锁 LCD 显示面板 滚动按钮(向上或向后) 选择按钮 滚动按钮(向下或向前) 图 1. Dell 塔式 UPS 通信端口 六个 5-15 插座(载入段 1) 网络抗瞬变装置 USB 端口 UPS 通信槽 开/关按钮 IEC-C14 输入连接器 两个 5-15 插座(载入段 2) EBM 接线器 图 2. UPS 后面板(1000W (瓦),120V (伏)后面板)
Page 69 - 取下 UPS 前盖; 取下 UPS 前盖。; 取下电池盖; 松开电池金属盖上的翼形螺钉,并提起以取下外盖。
65 安装和启动 | 取下 UPS 前盖 3 取下 UPS 前盖。 推动两个外盖闩锁,以松开前盖,并拉起。 取下电池盖 4 松开电池金属盖上的翼形螺钉,并提起以取下外盖。
Page 70 - 连接内部电池连接器; 连接内部电池接线器。
66 | 安装和启动 连接内部电池连接器 5 连接内部电池接线器。 6 重新放回电池金属盖。 将螺钉拧至 0.7 牛米(N·m) (6.2 磅英寸(lb in))。 7 重新放回 UPS 前盖。
Page 71 - 连接设备; 将需要保护的设备插入 UPS 输出插座,但不要启动受保护的设备。
67 安装和启动 | 连接设备 9 将设备连接到 UPS 上 将计算机的通信电缆连接到 UPS 上(可选) 8 8 如果您计划使用Dell UPS 管理软件,用提供的电缆将您的电脑连接到 USB 端口或 RS-232端口。 9 将需要保护的设备插入 UPS 输出插座,但不要启动受保护的设备。 注意: 确保全部设备的总额定值不超过 UPS 的负载能力,以防止出现过载警报。
Page 72 - 连接电源线; 根据电源线额定电流验证 UPS 的功率输入具有上游过电流保护。; 将 UPS 电源线插入电源插座。
68 | 安装和启动 连接电源线 10 根据电源线额定电流验证 UPS 的功率输入具有上游过电流保护。 11 验证 UPS 的功率输入具有足够的上游过电流保护: 图 1. 最小上游断路器额定值 UPS 输出功率 120V(伏) 208V(伏) 230V(伏) 500W(瓦) 15A(安) — 15A(安) 1000W(瓦) 15A(安) — 15A(安) 1500W (瓦)(在100V(伏)时) 1920W(瓦) 20A(安) — 15A(安) 12 将 UPS 电源线插入电源插座。
Page 73 - 启动 UPS
69 安装和启动 | 启动 UPS 13 按下 UPS 后面板上的 按钮。 完成启动 14 确认“正常”(Normal)图标 显示在 UPS 状态概要屏幕上,这表明 UPS 运转正常,任何负荷都有动力供给。 15 在 UPS 状态屏上,按下 按钮,查看现有警报或通知。 解决所有警报问题,然后继续。 参见 Dell 在线互动塔式 UPS 500W, 1000W, 和 1920/1500W 用户指南 中的“故障处理”。 如果没有现有警报,会出现“无现有警报”(No Active Alarms)信息。 16 要更改其它出厂设置默认项,请参见 Dell 在线互动塔式 UPS 500W, 1000W, ...
Page 76 - UPS
注意和警告 注意 : 「注意」表示可幫助您更好地使用本軟體的重要資訊。 危險: 「危險」表示緊急危險情況,如果不加以避免,將導致死亡或嚴重的傷害。 警告: 「警告」表示潛在危險情況,如果不加以避免,將會導致死亡或嚴重的傷害。 小心: 「小心」表示潛在危險情況,如果不加以避免,可能導致輕度或中度傷害,或財產損失事故。 危險: 遵守以下須知有助於防止緊急危險情況,其若不加以避免,將導致死亡或嚴重的傷害。 S 本 UPS 包含危險致命的電壓。所有維修和服務都只能由經過授權的維修人員進行。 UPS 中沒有可由使用者自行維修的零件。 本文件所含資訊如有變更,恕不另行通知。 E 2009 Dell Inc...
Page 77 - 系統性能
73 系統性能 | 系統性能 該 UPS 可提供傑出的性能與可靠性,包括下列獨有優勢: S 降壓與升壓調節,藉由調節電壓波動確保您的負載電壓穩定。 S 電池啟動功能使您能在沒有外部電源時,也能使 UPS 通電。 S 1000–1920W UPS 型號可藉由選配的 外部電池模組( EBM )延長運行時間。 S 兩個標準通信連接埠( USB 和 DB--9 序列埠)。 S 選配的 Dell 網路管理卡 具有增強通訊功能,可增加電源保護和控制。 S 網路瞬態過電保護裝置可保護您的網路通信設備免受電壓突波的損害。 S 使用 Dell UPS 管理軟體的先進電源管理,進行平滑關機和電力監控。 S 藉由稱...
Page 78 - 尋找資訊; Dell UPS; Dell UPS; 使用者指南; 安全、環保和法規資訊; 保固和支援資訊; 支援網站 —
74 | 尋找資訊 尋找資訊 CAUTION: 安全、環保和法規資訊 文件提供重要的安全和法規資訊。 您正在尋找什麼? 在此尋找 S 我的 UPS 的使用者指南 S Dell 網路管理卡 使用者指南 S Dell UPS 管理軟體 注意:文件和軟體更新可在 support.dell.com 找到。 Dell UPS 光碟 S 規格 S 如何進行 UPS 設定 S 如何排除故障和解決問題 Dell UPS 使用者指南 使用者指南可從 Dell UPS 光碟和 support.dell.com 上取得。 S 安全操作說明 S 行政法規資訊 S 回收資訊 安全、環保和法規資訊 S 保固資訊 S 條款...
Page 79 - 安裝和啟動; 本節描述首次安裝系統的步驟。; 拆除系統包裝; 拆除系統包裝,並檢查確定每個項目。
75 安裝和啟動 | 安裝和啟動 CAUTION: 在進行本文件中的步驟之前,請先閱讀和遵循 安全、環保和法規資訊 文件中的安全操作說明和重要法規資訊。 CAUTION: 小心: 機箱較重 [ 500W ; 11.6 公斤 ( 25.6 磅); 1000W ; 18.3 公斤 (40.3 磅); 1920/1500W : 30.5 公斤 ( 67.2 磅)]。 在拆開包裝和搬動機箱時請特別小心。 本節描述首次安裝系統的步驟。 拆除系統包裝 1 拆除系統包裝,並檢查確定每個項目。 2 以負責任的方式棄置或回收包裝材料,或者將其存放以備將來使用。
Page 80 - 的識別; 本節介紹; 在線互動機架式; 塔式
76 | 安裝和啟動 UPS 的識別 本節介紹 Dell 塔式 UPS 的前面板和後面板。後面板詳細情況請參見 Dell 在線互動機架式 UPS 500W 、 1000W 、和 1920/1500W 使用者指南 。 外蓋閂鎖 外蓋閂鎖 LCD 顯示面板 捲軸按鈕(向上或向後) 選擇按鈕 捲軸按鈕(向下或向前) 圖 1. Dell 塔式 UPS 通信連接埠 六個 5-15 插座(負載區段 1) 網路瞬態過電保護裝置 USB 連接埠 UPS 通信槽 開/關按鈕 IEC--C14 輸入連接器 兩個 5-15 插座(負載區段 2) EBM 接線器 圖 2. UPS 後面板(1000W,120V 後面板...
Page 81 - 取下 UPS 前蓋; 取下; 取下電池蓋; 鬆開電池金屬蓋上的翼形螺釘,提起以取下外蓋。
77 安裝和啟動 | 取下 UPS 前蓋 3 取下 UPS 前蓋。 推動兩個外蓋閂鎖,以鬆開前蓋並將其拉起。 取下電池蓋 4 鬆開電池金屬蓋上的翼形螺釘,提起以取下外蓋。
Page 82 - 連接內部電池連接器; N·m
78 | 安裝和啟動 連接內部電池連接器 5 連接內部電池接線器。 6 重新放囘電池金屬蓋。 將螺釘擰至 0.7 牛米( N·m )( 6.2 磅吋( lb in ))。 7 重新放囘 UPS 前蓋。
Page 83 - 連接設備
79 安裝和啟動 | 連接設備 9 將設備連接到 UPS 上 將電腦的通信電纜連接 到 UPS 上(可選 8 8 如果您計劃使用 Dell UPS 管理軟體,請使用提供的電纜將您的電腦連接到 USB 連接埠或 RS--232 連接埠。 9 將要保護的設備插入 UPS 輸出插座,但不要開啟受保護設備的電源。 注意 : 確保全部設備的縂額定值未超過 UPS 的負載能力,以防止出現過載警報。
Page 84 - 連接電源線; 根據電源線額定電流驗證
80 | 安裝和啟動 連接電源線 10 根據電源線額定電流驗證 UPS 的電源輸入具有上游過電保護。 11 驗證 UPS 的電源輸入具有足夠的上游過電保護: 表 1. 最小上游斷路器額定值 UPS 輸出功率 120V(伏) 208V(伏) 230V(伏) 500W(瓦) 15A(安) — 15A(安) 1000W(瓦) 15A(安) — 15A(安) 1500W(瓦)(當100V(伏)時) 1920W(瓦) 20A(安) — 15A(安) 12 將 UPS 電源線插入電源插座。
Page 87 - 사용자의 시스템
Dell t Tower UPS 500W, 1000W, 1920/1500W 사용자의 시스템 시작하기 H900N, J715N, K788N, H914N, J716N, K789N w w w . d e l l . c o m | s u p p o r t . d e l l . c o m
Page 88 - 참고 및 경고
참고 및 경고 참고: "참고"는 소프트웨어를 더 잘 활용하는 데 도움이 되는 중요한 정보를 나타냅니다. 위험: "위험"은 피하지 않을 경우, 급박한 위험 상황이 사망이나 중상의 결과를 야기할 수 있음을 나타냅니다. 경고: "경고"는 피하지 않을 경우 죽음이나 상해를 야기할 수 있는 잠재적 위험 상황을 표시합니다. 주의: "주의"는 피하지 않을 경우 경미하거나 보통의 상해 또는 재산 손실 사고를 야기할 수 있는 잠재적 위험 상황을 표시합니다. 위험: 아래의 지시사항을 준수하여,...
Page 89 - 시스템 기능
85 시스템 기능 | 시스템 기능 탁월한 성능과 신뢰도를 제공하면서, 본 UPS 는 다음과 같은 특유의 장점을 지닙니다. S 전압 변동을 교정하여 사용자의 부하에 대한 조정 전압을 보장하는 승강압형 전압 조정. S 상용 전력을 사용할 수 없는 경우에도 UPS 에 전력을 공급하는 스타트온 배터리 (start--on--battery) 기능. S 선택사양인 1000–1920W UPS 모델용 외장 배터리 모듈( EBM )을 갖춘 확장 런타임. S 2개의 표준 통신 포트 ( USB 및 DB--9 시리얼 포트). S 전원 보호 및 제어 능력을...
Page 90 - 정보 찾아보기; 적절한 지원 사이트를 보려면 해당
86 | 정보 찾아보기 정보 찾아보기 주의 : 안전, 환경, 및 규제 관련 정보 문서는 중요한 안전 및 규제 정보를 제공합니다. 찾는 정보 항목 정보의 소재 S UPS 용 사용자 설명서 S Dell Network Management Card 용 사용자 설명서 S Dell UPS Management Software 참고 : 문서 및 소프트웨어 업데이트는 support.dell.com 에서 조회할 수 있습니다. Dell UPS 디스크 S 사양 S UPS 설정 구성 방법 S 문제점 처리 및 해결 방법 Dell UPS 사용자 설명서 사용자...
Page 91 - 설치 및 시동; 이 절은 귀하의 시스템을 처음 설치하는 절차를 설명합니다.; 시스템 포장풀기; 시스템 포장을 풀고 각 품목을 확인하십시오.
87 설치 및 시동 | 설치 및 시동 주의 : 본 문서의 절차를 수행하기 전에 안전, 환경, 및 규제 관련 정보 문서에 있는 안전 지침 및 중요한 규제정보를 읽고 준수하십시오. 주의 : 캐비닛은 무겁습니다[500W : 11.6 kg (25.6 lb); 1000W : 18.3 kg (40.3 lb); 1920/1500W : 30.5 kg (67.2 lb)]. 주의하여 캐비닛의 포장을 풀고 캐비닛을 옮기십시오. 이 절은 귀하의 시스템을 처음 설치하는 절차를 설명합니다. 시스템 포장풀기 1 시스템 포장을 풀고 각 품목을 확인하십시오. 2...
Page 92 - UPS 확인하기; 이 절에서는; 사용자 설명서; Dell Tower
88 | 설치 및 시동 UPS 확인하기 이 절에서는 Dell Tower UPS 의 앞면 패널과 뒷면 패널을 보여줍니다. 모든 뒷면 패널의 세부에 대해서는 Dell Line--Interactive Tower UPS 500W, 1000W, 1920/1500W 사용자 설명서 를 참조하십시오. 덮개 걸쇠 덮개 걸쇠 LCD 패널 스크롤 버튼(위로 또는 뒤로) 버튼 선택 스크롤 버튼(아래로 또는 앞으로) 그림 1. Dell Tower UPS 통신 포트 6 개의 5-15 콘센트 ( 로드 세그먼트 1) 네트워크 과도전류 프로텍터 USB 포트 UP...
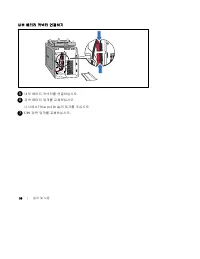
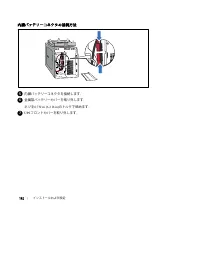
Page 93 - UPS 앞면 덮개 제거하기; 배터리 덮개 제거하기; 금속 배터리 덮개의 손나사를 풀고 들어올려 덮개를 제거하십시오.
89 설치 및 시동 | UPS 앞면 덮개 제거하기 3 UPS 앞면 덮개를 제거하십시오. 두 개의 덮개 걸쇠를 밀어서 앞면 덮개를 풀고 당겨 올리십시오. 배터리 덮개 제거하기 4 금속 배터리 덮개의 손나사를 풀고 들어올려 덮개를 제거하십시오.
Page 94 - 내부 배터리 커넥터 연결하기; 나사에
90 | 설치 및 시동 내부 배터리 커넥터 연결하기 5 내부 배터리 커넥터를 연결하십시오. 6 금속 배터리 덮개를 교체하십시오. 나사에 0.7 N·m (6.2 lb in) 의 토크를 주십시오. 7 UPS 앞면 덮개를 교체하십시오.
Page 95 - 장비 연결하기; Dell UPS Management Software
91 설치 및 시동 | 장비 연결하기 9 장비를 UPS 로 연결 컴퓨터에서 UPS 로 통신 케이블을 연결(선택사양) 8 8 Dell UPS Management Software 를 사용하실 계획이라면, 제공된 케이블을 이용하여 컴퓨터를 USB 포트나 RS--232 포트로 연결하십시오. 9 보호할 장비를 UPS 출력 콘센트에 꽂되 켜지는 마십시오. 참고 : 과부하 경보를 방지하려면 장비의 전체 정격사양이 UPS 용량을 초과하지 않도록 확인하십시오.
Page 96 - 전원 코드 연결하기
92 | 설치 및 시동 전원 코드 연결하기 10 UPS 로 입력되는 전원이 전원코드 전류 정격에 따라 업스트림 과전류 보호를 받고 있는지 확인하십시오. 11 UPS 로 입력되는 전원이 적당한 업스트림 과전류에 대해 보호 받고 있는지 확인하십시오. 표 1. 최소 업스트림 회로차단기 정격 UPS 출력 전원 120V 208V 230V 500W 15A — 15A 1000W 15A — 15A 1500W (100V ) 1920W 20A — 15A 12 UPS 전원코드를 전원 콘센트에 연결하십시오.
Page 97 - UPS 시동하기; 시동 완료하기
93 설치 및 시동 | UPS 시동하기 13 UPS 앞면 패널의 버튼을 누르십시오. 시동 완료하기 14 UPS 가 정상적으로 작동하고 있고 모든 부하가 전력을 공급받고 있음을 표시하는, 정상 아이콘 이 UPS 상태 요약 화면에 나타나는지 확인하십시오. 15 UPS 상태 요약 화면에서, 활성 경보나 통지를 확인하려면 버튼을 누르십시오. 후속 작업을 계속하기 전에 활성 경보를 처리하십시오. Dell Line--Interactive Tower UPS 500W, 1000W, 1920/1500W 사용자 설명서 의 "장애처리"를...
Page 99 - はじめに
Dell t タワー型 UPS 500W 、 1000W 、および 1920/1500W はじめに システムについて H900N, J715N, K788N, H914N, J716N, K789N w w w . d e l l . c o m | s u p p o r t . d e l l . c o m
Page 100 - 注意および警告; 注記; この; の中には致死的な電圧が掛かっています。 すべての修理や点検は、公認のサービ
注意および警告 注記 : 「注記」は、ソフトウェアを有効に利用するための重要な情報を示しています。 危険: 「危険」は、回避しないとほぼ確実に死亡、または重傷を招く危険な状況を示しています。 警告: 「警告」は、回避しないと死亡、または重傷を招く潜在的に危険な状況を示しています。 注意: 「注意」は、回避しないと軽傷、または中程度の傷害を招く恐れがある潜在的に危険な状況を示 しています。 危険: 避しないとほぼ確実に死亡、または重傷を招く危険な状況を防ぐため、以下の説明をよくお読みください。 S この UPS の中には致死的な電圧が掛かっています。 すべての修理や点検は、公認のサービ ススタッ...
Page 101 - システムの特徴
97 システムの特徴 | システムの特徴 UPS は優れた性能や信頼性を提供し、以下のような独自の利点がございます: S 電圧変動を修正することで、負荷への一貫した電圧を保証する「昇降圧」電圧調節。 S 外部電力がないときでも UPS の電力を入れることができる始動電池の能力。 S 拡張ランタイムおよびオプションとして 1000--1920W UPS 型用 の外付けバッテリーモジュール(外付けバッテリーモジュール)付き。 S 2 つの標準通信ポート( USB および DB--9 シリアルポート)。 S オプションとして、増加電力の保護や制御を行う高度通信機能付き Dell ネットワークマネージ...
Page 102 - 情報検出; 安全、環境、規則に関する情報
98 | 情報検出 情報検出 注意: : 安全、環境、規則に関する情報 資料には、安全および規定に関する重要情報が含まれています。 どんな情報をお探しですか? こちらでご覧いただけます S UPS ユーザーガイド S Dell ネットワークマネージメントカード用の ユーザーガイド S Dell UPS 制御ソフトウェア 注記: 説明書およびソフトウェアの更新情報 は、 support.dell.com でご確認いただけます。 Dell UPS ディスク S 仕様 S UPS の設定方法 S トラブルシューティングおよび問題の解決方法 Dell UPS ユーザーガイド ユーザーガイドは Dell...
Page 103 - インストールおよび設定; このセクションは、最初におけるシステムの設定方法について説明しています。; システムの開梱; システムを開梱し、各項目を識別します。
99 インストールおよび設定 | インストールおよび設定 注意: : 当資料の手順を実施する前に、 安全、環境、規則に関する情報 資料に記載されている安全に関す る説明書および重要な規制情報をご覧いただき、これらの情報に従ってください。 注意: : キャビネットの重量[500W: 11.6 kg (25.6 lb); 1000W: 18.3 kg (40.3 lb); 1920/1500W: 30.5 kg (67.2 lb)] 注意して開梱し、キャビネットを移動します。 このセクションは、最初におけるシステムの設定方法について説明しています。 システムの開梱 1 システムを開梱し、各項目を識...
Page 104 - UPSの識別; ラインインタラクティブ式ラック
100 | インストールおよび設定 UPSの識別 このセクションは、 Dell タワー型 UPS のフロントパネルおよびリヤパネルを示しています。 リヤパネルの詳細に関しましては、 Dell ラインインタラクティブ式ラック 500W、1000W、および1920/1500W ユーザーガイド をご参照ください。 カバー止め カバー止め LCDパネル スクロールボタン(上方向、または後方) 選択ボタン スクロールボタン(下方向、または前方) 図 1. Dell タワー型 UPS 通信ポート 5-15レセプタクル 6個(負荷セグメント1) ネットワーク過度 電流プロテクタ USBポート カバーを取り外...
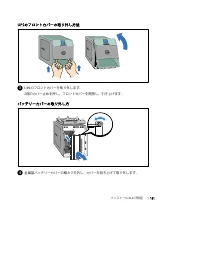
Page 105 - UPSのフロントカバーの取り外し方法; バッテリーカバーの取り外し方; 金属製バッテリーカバーの蝶ネジを外し、カバーを持ち上げて取り外します。
101 インストールおよび設定 | UPSのフロントカバーの取り外し方法 3 UPS のフロントカバーを取り外します。 2個のカバー止めを押し、フロントカバーを開放し、引き上げます。 バッテリーカバーの取り外し方 4 金属製バッテリーカバーの蝶ネジを外し、カバーを持ち上げて取り外します。
Page 106 - 内臓バッテリーコネクタの接続方法; 内臓バッテリーコネクタを接続します。
102 | インストールおよび設定 内臓バッテリーコネクタの接続方法 5 内臓バッテリーコネクタを接続します。 6 金属製バッテリーカバーを取り外します。 ネジを 0.7 N·m (6.2 lb in) のトルクで締めます。 7 UPS フロントカバーを取り外します。
Page 107 - 装置の接続方法
103 インストールおよび設定 | 装置の接続方法 9 装置をUPSへ接続 コンピューターからUPSへの通信 ケーブルを接続(オプション) 8 8 Dell UPS 制御ソフトウェアを使用する場合は、同梱のケーブルを使って、 コンピューターを USB ポートや RS--232 ポートへ接続してください。 9 保護する装置を UPS 出力レセプタクルに差し込みます。ただし保護装置の電源は入れない でください。 注記: : 過負荷アラームを防ぐため、装置の定格の合計が UPS の容量を超えていないか確認してください。
Page 108 - 電源コードの接続方法
104 | インストールおよび設定 電源コードの接続方法 10 UPS への電源入力には、電源コードの定格電流に従い、逆流過電流保護があるか確認して ください。 11 UPS への電源入力には、十分な逆流過電流保護があるか確認してください。 表 1. 上流遮断機最小定格 UPS出力 120V 208V 230V 500W 15A — 15A 1000W 15A — 15A 1500W (100V 時 ) 1920W 20A — 15A 12 UPS の電源コードを電源コンセントに差し込みます。
Page 109 - UPSの起動方法; 起動の完了
105 インストールおよび設定 | UPSの起動方法 13 UPS のリヤパネルの ボタンを押します。 起動の完了 14 UPS が正常に動作し、負荷電力があることを示す「正常」アイコン が UPS のステータス 要約画面に現れていることをお確かめください。 15 アクティブになっているアラームや通知を確かめるには、 UPS ステータス要約画面の ボタ ンを押します。 続ける前に、アクティブになっているアラームを解消してください。 Dell ラインインタラクティブ式ラック 500W、1000W、および1920/1500W ユーザーガイド の 「トラブルシューティング」をご参照ください。 アクテ...