Page 3 - Contents; Package Contents
Contents 3 Contents 1 Package Contents . . . . . . . . . . . . . . . . . . . 7 2 Dell™ Streak Features . . . . . . . . . . . . . . . . 8 3 Setting Up Your Dell™ Streak . . . . . . . . . 12 Getting Your Device Ready for Use . . . . . . . . . . . 12 Turning On Your Device . . . . . . . . . . . . . . ....
Page 4 - Using Your DellTM Streak
4 Contents 5 Using Your Dell™ Streak . . . . . . . . . . . . 32 Calling . . . . . . . . . . . . . . . . . . . . . . . . . . 32 Managing Contacts . . . . . . . . . . . . . . . . . . . 38 Messaging . . . . . . . . . . . . . . . . . . . . . . . . 41 Pop-Up Menu . . . . . . . . . . . . . . . . . . . . ....
Page 5 - Protecting Your DellTM Streak
Contents 5 8 Protecting Your Dell™ Streak . . . . . . . . . 99 Protect Your Device Data With a Screen Unlock Pattern . . . . . . . . . . . . . . . . . . 99 Protect Your SIM Card With the SIM Lock Password . . . . . . . . . . . . . . . . . . . 101 9 Applications . . . . . . . . . . . . . . . . . ...
Page 6 - 0 Synchronizing Your DellTM Streak; Connect to a Computer and Install; 1 Playing Videos on HDMI Devices
6 Contents 10 Synchronizing Your Dell™ Streak and Computer Using Dell PC Suite . . . . 126 Connect to a Computer and Install Dell PC Suite . . . . . . . . . . . . . . . . . . . . . . 126 Using Dell PC Suite . . . . . . . . . . . . . . . . . . 127 11 Playing Videos on HDMI Devices . . . . . 128 1...
Page 7 - Package Contents; Europe
Package Contents 7 Package Contents Check the contents of your package to verify that you have the following: U.S.A Streak deviceBatteryQuick Start GuideSafety, Environmental, and Regulatory InformationWarranty Service InformationUSB cableChargerUS plugPouchHeadset with mic Europe Streak deviceBatte...
Page 8 - DellTM Streak Features; Functionality
8 Dell™ Streak Features Dell™ Streak Features Buttons/Connectors/Parts Functionality 1 Headphone connector Connects to headphones. 2 Volume up/down button Landscape mode: Volume up button / Volume down button Portrait mode: Volume up button Volume down button • While playing media such as ...
Page 9 - Silent mode
Dell™ Streak Features 9 3 Power and Sleep/Wake button • If the device is off, press and hold to power on the device. • If the device is on, but the screen is off, press to turn on the screen. • If both the device and the screen are on, – Press to turn the screen off.– Press and hold to select one of...
Page 12 - Setting Up Your DellTM Streak; Getting Your Device Ready for Use; Remove the back cover
12 Setting Up Your Dell™ Streak Setting Up Your Dell™ Streak Getting Your Device Ready for Use 1 Remove the back cover 2 Insert the SIM card a Slide the back cover downwards in the direction towards the end of the device. b Lift the back cover off the device. NOTE: The device will shut down automati...
Page 13 - Insert the battery
Setting Up Your Dell™ Streak 13 3 Insert the battery 4 Install the microSD card Align the metal contacts on the battery with the contacts on the battery holder and insert the battery. a Hold the microSD card with the metal contacts facing down. b Slide the microSD card into the microSD card holder. ...
Page 15 - Turning On Your Device; OK; Turning Off Your Device; Power off; Turning Off the Screen
Setting Up Your Dell™ Streak 15 Turning On Your Device NOTE: Use this device in an environmental temperature between -10°C and 55°C. 1 Press and hold the Power button to turn on your device. The operating system starts up. 2 Touch the Menu button to unlock the screen if it is automatically locked. 3...
Page 16 - Understanding Your DellTM Streak; Touch Screen; the screen to operate the device.
16 Understanding Your Dell™ Streak Understanding Your Dell™ Streak NOTE: To view the on-screen tutorial for basic controls of your device, on the Home screen touch the icon, and follow the instructions on the screen to proceed. Touch Screen Your device has a multi-touch sensitive screen. You can tou...
Page 17 - Touch and hold
Understanding Your Dell™ Streak 17 Touch and hold Touch and hold your finger on the screen. • Move an item on the Home Screen. • Add Home screens. Touch and hold the Home button to add a Home screen. • Open or close the on-screen keyboard. Touch and hold the Menu button to open or close the on-scree...
Page 18 - Flick or swipe; Finger Gestures
18 Understanding Your Dell™ Streak Flick or swipe Move your finger in a vertical or horizontal direction on the screen. Scroll through Home screens, web pages, lists, entries, photo thumbnails, contacts, and so on. Zoom-out Move two fingers close together on the screen. Reduce the view of an image o...
Page 19 - Screen Orientation; Application
Understanding Your Dell™ Streak 19 Screen Orientation For optimal viewing experience, the screen orientation changes automatically to portrait or landscape depending on how you hold the device. NOTE: The Home screen is always displayed in landscape and does not automatically orient to portrait. Appl...
Page 20 - Home Screen; Multiple Home Screens; To navigate across the Home screens; Delete Room
20 Understanding Your Dell™ Streak Home Screen The Home screen displays widgets, folders, and shortcuts that provide easy access to your favorite or frequently-used applications. You can also display your favorite pictures as your Home screen wallpapers. NOTE: Touch the Home screen button to return ...
Page 21 - Customizing Your Home Screen; To add an item to a Home screen
Understanding Your Dell™ Streak 21 Customizing Your Home Screen To add an item to a Home screen 1 Touch the Home button . 2 To access the Add to Home screen menu, either: • Touch and hold an empty area on the home screen. The Add to Home screen menu appears. • Touch the Menu button and then touch th...
Page 22 - Items
22 Understanding Your Dell™ Streak Items Steps Shortcuts Add shortcuts for items that you wish to access directly from the Home screen. • Applications : 1 Scroll through the application menu to locate the desired application. 2 Touch the desired application to create the shortcut on the current Home...
Page 23 - Shortcuts; Gmail label
Understanding Your Dell™ Streak 23 Shortcuts • Directions : Create a shortcut that you can touch to open Google Maps and view directions to a location. 1 Enter your destination in the text box. 2 Choose how you want to get to your destination by touching the driving, public transportation, or walkin...
Page 24 - Folders
24 Understanding Your Dell™ Streak Folders You can create the following folders: New folder : Add a folder where you can store your Home screen shortcuts. All contacts : Add a shortcut to all your contacts stored in the Contacts application. Contacts with phone numbers : Add a shortcut to the contac...
Page 25 - Remove from Home; To open a Home screen folder
Understanding Your Dell™ Streak 25 To add an application shortcut to the Home screen from either the main application view or the Favorites bar: 1 Touch the Application button on top of the screen to open the Favorites bar. 2 If the main applications menu is not displayed, touch the More icon on the...
Page 26 - To remove a Home screen shortcut from a folder; Rename Folder
26 Understanding Your Dell™ Streak 3 Drag and drop the shortcut into the folder. NOTE: You can also drag items directly into a folder without opening the folder. NOTE: Widgets and folders cannot be moved inside a folder. To remove a Home screen shortcut from a folder 1 Touch a folder on the Home scr...
Page 27 - Status Bar; and the status and notification areas.
Understanding Your Dell™ Streak 27 Status Bar The status bar displays the application button, carrier name, date and time, and the status and notification areas. 1 Application button Touch the application button to display the applications available on your device: – The Favorites bar can be customi...
Page 28 - The status area may also display some of the following icons:
28 Understanding Your Dell™ Streak The status area may also display some of the following icons: 4 Status area • Displays status icons to show the current state of your device, such as battery power, charging progress, alarms set, network connections, and so on. • Touch the status area to view the i...
Page 30 - Navigating the Applications; Favorites Bar; You can add up to seven applications in the Favorites bar.; More; icon; Less
30 Understanding Your Dell™ Streak Navigating the Applications You can find applications available on your device in these screen elements: Favorites Bar You can customize the Favorites bar to include frequently used applications. You can add up to seven applications in the Favorites bar. To add app...
Page 31 - To remove applications from the Favorites bar; Application Shortcuts; To open an application using the application shortcuts; Recent applications; To open a recently used application
Understanding Your Dell™ Streak 31 4 Once the application becomes movable, drag and drop it on the Favorites bar. To remove applications from the Favorites bar 1 Touch the application button on top of the screen to open the Favorites bar. 2 On the Favorites bar, touch and hold the application to rem...
Page 32 - Using Your DellTM Streak; Calling; Making Calls; To make calls, touch; Phone; on the Home screen to open the Phone
32 Using Your Dell™ Streak Using Your Dell™ Streak Calling Making Calls To make calls, touch Phone on the Home screen to open the Phone application. To make a call 1 Touch to call a desired phone number or contact from the call log. 2 Touch the typed number to make a call to the number. 3 Type the n...
Page 33 - To cancel dialing; Clear call; To answer a call
Using Your Dell™ Streak 33 To cancel dialing Touch on the Dialing screen to cancel a dialed call. To manage and redial missed, dialed, and received calls On the Phone screen, scroll the call log to locate a call displayed either as a phone number or as a contact’s name. You can choose to do the foll...
Page 34 - Manage Your Calls
34 Using Your Dell™ Streak To end or reject a call Touch on the Dialing screen to end an active call; touch on the Incoming call screen to reject an incoming call. NOTE: Touching the Menu button End call also ends a call. To call a number with an extension 1 Type the number to call using the on-sc...
Page 35 - answer
Using Your Dell™ Streak 35 To use the speakerphone during a call WARNING: Ensure that you turn off the speakerphone before you hold the device close to your ear as this could damage your hearing. Touch to turn the speakerphone on or off. To accept calls using a Bluetooth headset When a Bluetooth hea...
Page 36 - To conduct a conference call; Adjust Call Settings; Voicemail
36 Using Your Dell™ Streak To conduct a conference call 1 During a call, touch the Menu button Add call . 2 Make the second call that you want to add to the conference call. The first call is automatically placed on hold. 3 When the second call is connected, touch the Menu button Merge calls to ...
Page 37 - Additional call settings
Using Your Dell™ Streak 37 Additional call settings • Call forwarding : Diverts incoming calls to a designated phone number when your device is busy, unreachable, does not answer, or if you want to always forward calls. To enable call forwarding, enter the number to divert to or touch to select a ...
Page 38 - Managing Contacts; To view and manage your contacts, touch the Application button; Contacts; To add a new contact; New contact; screen to find more items to fill.; button on the upper right or touch the Menu button; Save; to save the
38 Using Your Dell™ Streak Managing Contacts To view and manage your contacts, touch the Application button Contacts . NOTE: If you have signed in to your Google account and have selected Auto-sync and Contacts from: Home button Menu button Settings Data synchronization, your Google contacts...
Page 39 - To view the contact details; Search; Select label
Using Your Dell™ Streak 39 To view the contact details 1 To locate a contact, you can either:• Flick the contact list until you find the contact.• Touch an alphabet displayed on the top that matches the first letter of the contact’s first or last name. The screen then displays the contacts whose fir...
Page 40 - To call, e-mail, or send a message to a contact from your contacts list; To add contacts from your SIM card; Import contacts
40 Using Your Dell™ Streak To call, e-mail, or send a message to a contact from your contacts list 1 Locate the desired contact’s entry on the contact list. 2 Select the action you want to do by touching a corresponding icon: • To call the contact, touch . • To send a text or multimedia message to t...
Page 41 - Messaging; To compose and send a text message
Using Your Dell™ Streak 41 Messaging To compose, send, and read text (SMS) or multimedia (MMS) messages, touch Messaging . The Messaging screen opens with a list of messages or message threads representing all the received, sent and draft messages. NOTE: For information about the message thread, ...
Page 42 - To compose and send a multimedia message
42 Using Your Dell™ Streak To compose and send a multimedia message 1 In the To field, type the recipient’s mobile phone number, e-mail address, or contact name. Matching contacts with their mobile numbers or e-mail addresses appear below the To field. Touch a matched contact, or continue manually t...
Page 43 - Audio
Using Your Dell™ Streak 43 Audio Open the Select audio menu. Touch a desired audio file, and then touch OK to attach the file to your message.To attach an audio file stored on the SD card to MMS: 1 Create a folder named Ringtones in the SD card. 2 Open the Ringtones folder. 3 Copy the audio file you...
Page 44 - Slideshow
44 Using Your Dell™ Streak Slideshow Open the Edit slideshow screen to create a slide show and attach it to your message. 1 Touch Add slide to create new slides. 2 Touch a created slide such as Slide 1 to open the slideshow editor screen. 3 Touch Add picture , and then select the picture you want to...
Page 45 - If the message contains:; Browser
Using Your Dell™ Streak 45 Receiving text and multimedia messages Depending on your notification settings, the device rings, vibrates, or displays a message briefly in the status bar as a new text or multimedia message arrives. A new message icon appears and stays in the notifications area of the st...
Page 46 - To forward the message
46 Using Your Dell™ Streak To forward the message 1 Touch and hold the message. The Message options menu pops up. 2 Select Forward to forward the message. To view a multimedia message 1 Touch the notification area on the status bar where the new message icon is displayed. A list of notifications ope...
Page 47 - To edit message settings; Settings; To select an option or item on the pop-up menu
Using Your Dell™ Streak 47 NOTE: To delete all messages on the message list, touch the Menu button Delete threads. To edit message settings In the message list, touch the Menu button Settings to change the text or multimedia message settings. Follow the instructions on the screen. Pop-Up Menu To...
Page 48 - Keyboard controls
48 Using Your Dell™ Streak Keyboard controls 1 • Touch to type letters into the field where the cursor appears.• Touch and hold to type accented letters for applicable languages. 2 • Based on the letters being typed, the keyboard shows suggested words along the top, the most probable one highlighted...
Page 49 - Touch the Home button; Create your personal dictionary; your personal dictionary to make word suggestions.
Using Your Dell™ Streak 49 To configure the keyboard settings 1 Touch the Home button Menu button Settings Locale & text Android keyboard , or touch the Application button Settings icon Locale & text Android keyboard . 2 To enable a setting, touch the setting option to select...
Page 50 - To add a word to the dictionary
50 Using Your Dell™ Streak To add a word to the dictionary 1 Touch the Home button Menu button Settings Locale & text User dictionary , or touch the Application button Settings icon Locale & text User dictionary . 2 Touch the Menu button Add . 3 Type a desired word into the...
Page 51 - Widgets; Google Search; To search by typing; Google Quick Search Box; To search by voice
Using Your Dell™ Streak 51 Widgets Widgets are small applications which reside on the Home screen and provide quick and easy access to information. For example, the Facebook widget allows you to read posts on your wall and update your status. NOTE: To use the following widgets, you need to create th...
Page 52 - RSS; To find your RSS feed's URL; To subscribe to RSS feeds; Configure; To read RSS feeds
52 Using Your Dell™ Streak RSS Real Simple Syndication (RSS) is a web format for website owners to publish RSS feeds — full or summarized texts of frequently updated web contents such as blog entries and news headlines.After you subscribe to an RSS feed, you will receive an update once the RSS publi...
Page 53 - Facebook
Using Your Dell™ Streak 53 Facebook Facebook is a social networking website where you can post your personal profile, find and contact your friends, classmates or work associates, and exchange messages with them. 1 On the Home screen of your device, touch the Sign in button at the top right of the F...
Page 54 - Managing Your Device Settings; To check storage spaces
54 Using Your Dell™ Streak Managing Your Device Settings To check storage spaces Touch the Home button Menu button Settings SD card & device storage. The screen displays the total and available space on the device and on the microSD card. To erase unwanted application data to free storage ...
Page 55 - To erase all data from your device; To reset your device to the default state
Using Your Dell™ Streak 55 To erase all data from your device CAUTION: The following steps will erase all the data including your Google account and downloaded applications from your device. Ensure that you back up all the required data before you proceed. 1 Touch the Home button Menu button Set...
Page 56 - Press the Camera button
56 Using Your Dell™ Streak 3 Press the Camera button to confirm and start emergency software recovery. NOTE: If you wish to cancel software recovery, press the volume down button . 4 Wait for the device to load files and reboot the system. bk0_en.book Page 56 Sunday, May 30, 2010 12:34 PM
Page 57 - Web; Connecting to the Web; one of these data networking connections must be available:
Web 57 Web Connecting to the Web To browse the web and access web-based utilities such as instant messaging, one of these data networking connections must be available: • GPRS• EDGE• 3G• HSPA• Wi-Fi GPRS/EDGE/3G/HSPA To connect to the web using GPRS, EDGE, 3G, or HSPA Your device is configured with ...
Page 58 - To manually select a new network
58 Web NOTE: For quick access to wireless controls, touch the status bar as shown in the figure below to perform the same settings. NOTE: Depending on whether a GPRS, EDGE, 3G, or HSPA network is currently in use, a corresponding data network icon appears on the status bar after a data connection is...
Page 59 - To turn on Wi-Fi and connect to a network
Web 59 Wi-Fi You can connect your device to the Internet using Wi-Fi.To use Wi-Fi on your device, you need access to a wireless point or “hotspot” within a distance of up to 300 feet (100 meters). NOTE: The range and quality of the Wi-Fi signal is affected by the number of connected devices, infrast...
Page 60 - To check the current Wi-Fi network connection; To connect to another Wi-Fi network
60 Web To check the current Wi-Fi network connection From the status bar: When your device is connected to a wireless network, the Wi-Fi icon in the status bar indicates the signal strength (number of bands that light up). If Wi-Fi settings Network notification is enabled, this icon appears in the...
Page 61 - Disable all Connections Using the Airplane Mode; Browsing the Web; To open the browser
Web 61 Disable all Connections Using the Airplane Mode Selecting the Airplane mode disables all mobile and Wi-Fi connections. This feature is useful when wireless connectivity is strictly prohibited, such as on an airplane. Touch the Home button Menu button Settings Wireless controls Airplan...
Page 62 - To set up your home page; Viewing Web Pages; To navigate on a web page
62 Web 3 Touch an address displayed on the screen to go directly to that web page, or complete typing the web page address, then touch Go . To set up your home page 1 Touch the Menu button Settings Set home page . 2 Enter the web address of the web site you want to use as your home page and then...
Page 63 - To switch between browser windows; Window overview; To find text within a web page; Find on page; To copy text on a web page; Select text
Web 63 To switch between browser windows You can open multiple browser windows to easily switch from one web page to another. 1 On a browser window, touch the Menu button Window overview . The Current windows screen opens to display multiple browser windows in a smaller view. 2 Touch a browser win...
Page 64 - On the browser screen, touch; Bookmarks; Touch the; History; Touch the day when your desired web page was last visited.; Copy
64 Web Using Web Links, History, and Downloads To select a link on a web page Move to a link you want on a web page. The link is framed by an orange box when you touch it. To check the history of visited web pages 1 On the browser screen, touch or touch the Menu button Bookmarks . 2 Touch the Hist...
Page 65 - To allow download of web applications; Manage Bookmarks; To bookmark a web page
Web 65 To allow download of web applications CAUTION: Applications downloaded from the web can be from unknown sources. To protect your device and personal data, download applications only from trusted sources such as Android Market. To download web applications, enable your device’s downloading fea...
Page 66 - Edit bookmark
66 Web 4 Enter the bookmark name or edit the web address as needed. 5 Touch OK to save the web page as a bookmark. To open a bookmark 1 On the browser screen, touch or touch the Menu button Bookmarks . The Bookmarks window opens. 2 On the Bookmarks window, you can either: • Touch the bookmark you ...
Page 67 - To open the e-mail application; To compose and send e-mails
Web 67 E-mail You can create POP3, IMAP, and exchange e-mail accounts from web-based e- mail services on your device. To open the e-mail application Touch the Application button Email . To set up an e-mail account 1 On the Accounts screen, touch Next . 2 Type the e-mail address and password of the...
Page 68 - To delete or edit an e-mail account on your device; TouchDown; To open the TouchDown application
68 Web 5 Compose your message. 6 Touch the Menu button Send . NOTE: If you want to save the message as a draft and modify it later, touch or touch the Menu button Save as draft, and then select yes. To delete an e-mail 1 On the e-mail account inbox, touch and hold the e-mail you want to delete. ...
Page 69 - To quickly set up your exchange server account
Web 69 To quickly set up your exchange server account NOTE: Consult your IT administrator first before you set up your exchange server account. 1 Touch the gear button to open the configuration menu. 2 The Quick Configuration wizard opens asking whether you would like it to guide you through the qui...
Page 70 - Status area; Web Applications; To open Gmail; Gmail; To set up your Google account
70 Web NOTE: In any of the TouchDown views, touch the Menu button or touch and hold an item on the screen to see the operations that you can perform with that item or in that view. Status area This area displays status messages at the bottom of the main screen during a TouchDown operation, for examp...
Page 71 - Set up your Google account
Web 71 1 On the Set up your Google account screen, touch the Next button to proceed. 2 Touch the Sign in button. Enter your Google user name and password, then touch the Sign in button. NOTE: If you need to use a different Google user name and password with your device, it will be necessary to erase...
Page 72 - To refresh Gmail; Refresh; to send or receive e-mails and to; View Labels; appears on the status
72 Web To refresh Gmail Touch the Menu button Refresh to send or receive e-mails and to synchronize your e-mails with your Gmail account on the web. To view e-mails in different folders or with labels To view e-mails stored in the folders other than the inbox, such as in the Sent or All Mail folde...
Page 73 - To create and send an e-mail; Google Talk; To activate Google Talk; To sign in automatically
Web 73 To create and send an e-mail 1 Touch the Menu button Compose . 2 Enter the contact’s e-mail address in the To field. To send e-mail to multiple contacts, separate their e-mail addresses with a comma. To send a carbon copy (Cc) or a blind carbon copy (Bcc), touch the Menu button Add Cc/Bcc...
Page 74 - To add a new friend to your friends list; To view and accept an invitation
74 Web To add a new friend to your friends list NOTE: You can only add people who have a Google Account. 1 In the friends list, touch the Menu button Add friend . 2 Enter the Google Talk instant messaging ID or Gmail address of the friend you want to add to your friends list. NOTE: When you type t...
Page 76 - To pin a friend; To block a friend from sending you messages; To permanently remove a friend
76 Web To pin a friend You can pin a friend so that the friend always appears in your most popular friends list. 1 In the friends list, touch and hold the friend’s name to open the options menu. 2 Touch Pin friend . NOTE: To unpin a friend, in the friends list, touch and hold the friend you want to ...
Page 77 - To sign out from Google Talk; Maps; To enable location source
Web 77 To sign out from Google Talk In the friends list, touch the Menu button Sign out . Maps Google Maps helps you find your current location, view real-time traffic situations, and get directions to your destination. You can also use the search tool to locate addresses or places of interest on ...
Page 78 - Address
78 Web a Type the place you want to find into the search box. You can enter an address, a city or country, or a type of business or organization such “restaurant” or “school”. b Touch the search key on the keyboard or the search icon on the search box. To search by voice: a Touch . b Say your destin...
Page 79 - To move around a map; Layers
Web 79 To move around a map 1 Flick or drag the map in any direction on the screen to view desired areas. 2 If you spot a place of interest while navigating the map, touch and hold the place to display the address (a picture thumbnail is also displayed if the street view for the location is availabl...
Page 80 - Map layer
80 Web Map layer The map layer displays streets, highways, buildings, main establishments, mass transit stations, parks, rivers, lakes, mountains, boundaries, and so on. Traffic layer The traffic layer displays colored lines along the roads where real-time traffic data can be collected. Green lines ...
Page 81 - Satellite layer
Web 81 NOTE: Touch the Menu button Layers More layers to find more layers that you can apply to the map. For information about the other layers, visit Google Maps on the web. Satellite layer The satellite layer displays the map in non-real-time satellite view. Transit Lines layer The transit lin...
Page 82 - Clear Map; Street view; To get directions; Directions
82 Web NOTE: To remove all of the layers other than the map layer, touch the Menu button Layers Clear Map . To view a map in street view You can switch to street view for the location that you found on the map. The street view is composed of imagery captured from the streets. 1 Locate a place of...
Page 83 - To clear a map
Web 83 NOTE: By default, your current location is the starting point, and the place you found on the map is your destination. 3 Touch Go . The directions to your destination are listed. 4 Touch Show on map or touch a direction instruction on the list to show the directions or routes on the map. To c...
Page 84 - Using Google Latitude; To run Latitude
84 Web Using Google Latitude NOTE: To use Google Latitude, you will be required to sign in to a Google account. The Google Latitude location service allows you to share locations with your friends and family who have signed in to the service with their Google accounts. You can also send instant mess...
Page 86 - In Maps, touch the Menu button; Latitude; Touch your location callout on the map, or your name on the list of
86 Web To control what to share and change your public profile 1 In Maps, touch the Menu button Latitude . 2 Touch your location callout on the map, or your name on the list of friends. 3 Set the following options to your preferences. Sharing options • Share best available location : Share street-...
Page 87 - To open YouTube; YouTube; To search for a video by typing; To search for a video by voice command
Web 87 YouTube YouTube is a web video streaming service that allows you to view videos uploaded by YouTube members. NOTE: Browsing and viewing videos does not require you to sign in to a YouTube account. However, to use all of the YouTube features, such as rating or commenting on a video or viewing ...
Page 88 - Categories
88 Web 4 The videos that match the words you said are listed. 5 Touch the video to start playing the video. To search for a video by category 1 Touch the Menu button Categories . 2 Scroll the listed categories and touch the category under which the video appears. 3 Touch to start playing the video...
Page 89 - Android Market; To open Android Market; Market; more information, see To set up your Google account.; Accept; button after you read and agree with the; Android; Share; Flag
Web 89 Android Market You can use Android Market to download and install applications and games on your device. NOTE: Applications downloaded from Android Market may not support automatic screen orientation to portrait or landscape. To open Android Market 1 Touch the Application button Market . 2 ...
Page 90 - The Android Market screen opens.
90 Web 4 The Android Market screen opens. 1 • Touch the Apps tab to view the application categories. All applications available for download are sorted by these categories. • Touch the Games tab to view the game categories. All games available for download are sorted by these categories. 2 The Marke...
Page 91 - To download and install an application or game; Install
Web 91 When a category is selected, for example, touch the Games tab Brain & Puzzle : To download and install an application or game 1 Scroll and browse listed applications or games to locate the desired one. 2 Touch the application or game you want to download and install. 3 On the applicati...
Page 92 - To open an application or game; Synchronizing Your Google Data; To select the applications to synchronize
92 Web To open an application or game To uninstall an application or game 1 On the downloads screen, touch the application you want to uninstall. 2 Touch Uninstall . 3 After the uninstall is completed, you can select the reason for removing the application. Synchronizing Your Google Data Through a w...
Page 93 - Amazon MP3; Touch the Application button; MP3 Store; and play MP3 music from the Amazon MP3 store.
Web 93 NOTE: If you wish to synchronize individual applications manually, touch to clear Auto-sync, then touch a data option to start synchronization of the touched data. Touch the Menu button Sync now to sync all of the data manually. NOTE: While data is syncing, the sync icon appears on the stat...
Page 94 - Customizing Your DellTM Streak; To change display settings; Orientation
94 Customizing Your Dell™ Streak Customizing Your Dell™ Streak With the Settings menu, you can customize the way your device works to suit your individual needs. To change display settings 1 Touch the Home button Menu button Settings Sound & display , or touch the Application button Se...
Page 95 - To change sound and ringtone settings; Screen timeout
Customizing Your Dell™ Streak 95 To change sound and ringtone settings 1 Touch the Home button Menu button Settings Sound & display , or touch the Application button Settings icon Sound & display . 2 Use the options grouped under the Sound settings bar, and then touch a desired o...
Page 96 - To manually set the date, time and time zone; touch the Application button; Incoming call volume
96 Customizing Your Dell™ Streak To manually set the date, time and time zone 1 Touch the Home button Menu button Settings Date & time , or touch the Application button Settings icon Date & time . 2 Touch a desired option. Silent mode Mute everything except alarms, music and vide...
Page 97 - Flick the list to locate and touch a desired item.
Customizing Your Dell™ Streak 97 3 Flick the list to locate and touch a desired item. 4 To enable a setting, touch the setting option to select the check box ; to disable a setting, touch the setting option to clear the check box . Select time source • Manual : To manually adjust the date, time and ...
Page 98 - To choose a language
98 Customizing Your Dell™ Streak To choose a language Set the language of the display text. 1 Touch the Home button Menu button Settings Locale & text Select locale , or touch the Application button Settings icon Locale & text Select locale . 2 Select a language of your choi...
Page 99 - Protecting Your DellTM Streak; Protect Your Device Data With a Screen Unlock; To create a screen unlock pattern
Protecting Your Dell™ Streak 99 Protecting Your Dell™ Streak Protect Your Device Data With a Screen Unlock Pattern You can protect your device data against unauthorized access by locking the touch screen with a screen unlock pattern. Once the unlock pattern is enabled and the screen is locked, you n...
Page 101 - Protect Your SIM Card With the SIM Lock; To enable the SIM card PIN
Protecting Your Dell™ Streak 101 Protect Your SIM Card With the SIM Lock Password You can protect your SIM card against unauthorized use with a personal identification number (PIN). After a PIN is enabled to lock your SIM, you will need to enter the PIN each time you turn on the device in order to u...
Page 102 - To change the SIM card PIN
102 Protecting Your Dell™ Streak To change the SIM card PIN 1 Touch the Home button Menu button Settings Security & location Set up SIM card lock Change SIM PIN , or touch the Application button Settings icon Security & location Set up SIM card lock Change SIM PIN . 2 Typ...
Page 103 - Applications; Camera; To start the camera; Camera; To change the capture mode; Photo; To capture pictures
Applications 103 Applications Camera Your device has a 5.0 megapixel camera with auto-focus feature that allows you to capture and share high-quality pictures and videos. NOTE: Before you use the camera application, you need to install a microSD card in your device. All pictures and videos that you ...
Page 104 - To manage pictures; Recent Pics
104 Applications NOTE: To achieve optimal focus such as for taking a close shot, half-press and hold the camera button to use the auto-focus mode. Then without releasing press it again to take a picture. NOTE: To capture a picture such as a self-portrait using the front-facing camera lens, touch the...
Page 106 - To adjust camera settings; Scene; mode from; Automatic; to; Night; Edit
106 Applications To adjust camera settings 1 Touch the viewfinder screen to display the on-screen camera controls. 2 Flick the settings bar along the right side of the camera viewfinder and touch the desired setting. 3 Touch the desired value for the setting, for example, to change the Scene mode fr...
Page 107 - To capture videos
Applications 107 To capture videos 1 Touch the viewfinder screen to display the on-screen video controls. 2 Touch Video to switch to the video recording mode. 3 Frame your subject on the viewfinder. 4 Press or touch the on-screen video recording button to start recording. 5 Press or touch the on-scr...
Page 108 - To manage videos; MicroSD; To set the microSD card as a USB drive; Select Communication Method
108 Applications To manage videos On the right hand side of the picture viewing screen, you can perform these tasks for the displayed video: MicroSD The files on your device are stored on the microSD card. To exchange pictures, videos, music, and other files between your device and a computer, use t...
Page 109 - To turn off USB storage
Applications 109 4 If you touch the Always perform this action check box to enable this function, each time you plug in the cable, the Select Communication Method dialog appears and prompting you to select an option. NOTE: After you select Copy other files to/from your computer, open the My Computer...
Page 110 - Bluetooth; To turn on Bluetooth and make the device discoverable; On; Discoverable
110 Applications Bluetooth ® Bluetooth is a short-range wireless communications technology that lets your device connect over a wireless network to other Bluetooth-enabled devices for data exchange.Bluetooth on your device operates in three different modes: To turn on Bluetooth and make the device d...
Page 111 - To end a Bluetooth connection
Applications 111 5 When the pairing is successful, Paired but not connected is displayed under the paired device. 6 Touch the paired device to start connection. When the paired device is successfully connected to your device, the Bluetooth connected icon appears in the status bar. NOTE: To make and ...
Page 112 - Photos and Videos; To view pictures
112 Applications Photos and Videos To view and manage the pictures and videos stored on your device, touch the Application button Photos & Videos . NOTE: Before you run the Photos & Videos application, ensure that a microSD card containing media files is installed on your device. All pictu...
Page 113 - Mark
Applications 113 To play videos 1 Touch a video thumbnail to start playback of the video. 2 To control playback, use these controls below the viewing screen: • Touch the button to pause and the button to resume playback. • Touch or drag the yellow playback progress bar to rewind or fast- forward the...
Page 114 - Music; To open Music
114 Applications Music NOTE: The Music application only plays audio files saved on the microSD card of your device. Before opening Music, ensure that the needed audio files have been copied to the microSD card of your device. To open Music Touch the Application button Music . The Music screen open...
Page 115 - To control music playback
Applications 115 To control music playback 1 The album’s cover image if it has one. 2 The name of the song being played. 3 The name of the artist. 4 • If the song is playing for more than five seconds, touch to jump to the beginning of the song. • If the song is playing for less than five seconds, t...
Page 116 - To create a playlist
116 Applications NOTE: Press the volume up button or volume down button to adjust the playback volume. NOTE: On the Music screen, touch Shuffle All Songs to play all songs in your library in random order. The first randomly selected song starts to play. To create a playlist 1 On the Music screen, to...
Page 117 - Calendar; To open the calendar; To view the calendar
Applications 117 Calendar Use the calendar to schedule and manage your events, meetings, and appointments. To open the calendar Touch the Application button Calendar . To set up an event 1 On any calendar view, touch the Menu button New event to open the Event details screen. 2 Type the event na...
Page 118 - Event reminders; Snooze all; To open the alarm clock; Alarm Clock
118 Applications • Touch and hold an event to open a menu with options for viewing, editing, or deleting the event, or creating a new event. Event reminders If you set a reminder for an event, the upcoming event icon appears in the notifications area of the status bar when the reminder time arrives....
Page 119 - Set alarm; AM
Applications 119 To set an alarm 1 Touch one of the available alarms. 2 The Set alarm menu opens with these settings: NOTE: On the Alarm Clock screen you can also add a new alarm by touching the Menu button Add alarm. To temporarily disable an alarm On the Alarm Clock screen, clear the check box o...
Page 120 - Calculator
120 Applications 1 On the Alarm Clock screen, touch the Menu button Settings . 2 Touch Alarm in silent mode to set if the alarm should ring when the device is in Silent mode. Calculator 1 Touch the Application button Calculator . The basic calculator panel opens. 2 Perform calculations by touchi...
Page 121 - Voice Control; To adapt the device to your voice
Applications 121 Voice Control Touch the Application button Voice Control . Voice Control is a voice commander tool for you to say voice commands to call contacts, find contacts, and dial numbers. NOTE: If you are listening to the music with the supplied 3.5 mm headphones, you can press and hold t...
Page 122 - Outlook Tasks; Status
122 Applications Outlook Tasks Touch the Application button Outlook Tasks . Use this application to keep track of your to-do items. To add a task 1 Touch the Application button Outlook Tasks to open the Task list . 2 Touch the New task entry. 3 Enter the following information about the task: 4 T...
Page 123 - SIM Manager; Completed
Applications 123 To adjust task settings On the Tasks list, touch the Menu button Settings . To manage a task reminder 1 Touch the notification area of the status bar when the icon appears. 2 Touch a Task alert entry to view the task info. 3 Touch Snooze all if you want the reminder to alert you a...
Page 124 - Outlook Notes; To enter a note; To delete a note; Quickoffice; To open and view a document saved on the microSD card
124 Applications Outlook Notes To enter a note 1 Touch the Application button Outlook Notes to open the Notes screen. 2 Touch the New note entry to open the Create note screen. 3 Type your note into the note field using the on-screen keyboard. 4 Touch the Save button to save the note that you have...
Page 125 - To view a document or spreadsheet; To sort folders or files using Quickoffice; Sort by
Applications 125 To view a document or spreadsheet 1 Swipe the document to view the desired section. 2 To zoom in or out the desired area of a document, touch anywhere on the document to activate the zoom mode, and then touch the zoom controls or . To find text in a document 1 Touch the Menu button ...
Page 126 - Synchronizing Your DellTM Streak; Connect to a Computer and Install Dell PC Suite
126 Synchronizing Your Dell™ Streak and Computer Using Dell PC Suite Synchronizing Your Dell™ Streak and Computer Using Dell PC Suite Connect to a Computer and Install Dell PC Suite 1 Connect the 30-pin-to-USB cable to your device and a computer. Wait for your computer to automatically install the s...
Page 127 - Using Dell PC Suite; To synchronize using Sync Manager; To quit Dell PC Suite
Synchronizing Your Dell™ Streak and Computer Using Dell PC Suite 127 Using Dell PC Suite NOTE: For detailed information on all of the PC Suite functions and settings, after you open Sync Manager or Backup Manager, click Help on the menu bar at the top, or click the Help button next to the desired it...
Page 128 - Playing Videos on HDMI Devices; Video out
128 Playing Videos on HDMI Devices Playing Videos on HDMI Devices 1 Insert the 30-pin connector on the bottom of your device into the 30-pin connector on the home dock. 2 Connect your device to a HDMI device for example a HDMI monitor or TV using a HDMI data cable. 3 Touch the Application button P...
Page 129 - Troubleshooting; Problem
Troubleshooting 129 Troubleshooting Problem Possible causes Possible solutions Call-related problems SIM card error SIM card malfunction or damage. Take the SIM card to your service provider for testing. The SIM card is inserted improperly. Insert the SIM card properly. Dirt or dust on the SIM card’...
Page 131 - System problems
Troubleshooting 131 Noises during a call You may be near a strong electromagnetic source (such as a TV, a microwave oven, etc.) during a call. Move to another location to reduce the interference effects. You cannot enable certain call features Your service provider does not support these features, o...
Page 132 - Messaging problems
132 Troubleshooting Shortened standby time The length of standby time is affected by your service provider’s system configuration. The same device used with different service providers' systems does not have the same length of standby time. If you are located in an area where the network signal is w...
Page 133 - Internet problems; Media problems
Troubleshooting 133 Unable to send or receive multimedia messages. Your device is in Airplane mode with no wireless connectivity. Touch the status area on the status bar and clear the Airplane mode check box. No MMS service is available. Subscribe to the MMS service from your network service provide...
Page 134 - Reset your device to the default state
134 Troubleshooting If the device cannot power on due to system corruption, take either of these recovery actions:Reset your device to the default state 1 Press and hold the power button and then touch the Power off option on the screen to turn off the device. 2 Simultaneously press and hold the vol...
Page 135 - If necessary, you can calibrate your touch screen as follows:
Troubleshooting 135 If necessary, you can calibrate your touch screen as follows: 1 Press and hold the power button and then touch the Power off option on the screen to turn off the device. 2 Simultaneously press and hold the volume up button and volume down button . 3 Without releasing the volume b...
Page 136 - Index; Back cover
136 Index Index A Airplane Mode, 61Alarm Clock, 118Amazon MP3, 93Ambient light sensor, 10Android Market, 89Applications Definition, 19 Erase data, 54 Favorites bar, 30 Navigate, 30 Recently used, 31 Shortcuts, 31 B Back cover Close, 14 Remove, 12 Backup data, 127 Battery Charge, 14 Insert, 13 Blueto...
Page 137 - Data
Index 137 Controls, 8 Touch screen, 16 Customize, 94 D Data Backup and restore, 127 Data connection, 57Date, 96Device Customize, 94 Overview, 8 Protect, 99 Reset, 55 Settings, 54 Setup, 12 Turn off, 15 Turn on, 15 Disable all connections, 61Display settings, 94 E E-mail, 67Emergency software recover...
Page 139 - SIM card; Videos
Index 139 Shortcuts, 31 Add, 22 Definition, 19 SIM card Insert, 12 SIM Manager, 123Software Recovery, 134 Upgrade, 55 Sound, 95Status bar, 27 Icons, 28 Synchronize Google Data, 92Synchronize with PC Use PC Suite, 126 T Tasks, 122Text Messages Compose MMS , 42 SMS , 41 Receive, 45 Time, 96Time zone, ...


 Dell ST2420L Manual
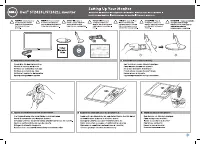 Dell ST2420L Monitor User Manual
 Dell Storage MD1400 User Manual
 Dell Storage MD1420 User Manual
 Dell STREAK 7 User Manual
 Dell Studio 17 User Manual
 Dell Studio 1735 User Manual
 Dell Studio Desktop User Manual
 Dell Studio PP39L User Manual
 Dell Studio Slim User Manual