Page 3 - Getting Started
Dell t Online Rack UPS 2700W Getting Started With Your System K803N , H950N, J728N H967N w w w . d e l l . c o m | s u p p o r t . d e l l . c o m
Page 4 - Notes and Warnings; moderate injury or in property damage incidents.; This UPS contains; LETHAL VOLTAGES; . All repairs and service should be performed by; AUTHORIZED SERVICE PERSONNEL ONLY
Notes and Warnings NOTE: A NOTE indicates important information that helps you make better use of your software. CAUTION: A CAUTION indicates a potentially hazardous situation which, if not avoided, may result in minor or moderate injury or in property damage incidents. WARNING: A WARNING indicates ...
Page 5 - System Features
3 System Features | System Features Providing outstanding performance and reliability, the UPS's unique benefits include: S Online UPS design with pure sine wave output. The UPS filters and regulates incoming AC power and provides consistent power to your equipment without draining the battery. S Tr...
Page 6 - Finding Information; The; document provides important safety and; Dell UPS Disc
4 | Finding Information Finding Information CAUTION: The Safety, Environmental, and Regulatory Information document provides important safety and regulatory information. What are You Looking For? Find It Here S The user's guide for my UPS S The user's guide for the Dell Network Management Card S Del...
Page 7 - Installation and Startup; important regulatory information in your; Unpacking the System
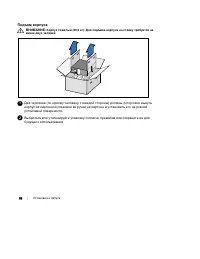
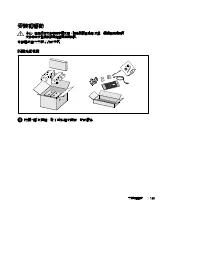
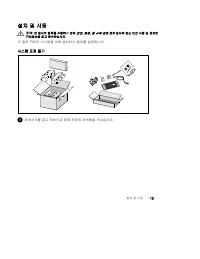
5 Installation and Startup | Installation and Startup CAUTION: Before performing the procedures in this document, read and follow the safety instructions and important regulatory information in your Safety, Environmental, and Regulatory Information document. This section describes the steps to set u...
Page 8 - Lifting the Cabinet; on the cardboard and set it on a flat, stable surface.
6 | Installation and Startup Lifting the Cabinet CAUTION: The cabinet is heavy (36.9 kg/81.4 lb). Lifting the cabinets into the rack requires a minimum of two people. 1 With one person on each side, carefully lift the cabinet out of the outer carton using the handles on the cardboard and set it on a...
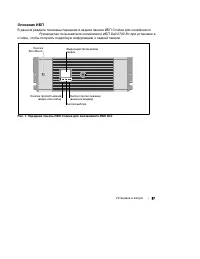
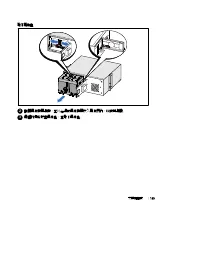
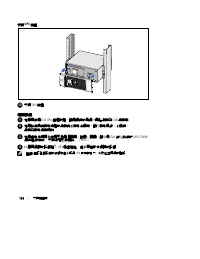
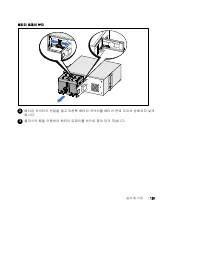
Page 9 - Identifying the UPS; Dell Online Rack; Figure 1. The Dell Online Rack UPS Front Panel
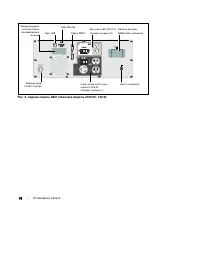
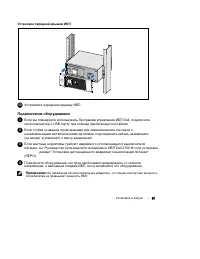
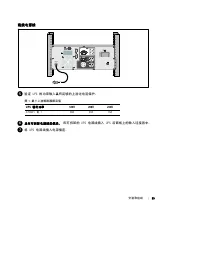
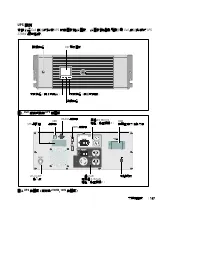
7 Installation and Startup | Identifying the UPS This section shows a front and rear panel of the Dell Online Rack UPS. Refer to the Dell Online Rack UPS 2700W User's Guide for all rear panel details. On/Off Button LCD Panel Scroll Button (Down or Forward) Select Button Scroll Button (Up or Back) Fi...
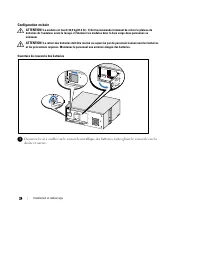
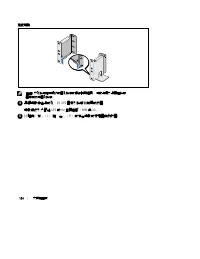
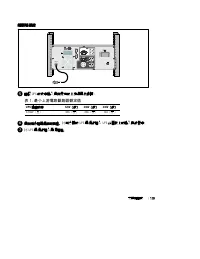
Page 10 - Rackmount Setup; Opening the Battery Cover
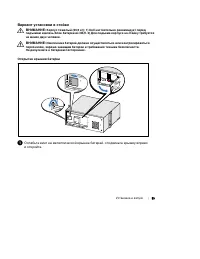
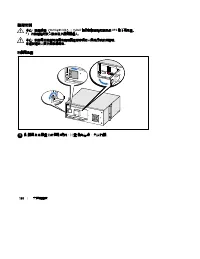
8 | Installation and Startup Rackmount Setup CAUTION: The cabinet is heavy (36.9 kg/81.4 lb): 1) Dell strongly recommends to remove the battery tray from the UPS before lifting. 2) Lifting the cabinets into the rack requires a minimum of two people. CAUTION: Removing the batteries should be performe...
Page 11 - Removing the Battery Tray; move it out of the way.
9 Installation and Startup | Removing the Battery Tray 2 Disconnect the battery connector and place the right battery connector in the battery door to move it out of the way. 3 Pull the battery tray out using the plastic tabs and remove the battery tray.
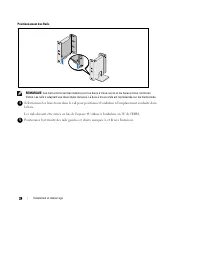
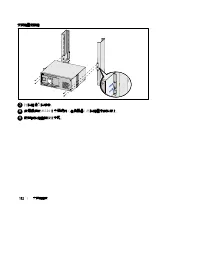
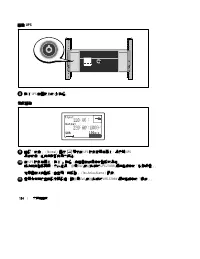
Page 12 - Positioning the Rails
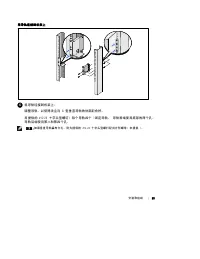
10 | Installation and Startup Positioning the Rails NOTE: The instructions are the same for square-hole racks and unthreaded, round-hole racks. The rails fit both rack styles. The round-hole rack is shown in the illustrations. 4 Select the proper holes in the rail for positioning the UPS in the desi...
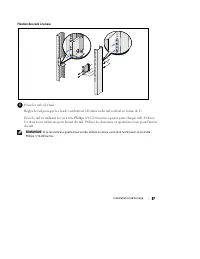
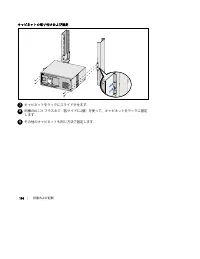
Page 13 - Attaching the Rails to the Rack; Attach the rails to the rack:
11 Installation and Startup | Attaching the Rails to the Rack 6 Attach the rails to the rack: Adjust the rail so that the flanges fit outside the C-shaped vertical rail. Secure the rail using the supplied #12-24 Phillips head screws (four for each rail). Use the bottom two holes for the front of the...
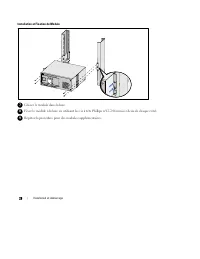
Page 14 - Installing and Securing the Cabinet; Slide the cabinet into the rack.
12 | Installation and Startup Installing and Securing the Cabinet 7 Slide the cabinet into the rack. 8 Secure the cabinet to the rack using the supplied #12-24 Phillips-head screws (two on each side). 9 Repeat for any additional cabinets.
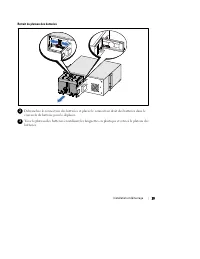
Page 15 - Installing the Battery Tray; Close the metal battery cover.
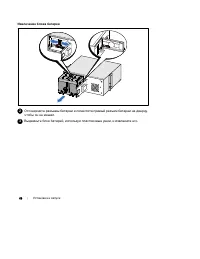
13 Installation and Startup | Installing the Battery Tray NOTE: A small amount of arcing may occur when connecting the batteries. This is normal and does not damage the unit or present any safety concern. 10 Remove the right battery connector from the door and connect the internal battery connector....
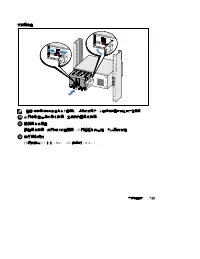
Page 16 - Installing the UPS Front Cover; Install the UPS front cover.; Connecting the Equipment; Dell Online Rack UPS 2700W User's Guide
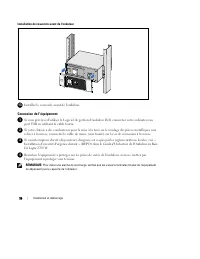
14 | Installation and Startup Installing the UPS Front Cover 13 Install the UPS front cover. Connecting the Equipment 1 If you plan to use Dell UPS Management Software, connect your computer to the USB port using the supplied cable. 2 If your rack has conductors for grounding or bonding of ungrounde...
Page 17 - Connecting the Power Cord; Table 1. Minimum Upstream Circuit Breaker Rating; Plug the detachable UPS power cord into the input
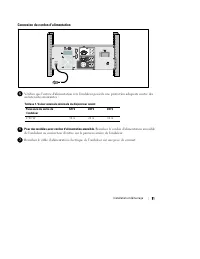
15 Installation and Startup | Connecting the Power Cord 5 Verify that the power input to the UPS has adequate upstream overcurrent protection: Table 1. Minimum Upstream Circuit Breaker Rating UPS Output Power 120V 208V 230V 2700W 30A 20A 16A 6 For models with a detachable power cord. Plug the detach...
Page 18 - Starting the UPS; Dell Online Rack UPS
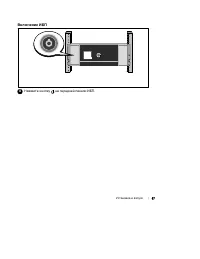
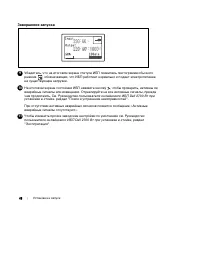
16 | Installation and Startup Starting the UPS 8 Press the button on the UPS front panel. Completing the Startup 9 Verify that the Normal icon appears on the UPS status summary screen, indicating that the UPS is operating normally and any loads are powered. 10 On the UPS status summary screen, press...
Page 19 - Onduleur en Baie En Ligne Dell; Démarrer
Onduleur en Baie En Ligne Dell t 2700 W Démarrer avec votre système K803N , H950N, J728N H967N w w w . d e l l . c o m | s u p p o r t . d e l l . c o m
Page 20 - Remarques et avertissements; pourrait provoquer la mort ou une blessure.; Cet onduleur contient des; TENSIONS MORTELLES; . Toutes les réparations et tous les entretiens; UNIQUEMENT PAR UN PERSONNEL D’ENTRETIEN AGRÉÉ; pièce à l’intérieur de cet onduleur; NE PEUT ÊTRE ENTRETENUE PAR L’UTILISATEUR
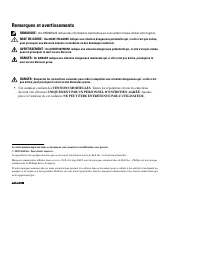
Remarques et avertissements REMARQUE : Une REMARQUE indique des informations importantes qui vous aident à mieux utiliser votre logiciel. MISE EN GARDE : Une MISE EN GARDE indique une situation dangereuse potentielle qui, si elle n'est pas évitée, peut provoquer une blessure mineure ou modérée ou de...
Page 21 - Caractéristiques du système; Mode de fonctionnement haute performance sélectionnable.
19 Caractéristiques du système | Caractéristiques du système Offrant une fiabilité et des performances remarquables, les avantages uniques de l'onduleur comprennent : S Conception en ligne avec sortie sinusoïdale pure. L'onduleur filtre et régule le courant CA entrant et fournit un courant constant ...
Page 22 - Trouver des informations; Le document; Disque de l'onduleur Dell
20 | Trouver des informations Trouver des informations ATTENTION! Le document Informations sur la sécurité, l'environnement et la réglementation fournit des informations importantes sur la sécurité et la réglementation. Que recherchez-vous ? Trouvez-le ici S Le guide d'utilisation de mon onduleur S ...
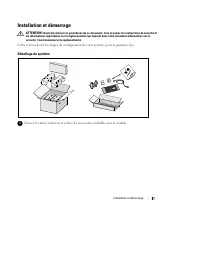
Page 23 - Installation et démarrage; Déballage du système
21 Installation et démarrage | Installation et démarrage ATTENTION! Avant de réaliser les procédures de ce document, lisez et suivez les instructions de sécurité et les informations importantes sur la réglementation qui figurent dans votre document Informations sur la sécurité, l'environnement et la...
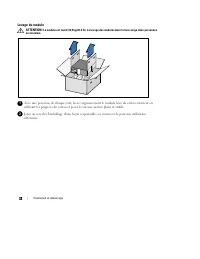
Page 24 - Levage du module
22 | Installation et démarrage Levage du module ATTENTION! Le module est lourd (36,9 kg/81.4 lb). Le levage des modules dans la baie exige deux personnes au minimum. 1 Avec une personne de chaque côté, levez soigneusement le module hors du carton extérieur en utilisant les poignées du carton et pose...
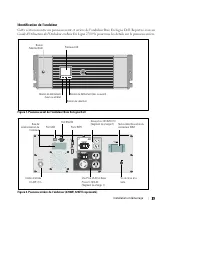
Page 25 - Identification de l'onduleur; Guide d'Utilisation de l'Onduleur en Baie En Ligne 2700 W; Figure 1. Panneau avant de l'onduleur Baie En Ligne Dell
23 Installation et démarrage | Identification de l'onduleur Cette section montre un panneau avant et arrière de l'onduleur Baie En Ligne Dell. Reportez-vous au Guide d'Utilisation de l'Onduleur en Baie En Ligne 2700 W pour tous les détails sur le panneau arrière. Bouton Marche/Arrêt Panneau LCD Bout...
Page 26 - Configuration en baie; Ouverture du couvercle des batteries
24 | Installation et démarrage Configuration en baie ATTENTION! Le module est lourd (36,9 kg/81.4 lb) : 1) Dell recommande fortement de retirer le plateau de batteries de l'onduleur avant le levage. 2) Soulever les modules dans la baie exige deux personnes auminimum. ATTENTION! Le retrait des batter...
Page 27 - Retrait du plateau des batteries; couvercle de batterie pour le déplacer.
25 Installation et démarrage | Retrait du plateau des batteries 2 Débranchez le connecteur des batteries et placez le connecteur droit des batteries dans le couvercle de batterie pour le déplacer. 3 Tirez le plateau des batteries en utilisant les languettes en plastique et retirez le plateau des bat...
Page 28 - Positionnement des Rails
26 | Installation et démarrage Positionnement des Rails REMARQUE: Les instructions sont les mêmes pour les baies à trous carrés et les baies à trous ronds non filetés. Les rails s'adaptent aux deux styles de baies. La baie à trous ronds est représentée sur les illustrations. 4 Sélectionnez les bons ...
Page 29 - Fixation des rails à la baie; Fixez les rails à la baie :
27 Installation et démarrage | Fixation des rails à la baie 6 Fixez les rails à la baie : Réglez le rail pour que les bords s'emboîtent à l'extérieur du rail vertical en forme de C. Fixez le rail en utilisant les vis à tête Phillips n°12-24 fournies (quatre pour chaque rail). Utilisez les deux trous...
Page 30 - Installation et Fixation du Module; Glissez le module dans la baie.
28 | Installation et démarrage Installation et Fixation du Module 7 Glissez le module dans la baie. 8 Fixez le module à la baie en utilisant les vis à tête Phillips n°12-24 fournies (deux de chaque côté). 9 Répétez la procédure pour des modules supplémentaires.
Page 31 - Installation du plateau des batteries; Fermez le couvercle métallique des batteries.
29 Installation et démarrage | Installation du plateau des batteries REMARQUE: Un petit arc électrique peut survenir lors du branchement des batteries. Ceci est normal, n'endommage pas l'unité et ne présente aucun problème de sécurité. 10 Retirez le connecteur droit des batteries du couvercle et bra...
Page 32 - Installation du couvercle avant de l'onduleur; Installez le couvercle avant de l'onduleur.; Connexion de l'équipement; port USB en utilisant le câble fourni.
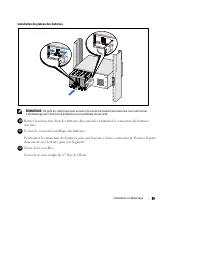
30 | Installation et démarrage Installation du couvercle avant de l'onduleur 13 Installez le couvercle avant de l'onduleur. Connexion de l'équipement 1 Si vous prévoyez d'utiliser le Logiciel de gestion d'onduleur Dell, connectez votre ordinateur au port USB en utilisant le câble fourni. 2 Si votre ...
Page 33 - Connexion du cordon d'alimentation; surintensités montantes :; Tableau 1. Valeur nominale minimale du disjoncteur amont; Branchez le cordon d'alimentation amovible
31 Installation et démarrage | Connexion du cordon d'alimentation 5 Vérifiez que l'entrée d'alimentation vers l'onduleur possède une protection adéquate contre des surintensités montantes : Tableau 1. Valeur nominale minimale du disjoncteur amont Puissance de sortie del'onduleur 120 V 208 V 230 V 27...
Page 34 - Démarrage de l'onduleur; Appuyez sur le bouton; Achèvement du démarrage; Vérifiez que l'icône Normal
32 | Installation et démarrage Démarrage de l'onduleur 8 Appuyez sur le bouton sur le panneau avant de l'onduleur. Achèvement du démarrage 9 Vérifiez que l'icône Normal apparaisse sur l'écran de résumé d'état de l'onduleur, indiquant que l'onduleur fonctionne normalement et que toutes les charges so...
Page 35 - Dell; Erste Schritte
Dell t Online Rack-UVS 2700 W Erste Schritte Mit Ihrem System K803N , H950N, J728N H967N w w w . d e l l . c o m | s u p p o r t . d e l l . c o m
Page 36 - Hinweise und Warnungen; Verletzungen führt, wenn sie nicht vermieden wird.; Diese USV führt; LEBENSGEFÄHRLICHE SPANNUNG; dürfen; NUR VON BEFUGTEM WARTUNGSPERSONAL; durchgeführt werden. Im Inneren der; KEINE VOM BENUTZER WARTBAREN TEILE
Hinweise und Warnungen HINWEIS: Ein HINWEIS macht auf eine wichtige Information aufmerksam, mit deren Hilfe Sie Ihre Software optimal nutzen können. ACHTUNG: ACHTUNG macht auf eine potenziell gefährliche Situation aufmerksam, die zu geringen oder mäßigen Verletzungen oder Sachschäden führen kann, we...
Page 37 - Systemmerkmale
35 Systemmerkmale | Systemmerkmale Die herausragende Leistung und Zuverlässigkeit sind nur einige der einzigartigen Vorteile der USV-Anlagen. Sie bieten zudem: S Online USV-Design mit reinem Sinusausgang. Die USV filtert und regelt eingehenden Wechselstrom und sorgt für eine gleichförmige Versorgung...
Page 38 - Auffinden von Informationen; Im Dokument; Die Disk für die Dell USV
36 | Auffinden von Informationen Auffinden von Informationen ACHTUNG: Im Dokument Informationen zu Sicherheit, Umweltschutz und Ordnungsvorschriften finden Sie wichtige Sicherheitshinweise und Informationen zu gesetzlichen Bestimmungen. Was suchen Sie? Hier finden Sie es S Die Benutzeranleitung für ...
Page 39 - Installation und Inbetriebnahme; Auspacken des Systems
37 Installation und Inbetriebnahme | Installation und Inbetriebnahme ACHTUNG: Vor der Ausführung der Verfahren in diesem Dokument lesen und befolgen Sie bitte die Sicherheitshinweise und wichtigen Informationen zu Ordnungsvorschriften in Ihrem Dokument über Informationen zu Sicherheit, Umweltschutz ...
Page 40 - Gehäuse heben; den späteren Gebrauch auf.
38 | Installation und Inbetriebnahme Gehäuse heben : Das Gehäuse ist schwer (36,9 kg). Zum Heben des Gehäuses in das Gestell sind mindestens zwei Personen erforderlich. 1 Heben Sie das Gehäuse mit einer Person auf jeder Seite mit den Griffen am Karton vorsichtig aus dem äußeren Karton heraus, und se...
Page 41 - Beschreibung der USV; Einzelheiten zur Rückseite finden Sie in der; Abbildung 1. Die Vorderseite der Dell Online Rack USV
39 Installation und Inbetriebnahme | Beschreibung der USV In diesem Abschnitt wird die Vorder- und Rückansicht der Dell Online Rack USV angezeigt. Alle Einzelheiten zur Rückseite finden Sie in der Benutzeranleitung für das Dell Online Rack UPS 2700 W . Ein-/Aus-Schalter LCD-Anzeige Bildlauftaste (ab...
Page 42 - Rackmontage; Öffnen der Batterieabdeckung; nach rechts und öffnen Sie sie.
40 | Installation und Inbetriebnahme Rackmontage : Das Gehäuse ist schwer (36,9 kg). 1) Dell empfiehlt vor dem Anheben ausdrücklich das Entfernen des Batterieträgers aus der USV. 2) Zum Heben des Gehäuses in das Gestell sind mindestens zwei Personenerforderlich. : Die Entfernung der Batterien sollte...
Page 43 - Entfernen des Batterieträgers
41 Installation und Inbetriebnahme | Entfernen des Batterieträgers 2 Entfernen Sie den Batterieanschluss, und platzieren Sie den rechten Batterieanschluss in der Batterieklappe, damit er nicht stört. 3 Ziehen Sie den Batterieträger mit den Kunststofflaschen heraus, und entfernen Sie ihn.
Page 44 - Positionierung der Schienen
42 | Installation und Inbetriebnahme Positionierung der Schienen HINWEIS: Für Gestelle mit quadratischen Öffnungen und Racks mit runden Öffnungen ohne Gewinde gelten die gleichen Anweisungen. Die Schienen passen zu beiden Gestellarten. Auf den Abbildungen ist das Gestell mitden runden Öffnungen zu s...
Page 45 - Anbringen der Schienen am Gestell; Bringen Sie die Schienen am Gestell an:
43 Installation und Inbetriebnahme | Anbringen der Schienen am Gestell 6 Bringen Sie die Schienen am Gestell an: Stellen Sie die Schiene so ein, dass die Flansche außen mit der C-förmigen senkrechten Schiene zusammenpassen. Sichern Sie die Schiene mithilfe der enthaltenen #12-24 Philips-Rändelschrau...
Page 46 - Installation und Sicherung des Gehäuses; Schieben Sie das Gehäuse in das Gestell.
44 | Installation und Inbetriebnahme Installation und Sicherung des Gehäuses 7 Schieben Sie das Gehäuse in das Gestell. 8 Sichern Sie das Gehäuse am Gestell mithilfe der enthaltenen #12-24 Philips-Rändelschrauben (zwei auf jeder Seite). 9 Wiederholen Sie den Vorgang für weitere Gehäuse.
Page 47 - Installation des Batterieträgers; Batterieanschluss an.
45 Installation und Inbetriebnahme | Installation des Batterieträgers HINWEIS: Bei der Verbindung der Batterien kann es zu einem kleinen Lichtbogen kommen. Das ist normal und schadet weder der Anlage noch stellt es ein Sicherheitsrisiko dar. 10 Entfernen Sie den rechten Batterieanschluss von der Kla...
Page 48 - Installation der vorderen USV-Abdeckung; Installieren Sie die vordere USV-Abdeckung.; Anschließen der Anlage; Computer mit dem beiliegenden Kabel an die USB-Schnittstelle an.
46 | Installation und Inbetriebnahme Installation der vorderen USV-Abdeckung 13 Installieren Sie die vordere USV-Abdeckung. Anschließen der Anlage 1 Sofern Sie die Benutzung der Dell USV Management Software planen, schließen Sie Ihren Computer mit dem beiliegenden Kabel an die USB-Schnittstelle an. ...
Page 49 - Anschließen des Netzkabels; Spannungsspitzen ausgestattet ist:; Tabelle 1. Mindestnennstrom der Überstromsicherung; Stecken Sie das abnehmbare Netzkabel der USV in den
47 Installation und Inbetriebnahme | Anschließen des Netzkabels 5 Vergewissern Sie sich, dass der Stromeingang der USV mit einem angemessenen Schutz gegen Spannungsspitzen ausgestattet ist: Tabelle 1. Mindestnennstrom der Überstromsicherung USV-Ausgangsleistung 120V 208V 230V 2700 W 30A 20A 16A 6 Be...
Page 50 - Starten der USV; Drücken Sie die Taste
48 | Installation und Inbetriebnahme Starten der USV 8 Drücken Sie die Taste auf der Vorderseite der USV.
Page 51 - Abschluss des Startvorgangs; Vergewissern Sie sich, dass das Symbol für „Normal“
49 Installation und Inbetriebnahme | Abschluss des Startvorgangs 9 Vergewissern Sie sich, dass das Symbol für „Normal“ auf dem Bildschirm der USV-Statusübersicht angezeigt wird. Hierdurch wird angezeigt, dass die USV ordnungsgemäß funktioniert und dass alle angeschlossenen Lasten mit Strom versorgt ...
Page 53 - Начало работы
Онлайновый ИБП Dell t для установки в стойке 2700 Вт Начало работы c вашей системой K803N , H950N, J728N H967N w w w . d e l l . c o m | s u p p o r t . d e l l . c o m
Page 54 - Примечания и предупреждения; Пометка ПРЕДУПРЕЖДЕНИЕ указывает на потенциально опасную; В устройстве ИБП некоторые узлы находятся под; СМЕРТЕЛЬНО ОПАСНЫМ; . Все работы по ремонту и обслуживанию должны выполняться; ТОЛЬКО УПОЛНОМОЧЕННЫМ ОБСЛУЖИВАЮЩИМ ПЕРСОНАЛОМ
Примечания и предупреждения ПРИМЕЧАНИЕ: Пометка ПРИМЕЧАНИЕ указывает на важную информацию, которая поможет вам более эффективно использовать свое программное обеспечение. ВНИМАНИЕ: Пометка ВНИМАНИЕ указывает на потенциально опасную ситуацию, которая, если ее не избежать, может привести к травмам лег...
Page 55 - Функции системы; Выбираемый пользователем режим высокой эффективности.
53 Функции системы | Функции системы Вот уникальные преимущества, обеспечивающие исключительную эффективность инадежность ИБП: S Онлайн ИБП с чистой синусоидой на выходе. ИБП фильтрует входной переменныйток и управляет им и обеспечивает стабильное питание вашего оборудования, неразряжая батарею. S Т...
Page 56 - Поиск информации; Документ; содержит важную информацию о технике
54 | Поиск информации Поиск информации ВНИМАНИЕ: Документ Информация о технике безопасности, охране окружающей среды и нормативная информация содержит важную информацию о технике безопасности и нормативную информацию. Что вы ищете? Вы найдете это здесь S Руководство пользователя для моего ИБП S Руко...
Page 57 - Установка и запуск; Перед выполнением процедур, описанных в данной документации,; Распаковка системы
55 Установка и запуск | Установка и запуск ВНИМАНИЕ: Перед выполнением процедур, описанных в данной документации, прочтите и выполните инструкции по технике безопасности и ознакомьтесь с важнойнормативной информацией, которая содержится в документе Информация о технике безопасности, охране окружающе...
Page 58 - Подъем корпуса
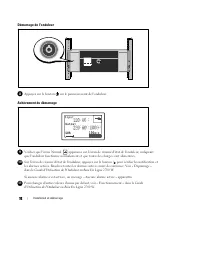
56 | Установка и запуск Подъем корпуса ВНИМАНИЕ: Корпус тяжелый (36,9 кг). Для подъема корпуса на стойку требуется не менее двух человек. 1 Два человека (по одному человеку с каждой стороны) должны осторожно вынутькорпус из картонной упаковки за ручки на картоне и установить его на ровнойустойчивой ...
Page 59 - Описание ИБП; стойке; Рис. 1. Передняя панель ИБП Стойка для онлайнового ИБП Dell
57 Установка и запуск | Описание ИБП В данном разделе показаны передняя и задняя панели ИБП Стойка для онлайнового Руководство пользователя онлайнового ИБП Dell 2700 Вт при установке в стойке , чтобы получить подробную информацию о задней панели. Кнопка Вкл./Выкл. Жидкокристаллическаяпанель Кнопка п...
Page 61 - Вариант установки в стойке; Открытие крышки батареи
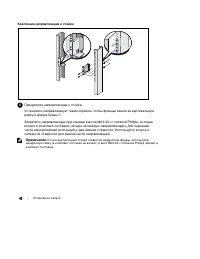
59 Установка и запуск | Вариант установки в стойке ВНИМАНИЕ: Корпустяжелый (36,9 кг): 1) Dell настоятельно рекомендует перед подъемом извлечь блок батареи из ИБП. 2) Для подъема корпуса на стойку требуетсяне менее двух человек. ВНИМАНИЕ: Извлечение батарей должно осуществляться или контролироваться ...
Page 62 - Извлечение блока батареи
60 | Установка и запуск Извлечение блока батареи 2 Отсоедините разъемы батареи и поместите правый разъем батареи на дверцу,чтобы он не мешал. 3 Выдвиньте блок батарей, используя пластиковые ушки, и извлеките его.
Page 63 - Установка на направляющие
61 Установка и запуск | Установка на направляющие Примечание: Инструкции по работе со стойками с квадратными отверстиями и стойками с круглыми безрезьбовыми отверстиями одинаковые. Направляющие подходят для обоихвидов стоек. Стойка с круглыми отверстиями показана на рисунке. 4 Выберите надлежащие от...
Page 64 - Крепление направляющих к стойке; Прикрепите направляющие к стойке:
62 | Установка и запуск Крепление направляющих к стойке 6 Прикрепите направляющие к стойке: Установите направляющую таким образом, чтобы фланцы зашли за вертикальнуюрейку в форме буквы C. Закрепите направляющую при помощи винтов №12-24 с головкой Phillips, которыевходят в комплект поставки (четыре н...
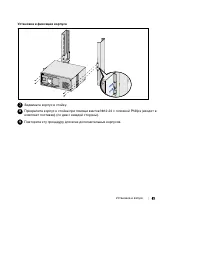
Page 65 - Установка и фиксация корпуса; Задвиньте корпус в стойку.
63 Установка и запуск | Установка и фиксация корпуса 7 Задвиньте корпус в стойку. 8 Прикрепите корпус к стойке при помощи винтов №12-24 с головкой Phillips (входят вкомплект поставки) (по два с каждой стороны). 9 Повторите эту процедуру для всех дополнительных корпусов.
Page 66 - Установка блока батарей; Закройте металлическую крышку батарей.
64 | Установка и запуск Установка блока батарей Примечание: При подключении батарей возможно незначительное искрение. Это нормальное явление; оно не повреждает ИБП и не является опасным. 10 Удалите правый разъем батареи с дверцы и присоедините разъем внутреннейбатареи. 11 Закройте металлическую крыш...
Page 67 - Установка передней крышки ИБП; Установите переднюю крышку ИБП.; Подключение оборудования
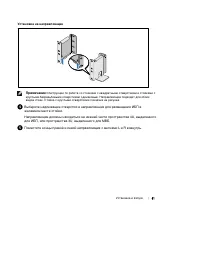
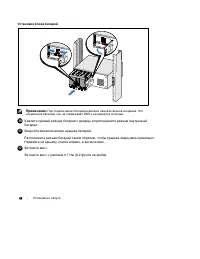
65 Установка и запуск | Установка передней крышки ИБП 13 Установите переднюю крышку ИБП. Подключение оборудования 1 Если вы планируете использовать Программа управления ИБП Dell, подключитесвой компьютер к USB-порту при помощи прилагающегося кабеля. 2 Если стойка оснащена проводниками для заземления...
Page 68 - Подключение шнура питания; Таблица 1. Минимальный номинал вышестоящего выключателя; Включите отсоединяемый шнур питания
66 | Установка и запуск Подключение шнура питания 5 Убедитесь, что вход питания ИБП имеет соответствующую защиту от верхнейперегрузки по току: Таблица 1. Минимальный номинал вышестоящего выключателя Выходная мощностьИБП 120 В 208 В 230 В 2700 Вт 30 A 20 A 16 A 6 Для моделей со съемным шнуром питания...
Page 69 - Включение ИБП; Нажмите кнопку
67 Установка и запуск | Включение ИБП 8 Нажмите кнопку на передней панели ИБП.
Page 70 - Завершение запуска; на существующие нагрузки.
68 | Установка и запуск Завершение запуска 9 Убедитесь, что на итоговом экране статуса ИБП появилась пиктограмма обычногорежима , обозначающая, что ИБП работает нормально и подает электропитание на существующие нагрузки. 10 На итоговом экране состояния ИБП нажмите кнопку , чтобы проверить, активны л...
Page 71 - UPS con bastidor en línea de Dell; Inicio
UPS con bastidor en línea de Dell t 2700W Inicio de su sistema K803N , H950N, J728N H967N w w w . d e l l . c o m | s u p p o r t . d e l l . c o m
Page 72 - Notas y advertencias; como resultado la muerte o una lesión.; Este UPS contiene; VOLTAJES LETALES; debe realizar las reparaciones y el servicio.; NO HAY PIEZAS QUE PUEDAN RECIBIR SERVICIO
Notas y advertencias NOTA: Una NOTA indica información importante que lo ayuda a utilizar mejor el software. PRECAUCIÓN: Una PRECAUCIÓN indica una situación potencialmente peligrosa que, si no se evita, puede dar como resultado una lesión moderada o leve, o incidentes de daños a la propiedad. ADVERT...
Page 73 - Características del sistema
71 Características del sistema | Características del sistema Dado que brindan rendimiento y confiabilidad sobresalientes, los beneficios exclusivos del UPS incluyen: S Diseño de UPS en línea con salida de onda senoidal pura. El UPS filtra y regula la energía de CA entrante y brinda al equipo energía...
Page 74 - Búsqueda de información; El documento; brinda información; Disco del UPS de Dell
72 | Búsqueda de información Búsqueda de información PRECAUCIÓN: El documento Información ambiental, regulatoria y de seguridad brinda información regulatoria y sobre seguridad importante. ¿Qué está buscando? Encuéntrelo aquí S La guía del usuario para mi UPS S La guía del usuario para la Tarjeta de...
Page 75 - Instalación y arranque; Cómo desembalar el sistema
73 Instalación y arranque | Instalación y arranque PRECAUCIÓN: Antes de realizar los procedimientos que se describen en este documento, lea y cumpla con las instrucciones de seguridad y la información regulatoria importante en su documento Información ambiental, regulatoria y de seguridad . En la pr...
Page 76 - Elevación del gabinete; al menos dos personas.
74 | Instalación y arranque Elevación del gabinete PRECAUCIÓN: El gabinete es pesado (36,9 kg/36,92 kg). Para levantar los gabinetes al bastidor se necesitan al menos dos personas. 1 Con una persona de cada lado, levante cuidadosamente el gabinete de la caja de cartón externa usando las manijas de l...
Page 77 - Identificación del UPS; Consulte la; Figura 1. El panel frontal del UPS Bastidor en línea Dell
75 Instalación y arranque | Identificación del UPS En la presente sección, se muestra un panel frontal y posterior del UPS de Bastidor en línea Dell. Consulte la Guía del usuario del UPS con bastidor en línea 2700W de Dell para obtener todos los detalles del panel posterior. Botón On/Off Pantalla Bo...
Page 78 - Configuración del montaje en bastidor; Cómo abrir la cubierta de la batería; hacia la derecha y abra.
76 | Instalación y arranque Configuración del montaje en bastidor PRECAUCIÓN: El gabinete es pesado (36,9 kg/81,4 lb): 1) Dell recomienda encarecidamente extraer la bandeja de las baterías de la UPS antes de levantarla. 2) Para levantar los gabinetes y colocarlos en elbastidor se necesitan al menos ...
Page 79 - Cómo extraer la bandeja de las baterías
77 Instalación y arranque | Cómo extraer la bandeja de las baterías 2 Desconecte el conector de la batería y coloque el conector derecho en la puerta de la batería para retirarlo. 3 Extraiga la bandeja de las baterías usando las fichas plásticas y quite la bandeja de las baterías.
Page 80 - Cómo colocar los rieles
78 | Instalación y arranque Cómo colocar los rieles NOTA: Las instrucciones son las mismas que para los bastidores de orificios cuadrados y los bastidores de orificios redondos y sin rosca. Los rieles sirven para ambos estilos de bastidores. En las ilustraciones semuestra el bastidor con orificios r...
Page 81 - Cómo sujetar los rieles al bastidor; Sujete los rieles al bastidor:
79 Instalación y arranque | Cómo sujetar los rieles al bastidor 6 Sujete los rieles al bastidor: Ajuste el riel de modo que las pestañas encajen fuera del riel vertical en forma de C. Asegure el riel con los tornillos de cabeza Phillips N°12-24 suministrados (cuatro para cada riel). Use los dos orif...
Page 82 - Cómo instalar y asegurar el gabinete; Deslice el gabinete por el bastidor.
80 | Instalación y arranque Cómo instalar y asegurar el gabinete 7 Deslice el gabinete por el bastidor. 8 Asegure el gabinete al bastidor con los tornillos de cabeza Phillips N°12-24 suministrados (dos de cada lado). 9 Repita este procedimiento para todos los gabinetes adicionales.
Page 83 - Instalación de la bandeja de las baterías; Cierre la cubierta metálica de las baterías.
81 Instalación y arranque | Instalación de la bandeja de las baterías NOTA: Se puede formar un pequeño arco cuando conecte las baterías. Esto es normal y no daña la unidad ni tampoco debe preocuparse por su seguridad. 10 Retire el conector derecho de la batería desde la puerta y conecte el conector ...
Page 84 - Instalación de la cubierta delantera del UPS; Instale la cubierta delantera del UPS.; Conectar el equipo; Guía del usuario del UPS con
82 | Instalación y arranque Instalación de la cubierta delantera del UPS 13 Instale la cubierta delantera del UPS. Conectar el equipo 1 Si planea utilizar el Software de gestión de UPS de Dell, conecte el equipo al puerto USB o el puerto RS-232 con el cable suministrado. 2 Si el bastidor tiene condu...
Page 85 - Conexión del cable de energía; Tabla 1. Régimen mínimo del disyuntor ascendente; Enchufe el cable de alimentación
83 Instalación y arranque | Conexión del cable de energía 5 Verifique que la entrada de energía al UPS tenga protección de sobrecarga de corriente ascendente adecuada: Tabla 1. Régimen mínimo del disyuntor ascendente Potencia de salida del UPS 120 V 208 V 230 V 2700W 30 A 20 A 16 A 6 Para los modelo...
Page 86 - Inicio del UPS; Guía del usuario del UPS con bastidor en línea
84 | Instalación y arranque Inicio del UPS 8 Presione el botón del panel frontal del UPS. Cómo completar el arranque 9 Verifique que el ícono Normal aparezca en la pantalla de resumen del estado de UPS, que indica que el UPS funciona normalmente y todas las cargas están energizadas. 10 En la pantall...
Page 88 - 注意和警告; UPS
注意和警告 注意: “注意”表示可帮助您更好使用本软件的重要信息。 小心: “小心”表示潜在危险情况,如果不加以避免,可能导致轻度或中度伤害,或财产损失事故。 警告: “警告”表示潜在危险情况,如果不加以避免,可能会导致死亡或伤害。 危险: “危险”表示紧急危险情况,如果不加以避免,将导致死亡或严重的伤害。 危险: 遵守下列须知有助于防止紧急危险情况,其若不加以避免,将导致死亡或严重的伤害: S 本 UPS 包含危险致命的电压。 所有维修和服务都只能由经过授权的 维修人员进行。 UPS 中没有用户可自行维修的部件。 本文档所含信息如有更改,恕不另行通知。 © 2009 Dell Inc. 保留...
Page 89 - 系统特性
87 系统特性 | 系统特性 该 UPS 提供杰出的性能与可靠性,其独特优势包括: S 具有纯正弦波输出的在线式 UPS 设计。 UPS 过滤和调节进入的交流电力并为 您的设备提供持续的电力,而无需耗用电池。 S 真正在线双转换技术,提供高功率密度,不依赖公用电源频率,而且兼容各种发电机。 S 可选择的“高效”操作模式。 S 4U 的大小适合任何标准 48 厘米( 19 英寸)机柜。 S 即使没有公用电源,电池启动功能也能给 UPS 供电。 S 通过可选外部电池模块 (EBM)延长备用时间( 2700WUPS 型号)。 S 通过远程应急电源关闭( REPO ) 端口进行紧急停机控制。 S 两个...
Page 90 - 查找信息; 小心:; 安全、环保和法规信息; Dell UPS
88 | 查找信息 查找信息 小心: 安全、环保和法规信息 文件提供了重要的安全和法规信息。 您正在寻找什么? 在此查找 S 我的 UPS 的用户指南 S Dell 网络管理卡用户指南 S Dell UPS 管理软件 注意: 文件和软件更新可在 support.dell.com 找到。 Dell UPS 光盘 S 规格 S 如何配置 UPS 设置 S 如何诊断故障和解决问题 S 如何安装 REPO 控制 Dell UPS 用户指南 用户指南可从 Dell UPS 光盘和 support.dell.com 上找到。 S 安全操作说明 S 行政法规信息 S 回收信息 安全、环保和法规信息 S 保修...
Page 91 - 安装和启动; 本节描述首次安装系统的步骤。; 打开系统; 打开外部包装箱,取下与机箱包装在一起的配件。
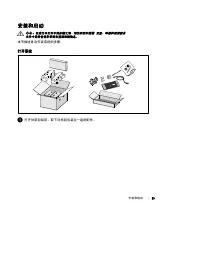
89 安装和启动 | 安装和启动 小心: 在进行本文件中的步骤之前,请先阅读和遵循 安全、环保和法规信息 文件中的安全操作说明和重要法规信息。 本节描述首次安装系统的步骤。 打开系统 1 打开外部包装箱,取下与机箱包装在一起的配件。
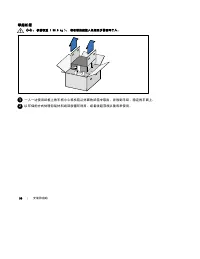
Page 92 - 举起机箱; 一人一边使用纸板上的手柄小心将机箱从外面的纸箱中取出,并放到平坦、稳定的平面上。
90 | 安装和启动 举起机箱 小心: 机箱很重 (36.9 kg)。 将机箱抬起放入机架至少需要两个人。 1 一人一边使用纸板上的手柄小心将机箱从外面的纸箱中取出,并放到平坦、稳定的平面上。 2 以环保的方式处理包装材料或回收循环利用,或者收起存放以备将来使用。
Page 93 - 识别; 本节介绍
91 安装和启动 | UPS 识别 本节介绍 Dell 在线机架式 UPS 的前面板和后面板。 后面板详细情况请参见 Dell 在线机架式 UPS 2700W 用户指南 。 开/关按钮 LCD 显示面板 滚动按钮(向下或向前) 选择按钮 滚动按钮(向上或向后) 图 1. Dell 在线机架式 UPS 前面板 UPS 通讯槽 2m, L5-30P 输入线 USB 端口 一个 L5-20 和两个 5-15/5-20 插座 (输出开关 1 ) REPO 端口 RS-232 端口 地脚螺钉 两个 IEC 320-C13 插座(输出开关 2 ) EBM 连接器盖/ 应变消除支架 图 2. UPS 后面板...
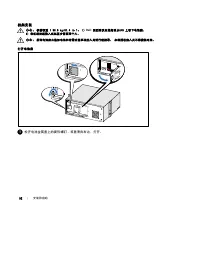
Page 94 - 机架安装; 松开电池金属盖上的翼形螺钉,将盖滑向右边,打开。
92 | 安装和启动 机架安装 小心: 机箱很重 (36.9 kg/81.4 lb): 1) Dell 强烈建议在抬起前从UPS 上取下电池座。 2) 将机箱抬起放入机架至少需要两个人。 小心: 拆卸电池应由熟知电池和所需注意事项的人员进行或指导。 未经授权的人员不得接触电池。 打开电池盖 1 松开电池金属盖上的翼形螺钉,将盖滑向右边,打开。
Page 95 - 断开电池连接器,并将右边的电池连接器放入电池门内,以便将其取出。
93 安装和启动 | 取下电池座 2 断开电池连接器,并将右边的电池连接器放入电池门内,以便将其取出。 3 用塑料薄片起出电池座,并取下电池座。
Page 96 - 选择导轨中合适的孔将
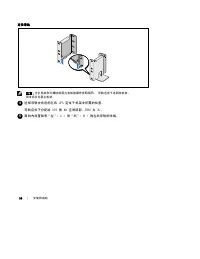
94 | 安装和启动 定位导轨 注意: 方孔机架和无螺纹的圆孔机架的操作说明相同。 导轨适用于这两种机架。 图中所示为圆孔机架。 4 选择导轨中合适的孔将 UPS 定位于机架中所需的位置。 导轨应位于分配给 UPS 的 4U 空间底部, EBM 为 3U 。 5 面向内放置贴有“左”(L) 和“右”(R) 的左右导轨的末端。
Page 97 - 将导轨连接到机架上:
95 安装和启动 | 将导轨连接到机架上 6 将导轨连接到机架上: 调整导轨,以使得法兰与 C 型垂直导轨的外部配合好。 用提供的 #12-24 十字头型螺钉(每个导轨四个)固定导轨。 导轨前端使用底部的两个孔。 导轨后端使用第二和第四个孔。 注意: 如果垂直导轨具有方孔,则为提供的 #12-24 十字头型螺钉配用方形螺母(未提供)。
Page 98 - 将机箱滑入机架中。
96 | 安装和启动 安装和固定机箱 7 将机箱滑入机架中。 8 用提供的 #12-24 十字头型螺钉(每侧两个)将机箱固定在机架上。 9 对其余机箱重复以上步骤。
Page 99 - Nm
97 安装和启动 | 安装电池座 注意: 连接电池时可能会发生少量电弧。 这是正常现象,不会损坏单元或存在任何安全隐患。 10 从门中取出右边的电池连接器,并连接内置电池连接器。 11 关闭电池金属盖。 调整电池连接器,以使得门可以正确关闭。 将门轻轻地向右推,然后再向左推。 12 拧紧翼形螺钉。 将螺钉拧至 0.7 牛米( Nm ) ( 6.2 磅英寸( lb in ))。
Page 100 - 连接设备; REPO
98 | 安装和启动 安装 UPS 前盖 13 安装 UPS 前盖。 连接设备 1 如果要使用 Dell UPS 管理软件,请用提供的电缆将电脑连接到 USB 端口。 2 如果机架具有接地导体或连接有不接地金属块,请将接地电线(不提供)连接到接地连接螺钉。 3 如果地方法规要求使用应急电源关闭(断开)开关,请参见 Dell 在线机架式 UPS 2700W 用户指南 中的“安装远程应急电源关闭”( REPO )。 4 将需要保护的设备插入 UPS 输出插座,但不要启动受保护的设备。 注意: 确保全部设备的总额定值不超过 UPS 的负载能力,以防止出现过载警报。
Page 101 - 连接电源线
99 安装和启动 | 连接电源线 5 验证 UPS 的功率输入具有足够的上游过电流保护: 图 1. 最小上游断路器额定值 UPS 输出功率 120V 208V 230V 2700W (瓦) 30A 20A 16A 6 具有可拆卸电源线的模块。 将可拆卸的 UPS 电源线插入 UPS 后面板上的输入连接器中。 7 将 UPS 电源线插入电源插座。
Page 105 - 系統特色
103 系統特色 | 系統特色 此 UPS 可提供傑出的性能與可靠性,其獨特優勢包括: S 具有純正弦波輸出的在線式 UPS 設計。 UPS 對進入的交流電力進行過濾和調節, 為您的設備提供持續的電力,而不耗用電池電力。 S 真正在線雙轉換技術,提供高功率密度,不依賴外部電源頻率,而且相容於各種發電機。 S 可選擇的「高效」操作模式。 S 4U 的空間適合任何標準 48 cm (1 9” )的機架。 S 即使沒有外部電源,直流開機功能也能給 UPS 供電。 S 藉由選配的 外部電池模組 ( EBM )延長備用時間( 2700WUPS 型號)。 S 藉由遠端緊急關機 ( REPO ) 連接埠進行...
Page 106 - 尋找資訊; 小心; 安全、環保和法規資訊
104 | 尋找資訊 尋找資訊 小心 : 安全、環保和法規資訊 文件提供了重要的安全和法規資訊。 您要尋找什麼? 在此尋找 S 我的 UPS 的使用者指南 S Dell 網路管理卡 使用者指南 S Dell UPS 管理軟體 注意: 文件和軟體更新可在 support.dell.com 取得。 Dell UPS 光碟 S 規格 S 如何進行 UPS 設定 S 如何診斷故障和解決問題 S 如何安裝 REPO 控制 Dell UPS 使用者指南 使用者指南可從 Dell UPS 光碟和 support.dell.com 上取得。 S 安全操作說明 S 法規資訊 S 回收資訊 安全、環保和法規資訊 ...
Page 107 - 安裝和啟動; 本節描述首次安裝系統的步驟。; 拆開系統包裝; 打開外部包裝箱,取下與機箱包裝在一起的配件。
105 安裝和啟動 | 安裝和啟動 小心 : 在進行本文件中的步驟之前,請先閱讀並遵循 安全、環保和法規資訊 文件中的安全操作說明和重要法規資訊。 本節描述首次安裝系統的步驟。 拆開系統包裝 1 打開外部包裝箱,取下與機箱包裝在一起的配件。
Page 108 - 抬起機箱; 以環保的方式棄置包裝材料或進行回收,或是收存以備將來使用。
106 | 安裝和啟動 抬起機箱 小心 : 機箱很重( 36.9 kg/81.4 lb )。 將機箱抬起放入機架至少需要兩個人。 1 一人一邊使用紙板上的握把小心地將機箱從外面的紙箱中取出,並放到平坦、穩定的平面上。 2 以環保的方式棄置包裝材料或進行回收,或是收存以備將來使用。
Page 109 - 識別; 本節介紹; 在綫機架式; 用戶指南
107 安裝和啟動 | UPS 識別 本節介紹 Dell 在綫式機架 UPS 的前面板和後面板。 後面板詳細情況請參見 Dell 在綫機架式 UPS 2700W 用戶指南 。 開/關按鈕 LCD 顯示面板 卷動按鈕(向下或向前) 選擇按鈕 卷動按鈕(向上或向後) 圖 1. Dell 在綫式機架 UPS 前面板 UPS 通訊槽 2m, L5-30P 輸入線 USB 連接埠 一個 L5-20 和兩個 5-15/5-20 插座(輸出開關 1 ) REPO 連接埠 RS-232 連接埠 地腳螺釘 兩個 IEC 320-C13 插座(輸出開關 2 ) EBM 接頭蓋/應力消除支架 圖 2. UPS 後面...
Page 110 - 機架安裝
108 | 安裝和啟動 機架安裝 小心 : 機箱很重 ( 36.9 kg/81.4 lb ): 1 ) Dell 強烈建議在抬起前先從 UPS 取下電池座。 2 ) 將機箱抬起放入機架至少需要兩個人。 小心 : 拆卸電池應由熟知電池和所需注意事項的人員進行或從旁指導。 未經授權的人員不得接觸電池。 打開電池蓋 1 鬆開電池金屬蓋上的翼形螺釘,將蓋滑向右邊,然後打開。
Page 111 - 斷開電池接頭連接,並將右邊的電池接頭放入電池門內,以使其避開。
109 安裝和啟動 | 取下電池座 2 斷開電池接頭連接,並將右邊的電池接頭放入電池門內,以使其避開。 3 用塑料薄片起出電池座,並取下電池座。
Page 114 - 將機箱滑入機架中。
112 | 安裝和啟動 安裝和固定機箱 7 將機箱滑入機架中。 8 使用提供的 #12-24 十字頭螺釘(每側兩個)將機箱固定在機架上。 9 對其餘機箱重複以上步驟。
Page 116 - 連接設備
114 | 安裝和啟動 安裝 UPS 前蓋 13 安裝 UPS 前蓋。 連接設備 1 如果要使用 Dell UPS 管理軟體,請用提供的電纜將電腦連接到 USB 連接埠。 2 如果機架具有接地導體或連接有不接地金屬塊,請將接地電線(不提供)連接到接地連接螺釘。 3 如果當地法規要求使用緊急電源關閉(斷開)開關,請參見 Dell 在綫機架式 UPS 2700W 用戶指南 中的「安裝遠端緊急關機」( REPO )。 4 將需要保護的設備插入 UPS 輸出插座,但不要啟動受保護的設備。 注意 : 確認全部設備的總額定值不超過 UPS 的負載能力,以防止出現過載警報。
Page 117 - 連接電源線
115 安裝和啟動 | 連接電源線 5 確認 UPS 的功率輸入具有足夠的上游過電流保護: 表 1. 最小上游電路斷路器額定值 UPS 輸出功率 120V (伏) 208V (伏) 230V (伏) 2700W (瓦) 30A (安) 20A (安) 16A (安) 6 具有可分離電源線的模組。 將可分開的 UPS 電源線插入 UPS 後面板上的輸入接線器中。 7 將 UPS 電源線插入電源插座。
Page 119 - 사용자의 시스템
Dell t 온라인 랙 UPS 2700W 사용자의 시스템 시작하기 K803N , H950N, J728N H967N w w w . d e l l . c o m | s u p p o r t . d e l l . c o m
Page 120 - 참고 및 경고
참고 및 경고 참고: “참고”는 소프트웨어를 더 잘 활용하는 데 도움이 되는 중요한 정보를 나타냅니다. 참고: “주의”는 피하지 않을 경우 경미하거나 보통의 상해 또는 재산 손실 사고를 야기할 수 있는 잠재적 위험 상황을 표시합니다. 경고: “경고”는 피하지 않을 경우 죽음이나 상해를 야기할 수 있는 잠재적 위험 상황을 표시합니다. 위험: “위험”은 피하지 않을 경우, 급박한 위험 상황이 사망이나 중상의 결과를 야기할 수 있음을 나타냅니다. 위험: 아래의 지시사항을 준수하여, 피하지 않을 경우 사망이나 중상의 결과를 야기할 수 있는...
Page 121 - 시스템 기능
119 시스템 기능 | 시스템 기능 탁월한 성능과 신뢰도를 제공하면서, 본 UPS 는 다음과 같은 특유의 장점을 지닙니다. S 순수 사인파 출력을 갖춘 온라인 UPS 설계. UPS 는 유입 AC 전원을 필터링 및 조절하여 배터리를 고갈시키지 않으면서 장비에 안정적인 전원을 공급합니다. S 고전력, 유틸리티 주파수 독립성, 제너레이터 호환성을 갖춘 진정한 온라인 이중-변환 기술. S 선택가능한 고효율 작동 모드. S 표준 48cm (19'') 랙에 맞는 4U 크기. S 상용 전원을 사용할 수 없는 경우에도 UPS에 전력을 공급하는 스...
Page 122 - 정보 찾아보기
120 | 정보 찾아보기 정보 찾아보기 주의: 안전, 환경, 및 규제 관련 정보 문서는 중요한 안전 및 규제 정보를 제공합니다. 찾는 정보 항목 정보의 소재 S UPS 용 사용자 설명서 S Dell 네트워크 관리카드용 사용자 설명서 S Dell UPS Management Software 참고: 문서 및 소프트웨어 업데이트는 support.dell.com 에서 조회할 수 있습니다. Dell UPS 디스크 S 사양 S UPS 설정 구성 방법 S 장애 처리 및 문제점 해결 방법 S REPO 제어 설치 방법 Dell UPS 사용자 설명서 ...
Page 123 - 설치 및 시동; 이 절은 귀하의 시스템을 처음 설치하는 절차를 설명합니다.; 시스템 포장 풀기; 포장상자를 열고 캐비닛과 함께 포장된 부속품을 꺼내십시오.
121 설치 및 시동 | 설치 및 시동 주의: 본 문서의 절차를 수행하기 전에 안전, 환경, 및 규제 관련 정보 문서에 있는 안전 지침 및 중요한 규제정보를 읽고 준수하십시오. 이 절은 귀하의 시스템을 처음 설치하는 절차를 설명합니다. 시스템 포장 풀기 1 포장상자를 열고 캐비닛과 함께 포장된 부속품을 꺼내십시오.
Page 124 - 캐비닛 들어올리기
122 | 설치 및 시동 캐비닛 들어올리기 주의: 캐비닛은 무겁습니다(36.9 kg/81.4 lb). 캐비닛을 랙 안으로 들어 올려 넣으려면 최소한 2인이 필요합니다. 1 양편에 각 한 사람이 자리한 후, 판지의 손잡이를 이용하여 포장상자에서 캐비닛을조심스럽게 들어 올려 평평하고 안정된 지면에 내려 놓으십시오. 2 포장은 적법한 처리방식에 따라 폐기하거나 재활용하십시오. 또는 추후 사용을 위해보관하십시오.
Page 125 - 확인하기; 이 항목에서는; 온라인 랙
123 설치 및 시동 | UPS 확인하기 이 항목에서는 Dell 온라인 랙 UPS의 전면 패널과 뒷면 패널을 보여줍니다. 모든 뒷면 패널의 세부에 대해서는 Dell 온라인 랙 UPS 2700W 사용자 가이드 를 참조하십시오. On/Off 버튼 LCD 패널 스크롤 버튼(아래로 또는 앞으로) 선택 버튼 스크롤 버튼 (위로 또는 뒤로) 그림 1. Dell 온라인 랙 UPS 전면 패널 UPS 통신 베이 2m, L5-30P 입력코드 USB 포트 L5-20 콘센트 1개 및 5-15/5-20 콘센트 2 개 (로드 세그먼트 1) REPO 포트 R...
Page 126 - 랙 장착 설치; 금속 배터리 커버의 손 나사를 풀고 커버를 오른쪽으로 밀어 엽니다.
124 | 설치 및 시동 랙 장착 설치 주의: 캐비닛은 무겁습니다( 36.9 kg/81.4 lb ). 1 ) Dell 은 UPS 를 들어 올리기 전에 UPS 에서 배터리 트레이를 제거할 것을 강력하게 권장합니다. 2 ) 캐비닛을 랙 안으로 들어올리는 데에는 최소한 2 인이 필요합니다. 주의: 배터리 제거는 배터리와 그 주의사항에 대해서 잘 아는 사람이 수행하거나 감독해야 합니다. 취급 자격이 없는 사람이 배터리를 취급해서는 안됩니다. 배터리 커버 열기 1 금속 배터리 커버의 손 나사를 풀고 커버를 오른쪽으로 밀어 엽니다.
Page 127 - 플라스틱 탭을 이용하여 배터리 트레이를 밖으로 잡아 당겨 꺼냅니다.
125 설치 및 시동 | 배터리 트레이 분리 2 배터리 커넥터의 연결을 끊고 오른쪽 배터리 커넥터를 배터리 문에 두어서 방해되지 않게합니다. 3 플라스틱 탭을 이용하여 배터리 트레이를 밖으로 잡아 당겨 꺼냅니다.
Page 130 - 제공된
128 | 설치 및 시동 캐비닛 설치 및 고정하기 7 캐비닛을 랙으로 밀어 넣습니다. 8 제공된 #12-24 필립스 헤드스크류(각 면에 2 개)를 사용하여 캐비닛을 랙에 고정합니다. 9 다른 캐비닛에 대해서도 같은 방법으로 고정하십시오.
Page 131 - 도어에서 오른쪽 배터리 커넥터를 분리하고 내장 배터리 커넥터를 연결하십시오.
129 설치 및 시동 | 배터리 트레이 설치하기 참고: 배터리를 연결할 때 소량의 아크 (arc) 가 발생할 수 있습니다. 이런 현상은 정상적이며 기기에 손상을 주거나 안전상의 문제를 나타내는 것은 아닙니다. 10 도어에서 오른쪽 배터리 커넥터를 분리하고 내장 배터리 커넥터를 연결하십시오. 11 금속 배터리 커버를 닫습니다. 문이 잘 닫히도록 배터리 커넥터를 조정하십시오. 문을 오른쪽으로 약간 민 후 왼쪽으로밉니다. 12 손 나사를 조입니다. 나사에 0.7N.m (6.2 lb in) 의 토크를 주십시오.
Page 132 - 장비 연결하기; 를 사용할 계획이라면, 제공된 케이블을 이용하여 컴퓨터를; 보호할 장비를
130 | 설치 및 시동 UPS 전면 커버 설치하기 13 UPS 전면 커버를 설치합니다. 장비 연결하기 1 Dell UPS Management Software 를 사용할 계획이라면, 제공된 케이블을 이용하여 컴퓨터를 USB 포트에 연결합니다. 2 접지되지 않은 금속 부품을 접지하거나 결속하는 도체가 랙에 있다면, 접지 케이블(비제공품)을 접지 결속 나사에 연결하십시오. 3 현지 규정에 따라 긴급 전원차단(연결해제) 스위치가 필요하다면, Dell 온라인 랙 UPS 2700W 사용자 가이드 의 "원격 긴급 전원차단 ( REPO ...
Page 133 - 전원 코드 연결하기; 분리 가능한
131 설치 및 시동 | 전원 코드 연결하기 5 UPS 로 입력되는 전원이 적당한 업스트림 과전류에 대해 보호 받고 있는지 확인합니다: 표 1. 최소 업스트림 회로차단기 정격 UPS 출력 전원 120V 208V 230V 2700W 30A 20A 16A 6 분리 가능한 전원코드가 있는 모델용. 분리 가능한 UPS 전원코드를 UPS 뒷면 패널의 입력 커넥터에 연결합니다. 7 UPS 전원코드를 전원 콘센트에 연결하십시오.
Page 135 - はじめに
Dell t オンラインラック UPS 2700W はじめに システムについて K803N 、 H950N 、 J728N H967N w w w . d e l l . c o m | s u p p o r t . d e l l . c o m
Page 136 - 注意および警告; 注記
注意および警告 注記 : 「注記」は、ソフトウェアを有効に利用するための重要な情報を示しています。 注意: 「注意」は、回避しないと軽傷、または中程度の傷害を招く恐れがある潜在的に危険な状況を 示しています。 警告: 「警告」は、回避しないと死亡、または重傷を招く潜在的に危険な状況を示しています。 危険: 「危険」は、回避しないとほぼ確実に死亡、または重傷を招く危険な状況を示しています。 危険: 回避しないとほぼ確実に死亡、または重傷を招く危険な状況を防ぐため、以下の説明をよく お読みください: S このUPSの中には 致死的な電圧 が掛かっています。すべての修理や点検は、公認のサービススタッ...
Page 137 - システムの特徴
135 システムの特徴 | システムの特徴 UPS は優れた性能や信頼性を提供し、以下のような独自の利点がございます: S 正弦波出力のあるオンライン UPS 設計。 UPS は、入力される交流電力をフィルター処理、 調節し、バッテリーを消耗せずに機器へ安定した電力を供給します。 S 高出力密度や商用周波数依存性、発電器の互換性を持つオンライン二重変換技術。 S 選択可能な動作の高性能モード。 S 48 cm (19h) 標準ラックにぴったりの4U サイズ。 S 外部電力がないときでも UPS の電力を入れることができる始動電池の能力。 S 拡張ランタイムおよびオプションとして外付けバッテリー...
Page 138 - 情報検索; 安全、環境、規則に関する情報
136 | 情報検索 情報検索 注意: 安全、環境、規則に関する情報 資料には、安全および規定に関する重要情報が含まれて います。 どんな情報をお探しですか? こちらでご覧いただけます S UPS ユーザーガイド S Dell ネットワークマネージメントカード用の ユーザーガイド S Dell UPS 制御ソフトウェア 注記説明書およびソフトウェアの更新情報は、 support.dell.com でご確認いただけます。 Dell UPS ディスク S 仕様 S UPS の設定方法 S トラブルシューティングおよび問題の解決方法 S REPO 制御のインストール方法 Dell UPS ユーザーガ...
Page 139 - 設置および起動; このセクションは、最初におけるシステムの設定方法について説明しています。; システムの開梱; 段ボール箱を開き、キャビネットと同梱の付属品を取り外します。
137 設置および起動 | 設置および起動 注意: 当資料の手順を実施する前に、 安全、環境、規則に関する情報 資料に記載されている安全 に 関する説明書および重要な規制情報をご覧いただき、これらの情報に従ってください。 このセクションは、最初におけるシステムの設定方法について説明しています。 システムの開梱 1 段ボール箱を開き、キャビネットと同梱の付属品を取り外します。
Page 140 - キャビネットの持ち上げ方
138 | 設置および起動 キャビネットの持ち上げ方 注意: キャビネットにはかなりの重量があります ( 36.9 kg/81.4 lb )。 キャビネットをラックに 移動するには、最低2名必要です。 1 一人が片方を持ち、段ボールのハンドル部分を使って、段ボール箱からキャビネットを注意して持ち上げ、平らな安定した表面上に置きます。 2 責任を持ってパッケージを処分、またはリサイクルし、あるいは将来使えるように保管します。
Page 141 - UPSの識別; このセクションは、; をご参照ください。
139 設置および起動 | UPSの識別 このセクションは、 Dell オンライン式ラック型 UPS のフロントパネルおよびリヤパネルを 示しています。 リヤパネルの詳細に関しましては、 Dell オンライン式ラック型 UPS 2700W ユーザーガイド をご参照ください。 オン/オフボタン LCDパネル スクロールボタン(下方向、または前方) 選択ボタン スクロールボタン (上方向、または後方) 図 1。 Dell オンライン式ラック型 UPS フロントパネル UPS通信ベイ 2m、L5-30P 入力コード USBポー ト L5-20 レセプタクル1個、および5-15/5-20レセプタクル2...
Page 142 - ラックマウント式設置方法; 金属のバッテリーカバーの蝶ネジを緩め、カバーを右にスライドさせて開けます。
140 | 設置および起動 ラックマウント式設置方法 注意: キャビネットにはかなりの重量があります ( 36.9 kg/81.4 lb ): 1) Dellでは、持ち上げる 前に、 UPS からバッテリートレーを取り外すことを推奨します。 2) キャビネットをラックに移動 するには、最低2名必要です。 注意: バッテリーの取り外しは、バッテリーや必要とされる安全上の注意に関して知識のあるスタッフが行うか、知識のあるスタッフが監視する必要があります。許可のないスタッフをバッテ リーに近寄らせないようにしてください。 バッテリーカバーの開け方 1 金属のバッテリーカバーの蝶ネジを緩め、カバーを右...
Page 145 - レールをラックに取り付ける方法:
143 設置および起動 | レールをラックに取り付ける方法 6 レールをラックに取り付ける方法: フランジが、 C の形をした垂直レールの外側にはまるようレールを調節します。 同梱の# 12-24 Phillips プラスネジ(各レールに4個)を使ってレールを固定します。 レール の前方には、下部の2つの穴を使用してください。レールの後方には、2番目と4番目の穴を使用してください。 注記: 垂直レールに四角型の穴がある場合、同梱の# 12-24 Phillips プラスネジと四角型のナット (同梱されていません)を使用してください。
Page 146 - キャビネットをラックにスライドさせます。
144 | 設置および起動 キャビネットの取り付けおよび固定 7 キャビネットをラックにスライドさせます。 8 同梱の# 12-24 プラスネジ(各サイドに2個)を使って、キャビネットをラックに固定 します。 9 その他のキャビネットも同じ方法で固定します。
Page 148 - 装置の接続方法
146 | 設置および起動 UPS のフロントカバーの取り付け方法 13 UPS フロントカバーを取り付けます。 装置の接続方法 1 Dell UPS 制御ソフトウェアを使用する場合は、同梱のケーブルを使って、コンピューターを USB ポートへ接続してください。 2 お使いのラックに、接地用、あるいは非接地金属部品の接合用の導体がある場合は、接地ケーブル(同梱されていません)を接地接合ネジに接続します。 3 地域の条例で、非常停止(切断)スイッチが要求されている場合は、 Dell オンライン式ラック型 UPS 2700W ユーザーガイド の「リモートエマージェンシーパワーオフ ( REPO )...
Page 149 - 電源コードの接続方法; 取り外し可能な電源コードを
147 設置および起動 | 電源コードの接続方法 5 UPS への電源入力には、十分な逆流過電流保護があるか確認してください: 表 1. 上流遮断機最小定格 UPS 出力 120V 208V 230V 2700W 30A 20A 16A 6 取り外し可能な電源コード付きモデル用。 取り外し可能な電源コードを UPS のリヤパネルに ある入力コネクターに差し込みます。 7 UPS の電源コードを電源コンセントに差し込みます。