Page 2 - SAFE OPERATION PRACTICES; GENERAL INFORMATION; WARNING
2 SAFE OPERATION PRACTICES GENERAL INFORMATION 1. Read, understand and follow all instructions on the tractor and in the manual(s) before attempting to assemble and operate. Keep this manual in a safe place for future and regular reference and for ordering replacement parts. 2. Be familiar with all ...
Page 3 - CHILDREN
3 SAFE OPERATION PRACTICES 8. Disengage blade(s), move the drive control levers fully outward to set the parking brake, stop engine and wait until the blade(s) come to a complete stop before removing grass catcher, emptying grass, removing any grass or debris, unclogging chute or making any adjustme...
Page 4 - HAULING
4 SAFE OPERATION PRACTICES 10. Keep all movement on the slopes slow and gradual. Do not make sudden changes in speed or direction. Rapid acceleration could cause the front of the tractor to lift and rapidly roll over backwards, which could cause serious injury or death. FIRE & FUEL 1. To avoid p...
Page 5 - NOTICE REGARDING EMISSIONS
5 SAFE OPERATION PRACTICES 6. Check to make sure the blades come to a complete stop in not more than five seconds after disengaging the blade disengagement control per the schedule shown on the Maintenance Schedule chart in the Service and Maintenance section of this manual. Measure the stopping tim...
Page 6 - SAFETY SYMBOLS; Symbol
6 SAFETY SYMBOLS This page depicts and describes safety symbols that MAY APPEAR on this product. Symbol Description OPESymbol.com WARNING – READ THE OPERATOR’S MANUAL(S)Read, understand and follow all the safety rules and instructions in the manual(s) and on the tractor before attempting to operate ...
Page 7 - warnings and instructions in this manual and on the machine
7 SAFETY SYMBOLS WARNING Your Responsibility —Restrict the use of this power machine to persons who read, understand and follow the warnings and instructions in this manual and on the machine - SAVE THESE INSTRUCTIONS! Symbol Description WARNING – AVOID AMPUTATION INJURYDo not put hands or feet near...
Page 8 - ASSEMBLY; Preparation; MANUALLY MOVING THE TRACTOR; Install Operator’s Seat; KNOB ADJUST OR LEVER ADJUST
8 ASSEMBLY NOTE: This Operator’s Manual covers several models. Tractor features may vary by model. Not all features in this manual are applicable to all tractor models and the tractor depicted may differ from yours. NOTE: All references in this manual to the left or right side and front or back of t...
Page 9 - Figure 5; Position Lapbar Drive Control Levers; Figure 7; Lower Discharge Chute Deflector; ATTACHING THE CHUTE DEFLECTOR (IF NECESSARY)
9 ASSEMBLY b. For a Lever Adjust seat use flange lock nuts (a) and flat washers (b). See Figure 5. (a) (a) (b) (b) (c) (a) (a) Figure 5 3. If necessary, securely connect the seat switch wiring harness (a) to the seat switch (b). See Figure 6. Secure excess wire away from pinch points before continui...
Page 10 - Figure 9; Battery Information
10 ASSEMBLY 3. Place the chute deflector on the deck, be sure to insert the tabs on the chute deflector into the holes on the deck. See Figure 9. 3 5 5 4 4 Figure 9 4. Slide the chute deflector toward the rear of the tractor until the bolt hole in the chute deflector aligns with the hole in the deck...
Page 11 - CONNECTING BATTERY CABLES; BATTERY MAINTENANCE
11 ASSEMBLY WARNING Should battery acid accidentally splatter into the eyes or onto the skin, rinse the affected area immediately with clean cold water. Seek prompt medical attention.If acid spills on clothing, first dilute it with clean water, then neutralize with a solution of ammonia/water or bak...
Page 12 - BATTERY REMOVAL; CHARGING THE BATTERY; Adjusting the Seat; KNOB ADJUST
12 ASSEMBLY BATTERY REMOVAL WARNING Battery posts, terminals and related accessories contain lead and lead compounds. Wash hands after handling. The battery is located beneath the seat frame. To remove the battery: 1. Remove the hex washer screw (a) securing the battery hold-down bracket (b) to the ...
Page 13 - OPERATION; Deck Height Index; Lapbar Drive Control Levers
13 OPERATION 2 Deck Height Index If equipped with a deck lift handle: Each height index notch corresponds to approximately a 1⁄2” (12.7 mm) change in deck height. See 3 in Figure 17. If equipped with a deck lift pedal and knob: Each rotation represents a 1⁄4” (6.35 mm) change in deck height. Positio...
Page 14 - CHANGE OIL
14 OPERATION 4a Deck Lift Pedal (If Equipped) The deck lift pedal is located on the front, right corner of the platform. The pedal is used in conjunction with the deck lift knob (if equipped) to raise and lower the mowing deck. Push forward on the deck lift pedal, rotate the deck lift knob to the de...
Page 15 - LOW BATTERY; 2 Throttle/Choke Control Lever, Throttle
15 OPERATION The LCD screen will alternate the letters “LO” followed by “OIL”, followed by the meter’s accumulated time, which indicates the engine has low oil pressure. This is common when starting an engine. The indicator will remain active until the engine sufficiently builds pressure after start...
Page 16 - Operation; BEFORE OPERATING YOUR TRACTOR; CHECKING THE SAFET Y INTERLOCK CIRCUITS; CAUTION; Control Levers Moved
16 OPERATION Operation BEFORE OPERATING YOUR TRACTOR • Before operation, refer to Maintenance Schedule chart located in this manual for regularly scheduled service items. • This engine is certified to operate only on clean, fresh, unleaded gasoline. Fill only with clean, fresh, unleaded gasoline wit...
Page 17 - COLD WEATHER STARTING; STOPPING THE ENGINE; Driving the Tractor
17 OPERATION COLD WEATHER STARTING When starting the engine at temperatures near or below freezing, ensure the correct viscosity motor oil is used in the engine and the battery is fully charged. Start the engine as follows: 1. Be sure the battery is in good condition. A warm battery has much more st...
Page 18 - DRIVING THE TRACTOR FORWARD; DRIVING THE TRACTOR IN REVERSE
18 OPERATION NOTE: Lapbar drive control levers must be moved fully inward before pushing forward or backward to ensure brakes are fully disengaged. Parking the tractor on uneven terrain or a hill may cause the brakes to bind and not release fully. In this case the tractor will not drive when the lap...
Page 19 - TURNING WHILE DRIVING REARWARD
19 OPERATION 1. Slowly and evenly move both lapbar drive control levers rearward. The tractor will start to move in the reverse direction. See Figure 24. Neutral Position Slower Faster Figure 24 2. As the lapbar drive control levers are pushed farther rearward the speed of the tractor will increase....
Page 20 - Counter-clockwise Zero Turn
20 OPERATION 3. To turn counter-clockwise, move the lapbar right drive control lever forward while simultaneously moving the left lapbar drive control lever rearward. See Figure 28. Counter-clockwise Zero Turn Figure 28 STOPPING THE TRACTOR 1. Move both lapbar drive control levers to the neutral pos...
Page 22 - SERVICE AND MAINTENANCE
22 SERVICE AND MAINTENANCE WARNING Before performing any type of maintenance/service, disengage all controls and stop the engine. Wait until all moving parts have come to a complete stop. Disconnect spark plug wire and ground it against the engine to prevent unintended starting. Always wear safety g...
Page 23 - Post-Operation Tractor Care
23 SERVICE AND MAINTENANCE Before Each Use After First 5 Hours Every 10 Hours Every 25 Hours Every 50 Hours Every 100 Hours Every 200 Hours Prior to Storing See Engine Manual Check That All Hardware is in Place & Secure P Check Engine Mounting Bolt Torque (Tighten to 325-450 in-lbs (37-50 N-m)) ...
Page 24 - Cleaning the Tractor
24 SERVICE AND MAINTENANCE 5. From the tractor operator’s seat, start the engine and engage the PTO. Allow to run as needed. Disengage the PTO and stop the engine. 6. Turn off the water supply. 7. Pull back the lock collar of the nozzle adapter to disconnect the nozzle adapter from the deck wash noz...
Page 25 - Storing the Tractor; Do not operate tractor with floor panel removed.; CHANGING THE ENGINE OIL
25 SERVICE AND MAINTENANCE • In addition to cleaning the tractor before operating and storing, do not attempt to mow unusually tall grass (10” (25.4 cm) or higher), dry grass (e.g., pasture) or piles of dry leaves. Dry grass or leaves may contact the engine exhaust and/or build up on the mower deck ...
Page 26 - LUBRICATION; TIRES
26 SERVICE AND MAINTENANCE NOTE: Place an absorbent towel beneath the oil filter to keep oil off the clutch. NOTE: Observe proper disposal laws and regulations for gas, oil, etc. to protect the environment. NOTE: Maintenance, repair or replacement of the emission control devices and systems which ar...
Page 27 - Removing the Tractor from Storage; ADJUSTING DECK LIFT PEDAL
27 SERVICE AND MAINTENANCE Removing the Tractor from Storage 1. Check the engine oil.2. Fully charge the battery and inflate the tires to the recommended pressure. See tire side wall for proper tire inflation pressure. 3. Fill the fuel tank with clean, fresh gasoline.4. Start the engine and allow to...
Page 28 - raise
28 SERVICE AND MAINTENANCE 2. Rotate the blade nearest the discharge chute so that it is parallel with the tractor. 3. Measure the distance from the front of the blade tip to the ground and the rear of the blade tip to the ground. The first measurement taken should be between 1⁄16-1⁄4” (2-6 mm) less...
Page 29 - Decks
29 SERVICE AND MAINTENANCE 1. Move the tractor to a level surface, disengage the PTO, stop the engine, place the RH and LH drive control levers fully outward into the park brake engaged position. 2. There are two methods for removing the belt, to remove the belt by releasing belt tension go on to St...
Page 30 - DECK INSTALLATION; REPLACING THE BELT
30 SERVICE AND MAINTENANCE (a) (b) (c) (d) Figure 43 b. Remove the third bow-tie pin (a) from the clevis pin (b) that secures the front deck control rod (c) to the front deck lift bracket (d). Remove the clevis pin (b). See Figure 44. (a) (d) (c) (b) Figure 44 c. Carefully maneuver the deck out from...
Page 31 - Deck s; Tractor Blade Care
31 SERVICE AND MAINTENANCE 42” Decks (a) (b) (d) (c) (c) (d) Figure 45 46” Decks (a) (b) (c) (c) (d) (d) Figure 46 (d) (b) (a) (d) (c) (c) 50/54” Deck s Figure 47 60” Decks (a) (b) (c) (c) (d) (d) Figure 48 Tractor Blade Care WARNING Before performing any maintenance, disengage the PTO and move the ...
Page 32 - Changing the Transmission Drive Belt
32 SERVICE AND MAINTENANCE 2. Use a 15⁄16” wrench to hold the hex nut on top of the spindle assembly when loosening the hex nut (a) securing the blade (b). A block of wood (c) may be placed between the deck housing and the cutting edge of the blade (b) to help in breaking loose the hex nut (a) secur...
Page 33 - TROUBLESHOOTING; PROBLEM
33 TROUBLESHOOTING WARNING Before performing any type of maintenance/service, disengage all controls and stop the engine. Wait until all moving parts have come to a complete stop. Disconnect spark plug wire and ground it against the engine to prevent unintended starting. Always wear safety glasses d...
Page 34 - Tractor de radio de giro cero; ADVERTENCIA
Prácticas de Operación Seguras • Montaje • Funcionamiento • Servicio y Mantenimiento M anual del O peradOr Tractor de radio de giro cero Controles de la barra de seguridad (“lapbar”) NOTA: Este Manual del Operador corresponde a varios modelos. Las características pueden variar según los modelos. No ...
Page 35 - PRÁCTICAS DE OPERACIÓN SEGURAS; INFORMACIÓN GENERAL
35 PRÁCTICAS DE OPERACIÓN SEGURAS INFORMACIÓN GENERAL 1. Lea, entienda y cumpla todas las instrucciones incluidas en el tractor y en los manuales antes de intentar armar la unidad y utilizarla. Guarde este manual en un lugar seguro para consultas futuras y periódicas, así como para solicitar repuest...
Page 36 - NIÑOS
36 PRÁCTICAS DE OPERACIÓN SEGURAS 6. Revise la holgura superior antes de conducir debajo de ramas bajas de árboles, cables, cerramientos de puertas, etc., donde el operador puede golpearse o ser tirado del tractor, lo que podría resultar en lesiones graves. 7. Nunca deje el tractor en funcionamiento...
Page 37 - INCENDIOS Y COMBUSTIBLE
37 PRÁCTICAS DE OPERACIÓN SEGURAS 2. Para su seguridad, mida las pendientes antes de usar el tractor en el lugar inclinado. Use un dispositivo de medición de pendientes además del indicador de pendiente que se incluye como parte de este manual para medir las pendientes antes de operar este tractor s...
Page 38 - SERVICIO
38 PRÁCTICAS DE OPERACIÓN SEGURAS REMOLQUE CON LOS TRACTORES DE GIRO CERO CON CONTROL DE LA TRANSMISIÓN 1. No remolque cargas que superen las 250 libras (113 kg) de peso de arrastre y nunca supere las 50 libras (22 kg) de peso sobre el punto de enganche. 2. No acople equipo remolcado excepto en el p...
Page 39 - AVISO SOBRE EMISIONES; INDICADOR DE PENDIENTE (CUBIERTA POSTERIOR)
39 PRÁCTICAS DE OPERACIÓN SEGURAS AVISO SOBRE EMISIONES Los motores tienen la certificación de cumplimiento de las reglamentaciones sobre emisiones federales de EPA y California para SORE (equipo pequeño para uso fuera de carreteras), funcionan con gasolina normal sin plomo y pueden incluir los sigu...
Page 40 - SÍMBOLOS DE SEGURIDAD; Símbolo
40 SÍMBOLOS DE SEGURIDAD En esta página, se presentan y describen los símbolos de seguridad que PUEDEN APARECER en este producto. Símbolo Descripción OPESymbol.com ADVERTENCIA – LEA EL MANUAL DEL OPERADORLea, entienda y cumpla todas las reglas e instrucciones de seguridad que se incluyen en el manua...
Page 41 - ¡GUARDE ESTAS INSTRUCCIONES!
41 SÍMBOLOS DE SEGURIDAD Símbolo Descripción ADVERTENCIA - EVITE LESIONES DE AMPUTACIÓNNo ponga las manos ni los pies cerca o debajo de la plataforma de corte. El contacto con la(s) cuchilla(s) puede amputar manos y pies. 1 2 3 ADVERTENCIA - EVITE LESIONES DE AMPUTACIÓNNo ponga las manos ni los pies...
Page 42 - MONTAJE; Preparativos; MUEVA EL TRACTOR MANUALMENTE; Instale el asiento del operador; AJUSTE DE PERILLA O AJUSTE DE PALANCA
42 MONTAJE NOTA: Este manual de operación, corresponde a varios modelos. Las características del tractor pueden variar según los modelos. No todas las características que se incluyen en este manual se aplican a todos los modelos de tractor y la máquina que se ilustra aquí puede diferir de la suya. N...
Page 43 - Figura 5
43 MONTAJE b. Para un asiento con ajuste de palanca, use las tuercas de seguridad con brida (a) y las arandelas planas (b). Consulte la Figura 5. Figura 5 3. Si es necesario, conecte el arnés de cables del interruptor del asiento (a) al interruptor del asiento (b). consulte la Figura 6. Sujete el ca...
Page 44 - Baje el deflector del canal de la plataforma; Figura 9; Ajuste de las ruedas de calibraci
44 MONTAJE Baje el deflector del canal de la plataforma ADVERTENCIA Nunca opere la plataforma de corte sin el deflector del canal instalado y en posición baja. COLOCACIÓN DEL DEFLECTOR DEL CANAL DE DESCARGA (SI FUERA NECESARIO) 1. Retire las chavetas que están sujetas con una unión con cierre al sop...
Page 45 - INFORMACIÓN SOBRE LA BATERÍA; CONEXIÓN DE LOS CABLES DE LA BATERÍA; MANTENIMIENTO DE LA BATERÍA
45 MONTAJE 7. Inserte el tornillo con reborde en uno de los cuatro orificios de posicionamiento, en el del soporte de rueda de calibración delantera. Deje 1⁄4-1⁄2” (6.35-12.7 mm) de separación entre el suelo y la rueda de calibración. 8. Observe el orificio de posicionamiento de la rueda que se acab...
Page 46 - Voltímetro; Ajuste del asiento; AJUSTE POR PERILLA; CARGA DE LA BATERÍA
46 MONTAJE • Un voltímetro o medidor de carga debería dar una lectura de 12.6 voltios (CC) o más en todos los terminales de la batería. Consulte la Figura 14. • Cargue la batería con un cargador de batería de 12 voltios a un MÁXIMO de 10 amperios. Voltímetro (lectura) Estado de la carga Tiempo de ca...
Page 47 - FUNCIONAMIENTO; Posicionamiento de la altura de; Palancas de control de la transmisión
47 FUNCIONAMIENTO Cada palanca de control de la transmisión controla la transmisión respectiva. En consecuencia, estas palancas controlan todos los movimientos del tractor. La conducción del tractor y la realización de maniobras con estas palancas de control difieren mucho de las funciones respectiv...
Page 49 - 1 LCD avisador de servicio y; CAMBIO DE ACEITE; POCA BATERÍA; 2 Palanca de control del acelerador/; 3 Control del cebador (si está equipado)
49 FUNCIONAMIENTO 11 LCD avisador de servicio y medidorhorario (si está equipado) El LCD avisador de servicio le recuerda al operador los intervalos de mantenimiento para el cambio del aceite del motor, el servicio del filtro de aire, las advertencias de bajo nivel de aceite y poca batería. Cuando s...
Page 50 - Funcionamiento; ANTES DE HACER FUNCIONAR EL TRACTOR
50 FUNCIONAMIENTO Herramienta para usos múltiples (Sólo modelos de elevación de la cubierta de pies) La herramienta para usos múltiples (a) está ubicada en el frente de la consola derecha. La herramienta para usos múltiples (a) se puede usar como bloqueo de elevación de la plataforma, para extraer e...
Page 51 - ARRANQUE DEL MOTOR; PRECAUCIÓN; Palancas de control colocadas hacia afuera y; DETENCIÓN DEL MOTOR
51 FUNCIONAMIENTO 3. Con las dos palancas de control de la transmisión de barras de seguridad totalmente hacia afuera en la posición de freno de mano aplicado, active la PTO. Levántelas desde el asiento del operador; el motor se debe detener. ARRANQUE DEL MOTOR PRECAUCIÓN El operador debe estar sent...
Page 52 - Conducción del tractor; Palancas de control colocadas hacia
52 FUNCIONAMIENTO 4. Gire la llave a la posición STOP (detención) y quite la llave del módulo de encendido. NOTA: Siempre quite la llave del módulo de encendido para evitar el arranque accidental o la descarga de la batería si el equipo queda sin supervisión. PRACTIQUE EL MODO DE OPERACIÓN CON EL TR...
Page 53 - CONDUCCIÓN DEL TRACTOR HACIA ADELANTE
53 FUNCIONAMIENTO CONDUCCIÓN DEL TRACTOR HACIA ADELANTE 1. Mueva las palancas de control de la transmisión de barras de seguridad lenta y suavemente hacia adelante. El tractor comenzará a desplazarse hacia adelante. Consulte la Figura 21. Figura 21 2. A medida que las palancas de control de la trans...
Page 54 - CONDUCCIÓN DEL TRACTOR EN MARCHA ATRÁS; Posición de punto muerto
54 FUNCIONAMIENTO CONDUCCIÓN DEL TRACTOR EN MARCHA ATRÁS ADVERTENCIA Siempre mire hacia atrás y hacia abajo a ambos lados del tractor antes de desplazarse marcha atrás. Siempre mire hacia atrás cuando se desplaza en marcha atrás. No se recomienda cortar el césped en marcha atrás. 1. Mueva las dos pa...
Page 55 - DETENCIÓN DEL TRACTOR
55 FUNCIONAMIENTO 2. Para girar en el sentido de las agujas del reloj, mueva la palanca de control de la transmisión de la barra de seguridad izquierda hacia adelante mientras mueve simultáneamente la palanca de control de la transmisión de la barra de seguridad derecha hacia atrás. Consulte la Figu...
Page 57 - SERVICIO Y MANTENIMIENTO; Controle el nivel de aceite del motor
57 SERVICIO Y MANTENIMIENTO ADVERTENCIA Antes de realizar cualquier tipo de mantenimiento o servicio, desactive todos los controles y detenga el motor. Espere a que se detengan completamente todas las piezas móviles. Desconecte el cable de la bujía y póngalo haciendo masa contra el motor para evitar...
Page 58 - Cambie el aceite del motor
58 SERVICIO Y MANTENIMIENTO Antes de cada uso Después de las primeras 5 horas Cada 10 horas Cada 25 horas Cada 50 horas Cada 100 horas Cada 200 horas Antes de almacenar Consulte el manual del motor Revise el tiempo de parada de las cuchillas de la cortadora de césped P P Inspeccione y lubrique las r...
Page 60 - Almacenaje del tractor; EXTRACCIÓN DEL PANEL DEL PISO (SI ESTÁ EQUIPADO); No opere el tractor si se extrajo el panel del piso.
60 SERVICIO Y MANTENIMIENTO • Además de limpiar el tractor antes de utilizarlo y antes de guardarlo, no intente cortar césped demasiado crecido (de 10” (25.4 cm) o más de altura), seco (como un pastizal) ni pilas de hojas secas. El césped o las hojas secas pueden entrar en contacto con el escape del...
Page 61 - MOTOR; CAMBIO DE ACEITE DEL MOTOR; LUBRICACIÓN
61 SERVICIO Y MANTENIMIENTO 2. Levante con cuidado la parte trasera del panel del piso. Consulte 2 en la Figura 33. 3. Para liberar el frente del panel del piso, deslícelo hacia atrás. Consulte 3 en la Figura 33. 4. Levántelo para separarlo del tractor. Consulte 4 en la Figura 33. 5. Para colocar el...
Page 62 - NEUMÁTICOS; Almacenamiento fuera de temporada
62 SERVICIO Y MANTENIMIENTO 2. Si guarda el tractor por 30 días o más: a. Para evitar que se formen depósitos de goma dentro del carburador del motor y posibles desperfectos en el motor, el sistema de combustible debe ser vaciado completamente, o se debe tratar la gasolina con un estabilizador para ...
Page 63 - Ajustes; AJUSTE DEL PEDAL DE ELEVACIÓN DE LA PLATAFORMA; NIVELACIÓN DE LA PLATAFORMA (DE LADO A LADO)
63 SERVICIO Y MANTENIMIENTO Retiro del tractor del lugar de almacenamiento 1. Inspeccione el aceite del motor. 2. Cargue totalmente la batería e infle los neumáticos a la presión recomendada. Consulte los laterales de los neumáticos para averiguar las presiones de inflado adecuadas. 3. Llene el depó...
Page 64 - AJUSTE DE LAS RUEDAS DE LA PLATAFORMA
64 SERVICIO Y MANTENIMIENTO NIVELACIÓN DE LA PLATAFORMA (INCLINACIÓN/DE ADELANTE HACIA ATRÁS) La parte delantera de la plataforma debe estar entre 1⁄16-1⁄4” (2-6 mm) más abajo que la parte trasera de la plataforma. De ser necesario, realice un ajuste de la siguiente manera: 1. Estacione el tractor s...
Page 65 - Servicio; SISTEMA ELÉCTRICO
65 SERVICIO Y MANTENIMIENTO Servicio SISTEMA ELÉCTRICO El tractor tiene instalado un fusible para proteger el sistema eléctrico de los daños causados por el exceso de amperaje. Siempre reemplace con fusibles de la misma capacidad. Si el sistema eléctrico no funciona, controle si hay un fusible quema...
Page 67 - INSTALACIÓN DE LA PLATAFORMA; CAMBIO DE LA CORREA
67 SERVICIO Y MANTENIMIENTO INSTALACIÓN DE LA PLATAFORMA Instale la plataforma sobre el tractor de la siguiente forma: 1. Maniobre con atención la plataforma debajo del tractor desde el lado derecho, alineando las ménsulas de suspensión de la plataforma y los brazos de elevación de la plataforma en ...
Page 68 - Plataformas; Cuidado de las cuchillas del tractor; Cambio de la correa de transmisión
68 SERVICIO Y MANTENIMIENTO (d) (b) (a) (d) (c) (c) Plataformas de 50/54" Figura 47 Plataformas de 60" (a) (b) (c) (c) (d) (d) Figura 48 Cuidado de las cuchillas del tractor ADVERTENCIA Antes de realizar tareas de mantenimiento, desactive la PTO y mueva las palancas de control de la transmis...
Page 69 - SOLUCIÓN DE PROBLEMAS; PROBLEMA
69 SOLUCIÓN DE PROBLEMAS ADVERTENCIA Antes de realizar cualquier tipo de mantenimiento o servicio, desactive todos los controles y detenga el motor. Espere a que se detengan completamente todas las piezas móviles. Desconecte el cable de la bujía y póngalo haciendo masa contra el motor para evitar qu...
Page 71 - Tracteur à rayon de braquage zéro; que le modèle illustré.; AVERTISSEMENT
Consignes de sécurité • Assemblage • Utilisation • Entretien et réparation M anuel de l ’ utilisateur Tracteur à rayon de braquage zéro Commande Lapbar REMARQUE : Ce manuel est commun à plusieurs modèles dont les caractéristiques peuvent différer du vôtre, de même que le modèle illustré. AVERTISSEME...
Page 72 - CONSIGNES DE SÉCURITÉ; RENSEIGNEMENTS GÉNÉRALES
72 CONSIGNES DE SÉCURITÉ RENSEIGNEMENTS GÉNÉRALES 1. Veuillez lire, assimiler et respecter les avertissements et les instructions qui sont apposés sur le tracteur et dans les manuels avant de la monter et de la mettre en marche. Conservez le présent manuel dans un endroit sûr pour consultation régul...
Page 73 - À PROPOS DES ENFANTS
73 CONSIGNES DE SÉCURITÉ 5. Prévoyez votre trajet de tonte pour éviter de projeter l’herbe vers les rues, les trottoirs, les assistants, etc. Évitez d’éjecter l’herbe en direction d’un mur ou d’un obstacle. De cette façon, les débris éventuels ne risquent pas de ricocher en direction de l’opérateur....
Page 74 - FEU ET CARBURANT
74 CONSIGNES DE SÉCURITÉ FONCTIONNEMENT SUR PENTE POUR LES TRACTEURS LAPBAR À RAYON DE BRAQUAGE ZÉRO 1. Les pentes sont l’un des principaux facteurs qui contribuent à la perte de contrôle et aux accidents liés aux renversements qui peuvent entraîner des blessures graves et même causer la mort. Tout ...
Page 75 - DÉPANNAGE
75 CONSIGNES DE SÉCURITÉ 2. Faites très attention en chargeant le tracteur dans une remorque ou un camion, ou en la déchargeant. Il ne faut pas conduire le tracteur sur un plan incliné pour le charger ou le décharger, car il peut basculer et causer des blessures graves. Le tracteur doit être poussé ...
Page 76 - AVIS RELATIF AUX ÉMISSIONS
76 CONSIGNES DE SÉCURITÉ AVIS RELATIF AUX ÉMISSIONS Les moteurs certifiés conformes aux règlements de la Californie et de l’EPA fédérale relatifs à la pollution pour les petits équipements hors route SORE (Small Off Road Equipment) sont certifiés fonctionner à l’essence régulière sans plomb et peuve...
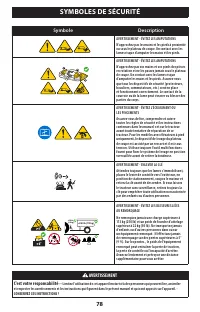
Page 77 - SYMBOLES DE SÉCURITÉ; Symbole
77 SYMBOLES DE SÉCURITÉ Ce tableau illustre et décrit les symboles de sécurité qui peuvent apparaître sur ce produit. Symbole Description OPESymbol.com AVERTISSEMENT – LIRE LE MANUEL DE L’OPÉRATEURAssurez-vous de lire, comprendre et suivre toutes les règles de sécurité et les instructions contenues ...
Page 78 - CONSERVEZ CES INSTRUCTIONS !
78 SYMBOLES DE SÉCURITÉ AVERTISSEMENT C’est votre responsabilité —Limitez l’utilisation de cet appareil motorisé à des personnes qui peuvent lire, assimiler et respecter les avertissements et les instructions qui figurent dans le présent manuel et qui sont apposés sur l’appareil. - CONSERVEZ CES INS...
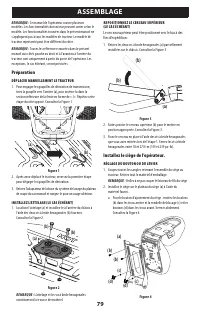
Page 79 - ASSEMBLAGE; Préparation; DÉPLACER MANUELLEMENT LE TRACTEUR; Installez le siège de l’opérateur.; RÉGLAGE DU BOUTON OU DU LEVIER
79 ASSEMBLAGE REMARQUE : Ce manuel de l’opérateur couvre plusieurs modèles. Les fonctionnalités du tracteur peuvent varier selon le modèle. Les fonctionnalités trouvées dans le présent manuel ne s’appliquent pas à tous les modèles de tracteur. Le modèle de tracteur représenté peut être différent du ...
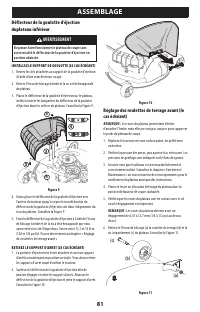
Page 81 - INSTALLEZ LE SUPPORT DE GOULOTTE (LE CAS ÉCHÉANT)
81 ASSEMBLAGE Déflecteur de la goulotte d’éjection duplateau inférieur AVERTISSEMENT Ne jamais faire fonctionner le plateau de coupe sans avoir installé le déflecteur de la goulotte d’éjection en position abaissée. INSTALLEZ LE SUPPORT DE GOULOTTE (LE CAS ÉCHÉANT) 1. Retirez les clés attachées au su...
Page 82 - Renseignements sur la batterie; BRANCHEMENT DES CÂBLES DE LA BATTERIE; ENTRETIEN DE LA BATTERIE
82 ASSEMBLAGE 7. Insérez la vis à épaulement dans l’un des quatre trous d’indexage du support de la roulette de terrage avant. Permettre un dégagement de 6,35 à 12,7 mm (1⁄4-1⁄2 po) entre le sol et la roulette de terrage. 8. Marquez le trou d’indexage utilisé sur la roulette précédemment ajustée. Re...
Page 83 - STOCKAGEDE LA BATTERIE; CHARGEMENT DE LA BATTERIE; Réglage du siège; BOUTON DE RÉGLAGE
83 ASSEMBLAGE • Évitez de la basculer. Même une batterie scellée perdra de l’électrolyte si elle est basculée. STOCKAGEDE LA BATTERIE • Lors du remisage du tracteur pendant des périodes prolongées, déconnectez le câble négatif de la batterie. Il n’est pas nécessaire d’enlever la batterie. • Toutes l...
Page 84 - RÉGLAGE DU LEVIER
84 ASSEMBLAGE RÉGLAGE DU LEVIER 1. Poussez à gauche et maintenez le levier de réglage du siège pour régler la position du siège. 2. Faites glisser le siège vers l’avant ou vers l’arrière jusqu’à la position souhaitée. 3. Relâchez le levier de réglage. Assurez-vous que le siège est bien verrouillé da...
Page 85 - UTILISATION; Indice de hauteur de plateau de coupe; Leviers de commande de la
85 UTILISATION Chaque levier de contrôle commande la transmission correspondante. Par conséquent, ces leviers contrôlent tous les mouvements du tracteur. Conduire et diriger à l’aide de ces leviers de commande est assez différent d’un tracteur conventionnel et sa mise en pratique sera difficile à ma...
Page 86 - PRISE DE FORCE ÉLECTRIQUE(LE CAS ÉCHÉANT)
86 UTILISATION 3 Manche de levage du plateau de coupe (le cas échéant) Le manche de levage du plateau sert à relever et à abaisser le plateau de coupe de la tondeuse. Pour abaisser le plateau de coupe, tirez le manche de levage vers la droite pour le sortir de l’encoche et poussez-le vers le bas. Po...
Page 87 - 1 Compteur horaire et afficheur de; VIDANGER L’HUILE; FAIBL NIVEAU DE LA BATTERIE FAIBLE; 2 COMMANDE D’ACCÉLÉRATEUR /; 3 Contrôle de l’étrangleur (le cas échéant)
87 UTILISATION 11 Compteur horaire et afficheur de service ACL (le cas échéant) Le rappel de service d’entretien ACL rappellera à l’opérateur les intervalles de maintenance pour la vidange de l’huile moteur, l’entretien du filtre à air, les avertissements de bas niveau d’huile moteur et de batterie ...
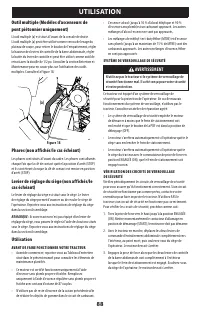
Page 88 - Utilisation; AVANT DE FAIRE FONCTIONNER VOTRE TRACTEUR
88 UTILISATION Outil multiple (Modèles d’ascenseurs de pont piétonnier uniquement) L’outil multiple (a) est situé à l’avant de la console de droite. L’outil multiple (a) peut être utilisé comme verrou de levage du plateau de coupe, pour retirer le boulon de l’empattement, régler la hauteur des levie...
Page 89 - METTRE LE MOTEUR EN MARCH; ATTENTION; DÉMARRAGE PAR TEMPS FROID; ARRÊTER LE MOTEUR
89 UTILISATION METTRE LE MOTEUR EN MARCH ATTENTION L’opérateur doit être assis sur le siège du tracteur pour mettre le moteur en marche. 1. L’opérateur doit être assis sur le siège du tracteur avec les leviers de contrôle de la barre abdominale complètement sortie et en position de stationnement. Co...
Page 90 - Conduire le tracteur; AVANCER LE TRACTEUR
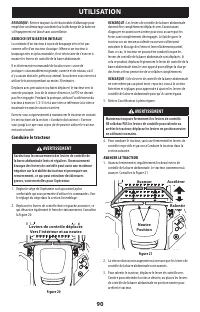
90 UTILISATION REMARQUE : Retirez toujours la clé du module d’allumage pour empêcher un démarrage accidentel ou la décharge de la batterie si l’équipement est laissé sans surveillance. EXERCICE (UTILISATION INITIALE) La conduite d’un tracteur à rayon de braquage zéro n’est pas comme celle d’un tract...
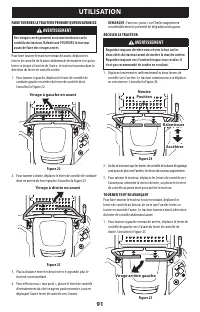
Page 91 - FAIRE TOURNER LE TRACTEUR PENDANT QUEVOUSAVANCEZ; RECULER LE TRACTEUR; TOURNER TOUT EN AVANÇANT
91 UTILISATION FAIRE TOURNER LE TRACTEUR PENDANT QUEVOUSAVANCEZ AVERTISSEMENT Des virages serrés peuvent avoir une incidence sur le contrôle du tracteur. Ralentissez TOUJOURS le tracteur avant de faire des virages serrés. Pour faire tourner le tracteur en marche avant, déplacez les leviers de contrô...
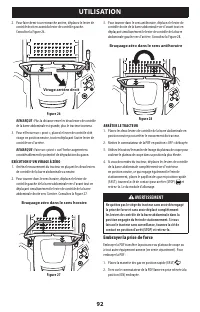
Page 92 - EXÉCUTION D’UN VIRAGE À ZÉRO; Braquage zéro dans le sens antihoraire
92 UTILISATION 2. Pour faire demi-tour en marche arrière, déplacez le levier de contrôle droit en avant du levier de contrôle gauche. Consultez la Figure 26. Figure 26 REMARQUE : Plus la distance entre les deux leviers de contrôle de la barre abdominale est grande, plus le tracteur tournera. 3. Pour...
Page 93 - Tonte
93 UTILISATION REMARQUE : Lorsque vous utilisez le tracteur, assurez-vous que la manette des gaz est toujours en position rapide (FAST) . L’utilisation de la pédale d’accélérateur à une cadence insuffisante peut entraîner une usure prématurée de la batterie et une mauvaise qualité de tonte. 3. Pour ...
Page 94 - ENTRETIEN ET MAINTENANCE; Vérifiez le niveau d’huile moteur.
94 ENTRETIEN ET MAINTENANCE AVERTISSEMENT Avant d’entreprendre toute intervention de maintenance ou d’entretien, désengagez toutes les commandes et arrêtez le moteur. Attendez que toutes les pièces mobiles s’arrêtent complètement. Débranchez le fil de la bougie d’allumage et mettez-le à la terre con...
Page 95 - Entretien du tracteur après utilisation; SYSTÈME DE NETTOYAGE DU PLATEAU
95 ENTRETIEN ET MAINTENANCE Avant chaque utilisa-tion Après les 5 premières heures Toutes les 10 heures Toutes les 25 heures Toutes les 50 heures Toutes les 100 heures Toutes les 200 heures Avant le remi-sage Consultez le manuel du moteur Vérifiez le temps d'arrêt de la lame de coupe P P Inspectez e...
Page 96 - Nettoyage du tracteur
96 ENTRETIEN ET MAINTENANCE Utilisez le système de nettoyage du plateau pour éliminer les déchets de coupe de la face inférieure du plateau et empêcher l’accumulation de produits chimiques corrosifs. Effectuez les étapes suivantes après chaque tonte : 1. Fixez l’adaptateur de buse à un boyau d’arros...
Page 97 - Entretien; RETRAIT DU PANNEAU DE PLANCHER (LE CAS ÉCHÉANT); MOTEUR
97 ENTRETIEN ET MAINTENANCE • Vérifiez le système de carburant (canalisations, réservoir, bouchon et raccords) conformément au programme d’entretien afin de détecter d’éventuelles fissures ou fuites. Réparez et nettoyez, le cas échéant. Entretien RETRAIT DU PANNEAU DE PLANCHER (LE CAS ÉCHÉANT) AVERT...
Page 98 - CHANGEMENT DE L’HUILE MOTEUR; LUBRIFICATION; PNEUS
98 ENTRETIEN ET MAINTENANCE REMARQUE : L’entretien, la réparation et le remplacement de dispositifs et de systèmes antipollution faits aux frais du propriétaire peuvent être effectués par n’importe quel établissement de réparation mécanique ou par n’importe quel mécanicien. Les réparations sous gara...
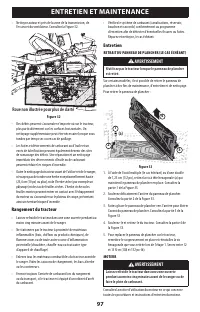
Page 99 - Retirer le tracteur de son lieu de stockage; RÉGLAGE DE LA PÉDALE DE LEVAGE DU PLATEAU; Remisage hors saison
99 ENTRETIEN ET MAINTENANCE REMARQUE : L’utilisation d’une laveuse à pression ou d’un boyau d’arrosage n’est pas recommandée pour nettoyer votre tracteur si ce n’est pour nettoyer le dessous du plateau. Cela risque d’endommager les composantes électriques, les fusées, les poulies, les roulements ou ...
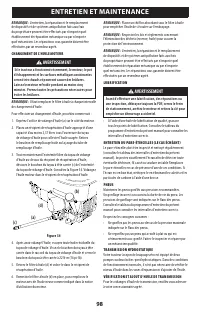
Page 100 - NIVELLEMENT DU PLATEAU; relever
100 ENTRETIEN ET MAINTENANCE 3. Positionnez la pédale sur la position optimale en fonction des préférences de l’opérateur. Voir Figure 36. Figure 36 4. Réinstallez le matériel précédemment retiré et serrez l’écrou à 38-47 N-m (28-35 pi-lb). Voir Figure 35. NIVELLEMENT DU PLATEAU Si le plateau de cou...
Page 101 - abaisser; SYSTÈME ÉLECTRIQUE
101 ENTRETIEN ET MAINTENANCE 6. Pour abaisser l’avant du plateau, retirez l’embout, desserrez le contre-écrou extérieur (a), puis desserrez (vissez à l’extérieur) l’écrou intérieur (b) à l’écart du support de suspension avant. Consultez la Figure 38. Si le réglage est correct, resserrez le contre-éc...
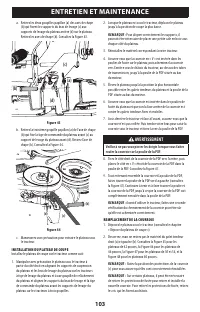
Page 103 - INSTALLATION DU PLATEAU DE COUPE; REMPLACEMENT DE LA COURROIE
103 ENTRETIEN ET MAINTENANCE a. Retirez les deux goupilles papillon (a) des axes de chape (b) qui fixent les supports du bras de levage (c) aux supports de levage du plateau arrière (d) sur le plateau. Retirez les axes de chape (b). Consultez la Figure 43. (a) (b) (c) (d) Figure 43 b. Retirez la tro...
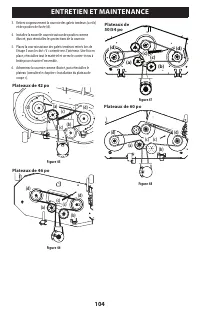
Page 104 - Plateaux de
104 ENTRETIEN ET MAINTENANCE 3. Retirez soigneusement la courroie des galets tendeurs (a et b) et des poulies de fusée (d). 4. Installez la nouvelle courroie autour des poulies comme illustré, puis réinstallez les protections de la courroie. 5. Placez la courroie autour des galets tendeurs retirés l...
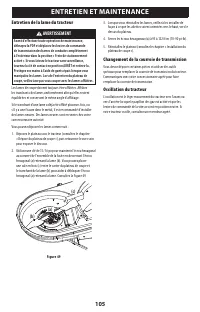
Page 105 - Entretien de la lame du tracteur; Changement de la courroie de transmission
105 ENTRETIEN ET MAINTENANCE Entretien de la lame du tracteur AVERTISSEMENT Avant d’effectuer toute opération de maintenance, débrayez la PDF et déplacez les leviers de commande de transmission des barres de conduite complètement à l’extérieur dans la position « Frein de stationnement activé ». Si v...
Page 106 - PROBLÈME
106 DÉPANNAGE AVERTISSEMENT Avant d’effectuer tout type de maintenance ou d’entretien, désengagez toutes les commandes et arrêtez le moteur. Attendez que toutes les pièces mobiles s’arrêtent complètement. Débranchez le fil de la bougie d’allumage et mettez-le à la terre contre le moteur pour empêche...
Page 108 - OK; ST
SLOPE GAUGE (INDICADOR DE PENDIENTE) (INCLINOMÈTRE) OK 15 °/2 5% S LO PE (P EN D IE N TE D E 15° ) (P EN TE D E 1 5°/ 25 %) 15 °/2 5% S LO PE (P EN D IE N TE D E 15° ) (P EN TE D E 1 5°/ 25 %) TO O S TE EP (D EM A SIADO EM PIN ADA ) (P EN TE TRO P RA ID E) 15 °/2 5% D A SHE D L IN E (L ÍN EA D E G U...


 Craftsman 1816-18CR User Manual
 Craftsman 37062 Manual
 Craftsman 37436 Manual
 Craftsman 37624 Manual
 Craftsman 37639 Manual
 Craftsman 37653 Manual
 Craftsman CMCRM233401 User Manual
 Craftsman CMXGMAM201207 User Manual
 Craftsman CMXGMAM211201 User Manual
 Craftsman CMXGMAM1125499 User Manual
 Craftsman CMXGMAM1125503 User Manual
 Craftsman CMXGMAM1125506 User Manual
 Craftsman CMXGNAM211701 User Manual
 Craftsman CMXGNAM211702 User Manual
 Craftsman CMXGRAM1130036 User Manual