Page 2 - WARNING; CAUTION; WARNING; SAFETY INFORMATION; READ ALL INSTRUCTIONS BEFORE USE; SAVE THESE INSTRUCTIONS; HOUSEHOLD USE ONLY
ENGLISH Page 2 DANGER DANGER - Immediate hazards which WILL result in severe personal injury or death WARNING WARNING - Hazards or unsafe practices which COULD result in severe personal injury or death CAUTION CAUTION - Hazards or unsafe practices which COULD result in minor personal injury IMPORTAN...
Page 3 - POWER SUPPLY CORD; SPECIFICATIONS
ENGLISH Page 3 SAFETY INFORMATION ELECTRICAL REQUIREMENTS This appliance has a polarized plug (one blade is wider than the other). To reduce the risk of electric shock, this plug is intended to fit into a polarized outlet only one way. If the plug does not fit into the outlet, reverse the plug. If i...
Page 4 - HANDLING ALKALINE BATTERIES
ENGLISH Page 4 HANDLING ALKALINE BATTERIES 1. Should fluid from the battery accidentally get into your eyes, there is a threat of loss of eyesight, do not rub them. Immediately rinse your eyes with clean tap water and then consult a physician immediately. 2. Do not put the battery in a fire, expose ...
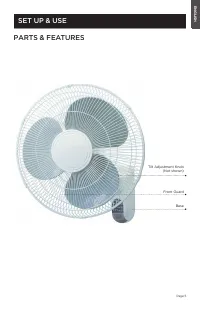
Page 6 - FAN ASSEMBLY
ENGLISH Page 6 FAN ASSEMBLY WARNING : Never attempt to run the fan without the grill in place and properly secured. Failure to have the grill in place can result in serious injury. 1. Remove the rear grill plastic nut from the motor shaft pin by turning it clockwise, while holding the motor housing ...
Page 8 - WALL INSTALLATION
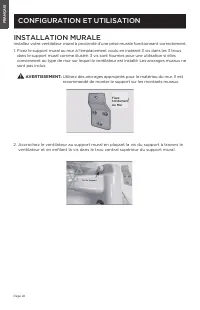
ENGLISH Page 8 SET UP & USE WALL INSTALLATION Install your wall fan near a properly functioning wall outlet. 1. Secure Wall Bracket to the wall in the desired location by inserting 3 screws through the 3 holes in the wall bracket as shown. 3 screws are provided for use if suitable for the wall t...
Page 9 - OPERATION OF YOUR FAN; REMOTE CONTROL BATTERY INSTALLATION; REMOTE CONTROL
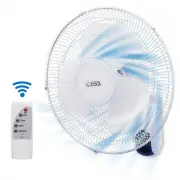
ENGLISH Page 9 OPERATION OF YOUR FAN TILT ADJUSTMENT To adjust the air flow upward or downward, push the grill section lightly to the desired direction. REMOTE CONTROL BATTERY INSTALLATION 1. Press down on the battery compartment cover and slide it out. 2. Insert 2 “AAA” batteries (not included) mak...
Page 10 - MODE; TIMER
ENGLISH Page 10 ON / SPEED • Press this button to turn the fan ON. The fan will begin to operate at low speed if it is the first time you have plugged it in. If the fan was plugged in previously, it will operate at the speed setting when last turned off. • Continue to press the key to scroll through...
Page 11 - CONTROL PANEL; CLEANING AND MAINTENANCE
ENGLISH Page 11 CONTROL PANEL • Press this button to turn the fan ON. The fan will begin to operate at low speed if it is the first time you have plugged it in. If the fan was plugged in previously, it will operate at the speed setting when last turned off. • Continue to press the key to scroll thro...
Page 12 - BEFORE YOU CALL FOR SERVICE; CUSTOMER SERVICE; IMPORTANT; DO NOT RETURN THIS Appliance TO THE STORE; TROUBLESHOOTING
ENGLISH Page 12 BEFORE YOU CALL FOR SERVICE IF THE APPLIANCE FAILS TO OPERATE: A) Check to make sure that the appliance is plugged in securely. If it is not, remove the plug from the outlet, wait 10 seconds and plug it in again securely. B) Check for a blown circuit fuse or a tripped main circuit br...
Page 13 - TROUBLESHOOTING & WARRANTY
ENGLISH Page 13 TROUBLESHOOTING & WARRANTY LIMITED WARRANTY Commercial Cool brand is used under license. Any repair, replacement, or warranty service, and all questions about this appliance should be directed to W Appliance Co. at 1 (855) 855- 0294 from the USA or Puerto Rico. W Appliance Co. wa...
Page 15 - MODÈLE CCFWR16W
Ventilateur Mural de 16 po Manuel de l’Utilisateur MODÈLE CCFWR16W
Page 16 - ATTENTION; CONSIGNES DE SÉCURITÉ IMPORTANTES; AVERTISSEMENT; INFORMATION SUR LA SÉCURITÉ; GARDEZ CES INSTRUCTIONS; UTILISATION DOMESTIQUE UNIQUEMENT
Page 16 DANGER DANGER - Dangers immédiats qui VONT entraîner des blessures graves ou la mort AVERTISSEMENT AVERTISSEMENT - Dangers ou pratiques dangereuses qui POURRAIENT entraîner des blessures graves ou la mort ATTENTION ATTENTION - Dangers ou pratiques dangereuses qui POURRAIENT entraîner des ble...
Page 17 - CORDON D’ALIMENTATION; SPÉCIFICATIONS
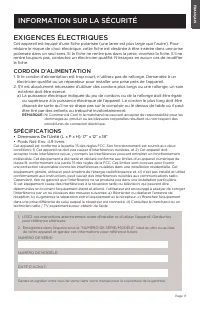
Page 17 FRANÇAIS INFORMATION SUR LA SÉCURITÉ EXIGENCES ÉLECTRIQUES Cet appareil est équipé d’une fiche polarisée (une lame est plus large que l’autre). Pour réduire le risque de choc électrique, cette fiche est destinée à être insérée dans une prise polarisée dans un seul sens. Si la fiche ne rentre...
Page 18 - MANIPULATION DES PILES ALCALINES
Page 18 MANIPULATION DES PILES ALCALINES 1. DSi du liquide de la pile entre accidentellement dans vos yeux, il y a un risque de perte de la vue, ne les frottez pas. Rincez-vous immédiatement les yeux à l’eau claire du robinet et puis consultez immédiatement un médecin. 2. Ne placez pas la pile dans ...
Page 20 - ASSEMBLAGE DU VENTILATEUR; CONFIGURATION ET UTILISATION
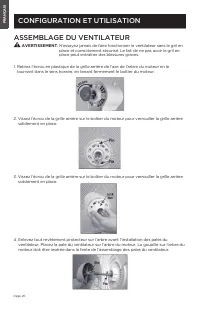
Page 20 ASSEMBLAGE DU VENTILATEUR AVERTISSEMENT : N’essayez jamais de faire fonctionner le ventilateur sans le gril en place et correctement sécurisé. Le fait de ne pas avoir le gril en place peut entraîner des blessures graves. 1. Retirez l’écrou en plastique de la grille arrière de l’axe de l’arbr...
Page 23 - FONCTIONNEMENT DE VOTRE VENTILATEUR; INSTALLATION DE LA PILE DE LA TÉLÉCOMMANDE; TÉLÉCOMMANDE
Page 23 FONCTIONNEMENT DE VOTRE VENTILATEUR RÉGLAGE DE L’INCLINAISON Pour régler le débit d’air vers le haut ou vers le bas, poussez légèrement la section de la grille dans la direction souhaitée. INSTALLATION DE LA PILE DE LA TÉLÉCOMMANDE 1. Appuyez sur le couvercle du compartiment à piles et faite...
Page 24 - MINUTERIE
Page 24 MARCHE / VITESSE • Appuyez sur ce bouton pour mettre le ventilateur en marche. Le ventilateur commencera à fonctionner à basse vitesse si c’est la première fois que vous l’avez branché. Si le ventilateur a été branché précédemment, il fonctionnera au réglage de la vitesse lors de la dernière...
Page 25 - PANNEAU DE COMMANDE
Page 25 PANNEAU DE COMMANDE • Appuyez sur ce bouton pour mettre le ventilateur en marche. Le ventilateur commencera à fonctionner à basse vitesse si c’est la première fois que vous le branchez. Si le ventilateur était branché auparavant, il fonctionnera à la vitesse réglée lors de sa dernière mise h...
Page 26 - AVANT D’APPELER POUR LE SERVICE; SERVICE À LA CLIENTÈLE; NE RETOURNEZ PAS CET APPAREIL AU MAGASIN; DÉPANNAGE
Page 26 AVANT D’APPELER POUR LE SERVICE SI L’APPAREIL NE FONCTIONNE PAS: A) Vérifiez que l’appareil est correctement branché. Si ce n’est pas le cas, retirez la fiche de la prise, attendez 10 secondes et rebranchez-la solidement. B) Recherchez un fusible de circuit grillé ou un disjoncteur principal...
Page 29 - MODELO CCFWR16W
Ventilador De Pared De 16” Manual del usuario MODELO CCFWR16W
Page 30 - ADVERTENCIA; PRECAUCIÓN; ADVERTENCIA; INFORMACIÓN DE SEGURIDAD; CONSERVE ESTAS INSTRUCCIONES; SOLO PARA USO DOMÉSTICO
Page 30 PELIGRO PELIGRO - Amenazas inmediatas que resultarán en lesiones personales graves o la muerte ADVERTENCIA ADVERTENCIA - Peligros o prácticas inseguras que pueden resultar en lesiones personales graves o la muerte PRECAUCIÓN PRECAUCIÓN - Peligros o prácticas inseguras que pueden resultar en ...
Page 31 - CABLE DE ALIMENTACIÓN; ESPECIFICACIONES
Page 31 INFORMACIÓN DE SEGURIDAD REQUISITOS ELÉCTRICOS Este aparato tiene un enchufe polarizado (una clavija es más ancha de la otra). Para reducir el riesgo de descarga eléctrica, este enchufe fue diseñado para encajar en una toma polarizada de una sola manera. Si el enchufe no encaja en la toma, d...
Page 32 - MANIPULACIÓN DE PILAS ALCALINAS
Page 32 MANIPULACIÓN DE PILAS ALCALINAS 1. Si el fluido de las pilas entrara en contacto con sus ojos accidentalmente, existe el riesgo de pérdida de la visión, no los frote. Enjuague sus ojos inmediatamente con abundante agua del grifo y luego consulte a un médico inmediatamente. 2. No coloque la p...
Page 34 - ENSAMBLAJE DEL VENTILADOR; CONFIGURACIÓN Y USO
Page 34 ENSAMBLAJE DEL VENTILADOR ADVERTENCIA: Never attempt to run the fan without the grill in place and properly secured. Failure to have the grill in place can result in serious injury. 1. Retire la tuerca de plástico que sujetará la parrilla trasera girándola en sentido horario para sacarla del...
Page 37 - OPERACIÓN DE SU VENTILADOR; INSTALACIÓN DE LAS PILAS DEL CONTROL REMOTO; CONTROL REMOTO
Page 37 OPERACIÓN DE SU VENTILADOR AJUSTE DE LA INCLINACIÓN Para ajustar el flujo de aire hacia arriba o hacia abajo, empuje la sección de la parrilla ligeramente hacia la dirección deseada. INSTALACIÓN DE LAS PILAS DEL CONTROL REMOTO 1. Presione y deslice hacia afuera la tapa del compartimiento de ...
Page 40 - ANTES DE LLAMAR AL SERVICIO TÉCNICO; SERVICIO AL CLIENTE; IMPORTANTE; NO DEVUELVA ESTE PRODUCTO A LA TIENDA; RESOLUCIÓN DE PROBLEMAS
Page 40 ANTES DE LLAMAR AL SERVICIO TÉCNICO SI EL APARATO NO FUNCIONA: A) Asegúrese de que el aparato esté enchufado de forma segura. Si no lo está, retire el enchufe de la toma de corriente, espere 10 segundos y conéctelo nuevamente de forma segura. B) Compruebe si hay un fusible quemado o un disyu...