Chefman RJ55-SS-11 - User Manual
Chefman RJ55-SS-11 Microwave – User Manual, read for free online in PDF format. We hope this helps you resolve any issues you may have. If you have further questions, please contact us through the contact form.


Table of Contents:
- Page 2 – READ ALL INSTRUCTIONS BEFORE USE; COOKING FORWARDTM; size makes it perfect for small spaces.; The Chefman
- Page 3 – CONTENTS
- Page 4 – Specifications; SAFETY INSTRUCTIONS; IMPORTANT SAFEGUARDS
- Page 8 – GROUNDING INSTRUCTIONS; DANGER; Improper use of the grounding plug can result in electrical shock.
- Page 9 – UTENSIL TEST; use it in the microwave.
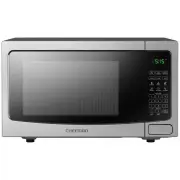
- Page 10 – FEATURES
- Page 12 – OPERATING INSTRUCTIONS; BEFORE FIRST USE; Never immerse the unit in water or other liquids.; COUNTERTOP INSTALLATION; • a minimum clearance of 12 inches
- Page 13 – receiver are on different branch circuits.; TURNTABLE INSTALLATION; If the turntable
- Page 14 – MATERIALS YOU CAN AND CAN’T USE IN THE OVEN
- Page 15 – MATERIALS YOU CAN AND CAN’T USE IN THE OVEN (continued)
- Page 16 – TO MICROWAVE IN MANUAL MODE; Press TIME COOK, and use the keypad to enter the cooking time.
- Page 17 – Press START. The unit will begin cooking and counting down.; TO DEFROST; Press START. The unit will begin defrosting and counting down.
- Page 18 – TO USE PRESET FUNCTIONS; PRESET FUNCTION CHART
- Page 19 – TO USE THE FAVORITES FUNCTION
- Page 20 – OTHER FUNCTIONS; used to cook when the timer is in use.; Safety Lock
- Page 21 – TROUBLESHOOTING
- Page 23 – CLEANING & MAINTENANCE
- Page 24 – TERMS AND CONDITIONS; Limited Warranty
- Page 26 – CHEFMAN; Label depicted here is an example.; What do I need to register my product?
- Page 27 – For product information,; Chefman® is a registered trademark of RJ Brands, LLC.
Countertop Select
1.1
C
u
. F
t
.
microwave
USER GUIDE
• Safety Instructions
• Features
• Operating Instructions
• Troubleshooting
• Cleaning and Maintenance
• Terms and Conditions
• Warranty Registration
RJ55-SS-11
Oz
POWER
CLOCK
TIMER
TIME
COOK
TIME
DEFROST
WEIGHT
DEFROST
VEGGIES
LEFTOVERS
POTATO
BEVERAGE
POPCORN
PIZZA
QUICK START
SELECT
FAVORITE
SAFETY
LOCK
ECO MOD E
ON | OFF
STOP
CANCEL
1
2
3
4
5
6
7
8
0
9
START
+30s
"Loading the manual" means you need to wait until the file loads and becomes available for online reading. Some manuals are very large, and the time they take to appear depends on your internet speed.
Summary
READ ALL INSTRUCTIONS BEFORE USE For your safety and continued enjoyment of this product, always read the instruction manual before using. COOKING FORWARD™ Welcome! Thank you for choosing the Countertop Select 1.1 Cu. Ft. Microwave as the newest addition to your kitchen. Whether this is your first C...
4 Safety Instructions 10 Features 12 Operating Instructions 21 Troubleshooting 23 Cleaning and Maintenance 24 Terms and Conditions 26 Warranty Registration CONTENTS
4 PRECAUTIONS TO AVOID POSSIBLE EXPOSURE TO EXCESSIVE MICROWAVE ENERGY 1. Do not attempt to operate this oven with the door open since this can result in harmful exposure to microwave energy. It is important not to disable or tamper with the safety interlocks. 2. Do not place any object between the ...