Page 2 - WARNING; WARNING; CAUTION; ENVIRONMENTAL TIPS; CONGRATULATIONS; IMPORTANT INFORMATION THAT MAY IMPACT
Congratulations and thank you for choosing our Built-in Oven. We are sure you will find your new appliance a pleasure to use and a great asset to your cooking. Before you use the appliance, we recommend that you read through the whole user manual which provides a description of the product and its f...
Page 3 - GENERAL SAFETY; THIS APPLIANCE MUST BE EARTHED.
GENERAL SAFETY Built-in Cooking GENERAL SAFETY 3 TIPS & INFORMATION TIPS & INFORMATION Important – check for any damage or marksIf you find the appliance is damaged or marked, you must report it within 7 days if you wish to claim for damage/marks under the manufacturer’s warranty. This does ...
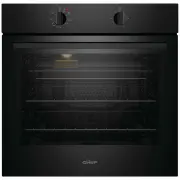
Page 4 - CVE612 UNDERBENCH OVEN MULTIFUNCTION 3
DESCRIPTION OF YOUR APPLIANCE CVE612 UNDERBENCH OVEN MULTIFUNCTION 3 Oven temperature selector Timer CVE614 UNDERBENCH OVEN MULTIFUNCTION 7 Oven function selector 3 button progammable clock Oven/Grill temperature selector CVE662 SEPARATE GRILL WALL OVEN MULTIFUNCTION Oven temperature selector Separa...
Page 5 - USE AN AUTHORISED PERSON; LEVELLING OVEN; IMPORTANT: This appliance must be properly earthed.; claims and lead to prosecution.; INSTALLATION
WARNING WARNING USE AN AUTHORISED PERSON As stated in the local municipal building codes and other relevant statutory regulations:• Wiring connections must be in accordance with AS/NZS 3000 Wiring Rules and any particular conditions of the local authority. • Refer to data plate for rating informatio...
Page 6 - CABINET CONSTRUCTION FOR YOUR APPLIANCE; NOTE: Your appliance must be mounted on a flat, horizontal; UNDERBENCH OVENS; NOTE: If a powerpoint is fitted
6 INSTALLATION Built-in Cooking INSTALLATION (CONT.) CABINET CONSTRUCTION FOR YOUR APPLIANCE For the best integration within a kitchen, install this appliance in a standard 600mm wide cupboard that gives a flush fit with the surrounding cupboard fronts (figure A). A recess of 20mm is ideal. This app...
Page 7 - HARD WIRING DETAIL; connections to terminals.; SEPARATE GRILL WALL OVEN & PIZZA OVEN; A requirement for all separate grill wall ovens and all Duo
HARD WIRING DETAIL 1. Remove terminal cover plate from rear panel of appliance.2. Fit wires through hole in cover plate and make connections to terminals. 3. Engage wires into plastic clip. Secure plastic clip with two long silver screws (supplied in separate bag). 4. Replace cover plate onto rear p...
Page 8 - PYROLYTIC UNDERBENCH OVEN-FLUSH FIT ONLY; Your underbench oven looks best when the control panel is
PYROLYTIC UNDERBENCH OVEN-FLUSH FIT ONLY Your underbench oven looks best when the control panel is directly under the benchtop. An upper infill panel may have to be added if the cooktop placed over the oven is too deep. Refer to cooktop installation instructions for required clearance between cookto...
Page 9 - BEFORE OPERATING YOUR; SETTING THE TIME; NOTE: For any time below fifteen minutes turn the knob; button programmable clock (where applicable); PREPARING YOUR APPLIANCE FOR THE FIRST TIME
Built-in Cooking BEFORE OPERATING YOUR APPLIANCE 9 BEFORE OPERATING YOUR APPLIANCE FOR THE FIRST TIME SETTING THE TIME 3 button programmable clock (where applicable) After electrically connecting the appliance, you must set the time of the day before you can operate your oven. • After the appliance ...
Page 10 - INSTALLING YOUR OVEN ACCESSORIES; Shelves and trays; Ensure the shelves are inserted in the correct orientation,
BEFORE OPERATING YOUR APPLIANCE FOR THE FIRST TIME (CONT.) 10 BEFORE OPERATING YOUR APPLIANCE Built-in Cooking INSTALLING YOUR OVEN ACCESSORIES The type of oven accessories you receive is dependant on the model you have purchased. 1. Shelves and trays WARNING CAUTION Ensure the shelves are inserted ...
Page 11 - IMPORTANT; The shelves are designed so that they have maximum travel but
Built-in Cooking BEFORE OPERATING YOUR APPLIANCE 11 Shelves and trays (CVE614 and CVEP614) TIPS & INFORMATION IMPORTANT The shelves are designed so that they have maximum travel but cannot be accidentally pulled right out. The trays are designed the same way and fit straight into the side racks....
Page 12 - OPERATING THE; BUTTON PROGRAMMABLE CLOCK; Selecting the timer
12 OPERATING THE PROGRAMMABLE CLOCK Built-in Cooking OPERATING THE PROGRAMMABLE CLOCK 3 BUTTON PROGRAMMABLE CLOCK Your oven is equipped with a 3 button timer that has the following features:• Timer - you can set a countdown time that will beep when the set time has elapsed. • Cook time - you can set...
Page 13 - BUTTON PROGRAMMABLE CLOCK
Built-in Cooking OPERATING THE PROGRAMMABLE CLOCK 13 Setting the delayed start cooking time • Set the cook time and end time as described in the previous sections. • Once both the cook time and end time have been set, the cook time and the end time ‘indicators’ will stop flashing and the current tim...
Page 16 - UNDERSTANDING YOUR OVEN FUNCTIONS; Fan Bake; NOTE: For models CVE612 and CVE662, to set up; Bake; USING YOUR OVEN
UNDERSTANDING YOUR OVEN FUNCTIONS Your oven will have a selection of the following functions. Refer to “Description of your appliance” to confirm what functions are available to you. Fan Bake Heat comes from the element surrounding the fan. This fan circulates the hot air around the oven cavity so t...
Page 17 - Quick Cook; the cooling fan will operate as soon as the function is selected.; CONDENSATION; NOTE: If you are using water in cooking, this will turn
Quick Cook Quick Cook allows you to preheat your oven 30% quicker than with standard “Bake”. Heat comes from the element surrounding the fan as well as a smaller element above the food. Quick Cook for rapid, high and even heat means better roasts at home, also ideal for cooking frozen pre-cooked foo...
Page 18 - OPERATING YOUR OVEN TEMPERATURE SELECTOR; NOTE: For multifunction ovens the desired cooking function; PRE-HEATING YOUR APPLIANCE; With “Fan Bake”; OVEN; ON COMPLETION OF COOKING
OPERATING YOUR OVEN TEMPERATURE SELECTOR A thermostat controls the temperature in your appliance. The temperature can be selected within the specified range. To set the temperature, turn the temperature selector in a clockwise direction to the desired setting. An indicator light above the temperatur...
Page 19 - Position Rack; Oven shelf location; COOKING GUIDE
COOKING GUIDE • Select the correct shelf location for food being cooked.• Make sure dishes will fit into the oven before you switch it on.• Keep edges of baking dishes at least 40mm from the side of the oven. This allows free circulation of heat and ensures even cooking. • Do not open the oven door ...
Page 20 - CHOOSING THE BEST OVEN SETTINGS; COOKING WITH THE PIZZA STONE; TIPS
CHOOSING THE BEST OVEN SETTINGS The following table is intended as a guide and experience may show some variation in cooking times necessary to meet individual requirements. For best baking results preheat the oven for 30 minutes. FOOD NON FAN MODE FAN MODE OVEN TIME IN MINUTES Temperature ºC O ven ...
Page 21 - ROASTING MEAT; RECOM MENDED TEMPER ATURE oC
Built-in Cooking COOKING GUIDE 21 ROASTING MEAT 1. Place the meat in the oven and set the temperature between 180°C and 200°C. (It is recommended to wrap your meats in an oven roasting bag or foil to prevent fats and oils from splattering, making it easier to clean your oven.) 2. Use the grill/oven ...
Page 22 - GRILLING GUIDE; GRILLING HINTS; Note: Always clean the grill/oven dish after every use. Excessive; Depending on your model of appliance, you will grill:; NOTE: Always use grill dish for grilling. Especially when using; As a method of cooking, grilling can be used to:; GUIDE TO BETTER GRILLING; For better grilling results, follow these easy instructions:
22 GRILLING GUIDE Built-in Cooking GRILLING GUIDE GRILLING HINTS WARNING WARNING Note: Always clean the grill/oven dish after every use. Excessive fat build up may cause a fire. Depending on your model of appliance, you will grill: • With the door open, if you are grilling in the separate grill comp...
Page 23 - PROBLEM
DEALING WITH COOKING PROBLEMS Built-in Cooking DEALING WITH COOKING PROBLEMS 23 PROBLEM CAUSES REMEDY Uneven cooking Incorrect shelf position Select shelf that puts food in centre of oven Oven tray too large Try other trays or dishes Trays not in centre Put trays in centre Air flow in oven uneven Ro...
Page 24 - GET TO KNOW YOUR NEW OVEN WITH THIS; ‘Simple Test Cake’; NOTE: If desired, substitute butter for either margarine or olive
GET TO KNOW YOUR OVEN 24 GET TO KNOW YOUR OVEN Built-in Cooking GET TO KNOW YOUR NEW OVEN WITH THIS ‘SIMPLE TEST CAKE’ Although we strive for a perfect performing oven, it’s possible that there will be some variation in colour when baking. Therefore, we suggest to make this easy and delicious Simple...
Page 25 - CLEANING YOUR APPLIANCE; Care must be taken when wiping exposed stainless steel; Removing the grill dish and shelves from your appliance
CLEANING YOUR APPLIANCE Built-in Cooking CLEANING YOUR APPLIANCE 25 TIPS & INFORMATION TIPS & INFORMATION Important: • Always make sure that the oven is electrically isolated before cleaning. This can be done via the functional switch located nearby. Do not use steam cleaners. • Do not line ...
Page 26 - Removing and replacing the oven back light and side light; • Turn oven back light glass anticlockwise to remove it for; Make sure the appliance is turned off before you remove; Removing the wire side racks (where applicable)
CLEANING YOUR APPLIANCE (CONT.) Removing and replacing the oven back light and side light (where fitted) • Turn oven back light glass anticlockwise to remove it for globe replacement. • To remove side light, place a spoon under the light glass and lever off. Replace globe and snap glass cover back i...
Page 27 - RELEASING THE GRILL ELEMENT; Retaining wire models; • Lift element up carefully.; Retaining clips models; Rotating latch models
Built-in Cooking CLEANING YOUR APPLIANCE 27 RELEASING THE GRILL ELEMENT Retaining wire models We have designed the upper element with a hanger clip to help you reach your oven roof for cleaning. • Lift element up carefully. • Push the sides of the clip together.The element will drop down freely. Ret...
Page 28 - Do not lift the door by the handle. Rough handling will cause; Removing the oven door
CLEANING YOUR OVEN DOOR WARNING WARNING Do not lift the door by the handle. Rough handling will cause glass to break. Removing the oven door Your oven is equipped with a door that can be disassembled in order to clean all the panes of glass. Remove the door before cleaning.• Open the door fully to a...
Page 29 - Removing door glass panels (2 layer and 3 layer doors); layer door shown; Re-assembling bottom trim
Built-in Cooking CLEANING YOUR OVEN DOOR 29 Removing door glass panels (2 layer and 3 layer doors) WARNING WARNING Rough handling, especially around the edges can cause the glass to break.• Lift the black bordered glass panel out of the guide.• Repeat this for the smaller clear glass panel (when fit...
Page 30 - CLEANING YOUR; Re-assembling top door trim
CLEANING YOUR OVEN DOOR (CONT.) Re-assembling top door trim • Hold the top door trim at each side and position it to the inside edge of the glass. • Push the trim down with its top edge over glass panel until the clip snaps in on each side of the trim. • Push the middle of the trim down to ensure it...
Page 31 - CLEANING THE 4 LAYER DOOR; Removing oven door top trim; CLEANING YOUR OVEN DOOR
Built-in Cooking CLEANING YOUR OVEN DOOR (PYROLYTIC MODELS) 31 CLEANING THE 4 LAYER DOOR (PYROLYTIC MODELS) WARNING CAUTION Do not lift the door by the handle. Rough handling will cause glass to break. Removing the oven door TIPS & INFORMATION IMPORTANT Your oven is equipped with a door that can...
Page 32 - Removing the door glass panels; Cleaning the door glass panels; Re-assembling the 4 layer oven door
Removing the door glass panels WARNING CAUTION Rough handling, especially around the edges can cause the glass to break.• Lift the black bordered glass panel out of the guide and place on something soft and flat to prevent scratches. • Repeat this for the smaller clear glass panels.• When removing p...
Page 33 - Replacing the top door trim
Built-in Cooking CLEANING YOUR OVEN DOOR (PYROLYTIC MODELS) 33 • Insert the black bordered glass panel into the upper position, ensuring the painted surface is facing the downside as per the diagram below.. stirrup in locked position door column Replacing the top door trim • Hold the top door trim a...
Page 34 - PYROLYTIC CLEANING; Pyrolytic Cleaning of the Oven Cavity; Starting the Pyrolytic cleaning function; NOTE: The “Remaining time” does not include cool-down time
PYROLYTIC CLEANING Pyrolytic Cleaning of the Oven Cavity (Pyrolytic models only) The oven has a pyrolytic self-cleaning function. It cleans by burning off the spatters and accumulated dirt and grease from the oven liner, at high temperature. This process produces ash which can then be wiped out of t...
Page 35 - SOLVING PROBLEMS; Faults; It may be possible to avoid a call by fixing the problem; Data Plate; The data plate is visible when the oven or grill door is open.
SOLVING PROBLEMS Faults If there is a problem with the oven and/or grill, please: • Check the points listed below before calling for service. It may be possible to avoid a call by fixing the problem yourself – and so continue cooking. • For cooking problems refer to “Dealing with cooking problems” s...
Page 36 - NOTES
Page 39 - Warranty; Important Notice; AUSTRALIA; NEW ZEALAND
This document sets out the terms and conditions of the product warranties for Chef Appliances. It is an important document. Please keep it with your proof of purchase documents in a safe place for future reference should there be a manufacturing defect in your Appliance. This warranty is in addition...
Page 40 - Contact us if you need more help; Australia
WE ARE PART OF THE ELECTROLUX FAMILY. TO ADD A TOUCH OF PROFESSIONAL INSPIRATION TO YOUR HOME, VISIT ELECTROLUX.COM © 2021 Electrolux Home Products Pty Ltd ABN 51 004 762 341 Part No. A21347501 Rev 03 ECN 133242 C_ MAN_Oven_ Mar21 Contact us if you need more help Australia phone: ......................