Candy CAFB1400 019 - User Manual
Candy CAFB1400 019 Vacuum – User Manual, read for free online in PDF format. We hope this helps you resolve any issues you may have. If you have further questions, please contact us through the contact form.
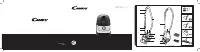


Table of Contents:
- Page 2 – * Certain models only
- Page 3 – INSTRUCTIONS FOR SAFE USE
- Page 4 – CLEANER MAINTENANCE; Replacing The Dust Bag; ACCESSORIES AND NOZZLES; Removing a Blockage From The System
- Page 5 – your local Candy service.; Candy spares and Consumables; Quality; Your Guarantee; any claim under the terms of this guarantee.
- Page 6 – ИНСТРУКЦИИ ПО ТЕХНИКЕ БЕЗОПАСНОСТИ; Статическое электричество:; ПОЗНАКОМЬТЕСЬ С КОНСТРУКЦИЕЙ ВАШЕГО ПЫЛЕСОСА; Твердое напольное покрытие:
- Page 7 – ТЕХНИЧЕСКОЕ ОБСЛУЖИВАНИЕ ПЫЛЕСОСА; Замена мешка для сбора пыли; АКСЕССУАРЫ И НАСАДКИ; Удаление засора
- Page 8 – Не засорились ли шланг или насадка? См. раздел «Устранение засоров».; Запасные части и расходные материалы компании Candy; части обязательно указывайте номер модели пылесоса.; Сервисное обслуживание компании Candy; Отдел обслуживания компании Candy.; Качество; Условия гарантии; условиями гарантии для данного прибора.
PRINTED IN P.R.C.
1
48030486
USER MANUAL (GB) ..............................P 01
РУКОВОДСТВО ПОЛЬЗОВАТЕЛЯ (RU)
.....P 04
S
A
Q
R
P
B
C
D
S
E
F*
G*
L*
M
I* J
N**
O
V*
W*
U*
T*
* Certain models only
** Nozzle design may vary according to model
K
H*
"Loading the manual" means you need to wait until the file loads and becomes available for online reading. Some manuals are very large, and the time they take to appear depends on your internet speed.
Summary
2 3 4 5 6* 7 8 9* 10 * 11 12 13 14 15 16 17 18 19 20 21 * Certain models only 22 23
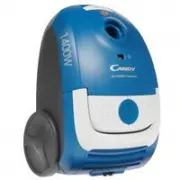
GETTING TO KNOW YOUR CLEANER ASSEMBLING YOUR CLEANER Remove all components from the packaging. 1. Connect the hose to the cleaner main body, ensuring it clips and locks into position. To release: simply press the two buttons on the hose end and pull [2] . 2. Connect the tube upper end to the handle....
CLEANER MAINTENANCE Replacing The Dust Bag If the bag check indicator is red please check and, if necessary, replace the bag.1. Lift the bag door release latch [13] to open the cover, pull the bag holder [14] and pull the bag collar to remove the bag [15] . 2. Apply the peel and seal sticker, locate...