Page 3 - “IMPORTANTES CONSIGNES DE SECURITE”; DANGER –; AVERTISSEMENT –; “CONSERVER CES INSTRUCTIONS”
“IMPORTANTES CONSIGNES DE SECURITE” Lors de l’utilisation de la machine à coudre, il convient de toujours suivre les consignes de sécurité essentielles et de prendre notamment les précautions suivantes: “Lire toutes les instructions avant d’utiliser la machine.” DANGER – Pour réduire le risque de dé...
Page 4 - PELIGRO –; CUIDADO –; “CONSERVE ESTE MANUAL DE INSTRUCCIONES”
“IMPORTANTES INSTRUCCIONES DE SEGURIDAD” Cuando se usa una máquina de coser, debe seguirse unas precauciones básicas y que vienen incluidas a continuación. “Leer las instrucciones antes de usar” PELIGRO – Para reducir el riesgo de una descarga eléctrica. 1. L a m á q u i n a n o d e b e d e j a r s ...
Page 5 - Connecting Plugs and Main Power / Sewing Light Switch
FOR USERS IN UK, EIRE, MALTA AND CYPRUS ONLY. If this machine is fitted with a 3 pin non-rewireable BS plug then please read the following. IMPORTANT (in the United Kingdom) Main supply (AC 230/240V~, 50Hz) DO NOT cut off the main plug from equipment. If the plugfitted is not suitable for the power ...
Page 7 - PLEASE READ BEFORE USING THIS MACHINE
PLEASE READ BEFORE USING THIS MACHINE For safe operation 1. Be sure to keep your eye on the needle while sewing. Do not touch the balance wheel, thread take-up, needle, or other moving parts. 2. Remember to turn off the power switch and unplug the cord when: • Operation is completed• Replacing or re...
Page 9 - LEA ESTE MANUAL ANTES DE USAR ESTA MÁQUINA
LEA ESTE MANUAL ANTES DE USAR ESTA MÁQUINA Para un funcionamiento seguro 1. Esté siempre atento a la aguja cuando cosa. No toque la polea, el tirahilo, la aguja u otras piezas móviles.2. Acuérdese de apagar la máquina y desenchufarla de la corriente cuando: • Termine la labor• Recambie o retire la a...
Page 10 - TABLE OF CONTENTS
KNOWING YOUR SEWING MACHINE PRINCIPAL PARTS ......................................................... 1ACCESSORIES ............................................................... 5 Optional Accessories .............................................. 5 OPERATING YOUR SEWING MACHINE ......................
Page 11 - TABLE DES MATIÈRES
TABLE DES MATIÈRES CONNAITRE SA MACHINE A COUDRE PIÈCES PRINCIPALES ........................................................... 2ACCESSOIRES ........................................................................ 6 Accessoires en option ..................................................... 6 FONCTI...
Page 12 - CONTENIDO
CONTENIDO CONOZCA SU MÁQUINA DE COSER ELEMENTOS PRINCIPALES ............................................... 2ACCESORIOS ................................................................... 6 Accesorios opcionales ............................................. 6 FUNCIONAMIENTO DE LA MÁQUINA DE COSER .....
Page 13 - PRINCIPAL PARTS
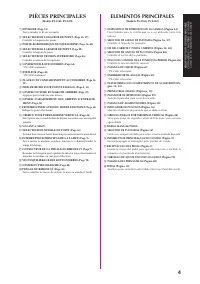
1 KNOWING YOUR SEWING MACHINE CONNAITRE SA MACHINE A COUDRE CONOZCA SU MÁQUINA DE COSER 5 2 1 D 3 4 9 0 C 8 B 7 6 A L E G H I M J K F PRINCIPAL PARTS (Model PS-2470, PS-3100) 1 BOBBIN WINDER (Page 33) Winds the thread onto the bobbin to be used for the lower thread. 2 STITCH LENGTH DIAL (Page 15, 26...
Page 14 - ELEMENTOS PRINCIPALES
2 KNOWING YOUR SEWING MACHINE CONNAITRE SA MACHINE A COUDRE CONOZCA SU MÁQUINA DE COSER ELEMENTOS PRINCIPALES (Modelo PS-2470, PS-3100) 1 DISPOSITIVO DE BOBINADO DE LA CANILLA (Página 34) Hace bobina para la canilla que va a ser utilizada como hilo inferior. 2 SELECTOR DE LARGO DE PUNTADA (Página 16...
Page 16 - PIÈCES PRINCIPALES
4 KNOWING YOUR SEWING MACHINE CONNAITRE SA MACHINE A COUDRE CONOZCA SU MÁQUINA DE COSER ELEMENTOS PRINCIPALES (Modelo PS-2360, PS-2250) 1 DISPOSITIVO DE BOBINADO DE LA CANILLA (Página 34) Hace bobina para la canilla que va a ser utilizada como hilo inferior. 2 SELECTOR DE LARGO DE PUNTADA (Página 16...
Page 17 - ACCESSORIES; Optional Accessories
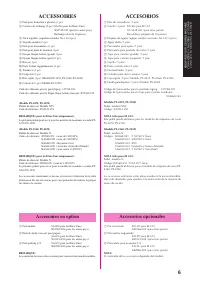
5 KNOWING YOUR SEWING MACHINE CONNAITRE SA MACHINE A COUDRE CONOZCA SU MÁQUINA DE COSER 1 X59370-051 2 SA156XA5539-051 3 X57117-051 4 X57521-001 5 XA4911-151(PS-2470, PS-2360, PS-3100) 6 137988-101 7 130012-054 8 130013-054 9 X59476-051 < 130920-051 A X55467-051 B X54243-001 1 SA140X81065-002 2 S...
Page 18 - ACCESORIOS; Accessoires en option; Accesorios opcionales
6 KNOWING YOUR SEWING MACHINE CONNAITRE SA MACHINE A COUDRE CONOZCA SU MÁQUINA DE COSER ACCESORIOS 1 Pata de cremalleras (1 pza) 2 Canilla (3 pzas) SA156 (para EE UU) XA 5539-051 (para otros países)Recambios (paquete de 10 piezas) 3 Paquete de agujas (agujas simples normales No 14) (3 pzas) 4 Aguja ...
Page 19 - Connecting Plugs; WARNING
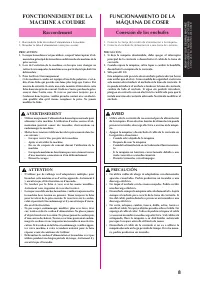
7 KNOWING YOUR SEWING MACHINE CONNAITRE SA MACHINE A COUDRE CONOZCA SU MÁQUINA DE COSER OPERATING YOURSEWING MACHINE Connecting Plugs 1. Connect the power cord plug into the machine.2. Connect the power supply plug into a wall outlet. CAUTION1. When leaving the machine unattended, the main switch of...
Page 20 - FUNCIONAMIENTO DE LA; Conexión de los enchufes; AVISO; FONCTIONNEMENT DE LA; Raccordement; AVERTISSEMENT; ATTENTION
8 KNOWING YOUR SEWING MACHINE CONNAITRE SA MACHINE A COUDRE CONOZCA SU MÁQUINA DE COSER FUNCIONAMIENTO DE LA MÁQUINA DE COSER Conexión de los enchufes 1. Conecte la clavija del cordón de alimentación a la máquina.2. Conecte el enchufe de alimentación a una toma de corriente. PRECAUCIÓN:1. Si deja la...
Page 21 - Light Switch; Interruptor principal/luz de cosido; Interrupteur principal/de la lampe
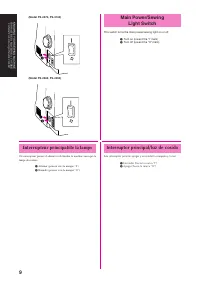
9 KNOWING YOUR SEWING MACHINE CONNAITRE SA MACHINE A COUDRE CONOZCA SU MÁQUINA DE COSER 1 2 1 2 Main Power/Sewing Light Switch This switch turns the main power/sewing light on or off. 1 Turn on (toward the “I” mark) 2 Turn off (toward the “O” mark) Interruptor principal/luz de cosido Este interrupto...
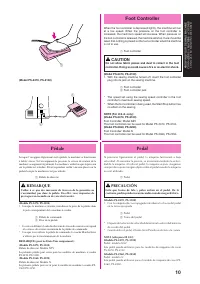
Page 22 - Pédale; REMARQUE; Foot Controller; CAUTION; PRECAUCIÓN
10 KNOWING YOUR SEWING MACHINE CONNAITRE SA MACHINE A COUDRE CONOZCA SU MÁQUINA DE COSER Pédale Lorsque l’on appuie légèrement sur la pédale, la machine va fonctionnerà faible vitesse. Si l’on augmente la pression, la vitesse de couture de lamachine va augmenter également. La machine s’arrête lorsqu...
Page 23 - Checking the Needle; Replacing the Needle
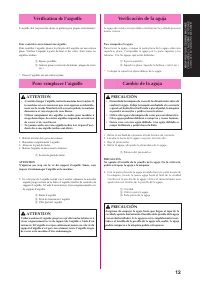
11 KNOWING YOUR SEWING MACHINE CONNAITRE SA MACHINE A COUDRE CONOZCA SU MÁQUINA DE COSER 1 2 3 4 Checking the Needle The sewing needle must always be straight and sharp for smoothsewing. To Check the Needle Correctly: To check the needle, place the flat side of the needle on a flatsurface. Check the...
Page 24 - Verificación de la aguja; Vérification de l’aiguille; Pour remplacer l’aiguille
12 KNOWING YOUR SEWING MACHINE CONNAITRE SA MACHINE A COUDRE CONOZCA SU MÁQUINA DE COSER Verificación de la aguja La aguja de costura siempre debe estar bien recta y afilada para unabuena costura. Para comprobar la aguja: Para revisar la aguja, coloque la parte plana de la aguja sobre unasuperficie ...
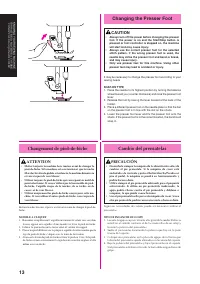
Page 25 - Changing the Presser Foot; Cambio del prensatelas
13 KNOWING YOUR SEWING MACHINE CONNAITRE SA MACHINE A COUDRE CONOZCA SU MÁQUINA DE COSER Changing the Presser Foot CAUTION • Always turn off the power before changing the presserfoot. If the power is on and the Start/Stop button ispressed or foot controller is stepped on, the machinewill start and m...
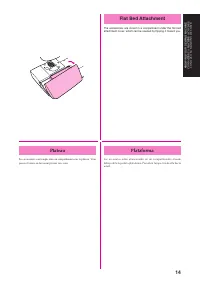
Page 26 - Plateau
14 KNOWING YOUR SEWING MACHINE CONNAITRE SA MACHINE A COUDRE CONOZCA SU MÁQUINA DE COSER Plateau Les accessoires sont rangés dans un compartiment sous la plateau. Vouspouvez l'ouvrir en la faisant pivoter vers vous. Plataforma Los accesorios están almacenados en un compartimiento situadodebajo de la...
Page 27 - VARIOUS CONTROLS; Pattern Selection Dial
15 KNOWING YOUR SEWING MACHINE CONNAITRE SA MACHINE A COUDRE CONOZCA SU MÁQUINA DE COSER VARIOUS CONTROLS Pattern Selection Dial CAUTIONWhen you use the Pattern Selection Dial to select a pattern,turn the balance wheel to the front (counter-clockwise) byhand to set the needle in the highest position...
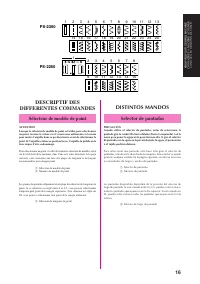
Page 28 - DESCRIPTIF DES; DISTINTOS MANDOS; Selector de puntadas
16 KNOWING YOUR SEWING MACHINE CONNAITRE SA MACHINE A COUDRE CONOZCA SU MÁQUINA DE COSER PS-2250 9 10 11 12 13 14 15 2 3 1 4 5 6 7 8 DESCRIPTIF DES DIFFERENTES COMMANDES Sélecteur de modèle de point ATTENTIONLorsque le sélecteur de modèle de point est utilisé pour sélectionnerun point, tourner le vo...
Page 29 - RECOMMENDED WIDTHS AND LENGTHS FOR STITCHES
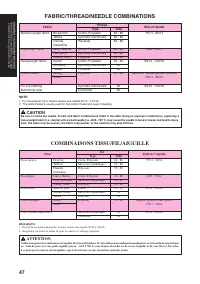
17 KNOWING YOUR SEWING MACHINE CONNAITRE SA MACHINE A COUDRE CONOZCA SU MÁQUINA DE COSER RECOMMENDED WIDTHS AND LENGTHS FOR STITCHES (Model PS-2470, PS-3100) PATTERN STITCH NAME RECOMMENDED WIDTH RECOMMENDED INSTRUCTION mm (inch) LENGTH mm (inch) MANUAL PAGE 1-STEP AUTOMATIC 3-5 (Dial 4-7) F-1.5 63 ...
Page 32 - LONGUEURS ET LARGEURS RECOMMANDEES POUR CHAQUE POINT
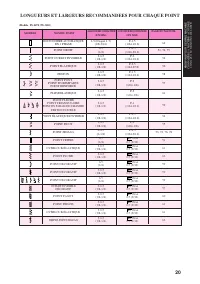
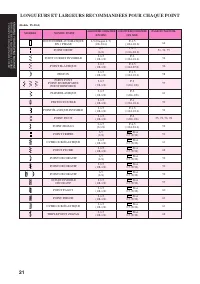
20 KNOWING YOUR SEWING MACHINE CONNAITRE SA MACHINE A COUDRE CONOZCA SU MÁQUINA DE COSER LONGUEURS ET LARGEURS RECOMMANDEES POUR CHAQUE POINT (Modèle PS-2470, PS-3100) MODÈLE NOM DU POINT LARGEUR RECOMMANDÉE LONGUEUR RECOMMANDÉE PAGE DU MANUEL (EN MM) (EN MM) BOUTONNIÈRE AUTOMATIQUE 3-5 (Disque 4-7)...
Page 35 - ANCHOS Y LARGOS RECOMENDADOS PARA CADA PUNTADA
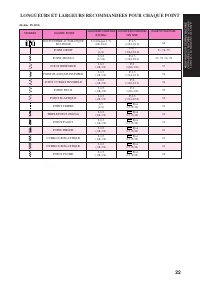
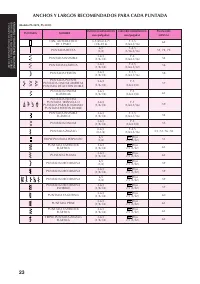
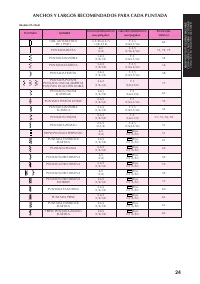
23 KNOWING YOUR SEWING MACHINE CONNAITRE SA MACHINE A COUDRE CONOZCA SU MÁQUINA DE COSER ANCHOS Y LARGOS RECOMENDADOS PARA CADA PUNTADA (Modelo PS-2470, PS-3100) PUNTADA NOMBRE ANCHO ECOMENDADO EN LARGO RECOMENDADO EN PÁGINA DEL mm (pulgadas) mm (pulgadas) MANUAL OJAL AUTOMÁTICO 3-5 (Dial 4-7) F-1,5...
Page 38 - Stitch Length Dial
26 KNOWING YOUR SEWING MACHINE CONNAITRE SA MACHINE A COUDRE CONOZCA SU MÁQUINA DE COSER 1 3 2 1 2 3 4 · · · 4 · 3 · 2 · 1 · F · 0 ................. SS A A A A A Stitch Length Dial Depending on your selected stitch, you may need to adjust the stitchlength for best results.The numbers marked on the S...
Page 39 - Selector de largo de puntada
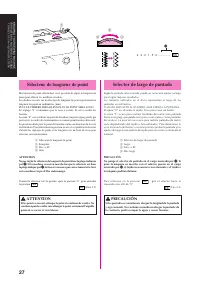
27 KNOWING YOUR SEWING MACHINE CONNAITRE SA MACHINE A COUDRE CONOZCA SU MÁQUINA DE COSER Sélecteur de longueur de point En fonction du point sélectionné, il est possible de régler la longueur depoint pour obtenir les meilleurs résultats.Les chiffres inscrits sur le sélecteur de longueur de point rep...
Page 40 - Stitch Width Dial; Selector de ancho de puntada
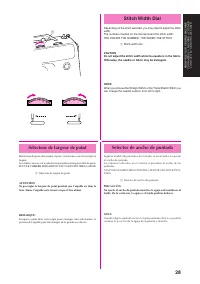
28 KNOWING YOUR SEWING MACHINE CONNAITRE SA MACHINE A COUDRE CONOZCA SU MÁQUINA DE COSER 7 6 5 2 1 0 1 Stitch Width Dial Depending on the stitch selected, you may need to adjust the stitchwidth.The numbers marked on the dial represent the stitch width.THE HIGHER THE NUMBER, THE WIDER THE STITCH. 1 S...
Page 41 - Reverse Sewing Lever; Pulsador de retroceso
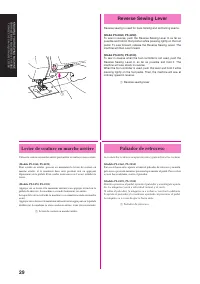
29 KNOWING YOUR SEWING MACHINE CONNAITRE SA MACHINE A COUDRE CONOZCA SU MÁQUINA DE COSER 1 Reverse Sewing Lever Reverse sewing is used for back tacking and reinforcing seams. (Model PS-2360, PS-2250) To sew in reverse, push the Reverse Sewing Lever in as far aspossible and hold in that position whil...
Page 42 - Feed Dog Position Switch; Palanca de los alimentadores
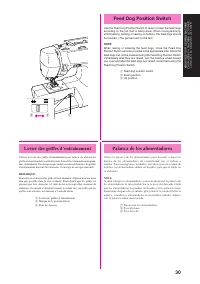
30 KNOWING YOUR SEWING MACHINE CONNAITRE SA MACHINE A COUDRE CONOZCA SU MÁQUINA DE COSER 3 2 1 Feed Dog Position Switch Use the Feed Dog Position Switch to raise or lower the feed dogsaccording to the job that is being done. When monogramming,embroidering, darning or sewing on buttons, the feed dogs...
Page 43 - Pulsador de puesta en
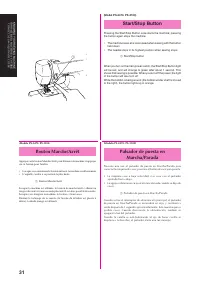
31 KNOWING YOUR SEWING MACHINE CONNAITRE SA MACHINE A COUDRE CONOZCA SU MÁQUINA DE COSER 1 (Model PS-2470, PS-3100) Start/Stop Button Pressing the Start/Stop Button once starts the machine; pressingthe button again stops the machine. • The machine sews at a slow speed when sewing with the button hel...
Page 44 - Sewing Speed Controller; Converting to Free-arm Style; Levier de contrôle de; Conversion en modèle bras libre; Palanca de control de; Conversión en modalidad
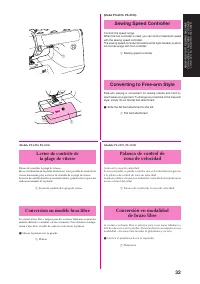
32 KNOWING YOUR SEWING MACHINE CONNAITRE SA MACHINE A COUDRE CONOZCA SU MÁQUINA DE COSER 1 1 1 (Model PS-2470, PS-3100) Sewing Speed Controller Controls the speed range.When the foot controller is used, you can control maximum speedwith the sewing speed controller.The sewing speed controller should ...
Page 45 - THREADING; Winding the Bobbin
33 KNOWING YOUR SEWING MACHINE CONNAITRE SA MACHINE A COUDRE CONOZCA SU MÁQUINA DE COSER THREADING THE MACHINE Winding the Bobbin CAUTION • If the thread spool and/or spool cap are set incorrectly,the thread may tangle on the spool pin. • Use the spool cap (large, medium, or small) that isclosest in...
Page 46 - ENHEBRADO DE LA; Bobinado de la canilla; ENFILAGE DE; Remplissage de la canette
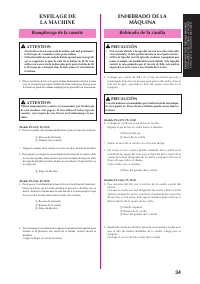
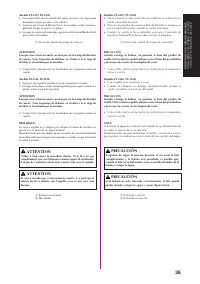
34 KNOWING YOUR SEWING MACHINE CONNAITRE SA MACHINE A COUDRE CONOZCA SU MÁQUINA DE COSER ENHEBRADO DE LA MÁQUINA Bobinado de la canilla PRECAUCIÓN • Si el carrete de hilo o la tapa del carrete no están colocados correctamente, el hilo podría enredarse en el portacarrete. • Utilice la tapa del carret...
Page 49 - Lower Threading
37 KNOWING YOUR SEWING MACHINE CONNAITRE SA MACHINE A COUDRE CONOZCA SU MÁQUINA DE COSER 1 2 1 2 Lower Threading CAUTION Setting the bobbin improperly may cause the thread ten-sion to loosen, breaking the needle and resulting in injury. 1 Wound evenly 2 Wound poorly CAUTION Be sure to turn off the p...
Page 50 - Enhebrado inferior; Enfilage inférieur
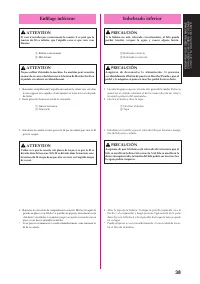
38 KNOWING YOUR SEWING MACHINE CONNAITRE SA MACHINE A COUDRE CONOZCA SU MÁQUINA DE COSER Enhebrado inferior PRECAUCIÓN Si la bobina no está colocada correctamente, el hilo puedeperder tensión, romper la aguja y causar alguna lesión. 1 Bobinado correcto 2 Bobinado incorrecto PRECAUCIÓN Asegúrese de d...
Page 51 - Upper Threading
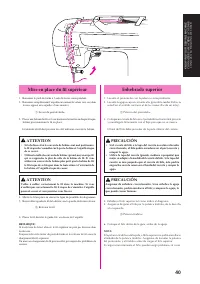
39 KNOWING YOUR SEWING MACHINE CONNAITRE SA MACHINE A COUDRE CONOZCA SU MÁQUINA DE COSER Upper Threading 1. Raise the presser foot using the Presser Foot Lever.2. Raise the needle to its highest position by turning the balance wheel toward you (counterclockwise). 1 Presser foot lever 3. Place a spoo...
Page 52 - Enhebrado superior; Mise en place du fil supérieur
40 KNOWING YOUR SEWING MACHINE CONNAITRE SA MACHINE A COUDRE CONOZCA SU MÁQUINA DE COSER Enhebrado superior 1. Levante el prensatelas con la palanca correspondiente.2. Levante la aguja a su posición más alta, girando la ruedecilla hacia usted (en el sentido contrario al de las manecillas de un reloj...
Page 53 - Using Needle Threader
41 KNOWING YOUR SEWING MACHINE CONNAITRE SA MACHINE A COUDRE CONOZCA SU MÁQUINA DE COSER (Model PS-2470, PS-2360, PS-3100) Using Needle Threader Turn power switch to “O”.1. Lower the presser foot lever.2. Turn the balance wheel toward you (counter-clockwise) to raise the needle holder to the highest...
Page 54 - Uso del enhebrador; Utilisation de l’enfileur
42 KNOWING YOUR SEWING MACHINE CONNAITRE SA MACHINE A COUDRE CONOZCA SU MÁQUINA DE COSER (Modelo PS-2470, PS-2360, PS-3100) Uso del enhebrador Desenchufar la máquina, interruptor principale a “O”.1. Baje la palanca de la pata del prensatelas.2. Gire la ruedecilla hacia usted (hacia la izquierda) par...
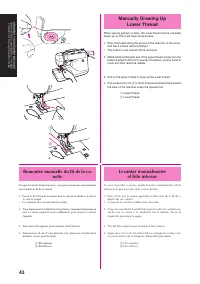
Page 55 - Manually Drawing Up
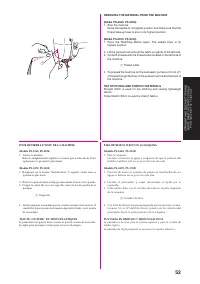
43 KNOWING YOUR SEWING MACHINE CONNAITRE SA MACHINE A COUDRE CONOZCA SU MÁQUINA DE COSER Manually Drawing Up Lower Thread When sewing gathers or darts, the lower thread can be manuallydrawn up so that it will have some excess. 1. Pass the thread along the groove in the direction of the arrow, and le...
Page 56 - Twin Needle Sewing; Costura con aguja doble; Couture avec l’aiguille jumelée
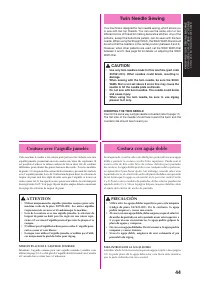
44 KNOWING YOUR SEWING MACHINE CONNAITRE SA MACHINE A COUDRE CONOZCA SU MÁQUINA DE COSER Twin Needle Sewing Your machine is designed for twin needle sewing, which allows youto sew with two top threads. You can use the same color or twodifferent colors of thread for making decorative stitches. Any of...
Page 58 - Thread Tension; Tensión de los hilos; Tension des fils
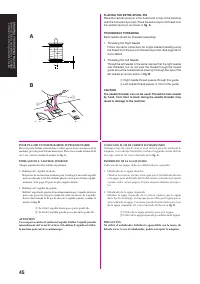
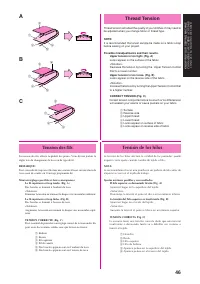
46 KNOWING YOUR SEWING MACHINE CONNAITRE SA MACHINE A COUDRE CONOZCA SU MÁQUINA DE COSER Thread Tension Thread tension will affect the quality of your stitches. It may need tobe adjusted when you change fabric or thread type. NOTE: It is recommended that a test sample be made on a fabric scrapbefore...
Page 61 - PLEASE READ BEFORE SEWING; LEA ESTO POR FAVOR ANTES DE COSER; A LIRE AVANT DE COMMENCER À COUDRE
49 STRAIGHT AND ZIGZAG STITCHING POINTS DROITS ET POINTS ZIGZAG PUNTADAS RECTAS Y ZIGZAGE PLEASE READ BEFORE SEWING CAUTION • To avoid injury, pay special attention to the needle while the machine is in operation. Keep your hands away from movingparts while the machine is in operation. • Do not stre...
Page 62 - Straight Stitching
50 STRAIGHT AND ZIGZAG STITCHING POINTS DROITS ET POINTS ZIGZAG PUNTADAS RECTAS Y ZIGZAGE Straight Stitching Pattern Stitch Length Stitch Width (Straight Stitch) 1-4.5 6.5 (Triple Stretch Stitch) SS STARTING SEWING 1. Turn the Pattern Selection Dial to show your desired stitch in the Pattern Indicat...
Page 63 - Puntadas rectas; Point droit
51 STRAIGHT AND ZIGZAG STITCHING POINTS DROITS ET POINTS ZIGZAG PUNTADAS RECTAS Y ZIGZAGE Puntadas rectas Modelo de puntada Largo de puntada Ancho de puntada (Puntada recta) 1-4,5 6,5 (Triple puntada pespunto) SS PARA EMPEZAR A COSER 1. Gire el selector de puntada hasta que la puntada que desea apar...
Page 65 - Zigzag Stitching; Puntadas zigzag; Point zigzag
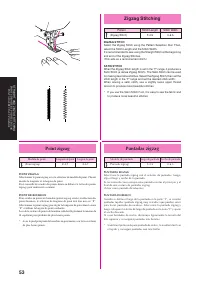
53 STRAIGHT AND ZIGZAG STITCHING POINTS DROITS ET POINTS ZIGZAG PUNTADAS RECTAS Y ZIGZAGE Zigzag Stitching Pattern Stitch Length Stitch Width (Zigzag Stitch) F-4.5 0-6.5 ZIGZAG STITCH Select the Zigzag Stitch using the Pattern Selection Dial. Then,select the Stitch Length and the Stitch Width.It is ...
Page 66 - Blind Hem Stitching
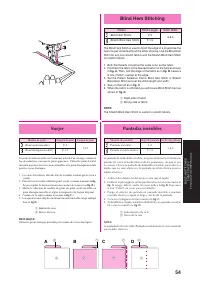
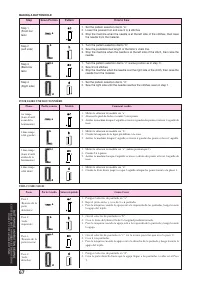
54 BUILT-IN STITCHES POINTS INCLUS PUNTADAS INCORPORADAS Blind Hem Stitching Pattern Stitch Length Stitch Width (Blind Hem Stitch) F-2 3-6.5 (Stretch Blind Hem Stitch) F-1.5 The Blind Hem Stitch is used to finish the edge of a project like thehem of a pair of pants without the stitch showing. Use th...
Page 67 - Shell Tuck Stitching; Puntada ondas; Plissé
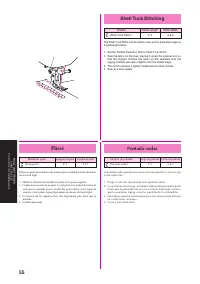
55 BUILT-IN STITCHES POINTS INCLUS PUNTADAS INCORPORADAS Shell Tuck Stitching Pattern Stitch Length Stitch Width (Shell Tuck Stitch) F-3 3-6.5 The Shell Tuck Stitch can be used to sew a picot (lace like) edge ona lightweight fabric. 1. Set the Pattern Selection Dial to Shell Tuck Stitch.2. Sew the f...
Page 68 - Elastic Stitching; Puntada elástica; Point élastique
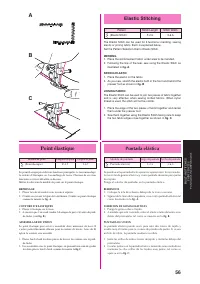
56 BUILT-IN STITCHES POINTS INCLUS PUNTADAS INCORPORADAS Elastic Stitching Pattern Stitch Length Stitch Width (Elastic Stitch) F-2.5 3-6.5 The Elastic Stitch can be used for 3 functions: mending, sewingelastic or joining fabric. Each is explained below.Set the Pattern Selection Dial to Elastic Stitc...
Page 69 - Double Action Stitching; Puntada de acción doble; Point renforcé
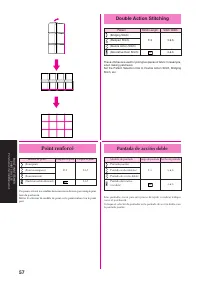
57 BUILT-IN STITCHES POINTS INCLUS PUNTADAS INCORPORADAS Double Action Stitching Pattern Stitch Length Stitch Width (Bridging Stitch) (Rampart Stitch) F-3 3-6.5 (Double Action Stitch) (Decorative Hem Stitch) SS 3-6.5 These stitches are used for joining two pieces of fabric, for example,when making p...
Page 70 - Scallop Stitching; Feston
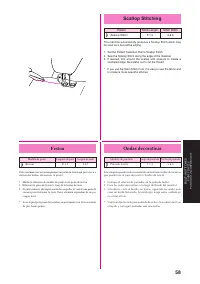
58 BUILT-IN STITCHES POINTS INCLUS PUNTADAS INCORPORADAS Scallop Stitching Pattern Stitch Length Stitch Width (Scallop Stitch) F-1.5 3-6.5 This machine automatically produces a Scallop Stitch which maybe used as a decorative edging. 1. Set the Pattern Selection Dial to Scallop Stitch.2. Sew the Scal...
Page 71 - Decorative Stitching; Puntadas decorativas; Points décoratifs
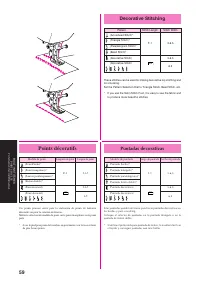
59 BUILT-IN STITCHES POINTS INCLUS PUNTADAS INCORPORADAS SS SS Decorative Stitching Pattern Stitch Length Stitch Width (Arrowhead Stitch)* (Triangle Stitch)* F-1 3-6.5 (Parallelogram Stitch)* (Bead Stitch)* (Decorative Stitch) 3-6.5 (Decorative Stitch) 6.5 These stitches can be used for making decor...
Page 72 - Patchwork
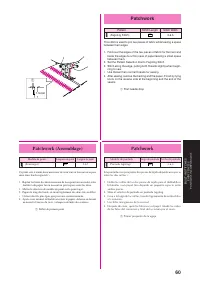
60 BUILT-IN STITCHES POINTS INCLUS PUNTADAS INCORPORADAS Patchwork Pattern Stitch Length Stitch Width (Fagoting Stitch) SS 3-6.5 This stitch is used to join two pieces of fabric while leaving a spacebetween their edges. 1. Fold over the edges of the two pieces of fabric for the hem and baste the edg...
Page 73 - Overedge Stitching; Puntada por encima de la orilla; Overlock élastique
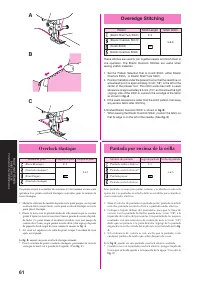
61 BUILT-IN STITCHES POINTS INCLUS PUNTADAS INCORPORADAS A B C Overedge Stitching Pattern Stitch Length Stitch Width (Elastic Shell Tuck Stitch) F-3 (Elastic Overlock Stitch)* 3-6.5 (Comb Stitch) SS (Elastic Overlock Stitch) These stitches are used to join together seams and finish them inone operat...
Page 74 - Feather Stitching; Triple puntada zigzag elástica; Point plume
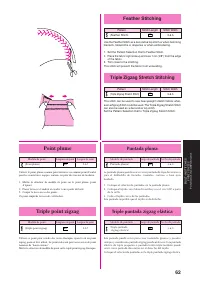
62 BUILT-IN STITCHES POINTS INCLUS PUNTADAS INCORPORADAS Feather Stitching Pattern Stitch Length Stitch Width (Feather Stitch) SS 3-6.5 Use the Feather Stitch as a decorative top stitch or when hemmingblankets, tablecloths or draperies or when embroidering. 1. Set the Pattern Selection Dial to Feath...
Page 75 - Making a Buttonhole
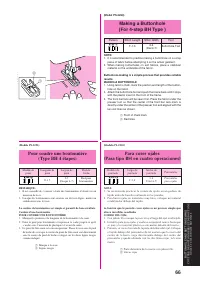
63 BUTTONHOLE AND BUTTON SEWING COUTURE DE BOUTONNIERES ET DE BOUTONS OJALES Y COSTURA DE BOTONES (Model PS-2470, PS-2360, PS-3100) Making a Buttonhole (For 1-step BH Type) Pattern Stitch Length Stitch Width Foot F-1.5 3-5 Buttonhole Foot (Dial 4-7) NOTE: 1. It is recommended to practice making a bu...
Page 76 - Para coser ojales; Pour coudre une boutonnière
64 BUTTONHOLE AND BUTTON SEWING COUTURE DE BOUTONNIERES ET DE BOUTONS OJALES Y COSTURA DE BOTONES (Modelo PS-2470, PS-2360, PS-3100) Para coser ojales (Para tipo BH en una operación) Modelo de Largo de Ancho de Prensatelas puntada puntada puntada F-1,5 3-5 Prensatelas (Dial 4-7) para ojales NOTA: 1....
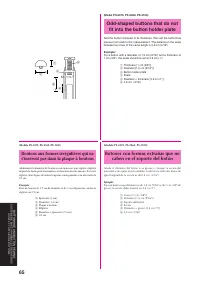
Page 77 - Boutons aux formes irrégulières qui ne; Odd-shaped buttons that do not; Botones con formas extrañas que no
65 BUTTONHOLE AND BUTTON SEWING COUTURE DE BOUTONNIERES ET DE BOUTONS OJALES Y COSTURA DE BOTONES (Modèle PS-2470, PS-2360, PS-3100) Boutons aux formes irrégulières qui ne s'insèrent pas dans la plaque à boutons Additionner le diamètre du bouton et son épaisseur, puis régler la réglettedu pied-de-bi...
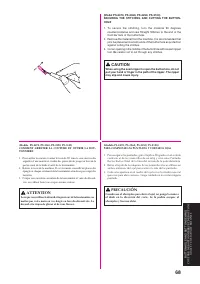
Page 81 - Buttonhole Fine Adjustment
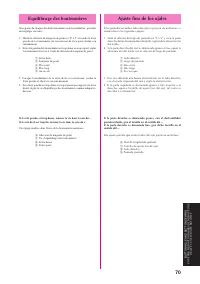
69 BUTTONHOLE AND BUTTON SEWING COUTURE DE BOUTONNIERES ET DE BOUTONS OJALES Y COSTURA DE BOTONES Buttonhole Fine Adjustment If the stitching on the two sides of the buttonhole do not appearuniform, the following adjustments can be made. 1. Set the Stitch Length Dial at “F-1.5” and stitch the right ...
Page 82 - Ajuste fino de los ojales
70 BUTTONHOLE AND BUTTON SEWING COUTURE DE BOUTONNIERES ET DE BOUTONS OJALES Y COSTURA DE BOTONES Ajuste fino de los ojales Si las puntadas en ambos lados del ojal no parecen ser uniformes, sepueden hacer los siguientes ajustes. 1. Sitúe el selector de largo de puntada en "F-1,5" y cosa la p...
Page 84 - Button Sewing; Costura de botones; Pour coudre un bouton
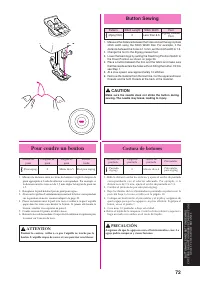
72 BUTTONHOLE AND BUTTON SEWING COUTURE DE BOUTONNIERES ET DE BOUTONS OJALES Y COSTURA DE BOTONES Button Sewing Pattern Stitch Length Stitch Width Foot (Zigzag Stitch) 0 Less than 6.5 1. Measure the distance between the holes and set the appropriate stitch width using the Stitch Width Dial. For exam...
Page 85 - Zipper Insertion; Gathering
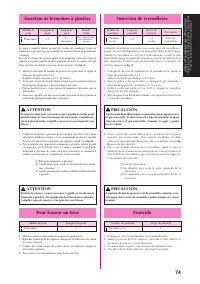
73 USING ATTACHMENTS AND APPLICATIONS UTILISATION DES ACCESSOIRES ET LEURS APPLICATIONS USO DE ACCESORIOS Y APLICACIONES Zipper Insertion Pattern Stitch Length Stitch Width Foot (Straight Stitch) 2-3 3.5 (center) Zipper Foot The zipper foot is used to sew various types of zippers and caneasily be po...
Page 86 - Inserción de cremalleras; Fruncido; Pour froncer un tissu
74 USING ATTACHMENTS AND APPLICATIONS UTILISATION DES ACCESSOIRES ET LEURS APPLICATIONS USO DE ACCESORIOS Y APLICACIONES Inserción de cremalleras Modelo de Largo de Ancho de Prensatelas puntada puntada puntada (Puntada 2-3 3,5 Pata de recta) (centro) cremalleras La pata de cremalleras sirve para cos...
Page 87 - Darning
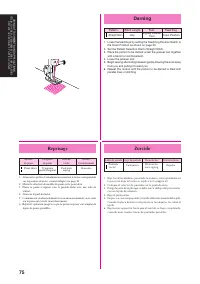
75 USING ATTACHMENTS AND APPLICATIONS UTILISATION DES ACCESSOIRES ET LEURS APPLICATIONS USO DE ACCESORIOS Y APLICACIONES Darning Pattern Stitch Length Foot Feed Dog (Straight Stitch) Any Down Position 1. Lower the feed dogs by setting the Feed Dog Position Switch to the Down Position as shown on pag...
Page 88 - Appliqués; Aplicaciones; Appliques
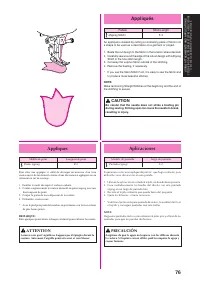
76 USING ATTACHMENTS AND APPLICATIONS UTILISATION DES ACCESSOIRES ET LEURS APPLICATIONS USO DE ACCESORIOS Y APLICACIONES Appliqués Pattern Stitch Length (Zigzag Stitch) F-2 An appliqué is created by cutting a contrasting piece of fabric intoa shape to be used as a decoration on a garment or project....
Page 89 - Monogramming and
77 USING ATTACHMENTS AND APPLICATIONS UTILISATION DES ACCESSOIRES ET LEURS APPLICATIONS USO DE ACCESORIOS Y APLICACIONES Monogramming and Embroidering Pattern Stitch Length Stitch Width Foot Feed Dog (Zigzag Stitch) Any Any None Down Position PREPARING FOR MONOGRAMMING AND EMBROIDERING 1. Lower the ...
Page 90 - Monogramas y bordados; Monogrammes et broderies
78 USING ATTACHMENTS AND APPLICATIONS UTILISATION DES ACCESSOIRES ET LEURS APPLICATIONS USO DE ACCESORIOS Y APLICACIONES Monogramas y bordados Modelo de Largo de Ancho de Prensatelas Alimentadores puntada puntada puntada (Puntada Cualquiera Cualquiera Quitarlo, sin Bajados zigzag) prensatelas PREPAR...
Page 91 - OPTIONAL ACCESSORIES; Using the Walking Foot
79 USING ATTACHMENTS AND APPLICATIONS UTILISATION DES ACCESSOIRES ET LEURS APPLICATIONS USO DE ACCESORIOS Y APLICACIONES OPTIONAL ACCESSORIES Using the Walking Foot Pattern Stitch Length Stitch Width (Straight Stitch) 1-4.5 3-4 (Zigzag Stitch) 0-6.5 This foot is very useful for sewing materials such...
Page 92 - ACCESORIOS OPCIONALES; Utilización del pie caminante; ACCESSOIRES EN OPTION
80 USING ATTACHMENTS AND APPLICATIONS UTILISATION DES ACCESSOIRES ET LEURS APPLICATIONS USO DE ACCESORIOS Y APLICACIONES ACCESORIOS OPCIONALES Utilización del pie caminante Modelo de puntada Largo de puntada Ancho de puntada (Puntada recta) 1-4,5 3-4 (Puntada zigazg) 0-6,5 Este pie resulta muy útil ...
Page 93 - Using the Spring-action
81 USING ATTACHMENTS AND APPLICATIONS UTILISATION DES ACCESSOIRES ET LEURS APPLICATIONS USO DE ACCESORIOS Y APLICACIONES OPTIONAL ACCESSORIES Using the Spring-action Quilting Foot Pattern Stitch Length Stitch Width Feed Dog (Straight Stitch) Any 3.5 (center) Down position The Spring -action Quilting...
Page 94 - Utilización del prensatelas; Utilisation du pied pour quilts avec
82 USING ATTACHMENTS AND APPLICATIONS UTILISATION DES ACCESSOIRES ET LEURS APPLICATIONS USO DE ACCESORIOS Y APLICACIONES ACCESORIOS OPCIONALES Utilización del prensatelas enguatador accionado por muelle Modelo de Largo de Ancho de Alimentadores puntada puntada puntada (Puntada recta) Cualquiera 3,5 ...
Page 96 - Utilización del prensatela para
84 USING ATTACHMENTS AND APPLICATIONS UTILISATION DES ACCESSOIRES ET LEURS APPLICATIONS USO DE ACCESORIOS Y APLICACIONES ACCESORIOS OPCIONALES Utilización del prensatela para pespunte 1/4 Modelo de puntada Largo de puntada Ancho de puntada (Puntada recta) 2-2,5 3,5 (centro) El prensatela para pespun...
Page 97 - Changing the Light Bulb
85 MAINTENANCE ENTRETIEN MANTENIMIENTO Changing the Light Bulb CAUTION • Turn off the main power switch and unplug the machinebefore changing the light bulb. If the main power switchis on when the light bulb is changed, an electric shockmay result. If the machine is on and Start/Stop button ispresse...
Page 98 - Cambio de la bombilla; Remplacement de l’ampoule
86 MAINTENANCE ENTRETIEN MANTENIMIENTO Cambio de la bombilla PRECAUCIÓN • Apague y desenchufe la máquina de coser de la corriente antes de cambiar la bombilla. Si cambia la bombilla con lamáquina encendida, podrá sufrir una descarga eléctrica. Si lamáquina está enchufada y aprieta por accidente el b...
Page 99 - Cleaning
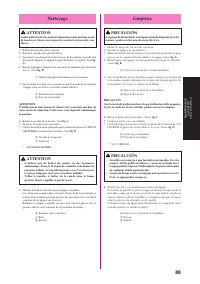
87 MAINTENANCE ENTRETIEN MANTENIMIENTO Cleaning CAUTION Be sure to unplug the machine before cleaning it. Other-wise, electric shock or injury may result. 1. Remove the power supply plug from the outlet.2. Raise the needle and the presser foot.3. Loosen the presser foot screw and the needle clamp sc...
Page 100 - Limpieza; Nettoyage
88 MAINTENANCE ENTRETIEN MANTENIMIENTO Limpieza PRECAUCIÓN Asegúrese de desenchufar la máquina antes de limpiarla. De otramanera, podría recibir una descarga eléctrica. 1. Retire la clavija de la toma de corriente.2. Levante la aguja y el prensatelas.3. Suelte el tornillo del prensatelas y el tornil...
Page 101 - CONTACT YOUR LOCAL SERVICE CENTER
89 MAINTENANCE ENTRETIEN MANTENIMIENTO No Page 47 No Page 87 No Page 11 No Page 37 Bobbin is not threaded properly in the race. Inferior needle is used. Lint is clinging to the bottom of the needle plate. The combination of needle size/thread size/fabric is incorrect. SKIPPED STITCHES LOOP IN SEAM F...
Page 103 - LISTE DE VÉRIFICATION EN CAS DE DÉFAILLANCES; CONTACTER LE CENTRE TECHNIQUE LE PLUS PROCHE
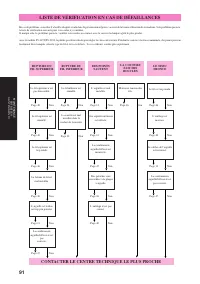
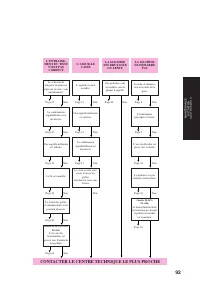
91 MAINTENANCE ENTRETIEN MANTENIMIENTO LISTE DE VÉRIFICATION EN CAS DE DÉFAILLANCES En cas de problème, consulter d’abord le chapitre voulu dans le présent manuel pour s’assurer de la bonne utilisation de la machine. Si le problème persiste,la liste de vérification suivante peut vous aider à y reméd...
Page 105 - LISTADO DE POSIBLES INCIDENCIAS
93 MAINTENANCE ENTRETIEN MANTENIMIENTO LISTADO DE POSIBLES INCIDENCIAS Cada vez que encuentre dificultades al coser, vuelva a consultar la parte de este manual de instrucciones que detalla la operación que estárealizando, para comprobar que usa correctamente la máquina. Si el problema persiste, el s...
Page 106 - PONGASE EN CONTACTO CON EL SERVICIO TECNICO LOCAL
94 MAINTENANCE ENTRETIEN MANTENIMIENTO No Página 10 No se usa bien el pedal LA MAQUINA ES RUIDOSA O FUNCIONA MUY DESPACIO LA MAQUINA NO ARRANCA PONGASE EN CONTACTO CON EL SERVICIO TECNICO LOCAL EL TEJIDO NO ARRASTRA BIEN No Página 27 El selector de largo de puntada está puesto para que el tejido no ...
Page 107 - Repacking the Machine; Embalaje de la máquina; IMPORTANTE; Emballage de la machine; IMPORTANT
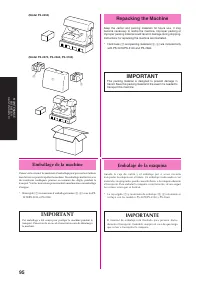
95 MAINTENANCE ENTRETIEN MANTENIMIENTO Repacking the Machine Keep the carton and packing materials for future use. It maybecome necessary to reship the machine. Improper packing orimproper packing material could result in damage during shipping.Instructions for repacking the machine are illustrated....
Page 111 - Black
Black ENGLISHFRANÇAISESPAÑOL194279-011 1 Printed in Taiwan Instruction ManualManuel d'instructionsManual de instrucciones