Page 20 - ADVERTENCIAS Y CONSEJOS IMPORTANTES; Seguridad
ADVERTENCIAS Y CONSEJOS IMPORTANTES Es muy importante conservar este libro de instrucciones junto al aparato por si fuera necesarioconsultarlo. Si el aparato se vendiese o transfiriese a otra persona, acuérdese de entregarlo junto conél para que el nuevo propietario conozca el funcionamiento de la m...
Page 21 - Desguace de aparatos viejos; Instalación; ADVERTENCIAS IMPORTANTES; Alojamiento del aparato
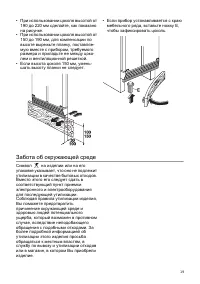
21 • Si el aparato es transportado en forma horizontal es posible que el aceite contenido en elcompresor pase al circuito refrigerante. Esperarpor lo menos dos horas antes de poner enmarcha el aparato para dar tiempo a que elaceite regrese al compresor. Protección delambiente Este aparato no contien...
Page 22 - Limpieza de las partes internas; USO; Panel de mandos del congelador; INDICE
22 Limpieza de las partes internas Antes del empleo limpiar todas las partes internascon agua tibia y jabón neutro, a fin de eliminar elcaracterístico olor de nuevo y secarlas luegocuidadosamente. USO No emplear detergentes o polvos abrasivos que podrían dañar las superficies. E C D F A B G H I Pane...
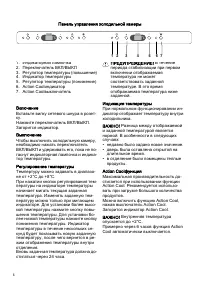
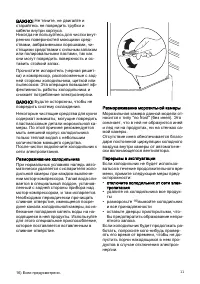
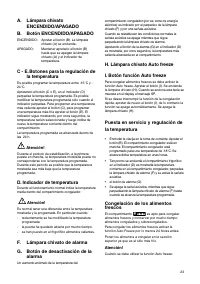
Page 25 - Panel de mandos del frigorífico; de la temperatura
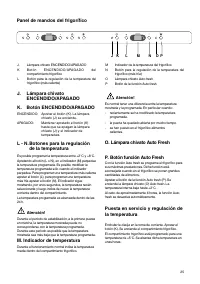
25 N L M O J K P Panel de mandos del frigorífico J. Lámpara chivato ENCENDIDO/APAGADO K Botón ENCENDIDO/APAGADO delcompartimiento frigorífico L Botón para la regulación de la temperatura delfrigorífico (más caliente) M Indicador de la temperatura del frigorífico N Botón para la regulación de la temp...
Page 26 - Compartimento frigorífico
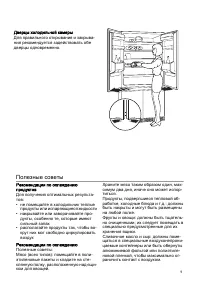
26 Compartimento frigorífico Para una correcta apertura y cierre de las puertasdel frigorífico se aconseja actuar simultáneamentesobre las dos puertas (como mostrado en la figura). • No introducir en el frigorífico ni alimentos ni bebidas calientes, dejarlas enfriar antes atemperatura ambiente. • Cu...
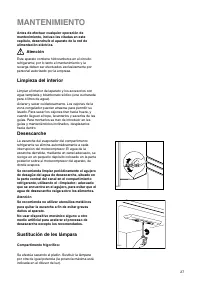
Page 27 - Atención; Limpieza del interior; MANTENIMIENTO
27 Antes de efectuar cualquier operación demantenimiento, incluso les citadas en estecapítulo, desenchufe el aparato de la red dealimentación eléctrica. Atención Este aparato contiene hidrocarburos en el circuitorefrigerante; por lo tanto el mantenimiento y larecarga deben ser efectuados exclusivame...
Page 29 - INSTALACIÓN
29 En el caso que este aparato, dotado de cierremagnético, sustitaya uno con cierre automático,aconsejamos inutilizar la cerradura de este último,antes de deshacerse de él. Así se evitará que losniños, jugando, puedan quedarse encerrados dentro,con grave peligro para sus vidas. Colocación Situar el ...
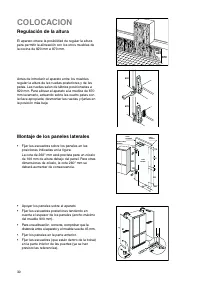
Page 30 - COLOCACION
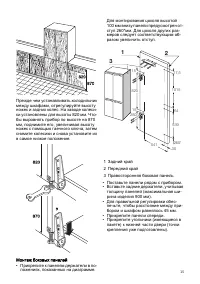
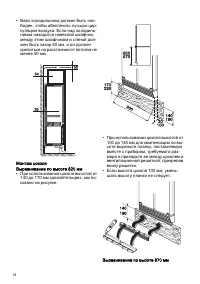
30 Regulación de la altura El aparato ofrece la posibilidad de regular la alturapara permitir la alineación con los otros muebles dela cocina de 820 mm a 870 mm. Antes de introducir el aparato entre los mueblesregular ia altura de les ruedas posteriores y de lespatas. Las ruedas salen de fábrica pos...
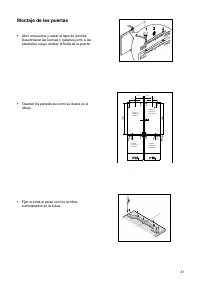
Page 31 - Montaje de las puertas
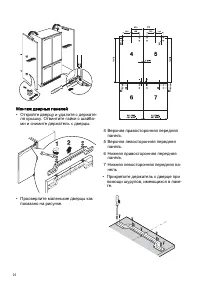
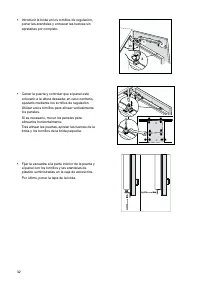
31 Montaje de las puertas • Abrir una puerta y quitar la tapa de la brida. Desenroscar las tuercas y quitarlas junto a lasarandelas; luego, extraer la brida de la puerta. • Taladrar los paneles tal como se ilustra en el dibujo. • Fijar la brida al panel con los tornillos suministrados en la bolsa. F...
Page 33 - Aplicación del zócalo
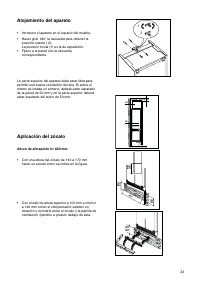
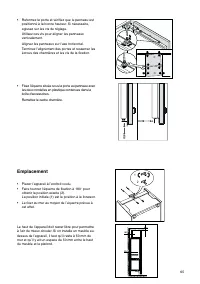
33 Alojamiento del aparato • Introducir el aparato en el espacio del mueble.• Hacer girar 180° la escuadra para obtener la posición exacta ( 2).La posición inicial (1) es la de expedición. • Fijario a la pared con la escuadra correspondiente. La parte superior del aparato debe estar libre parapermit...
Page 35 - WARNINGS; General Safety
35 WARNINGS It is most important that this instruction book should be retained with the appliance for futurereference. Should the appliance be sold or transferred to another owner, or should you move houseand leave the appliance, always ensure that the book is supplied with the appliance in order th...
Page 36 - Disposal of old Appliances; IMPORTANT SAFETY INFORMATION; Building the appliance in
36 which may cause it to explode, resulting indamage to the appliance. Installation • During normal operation, the condenser and compressor at the back of the appliance heat upconsiderably. For safety reasons, minimumventilation must be as shown in the instructions. Attention: keep ventilation openi...
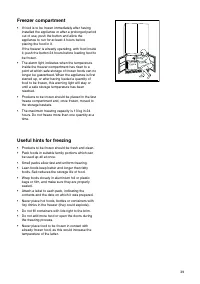
Page 37 - OPERATION; Cleaning the interior; Use of the freezer; CONTENTS; Control panel
OPERATION Cleaning the interior Before using the appliance for the first time, washthe interior and all internal accessories with luke-warm water and some neutral soap so as to removethe typical smell of a brand-new product, then drythoroughly. Use of the freezer E C D F A B G H I A ON/OFF light B F...
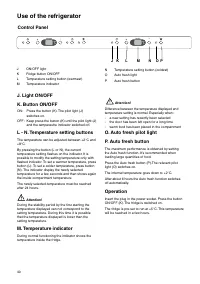
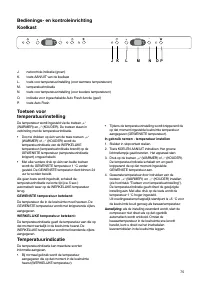
Page 40 - Control Panel; M. Temperature indicator; Use of the refrigerator; O. Auto fresh pilot light; Operation
40 N L M O J K P Control Panel J ON/OFF light K Fridge button ON/OFF L Temperature setting button (warmest) M Temperature indicator J. Light ON/OFF K. Button ON/OFF ON: Press the button (K). The pilot light (J) switches on. OFF: Keep press the button (K) until the pilot light (J) and the temperautre...
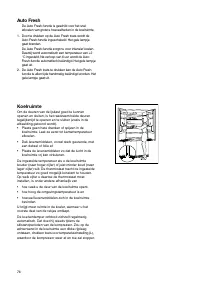
Page 41 - Refrigerator compartment
41 Refrigerator compartment For proper opening and closing, it is advisable to acton both doors simultaneously (as shown in thefigure).• Do not place hot food or drinks in the refrigerator; wait until they trave cooled to room temperature. • Always cover foods, especially those which are strong-smel...
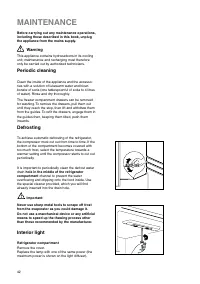
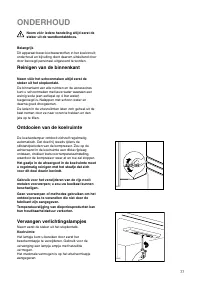
Page 42 - Warning; Periodic cleaning; Interior light; MAINTENANCE
42 D051 Before carrying out any maintenance operations,including those described in this book, unplugthe appliance from the mains supply. Warning This appliance contains hydrocarbons in its coolingunit; maintenance and recharging must thereforeonly be carried out by authorized technicians. Periodic ...
Page 43 - TROUBLESHOOTING; TECHNICAL INFORMATION
43 TROUBLESHOOTING If something is not working properly, make sure thatall the instructions in this book trave been followedbefore calling the SERVICECENTRE. The compressore are not working • Power cut or power supply problem. • Mains On/Off switch in position “0”. The interior lights are not workin...
Page 44 - INSTALLATION
44 If this appliance featuring magnetic door seals isto replace an older appliance having a springlock (latch) on the door or lid, be sure to makethat spring lock unusable before you discard theold appliance. This will prevent it from becominga death-trap for a child. Location The appliance should b...
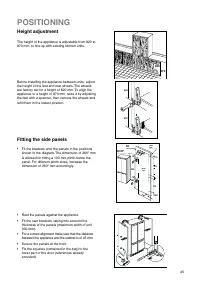
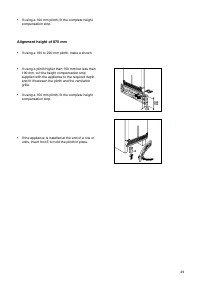
Page 45 - POSITIONING
45 Height adjustment The height of the appliance is adjustable from 820 to870 mm to fine up with existing kitchen units. Before installing the appliance between unite, adjustthe height of the feet and rear wheels. The wheelsare factory set for a height of 820 mm. To align theappliance to a height of...
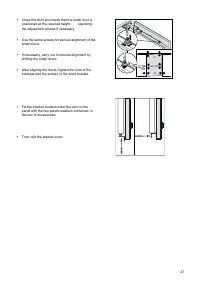
Page 46 - Fitting the door panels
46 Fitting the door panels • Open a door a remove the bracket cover. Undo the nuts with washers and remove the bracketfrom the door. • Drill the small doors as shown in the figure. • Fix the bracket to the door with the screws contained in the bag. • Refit the bracket on the adjustment screws and sc...
Page 48 - Fitting the plinth
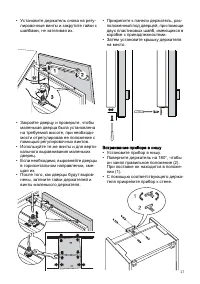
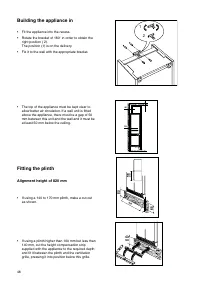
48 Building the appliance in • Fit the appliance into the recess.• Rotate the bracket of 180° in order to obtain the right position ( 2).The position (1) is on the delivery. • Fix it to the wali with the appropriate bracket. • The top of the appliance must be kept ciear to allow better air circulati...
Page 50 - DECLARATION OF GUARANTEE TERMS
50 DECLARATION OF GUARANTEE TERMS Our appliances are produced with the greatest of care. However, a defect may still occur. Our consumerservices department will repair this upon request, either during or after the guarantee period. The service life ofthe appliance will not, however, be reduced as a ...
Page 52 - AVERTISSEMENTS ET CONSEILS IMPORTANTS; Sûreté
52 AVERTISSEMENTS ET CONSEILS IMPORTANTS Il est très important que cette notice d’utilisation soit gardée avec l’appareil pour toute futureconsultation. Si cet appareil devait être vendu ou transféré à une autre personne, assurez-vous que lanotice d’utilisation suive l’appareil, de façon à ce que le...
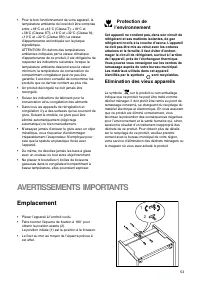
Page 53 - AVERTISSEMENTS IMPORTANTS; Emplacement
53 • Pour le bon fonctionnement de votre appareil, la température ambiante du local doit être compriseentre +18°C et +43°C (Classe T); +18°C et+38°C (Classe ST); +16°C et +32°C (Classe N);+10°C et +32°C (Classe SN); La classed’appartenance est indiquée sur la plaquesignalétique.ATTENTION: En dehors ...
Page 54 - PIÉCES EN MATIÉRE PLASTIQUE
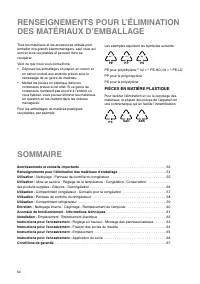
54 SOMMAIRE RENSEIGNEMENTS POUR L’ÉLIMINATION DES MATÉRIAUX D’EMBALLAGE Tous les matériaux et les accessoires utilisés pouremballer nos grands électroménagers, sauf ceux quisont en bois recyclables et peuvent donc serécupérer. Voici ce que nous vous conseillons: • Déposez les emballages en papier, e...
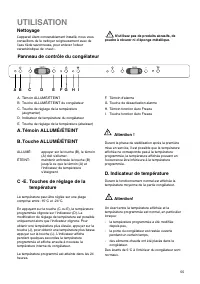
Page 55 - UTILISATION; Nettoyage; Panneau de contrôle du congélateur; température
55 UTILISATION Nettoyage L’appareil étant convenablement installé, nous vousconseillons de le nettoyer soigneusement avec del’eau tiède savonneuse, pour enlever l’odeurcaractéristique de «neuf». . N’utilisez pas de produits abrasifs, de poudre à récurer ni d’éponge métallique. Panneau de contrôle du...
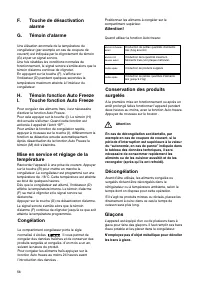
Page 56 - Témoin fonction Auto Freeze; Décongélation
56 environ 6 heuresavant environ 24heures avant inutile après inutile après introduction de petites quantités d'alimentsfrais (5 kg environ) introduction de la quantité maximumd'aliments frais (voir plaque matricule) introduction de produits surgelés introduction de petites quantités d'alimentsfrais...
Page 58 - O. Touche fonction Auto Fresh
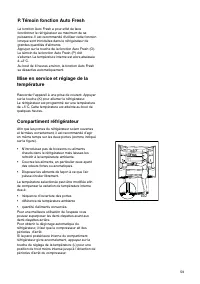
58 Panneau de contrôle duréfrigérateur N L M O J K P J. Témoin ALLUMÉ/ÉTEINTK. Touche ALLUMÉ/ÉTEINT du réfrigérateurL. Touche de réglage de la température du réfrigérateur (augmenter) M. Indicateur de température du réfrigérateur N. Touche de réglage de la température du réfrigérateur (abaisser) O. ...
Page 59 - Compartiment réfrigérateur; P. Témoin fonction Auto Fresh
59 Compartiment réfrigérateur Afin que les portes du réfrigérateur soient ouverteset fermées correctement, il est recommandé d’agiren même temps sur les deux portes (comme indiquésur la figure). • N’introduisez pas de boissons ou aliments chauds dans le réfrigérateur mais laissez-lesrefroidir à la t...
Page 60 - Nettoyage interne; ENTRETIEN
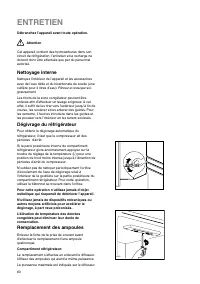
60 D051 Débranchez l’appareil avant toute opération. Attention Cet appareil contient des hydrocarbures dans soncircuit de réfrigération; l’entretien et la recharge nedoivent donc être effectués que par du personnelautorisé. Nettoyage interne Nettoyez l’intérieur de l’appareil et les accessoiresavec ...
Page 62 - Branchement électrique
62 Branchement électrique Contrôlez, avant de brancher l’appareil, que levoltage et la fréquence indiqués sur la plaquesignalétique correspondent à ceux de votre réseau. Tolérance admise: ±6%. Pour l’adaptation de l’appareil à des voltagesdifférents, l’adjonction d’un autotransformateur d’unepuissan...
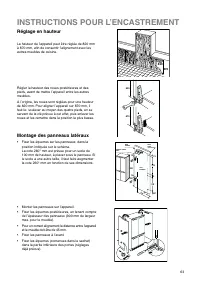
Page 63 - INSTRUCTIONS POUR L’ENCASTREMENT
63 Réglage en hauteur La hauteur de l’appareil peut être réglée de 820 mmà 870 mm, afin de consentir l’alignement avec lesautres meubles de cuisine. Régler la hauteur des roues postérieures et despieds, avant de mettre l’appareil entre les autresmeubles. A l’origine, les roues sont réglées pour une ...
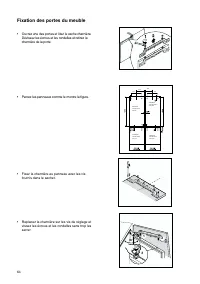
Page 64 - Fixation des portes du meuble
64 Fixation des portes du meuble • Ouvrez une des portes et ôtez le cache charnière. Dévissez les écrous et les rondelles et retirez lacharnière de la porte • Percez les panneaux comme le montre la figure. • Fixez la charnière au panneau avec les vis fournis dans le sachet. • Replacez la charnière s...
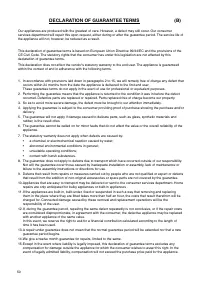
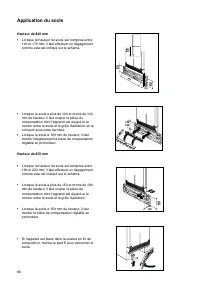
Page 66 - Application du socle
66 Application du socle Hauteur de 820 mm • Lorsque la hauteur du socle est comprise entre 140 et 170 mm, il faut effectuer un dégagementcomme cela est indiqué sur le schéma. • Lorsque le socle a plus de 100 et moins de 140 mm de hauteur, il faut couper la pièce decompensation dont l’appareil est éq...
Page 67 - DÉCLARATION DE CONDITIONS DE GARANTIE
67 DÉCLARATION DE CONDITIONS DE GARANTIE Nos appareils sont produits avec le plus grand soin. Malgré cela, un défaut peut toujours se présenter. Notreservice clientèle se chargera de réparer ceci sur demande, pendant ou après la période de garantie. La duréede vie de l’appareil n’en sera pas pour au...
Page 69 - WAARSCHUWINGEN EN BELANGRIJKE ADVIEZEN; Algemene veiligheid; Onderhoud / Reparatie
69 WAARSCHUWINGEN EN BELANGRIJKE ADVIEZEN Het is uiterst belangrijk dat het bij het apparaat behorende instructieboekje bewaard blijft. Zou hetapparaat door u aan iemand anders gegeven of verkocht worden, of zou het apparaat in het huis vanwaaruit u verhuist achterblijven, dan dient de nieuwe gebrui...
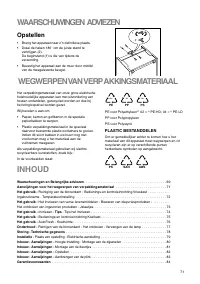
Page 71 - PLASTIC BESTANDDELEN; WAARSCHUWINGEN ADVIEZEN; Opstellen
71 INHOUD WEGWERPEN VAN VERPAKKINGSMATERIAAL Het verpakkingsmateriaal van onze grote elektrischehuishoudelijke apparaten kan met uitzondering vanhouten onderdelen, gerecycled worden en dus bijhet kringloopafval worden gezet. Wij bevelen u aan om: • Papier, karton en golfkarton in de speciale papierb...
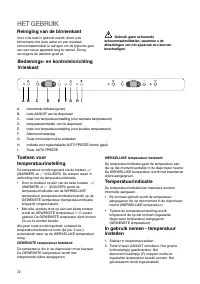
Page 72 - Temperatuurindicatie; HET GEBRUIK
72 E C D F A B G H I A. netcontrole-indicatie (groen) B. toets AAN/UIT van de diepvriezer C. toets voor temperatuurinstelling (voor warmere temperaturen) D. temperatuurindicatie van de diepvriezer E. toets voor temperatuurinstelling (voor koudere temperaturen) F. Alarmcontrolelampje G. Toets om het ...
Page 77 - Reinigen van de binnenkant; ONDERHOUD
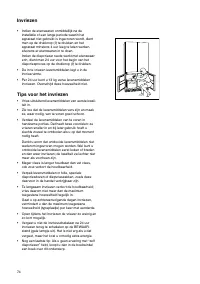
77 Neem vóór iedere handeling altijd eerst desteker uit de wandkontaktdoos. Belangrijk Dit apparaat bevat koolwaterstoffen in het koelcircuit;onderhoud en bijvulling dient daarom uitsluitend doordoor bevoegd personeel uitgevoerd te worden. Reinigen van de binnenkant Neem võõr het schoonmaken altijd ...
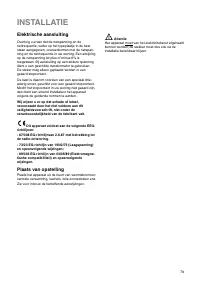
Page 79 - Elektrische aansluiting; Plaats van opstelling; INSTALLATIE
79 Elektrische aansluiting Overtuig u ervan dat de netspanning en denetfrequentie, welke op het typeplaatje in de kaststaan aangegeven, overeenkomen met de netspan-ning en de netfrequentie in uw woning. Een afwijkingop de netspanning tot plus of minus 6% istoegestaan. Bij aansluiting op een andere s...
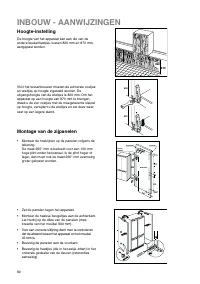
Page 80 - Montage van de zijpanelen; INBOUW - AANWIJZINGEN
80 Hoogte-instelling De hoogte van het apparaat kan aan die van deandere keukenkastjes, tussen 820 mm en 870 mm,aangepast worden. Vòòr het tussenbouwen moeten de achterste voetjesen wieltjes op hoogte ingesteld worden. Deuitgangshoogte van de wieltjes is 820 mm. Om hetapparaat op een hoogte van 870 ...
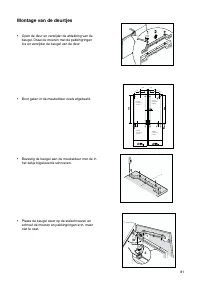
Page 81 - Montage van de deurtjes
81 Montage van de deurtjes • Open de deur en verwijder de afdekking van de beugel. Draai de moeren met de pakkingringenlos en verwijder de beugel van de deur. • Boor gaten in de meubeldeur zoals afgebeeld. • Bevestig de beugel aan de meubeldeur met de in het zakje bijgeleverde schroeven. 193 193 193...
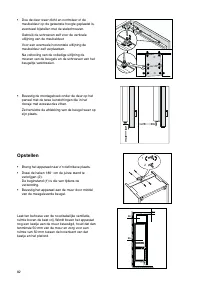
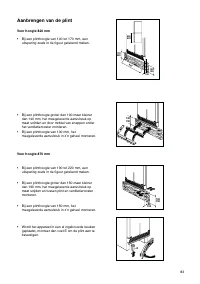
Page 83 - Aanbrengen van de plint
83 Aanbrengen van de plint Voor hoogte 820 mm • Bij een plinthoogte van 140 tot 170 mm, een uitsparing zoals in de figuur getekend maken. • Bij een plinthoogte groter dan 100 maar kleiner dan 140 mm, het meegeleverde aanvulstuk opmaat sn9den en door middel van snappen onderhet ventilatierooster mont...
Page 84 - Waarborgvoorwaarden
84 Waarborgvoorwaarden Onze toestellen worden met de grootst mogelijke zorgvuldigheid geproduceerd. Desondanks kan hetvoorkomen dat er een defect optreedt. Onze klantendienst zal dit op verzoek herstellen, zowel binnen alsbuiten de waarborgtermijn. De levensduur van het toestel wordt daardoor niet n...


 Zanussi ZBA 3154A
User Manual
Zanussi ZBA 3154A
User Manual
 Zanussi ZBA 6230
Manual
Zanussi ZBA 6230
Manual
 Zanussi ZBA3224A
Manual
Zanussi ZBA3224A
Manual
 Zanussi ZBB 6286
User Manual
Zanussi ZBB 6286
User Manual
 Zanussi ZBB 928465 S
User Manual
Zanussi ZBB 928465 S
User Manual
 Zanussi ZBB7297
User Manual
Zanussi ZBB7297
User Manual
 Zanussi ZI 9225
Manual
Zanussi ZI 9225
Manual
 Zanussi ZRB 34 NA
User Manual
Zanussi ZRB 34 NA
User Manual
 Zanussi ZRB 36 ND
User Manual
Zanussi ZRB 36 ND
User Manual
 Zanussi ZRB 40 ND
User Manual
Zanussi ZRB 40 ND
User Manual
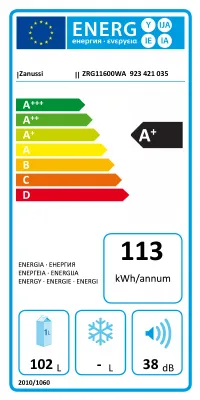 Zanussi ZRG11600WA
User Manual
Zanussi ZRG11600WA
User Manual
 Zanussi ZRT23100WA
User Manual
Zanussi ZRT23100WA
User Manual
 Zanussi ZRT27101WA
User Manual
Zanussi ZRT27101WA
User Manual
 Zanussi ZRX51100WA
User Manual
Zanussi ZRX51100WA
User Manual
 Zanussi ZUF 11420 SA
User Manual
Zanussi ZUF 11420 SA
User Manual
 Zanussi ZUS 6140
User Manual
Zanussi ZUS 6140
User Manual