Page 3 - During Operation; English; Important Safety Information; Child Safety
3 About Installation, Cleaningand Manteinance • It is mandatory that all operations required for theinstallation are carried out by a qualified or competentperson, in accordance with existing rules andregulations. • Disconnect the appliance from the electrical supply,before carrying out any cleaning...
Page 4 - Contents; For the User; Guide to Use the instructions
4 Contents This appliance complies with the followingE.E.C. Directives: - 2006/95 (Low Voltage Directive); - 89/336 (Electromagnetical Compatibility Directive); - 93/68 (General Directives) and subsequent modifications. MANUFACTURER: ELECTROLUX HOME PRODUCTS ITALY S.p.A.Viale Bologna, 29847100 FORLÌ...
Page 5 - Hob burners control knobs; Lighting the burners; Instruction for the User
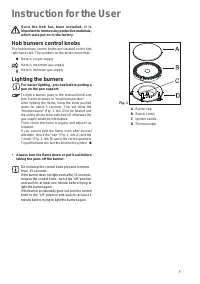
5 O n c e t h e h o b h a s b e e n i n s t a l l e d , i t i simportant to remove any protective materials,which were put on in the factory. Hob burners control knobs The hob burners control knobs are situated on the hobright hand side. The symbols on the knobs mean that: there is no gas supply the...
Page 7 - Cleaning and Maintenance
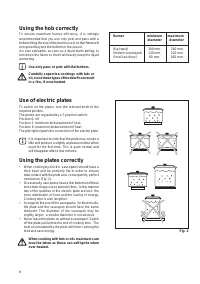
7 Cleaning and Maintenance Disconnect the appliance from the electricalsupply, before carrying out any cleaning ormanteinance work. General cleaning Wash the enamelled components with warm soapywater. Never use abrasive cleaners. Frequently wash the "caps" and the "crowns" with hotso...
Page 8 - Technical Data
8 Gas Burners Rating Rapid Burner 3,0 kW (G20) - 2,8 kW (G30/G31) Semirapid Burner 2,0 kW Auxiliary Burner 1,0 kW Appliance Class 3 Category II 2H3B/P Setting ZGL 66: Natural gas G 20 / 20 mbar ZXL 66: LPG G30/G31 28-30/37 mbar Gas connection G 1/2" • The following instructions about installatio...
Page 9 - Replacement of the voltage cable; Electrical Connection
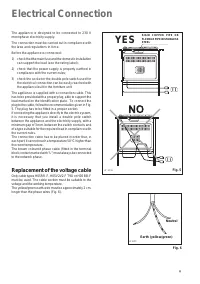
9 The appliance is designed to be connected to 230 Vmonophase electricity supply. The connection must be carried out in compliance withthe laws and regulations in force. Before the appliance is connected: 1) check that the main fuse and the domestic installation can support the load (see the rating ...
Page 10 - Injectors replacement; Adjustment of minimum level; Adaptation to different types of gas
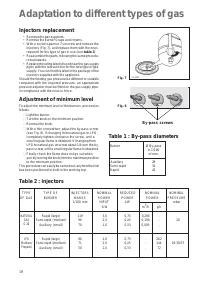
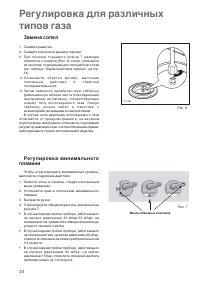
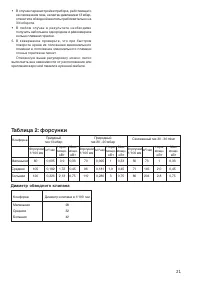
10 Injectors replacement • Remove the pan supports.• Remove the burner's caps and crowns.• With a socket spanner 7 unscrew and remove the injectors (Fig. 7), and replace them with the onesrequired for the type of gas in use (see table 2 ). • Reassemble the parts, following the same procedu- re backw...
Page 11 - Fitting the hob to the worktop; Building In; PE
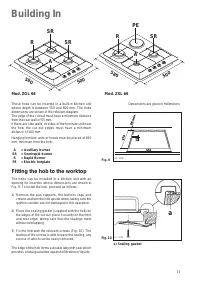
11 These hobs can be inserted in a built-in kitchen unitwhose depth is between 550 and 600 mm. The hobsdimensions are shown in the relevant diagram.The edge of the cut out must have a minimum distancefrom the rear wall of 55 mm.If there are side walls, or sides of the furniture unit nearthe hob, the...
Page 12 - Kitchen unit with door; Possibilities for insertion
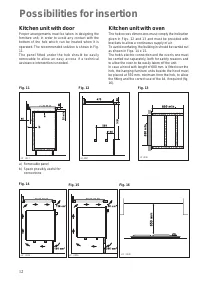
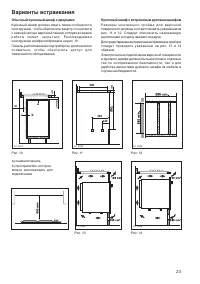
12 a) Removable panelb) Space possibly useful for connections Fig. 11 Fig. 12 Fig. 14 Fig. 15 FO 1013 FO 0947 FO 0198 Kitchen unit with door Proper arrangements must be taken in designing theforniture unit, in order to avoid any contact with thebottom of the hob which can be heated when it isoperate...
Page 13 - Service and original spare parts
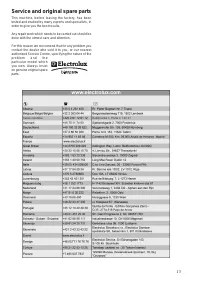
13 Service and original spare parts This machine, before leaving the factory, has beentested and studied by many experts and specialists, inorder to give you the best results. Any repair work which needs to be carried out should bedone with the utmost care and attention. For this reason we reccomend...
Page 14 - Важная информация по безопасности; При эксплуатации; Безопасность детей; РУССКИЙ
1 4 Важная информация по безопасности Эти рекомендации приведены в интересах вашей безопасности. Обязательно внимательно прочитайте этирекомендации перед установкой и использованием прибора. При эксплуатации • Данный прибор предназначен для приготовленияпищи в быту и только для личного хозяйства.При...
Page 16 - Зажигание конфорок
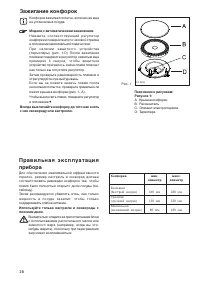
1 6 Зажигание конфорок Конфорка зажигается легче, если на нее ещене установлена посуда. Модели с автоматическим зажиганием Н а ж м и т е с о о т в е т с т в у ю щ и й р е г у л я т о рконфорки и поверните его по часовой стрелкев положение максимальной подачи газа. П р и н а л и ч и и з а щ и т н о г...
Page 17 - Уход и очистка
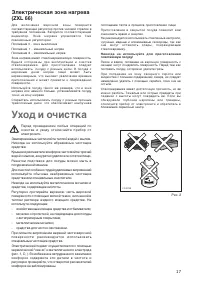
1 7 Перед проведением любых операций пооч и с т ке и у ход у о т к л ю ч а й т е п р и б о р о тэлектросети. Эмалированные части мойте теплой водой с мылом.Никогда не используйте абразивные чистящиесредства. Крышки и рассекатели конфорок часто мойте горячейводой с мылом, аккуратно удаляя все остатки...
Page 18 - Технические данные; Инструкции по установке; Подключение газа
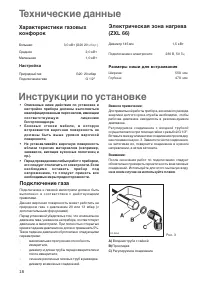
1 8 Технические данные Характеристики газовыхконфорок Большая 3,0 кВт (G20 20 мбар ) Средняя 2,0 кВт Маленькая 1,0 кВт Настройка Природный газ G20 20 мбар Подключение газа G 1/2" Электрическая зона нагрева(ZXL 66) Диаметр 145 мм 1,5 кВт Подключение к электросети 230 В, 50 Гц Размеры ниши для вст...
Page 19 - Электрическое подключение; Замена кабеля питания
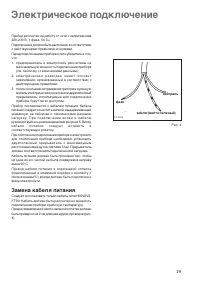
1 9 Электрическое подключение Прибор рассчитан на работу от сети с напряжением220-230 В, 1 фаза, 50 Гц. Подключение должно быть выполнено в соответствиис действующими правилами и нормами. Перед подключением прибора к сети убедитесь в том,что: 1. предохранитель и электросеть рассчитаны на максимальну...
Page 22 - Установка в кухонной мебели; Встраивание в столешницу моделей ZGL66, ZXL66
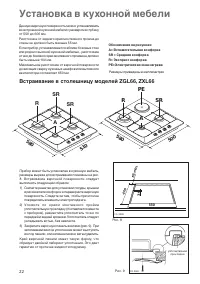
2 2 Прибор может быть установлен в кухонную мебель,размеры выреза для встраивания показаны на рис.8. Встраивание варочной поверхности следуетвыполнять следующим образом: 1) Снимите решетки для установки посуды, крышки и рассекатели конфорок и переверните варочнуюповерхность. Следите за тем, чтобы пр...
Page 23 - Варианты встраивания
2 3 Варианты встраивания Обычный кухонный шкаф с дверцами Кухонный шкаф должен иметь такие особенностиконструкции, чтобы обеспечить защиту от контактас нижней частью варочной панели, которая во времяра б о т ы м оже т н а г р е т ь с я . Ре ко м е н д у е м а яконструкция шкафа изображена на рис. 10...
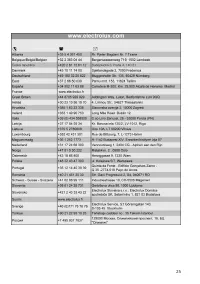
Page 24 - Гарантия/сервисная служба; ЕВРОПЕЙСКАЯ ГАРАНТИЯ
2 4 Гарантия/сервисная служба Сервисное обслуживание и запасные части В случае необходимости ремонта прибора, или если Вы хотите приобрести запасные части,обращайтесь в наш ближайший авторизованныйсервисный центр (список сервисных центровприлагается). Если у вас возникли вопросы поиспользованию приб...