Page 2 - Contents
Thank you for selecting ourappliance We wish you lots of enjoyment with your newappliance and we hope that you will considerour brand again when purchasing householdappliances.Please read this user manual carefully andkeep it throughout the product life cycle as areference document. The user manual ...
Page 3 - Safety information; Correct use
Safety information In the interest of your safety and to ensure thecorrect use, before installing and first using theappliance, read this user manual carefully, in-cluding its hints and warnings. To avoidunnecessary mistakes and accidents, it is im-portant to ensure that all people using theapplianc...
Page 4 - Installation; Control panel; Functions buttons
Installation • Check your dishwasher for any transport damage. Never connect a damaged ma-chine. If your dishwasher is damaged con-tact your supplier. • All packaging must be removed before use.• Any electrical and plumbing work required to install this appliance must be carried out bya qualified an...
Page 5 - MUST
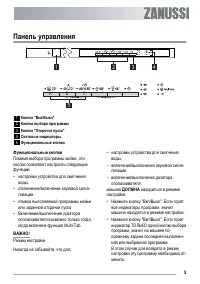
In addition to the dishwashing programme se-lection, the following functions can also be setwith the help of these buttons:• the setting of the water softener,• deactivation/activation of the audible sig- nals. • cancel a washing programme or a delay start in progress • activation/deactivation of th...
Page 6 - Audible signals; end of programme; Select and start a washing programme
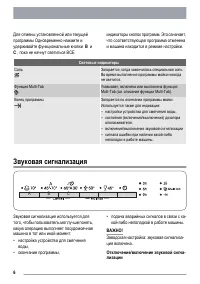
Audible signals B C A Audible signals have been introduced to helpindicate which operations the dishwasher isperforming:• setting the water softener,• end of the programme,• intervention of an alarm due to malfunction. IMPORTANT! Factory setting: audible signals activated. Deactivation/activation of...
Page 8 - Washing programmes
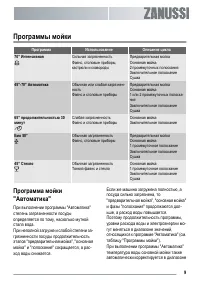
IMPORTANT! When the washing programme has finished, itis recommended that the dishwasher is un- plugged and the water tap turned off. Washing programmes Programme Use Cycle description Intensive 70° Heavy soil.Crockery, cutlery, pots and pans PrewashMain wash2 intermediate rinsesFinal rinseDry AUTO ...
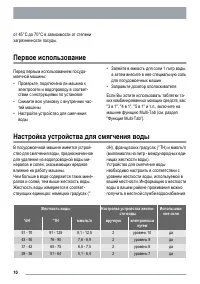
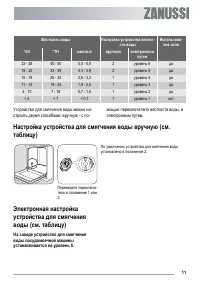
Page 10 - Setting the water softener manually (see table); The dishwasher is factory set at level 5.
Water hardness Adjusting the water hardness setting Use of salt °dH °TH mmol/l manually electronically 4 - 10 7 - 18 0,7 - 1,8 1 level 2 yes < 4 < 7 < 0,7 1 level 1 no The water softener must be set in both ways:manually, using the water hardness dial andelectronically. Setting the water so...
Page 11 - Filling with dishwasher salt
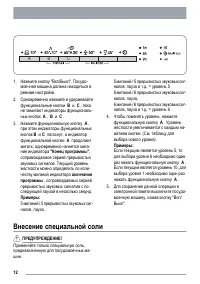
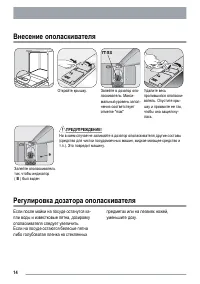
3. Press function button A , the lights function buttons B and C turn off while the light of function button A goes flashing, at the same time the end of programme indica- tor light starts to flash, along with a se-quence of intermittent audible signals. Thecurrent level is indicated by the number o...
Page 12 - Filling with rinse aid
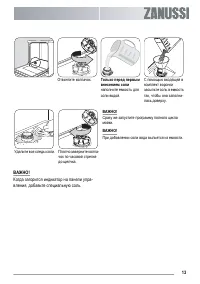
Remove any trace of salt. Replace the cap tightly turning it clockwise until itstops with a click. IMPORTANT! Immediately start a complete programme. IMPORTANT! Water will overflow from the container as salt is added. IMPORTANT! Top up the special salt when the light on thecontrol panel illuminates....
Page 16 - Use of detergent
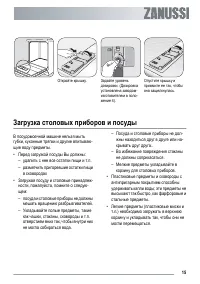
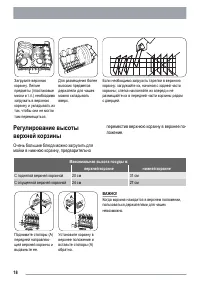
Adjusting the height of theupper basket If washing very large plates you can load themin the lower basket after moving the upper bas-ket to the higher position. Maximum height of the dishes in: upper basket lower basket With upper basket raised 20 cm 31 cm With upper basket lowered 24 cm 27 cm Move ...
Page 17 - Detergent tablets
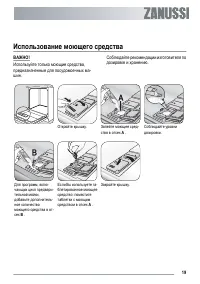
Open the lid. Fill in the detergent incompartment A . Observe the dosing lev-els. For programmes with pre-wash add an additionaldetergent dose in com-partment B . When using detergenttablets: place detergenttablets in compartment A . Close the lid. Detergent tablets Detergent tablets from different ...
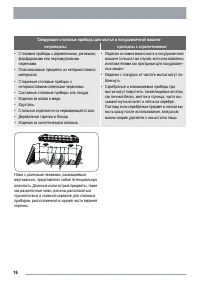
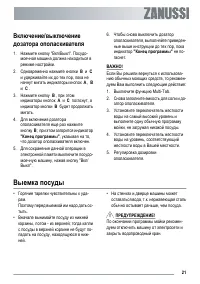
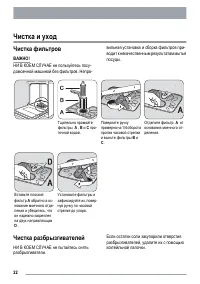
Page 19 - Unloading the dishwasher; Care and cleaning; Cleaning the filters
IMPORTANT! If you decide to turn back to the use of standarddetergent system we advise that you:1. Deactivate the Multi-Tab function.2. Fill up the salt container and the rinse aid dispenser again. 3. Adjust the water hardness setting to the highest setting and perform 1 normal wash-ing programme wi...
Page 20 - Cleaning the spray arms; External cleaning
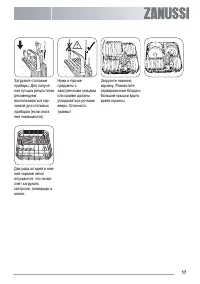
Clean filters A , B and C thoroughly under runningwater. Turn the handle about 1/4turn anticlockwise and re-move filters B and C . Remove filter A from the base of the washing com-partment. Put the flat filter A back in the base of the washingcompartment and ensurethat it fits perfectly underthe two...
Page 21 - Frost precautions; Environmental concerns; Packaging material
2. Leave the door ajar to prevent the forma- tion of any unpleasant smells. 3. Leave the inside of the machine clean. Frost precautions Avoid placing the machine in a location wherethe temperature is below 0°C. If this isunavoidable, empty the machine, close the ap-pliance door, disconnect the water...
Page 22 - Something not working
Something not working The dishwasher will not start or stops duringoperation.Certain problems are due to the lack of simplemaintenance or oversights, which can be solved with the help of the indications describedin the chart, without calling out an engineer.Switch off the dishwasher and carry out th...
Page 24 - Technical data; Hints for test institutes
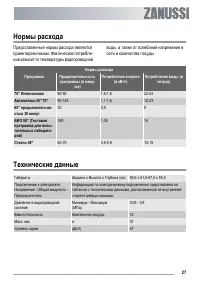
Consumption values The consumption values are intended as aguide and depends on the pressure and thetemperature of the water and also by the var- iations of the power supply and the amount ofdishes. Consumption values Programme Programme duration (in minutes) Energy consumption (in kWh) Water (litre...
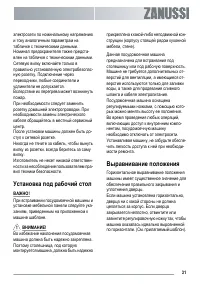
Page 25 - Water connection
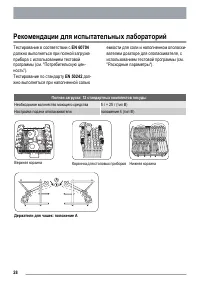
rinse aid respectively and using the test pro-gramme (see "Consumption values"). Full load: 12 standard place settings Amount of detergent required 5 g + 25 g (Type B) Rinse aid setting position 4 (Type III) Upper basket Cutlery basket Lower basket cup racks: position A Installation WARNING!...
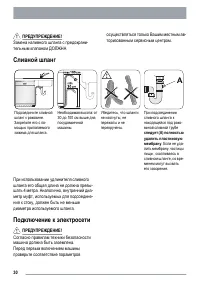
Page 27 - Drain hose; Electrical connection
Drain hose Connect drain hose to thesink. Required height: 30 to 100cm above bottom of thedishwasher. Ensure that the hoses arenot kinked, crushed or en-tangled. When connecting thedrain hose to an undersink trap spigot, the entire plastic membrane (A)must be removed . Fail- ure to remove all the me...