Page 2 - GENERAL SAFETY WARNINGS; Unauthorized modification may impair the function and/or; Use the right tool for the job.; IMPORTANT SAFETY INFORMATION
GENERAL SAFETY WARNINGS Read all safety warnings and instructions. Failure to follow the warnings and instructions may result in electric shock, fire and/or serious injury. Save all warnings and instructions for future reference. The warnings, precautions, and instructions discussed in this instruct...
Page 4 - fully open filter manual air relief valve.; MUST be OPEN
3 IMPORTANT SAFETY INFORMATION Hazardous Pressure: Pool and spa water circulation systems operate under hazardous pressure during start-up, normal operation, and after pump shut-off. Stand clear of circulation system equipment during pump start-up. Failure to follow safety and operation instructions...
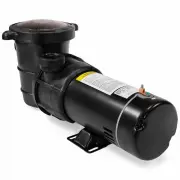
Page 5 - DIAGRAM AND SPECIFICATIONS; STRAINER; FEATURES AND SPECIFICATIONS; housing, performance and quiet operation
4 DIAGRAM AND SPECIFICATIONS PUMP HOUSING PUMP HOUSING PUMP COVER & GASKET MOTOR MOUNTING FOOT STRAINER COVER TRAINER HOUSING STRAINER BASKET FEATURES AND SPECIFICATIONS • Can only be used with sand filters or cartridge corrosion-proof reinforced thermoplastic housing, performance and quiet oper...
Page 6 - PUMP LOCATION; DO NOT; install pump in a damp or non-ventilated location.; Pump Mounting; Allow pump inlet height to be as close to water level as possible.; PIPE SIZING CHART; NOTE; between the pump suction inlet and any plumbing fittings.; INSTALLATION
5 PUMP LOCATION Locate the system below the pool water line, for best pump performance. Install pump on a firm, level base or pad to meet all local and national codes. The field supplied base or pad must be level. Though the pump is designed for outdoor use, it is strongly advised to protect the ele...
Page 7 - over-tighten fitting or you may cause damage. If leaks occur,
6 Fasten pump to base or pad with screws or bolts to reduce vibration and stress on pipe or hose joints. We recommend a minimum clearance around the pad of 18” to allow adequate access for servicing pump and piping. PUMP LOCATION Installing union connections at the suction and outlet ports is recomm...
Page 8 - PUMP DISCHARGE POSITION; NEVER; PRIMING THE PUMP; Release all air from filter and piping system.; NOT; START-UP AND OPERATION
7 PUMP DISCHARGE POSITION Step 1: Remove ALL plumbing attached to pump. Remove pump from base (if applicable). Step 2: Remove strainer housing. Disengage and lift off strainer cover. Remove strainer basket. Lift up on strainer ‘C’ clip and remove. Slide strainer housing forward and remove. S...
Page 9 - PUMP WINTERIZATION STORAGE; Install all intake and output fittings and piping.; START-UP FOR WINTERIZED EQUIPMENT; OPERATION
8 EXPLOSION HAZARD: Purging the system with compressed air can cause components to explode, with risk of severe injury or death to anyone nearby. Use only a low pressure (below 5 PSI), high volume blower when air purging the pump, filter, or piping. Allowing the pump to freeze will void the warranty...
Page 10 - SHAFT SEAL CHANGE INSTRUCTIONS
1. Shut off water flow to pump by closing appropriate valves or by plugging both the skimmer outlet port and return port to pool. Disconnect piping or hoses from the motor/pump assembly. 2. Remove the strainer by disengaging and removing the strainer cover. Remove the basket. Lift up on strainer ‘C’...
Page 11 - TROUBLESHOOTING
Page 12 - PARTS LIST
Page 13 - OF REPLACEMENT PARTS THERETO.; Record Product’s Serial Number Here:; as replacement parts.; PLEASE READ THE FOLLOWING CAREFULLY; OF NOTE; PRODUCT MADE IN CHINA
12 THE MANUFACTURER AND/OR DISTRIBUTOR HAS PROVIDED THE PARTS LIST AND ASSEMBLY DIAGRAM IN THIS MANUAL AS A REFERENCE TOOL ONLY. NEITHER THE MANUFACTURER OR DISTRIBUTOR MAKES ANY REPRESENTATION OR WARRANTY OF ANY KIND TO THE BUYER THAT HE OR SHE IS QUALIFIED TO MAKE ANY REPAIRS TO THE PRODUCT, OR TH...