Page 2 - Attention
Attention P D F- XC hange E dit o r w w w .tr a c k e r s o f a e . c P D F- XC hange E dit o r w w w .tr a c k e r s o f a e . c Click to BUY NOW! P D F- XC hange E dit o r w w w .tr a c k e r - s o f t w a r e . c o m Click to BUY NOW! P D F- XC hange E dit o r w w w .tr a c k e r - s o f t w a r ...
Page 3 - Содержание; Применимость
-2- 4. Установка батареи ............................................................................................................ 4 6. Пульт ДУ ..............................................................................................................................8 7. Авто зарядная станция...
Page 4 - Применяемость; Устройство; З н а ком с т в а с фу н к ц и я м и; Робот; Компоненты робота
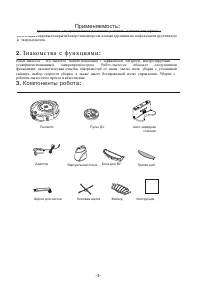
-3- P D F- XC hange E dit o r w w w .tr a c k e r s o f a e . c P D F- XC hange E dit o r w w w .tr a c k e r s o f a e . c Пылесос Пульт ДУ Авто зарядная станция Адаптор Виртуальная стена Блок для ВУ Тряпка pad Щетка для чистки Боковая щетка Фильтр Инструкция Click to BUY NOW! P D F- XC hange E dit...
Page 6 - Введение; Верхняя часть; Нижняя
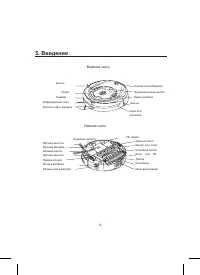
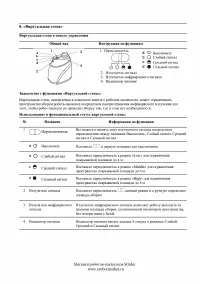
-5- P D F- XC hange E dit o r w w w .tr a c k e r s o f a e . c P D F- XC hange E dit o r w w w .tr a c k e r s o f a e . c 5. Введение : Верхняя часть Бампер Ручка Бампер Инфракрасный порт Контакты авто зарядки Окно для датчиков Бампер Экран дисплея Фунциональные кнопки Кнопка пылесборника Датчики ...
Page 9 - Using Method & Functional Status of Control Panel:; Overall Appearance
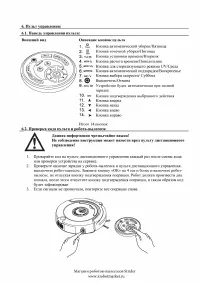
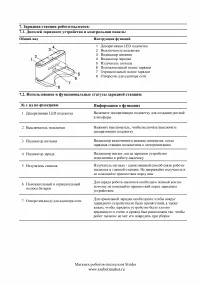
i. Control panel: ii. Using Method & Functional Status of Control Panel: the following steps are very important, or the remote control may fail. 6. Remote Control: Overall Appearance Key Description 1. Automatic cleaning key/Thursday 2. Spot cleaning key/Friday 3. Time set key/Tuesday 4. Timing ...
Page 10 - Function Guide; Auto Cleaning
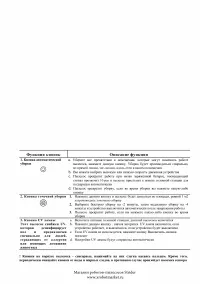
1. Turn on the Cleaner. 2. Press on the remote controller, the icon in the LCD screen of cleaner will flicker. 3. Press correct week button on the remote controller; there is display in icon , 1 means Sunday, 2 means Monday, …accordingly, 7 means Saturday. 4. After setting correct week , then you ca...
Page 11 - may fail to control the main body.
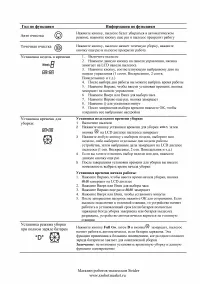
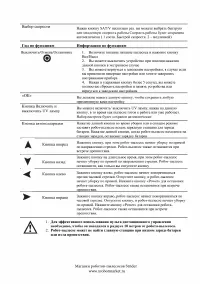
Function Guide Function Information Press and release till the Cleaner turn right to the direction you want. It will stop automatically in case of the obstacle. Turn off/cancel/stop OK key UV lamp key 1 . Turn on the power switch of the cleaner, and press the key can turn on/off the Cleaner . 2 . Yo...
Page 13 - Installation of Docking Station and Charging for the cleaner:; Automatic recharging:
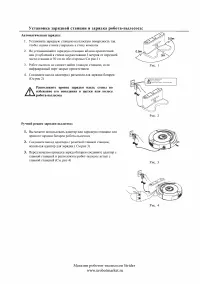
Installation of Docking Station and Charging for the cleaner: Automatic recharging: Install the Docking Station on the flat ground firmly and against the vertical wall. No obstacle or hollow areas 3m away from the Docking Station in the front and 0.5m on the right and left. (Refer to Figure 1) The C...
Page 14 - Turn on the Cleaner, full three grids show; Figure 3; be put in wide space.
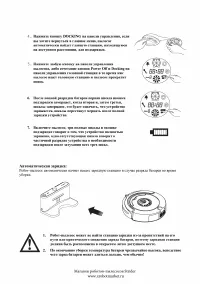
Automatic charging: Press DOCKING in the remote control if you want to charge for the main body, the Cleaner will search the Docking Station for charging within available scope automatically. (Refer to Figure 3) Press any key in host panel or POWER OFF and DOCKING keys in the remote control while th...
Page 18 - Figure 1
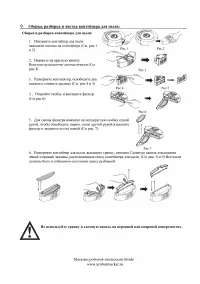
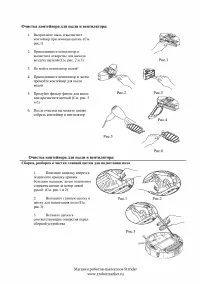
Cleaning of Dustbin and Blower: First dump the dust, and then clean it with Dust Brush. (Refer to Figure 1) Pop up the blower, and then clean the air inlet/outlet with dust brush. (Refer to Figure 2 and Figure 3) Don’t clean the blower in water! 3. Pop up the blower, take out the filter, and then cl...
Page 22 - Failure information which may appear during using:
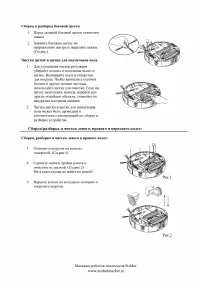
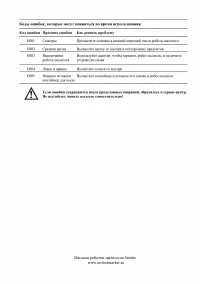
Failure Code E001 Ground detection sensors Clean the sensors at the front bottom of the cleaner E002 Middle brush Clean the rubbish such as hair, thread wrapped on the brush E003 Power off Use the adaptor to charge , after full charged , then use again E004 Left &right wheel Check the left and r...