Page 2 - CONTENTS; This product is suitable for 220 - 240 V only.
2 ZERO English CONTENTS ▶ This product is suitable for 220 - 240 V only. 4-STAGE AIR PURIFICATION ·············································· 3 CONTROLS ····························································· 4 WHERE TO USE ························································· 5 INSTALL...
Page 3 - -STAGE AIR PURIFICATION
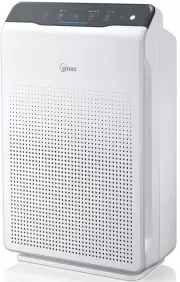
3 English ZERO 4-STAGE AIR PURIFICATION Light sensor Deodorization filter PlasmaWave Control Panel / Display Panel True HEPA filter Particle sensor Pre-filter Power cord with plug (This product is suitable for 220-240V only.) Front panel 1 2 3 4 User Manual Unit Pre-filter/ Deodorization filter/ Tru...
Page 4 - CONTROLS
4 English ZERO CONTROLS 소피아 1 Air Outlet Vent Reset Button After replacing a filter, press the RESET button for at least 5 seconds. Fan Speed Indicator Indicates the current fan speed. Timer Indicator If timer has been set, the LED light indicates the set time of operation. Air Quality Indicator Col...
Page 5 - WHERE TO USE; WARNING
5 English ZERO WHERE TO USE Allow 30 - 45 cm of space between TVs, radios, and other electronic productselectromagnetic interference from certain electronics may cause product malfunction. Place indoors away from direct sun lightdirect exposure may cause product malfunction or failure. Only place on...
Page 6 - NOTE; INSTALLING FILTERS
6 English ZERO This product comes with all required filters. The protective plastic wrap must be removed from the filter before use. ※ Operating the unit without removing the plastic wrap may result in product failure. ※ Unplug and make sure the unit is turned off before installing filter. ① Remove ...
Page 7 - GI
7 English ZERO INSTALLING FILTERS ④ Install the filters until they fit securely in place. Filters must be installed in this order: 3 True HEPA Filter (rear) 2 Deodorization filter (middle) 1 Pre-filter (front) ˍ To install the Pre-filter, insert bottom tabs into the slots on either side of the lower...
Page 8 - SAFETY AND CAUTIONS
8 English ZERO SAFETY AND CAUTIONS Before operating this equipment, carefully read and follow these safety cautions Ensure filters are inserted before running unit running unit without filters can shorten the units life and cause electric shock or injury. Be sure foreign objects are NOT inserted int...
Page 9 - INITIAL OPERATION
9 English ZERO INITIAL OPERATION ① Insert the power cord into an electrical outlet. ② Press the 'Power' button. NOTE ˍ During the first 30 seconds of power up, the Air Quality Indicator will cycle through Blue, Amber and Red colors. The Particle Sensors take approximately 30 seconds to gauge the air...
Page 12 - PLASMAWAVE
12 English ZERO PLASMAWAVE ® & AIR QUALITY INDICATOR 5. PlasmaWave ® By default, PlasmaWave ® is enabled whenever the unit is powered on. ① Press the Plasmawave button, when the unit is on, to enable or disable this feature. NOTE ˍ In Auto mode, as the indoor air quality improves, the fan speed ...
Page 13 - FILTER CARE
13 English ZERO FILTER CARE 1. Know The Filters When the Check Filter indicator LED is on, it is time to replace both the True HEPA and Deodorization filters. Filter Indicator Light When to service When to replace 1 Pre-filter none Clean once every 14 days Permanent 2 Deodorization filter Can NOT be...
Page 14 - Preparing New Filters; NOTICE
14 English ZERO FILTER CARE 2. Removing Filters Turn the unit power off before removing filters. ① Remove the front panel by grasping its upper edge and gently pulling forward. Latch ② Press on the Pre-filter tabs near the top of the filter, release and remove. Tabs Pre-filter ③ Pull out the Deodori...
Page 15 - Resetting The Unit
15 English ZERO FILTER CARE 4. Replacing Filters ① Insert the True HEPA Filter first, then the Deodorization filter. Deodorization filter True HEPA filter ② Insert the Pre-filter. ˍ Insert bottom tabs of the Pre-filter into the slots on either side of the lower part of the unit, then rotate upward t...
Page 16 - Cleaning the filter; Please contact your local dealer
16 English ZERO FILTER CARE 6. Cleaning the filter Intervals between filter cleaning may vary depending on the air quality. ① Use a vacuum cleaner or soft brush to clean the Pre-filter. If it is excessively soiled, rinse in room temperature water. ˍ Do not use detergent or soap. ˍ Allow the filter t...
Page 17 - PARTICLE SENSOR CARE; Particle Sensors Care
17 English ZERO PARTICLE SENSOR CARE Particle Sensors Care For optimal performance of the Particle Sensor, which detects airborne dust and ultrafine particles, clean it every two months. Clean it more frequently when the unit is running in a place with high dust levels. ① Open the Particle Sensor co...
Page 18 - CLEANING CARE
18 English ZERO CLEANING CARE 1. Cleaning the Exterior & Interior ① Wipe with a soft damp cloth using room temperature water. Afterwards, wipe it down with a clean dry cloth. ˍ To keep unit in peak condition, clean every 1-2 months. ② Open the front panel and clean the interior with a vacuum cle...
Page 19 - FREQUENTLY ASKED QUESTIONS
19 English ZERO FREQUENTLY ASKED QUESTIONS Problem Check / Actions to take It does not turn on at all. ˍ Is the plug securely attached to the outlet? - Make sure the outlet has power going to it, and ensure the plug is secured. ˍ Is there a power outage? - Check to see if other lights and electrical...
Page 21 - UNIT SPECIFICATIONS
21 English ZERO UNIT SPECIFICATIONS Model Name AUS-1050AZBU Power Voltage 220 - 240 V, 50 / 60 Hz Power Rate 35 W Recommended room capacity 38.2 m 2 Weight 7 kg Dimensions 380 mm(W) x 208 mm(D) x 600 mm(H) Replacement Filter FILTER GI, item : 1712-0090-01 ※ The exterior, design, and product specific...
Page 22 - SAFETY INSTRUCTIONS; IMPORTANT CAUTIONS FOR; IMPORTANT PRECAUTIONS FOR
22 English ZERO SAFETY INSTRUCTIONS Thank you for purchasing a Winix air purifier. This product is for household use only. IMPORTANT CAUTIONS FOR USING YOUR AIR PURIFIER WARNING : Follow the instructions in this manual to reduce the risk of electric shock, short circuit, and/or fire. ˍ Do not repair...
Page 23 - PRODUCT WARRANTY
23 English ZERO PRODUCT WARRANTY Product Name Air Purifier Model Name AUS-1050AZBU Purchase Date Warranty period Two (2) years Place of purchase Place of purchase Tel. Customer Address Name Tel. ※ After purchase, be sure to complete all of the above information.