Page 2 - TABLE OF CONTENTS
1 IMPORTANT SAFETY INSTRUCTIONS …………………………………………………2 PREPARING YOUR ICE MAKER FOR USE IMPORTANT SAFETY TIPS …………………………………………………………………….3 GETTING TO KNOW YOUR UNIT … … … … … … … … … … … … … … … … … … … … … … … … … … … … … … … … … … … … … … … … … … . . . . 4 4 OPERATING PROCEDURES & MAINTENANCE U ...
Page 3 - IMPORTANT SAFETY INSTRUCTIONS
2 DANGER WARNING Your safety and the safety of others are very important. We have provided many important safety messages manual and your appliance. Always read and obey all safety massages. This is the safety alert symbol: ! All safety messages will follow the safety alert symbol and the word “DANG...
Page 4 - PREPARING YOUR ICE MAKER FOR USE
3 When using electrical appliances, basic safety precautions should be followed to reduce the risk of fire, electric shock, and injury to persons or property. Read all instructions before using any appliance. z Do not operate this , or any other appliance with a damaged cord. If the supply cord is d...
Page 5 - GETTING TO KNOW YOUR UNIT
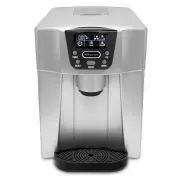
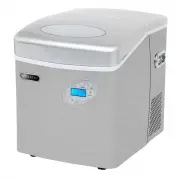
4 1. Water drip tray: 2. Water drip tray cover: Also used for the support of the ice-cube container 3. Water drain plug: For draining water from water reservoir. 4. Hot Air outlet 5. Top window 6. Ice cube pushing spring 7. Control Panel: Easy to use, visible functions touch display setting. A.: LCD...
Page 6 - DANGER; WARNING: fill with potable water only. Only use drinking water.; OPERATING PROCEDURES & MAINTENANCE
5 DANGER 1. Remove the exterior and interior packaging, Then check all the accessories are included. If any parts are missing, please contact our customer service. 2. Remove all the tapes on the unit. Open the transparent window, take out the accessory parts inside. 3. Clean the interior (such as wa...
Page 7 - How to start the unit; USING YOUR ICE MAKER
6 How to start the unit 1. Open the left side door, pour potable water into water reservoir. Keep water level below the “MAX” water level mark. 2. Plug your ice-maker into the main power outlet, then the “ ” symbol will flash in LCD display window. 3. Press “ON/OFF” button on the control panel to be...
Page 9 - TIMER SETTING
8 the water reservoir, just unplug the water drain cap which located at the bottom of the unit and near the water drip tray, the water will flow out from the unit completely. 10. Change water in the water reservoir every 24 hours to ensure a reasonable hygiene level. If the unit isn’t to be used, dr...
Page 11 - TECHNICAL PARAMETERS & CIRCUIT DIAGRAM
0 1 M M o o d d e e l l IDC-221SC IDC-221SC P P r r o o t t e e c c t t i i o o n n T T y y p p e e I I P P o o w w e e r r 1 1 1 1 5 5 V V / / 6 6 0 0 H H z z I I c c e e M M a a k k i i n n g g C C u u r r r r e e n n t t 1 1 . . 5 5 A A I I c c e e H H a a r r v v e e s s t t C C u u r r r r e e ...
Page 12 - Disposal; Warranty Information; Disposal and Warranty Information
1 Disposal When the unit is not to be used again, disposal of these unit’s material shall be in accordance with national regulations. Warranty Information The manufacturer provides warranty in accordance with the legislation of the customer's own country of residence, with a minimum of 1 year, start...