Page 2 - REFRIGERATOR SAFETY; Your safety and the safety of others are very important.; DANGER; IMPORTANT SAFETY INSTRUCTIONS; SAVE THESE INSTRUCTIONS
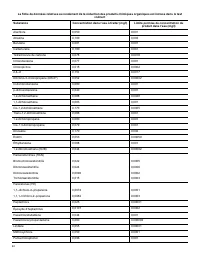
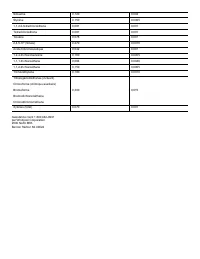
2 REFRIGERATOR SAFETY Your safety and the safety of others are very important. We have provided many important safety messages in this manual and on your appliance. Always read and obey all safetymessages. This is the safety alert symbol. This symbol alerts you to potential hazards that can kill or ...
Page 3 - Proper Disposal of Your Old Refrigerator; REFRIGERATOR CARE; Cleaning; WARNING; Cleaning the Interior:
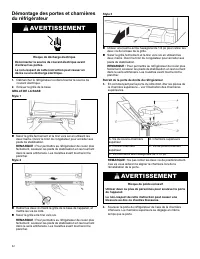
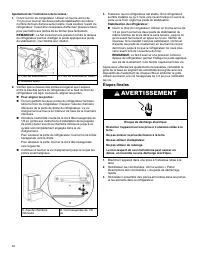
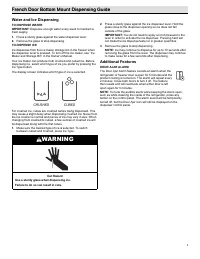
3 Proper Disposal of Your Old Refrigerator WARNING: Risk of child entrapment. Before you throw awayyour old refrigerator or freezer: � Take off the doors. � Leave the shelves in place so that children may not easilyclimb inside. WARNING Suffocation Hazard Remove doors or lid from your old appliance....
Page 4 - Cleaning the Exterior:
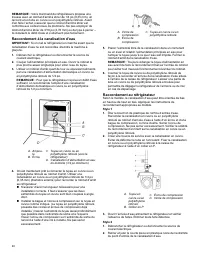
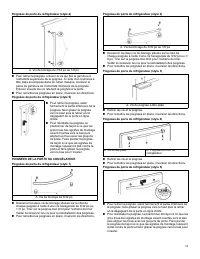
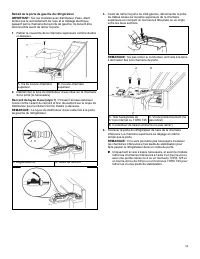
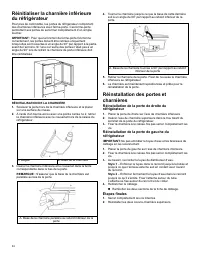
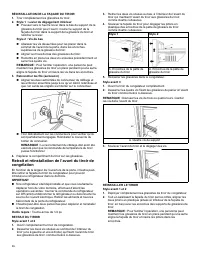
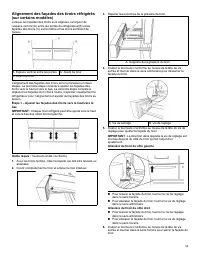
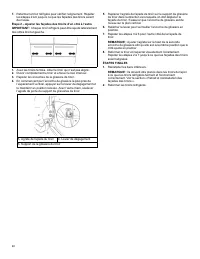
4 Cleaning the Exterior: IMPORTANT: Damage to smooth finish due to improper use of cleaning products or using non-recommended cleaning productsis not covered under the warranty. Sharp or blunt instruments willmar the finish. 1. Unplug refrigerator or disconnect power. 2. Using a clean sponge or soft...
Page 5 - Condenser Cleaning; Changing the LED Module; Glass Shelves; Shelves with Shelf Mounts
5 Condenser Cleaning WARNING Explosion Hazard Risk of Fire or Explosion due to Puncture of RefrigerantTubing; Follow Handling Instructions Carefully. Flammable Refrigerant Used. There is no need for routine condenser cleaning in normal homeoperating environments. If the environment is particularly g...
Page 6 - MicroEdge; Opening and Closing Doors
6 To remove and replace shelves: 1. Make sure adjustable shelf mounts are in the lower positionbefore removing shelves. Also doors will need to be open at a90˚ angle. If open wider, it will make it harder to remove theshelves. 2. Remove the middle shelf or top shelf by lifting it up and out ofthe sh...
Page 7 - Vacation and Moving Care; Vacation; Moving; INSTALLATION INSTRUCTIONS; Unpack the Refrigerator; Refrigerator Delivery; Clean Before Using
7 Vacation and Moving Care Vacation If You Choose to Leave the Refrigerator On While You’reAway: 1. Use up any perishables and freeze other items. 2. If your refrigerator has an automatic ice maker, and isconnected to the household water supply, turn off the watersupply to the refrigerator. Property...
Page 8 - Location Requirements; Electrical Requirements; Water Supply Requirements
8 Location Requirements WARNING Explosion Hazard Keep flammable materials and vapors, such as gasoline,away from appliance. Use nonflammable cleaner. Failure to do so can result in death, explosion, or fire. IMPORTANT: This appliance is intended to be used indoor for household and similar applicatio...
Page 9 - Connect the Water Supply; Connect to Water Line
9 � Do not use a piercing-type or 3/16" (4.76 mm) saddle valvewhich reduces water flow and clogs more easily. � Use copper or PEX tubing and check for leaks. Install copperor PEX tubing only in areas where the household temperatureswill remain above freezing. � For models with water filters, the...
Page 10 - Connect to Refrigerator
10 4. Now you are ready to connect the copper or PEX tubing to theshutoff valve. Use 1/4" (6.35 mm) O.D. (outside diameter) softcopper or PEX tubing to connect the shutoff valve and therefrigerator. � Ensure that you have the proper length needed for the job.Be sure both ends of the copper tubin...
Page 11 - Complete the Installation
11 5. Using a cordless drill, drill a 1/4" hole in the cold water pipeyou have selected. A. Cold water pipeB. Pipe clampC. Copper tubingD. Compression nut E. Compression sleeve F. Shutoff valve G. Packing nut 6. Fasten the shutoff valve to the cold water pipe with the pipeclamp. Be sure the outl...
Page 12 - Installing the Air Filter; Air Filter Status Indicator—Standard Installation
12 Install Air Filter (on some models) The air filter reduces the buildup of odors. This helps to maintain acleaner environment inside your refrigerator. An air filter is 15times more powerful than baking soda at reducing common foododors inside the refrigerator. Your refrigerator's accessory packet...
Page 13 - Installing the Produce Preserver
13 On models with notches: � With the indicator screen facing outward, slide the indicatordown into the notches. NOTE: The indicator will not easily slide into the notches if the rear bubble has not been popped. � Close the air filter door, and check that the indicator is visiblethrough the window i...
Page 14 - REFRIGERATOR FEATURES; Flush the Water System; The Water Dispenser
14 Installing the Status Indicator The Produce Preserver comes with a status indicator, whichshould be activated and installed at the same time the pouch isinstalled. 1. Place the indicator facedown on a firm, flat surface. 2. Apply pressure to the bubble on the back of the indicator, untilthe bubbl...
Page 15 - Cleaning the Ice Dispenser Chute; Ice Maker and Storage Bin; Ice Production Rate; Ice Maker in the Refrigerator (on some models); Style 1—Left-Hand Refrigerator Door
15 Cleaning the Ice Dispenser Chute Humidity causes ice to naturally clump together. Ice particles canbuild up until the ice dispenser chute becomes blocked. If ice is not dispensed regularly, it may be necessary to empty theice storage bin and clean the ice delivery chute, the ice storagebin and th...
Page 16 - Style 3—Left-Hand Door Behind the Refrigerator Bins; Water Filtration System; Install the Water Filter
16 2. Turn on the ice maker by moving the switch to the (left) onposition. � To manually turn off the ice maker, move the control to theoff (right) position. � Your ice maker has an automatic shutoff. The sensor willautomatically stop ice production if the storage bin is full, ifthe door is open or ...
Page 17 - Replacing; Door and Drawers
17 Right-Hand Side of Refrigerator Ceiling 1. Locate the accessory packet in the refrigerator and removethe water filter. 2. Take the water filter out of its packaging and remove the coverfrom the O-rings. Be sure the O-rings are still in place after thecover is removed. 3. The water filter compartm...
Page 18 - Remove and Replace Handles
18 Remove and Replace Handles REFRIGERATOR DOOR HANDLES Refrigerator Door Handle Style 1 A. 3/32 " Setscrew � Using a 3 / 32" or 1 / 8" hex key, loosen the two setscrews locatedon the side of each handle. Pullthe handle straight out from thedrawer. Make sure you keep thescrews for reatta...
Page 21 - Replace Right-Hand Refrigerator Door
21 3. Before removing the left-hand side door, disconnect the wiringplug located on top of the top hinge by wedging a flat-bladescrewdriver or your fingernail between the two sections. NOTE: Do not remove the green, ground wire. It should remain attached to the door hinge. A. 3/4 " Internal hex-...
Page 23 - Remove and Replace Freezer Drawer Front
23 REPLACE DRAWER FRONT 1. Pull out the drawer glides until they are full extended. 2. Style 1: Bottom Release Lever � Push up on the lever at the bottom of the drawer glidebracket to open. Insert the drawer front bracket into thedrawer glide bracket and release the lever. Style 2: Bottom Screws � L...
Page 24 - Door Closing and Alignment
24 Style 1 Style 2 A. Drawer front screw A. Drawer front screw B. Drawer front plastic stud 3. Replace and tighten the two screws at the top of the drawerfront (one on the left-hand side and one on the right-handside). Front Style 3 1. Slide the drawer glides out of the freezer compartment. 2. Inser...
Page 25 - Final Steps
25 A. Brake foot A. Brake front B. Front roller 2. Make sure the doors are even at the top and that the spacebetween the bottom of the refrigerator doors and the top of thefreezer drawer is even. If necessary, align the doors. � To Align the Doors: � Keeping both refrigerator doors closed, pull out ...
Page 27 - PERFORMANCE DATA SHEET; Water
27 PERFORMANCE DATA SHEET Water Filtration System Model W11569863 (PID), W11569861 (Without PID) Replacement element model numbers: EDRARXD1/EDRARXD1B/W11536439/WHRARXD1/ WHRARXD1B/ KADARXD1/ KADARXD1B/ MAYARSD1B/ MAYARXD1B /W11486187 Capacity 200 Gallons (757 Liters) with PID W11569863, 100 Gallons...
Page 32 - SÉCURITÉ DU RÉFRIGÉRATEUR; Votre sécurité et celle des autres sont très importantes.; INSTRUCTIONS IMPORTANTES DE SÉCURITÉ; CONSERVER CES INSTRUCTIONS
32 SÉCURITÉ DU RÉFRIGÉRATEUR Votre sécurité et celle des autres sont très importantes. Nous donnons de nombreux messages de sécurité importants dans ce manuel et sur votre appareil. Assurez-vous de toujours liretous les messages de sécurité et de vous y conformer. Voici le symbole d’alerte de sécuri...
Page 33 - Mise au rebut du vieux réfrigérateur; ENTRETIEN DU RÉFRIGÉRATEUR; Nettoyage; AVERTISSEMENT
33 Mise au rebut du vieux réfrigérateur AVERTISSEMENT : Un enfant peut rester piégé. Avant de jetervotre vieux réfrigérateur ou congélateur : � Enlever les portes. � Laisser les tablettes en place de sorte que les enfants nepuissent pas y pénétrer facilement. IMPORTANT : Le risque qu’un enfant puiss...
Page 35 - Nettoyage du condensateur; Remplacer le module à DEL; Tablettes en verre
35 Nettoyage du condensateur AVERTISSEMENT Risque d’explosion Risque d’incendie ou d’explosion causé par laperforation de la tubulure de réfrigération; suivre avec attention les instructions de manipulation. Fluide frigorigène inflammable utilisé. Le condensateur n’a pas besoin d’être nettoyé souven...
Page 36 - Tablette repliable (sur certains modèles); Tablettes; Ouverture et fermeture des portes
36 3. Appliquer une pression sur le haut de la tablette pour vérifierqu’elle est correctement appuyée sur les supports de tablette. Pour enlever et réinstaller les tablettes : 1. S’assurer que les supports ajustables de tablettes sont placésà la position la plus basse avant de retirer les tablettes....
Page 37 - INSTRUCTIONS D’INSTALLATION; Déballage du réfrigérateur; Livraison du réfrigérateur
37 Le commutateur de la porte du réfrigérateur est situé dans le coinsupérieur gauche et le couvercle de la charnière de droite. � Le commutateur de porte utilise un aimant pour capterl’ouverture et la fermeture de la porte. � S’assurer qu’aucun aimant ou appareil électronique (enceinte,CoolVox, ® e...
Page 38 - Exigences d’emplacement; Spécifications électriques
38 Retrait des matériaux d’emballage � Enlever tout résidu de ruban adhésif et de colle des surfacesavant de mettre en marche votre tiroir de réfrigération. Frotterune petite quantité de savon liquide à vaisselle sur l’adhésifavec les doigts. Rincer à l’eau tiède et sécher. � Ne pas utiliser d’instr...
Page 39 - Pression d’eau
39 Méthode recommandée de liaison à la terre Un circuit de 115 V CA à 60 Hz relié à la terre et protégé par unfusible de 15 A ou 20 A est requis. On recommande que leréfrigérateur et les accessoires approuvés soient alimentés par uncircuit indépendant. Utiliser une prise de courant dontl’alimentatio...
Page 40 - Raccordement à la canalisation d’eau; Raccordement au réfrigérateur
40 REMARQUE : Votre marchand de réfrigérateurs propose une trousse avec un robinet d’arrêt à étrier de 1/4 po (6,35 mm), unraccord et un tube en cuivre ou en polyéthylène réticulé. Avantd’en faire l’achat, s’assurer que le robinet d’arrêt à étrier estconforme aux codes locaux de plomberie. Ne pas em...
Page 42 - Terminer l’installation; Installation du filtre à air
42 4. Faire glisser l’écrou de compression sur le manchon et levisser sur l’orifice d’entrée d’eau. A. Canalisation d’eau enplastique B. Gaine C. Écrou de compression D. Tube de cuivre 5. À l’aide d’une clé à molette, immobiliser l’écrou sur lacanalisation d’eau en plastique pour l’empêcher de sedép...
Page 43 - Témoin d’état du filtre à air – Installation standard
43 A. Filtre à air Style 2 – Derrière le couvercle d’aération à DEL Installer le filtre derrière le couvercle d’aération illuminé à DELbleue situé le long de la paroi arrière, près du milieu duréfrigérateur. 1. Retirer le filtre à air de son emballage. 2. Saisir fermement à deux mains le couvercle d...
Page 44 - Installation du conservateur pour produits frais
44 Remplacer le filtre à air Le filtre à air jetable doit être remplacé tous les 6 mois, lorsque letémoin est entièrement passé du blanc au rouge. Pour commander un filtre à air de remplacement, consulter lesinformations de commande du guide de démarrage rapide. 1. Retirer l’ancien filtre à air en s...
Page 46 - Distributeur d’eau
46 3. Une fois que l’eau commence à couler, continuer d’appuyer etde relâcher la plaque du distributeur (appui pendant 5 secondes, relâchement pendant 5 secondes) jusqu’à ce qu’un total de 1 gal lon ( 3,8 L) ait été distribué. Distributeur d’eau IMPORTANT : Distribuer au moins 1 pte (1 L) d’eau chaq...
Page 48 - Système de filtration de l’eau; Installation du filtre à eau
48 Style 2 – Partie supérieure gauche du compartiment deréfrigération La machine à glaçons et le bac d’entreposage se trouvent dans lapartie supérieure gauche du compartiment de réfrigération. Certains modèles possèdent un commutateur marche/arrêt situésur la machine à glaçons. Pour mettre en marche...
Page 49 - Remplacer
49 Côté droit au plafond du réfrigérateur 1. Identifier le sachet d’accessoires à l’intérieur du réfrigérateuret retirer le filtre à eau. 2. Retirer le filtre à eau neuf de son emballage, puis retirer lesprotections des joints toriques. S’assurer que les jointstoriques sont toujours en place une foi...
Page 54 - Étapes finales
54 Réinitialiser la charnière inférieuredu réfrigérateur Pour plus de commodité, les portes du réfrigérateur comportentdes charnières inférieures avec ferme-porte. Ces ferme-portepermettent aux portes de se fermer complètement d’un simpletoucher. IMPORTANT : Pour que la fonction de ferme-porte fonct...
Page 57 - Fermeture et alignement des portes
57 Style 1 Style 2 A. Vis de la façade du tiroir A. Vis de la façade du tiroir B. Piton en plastique de la façade du tiroir 3. Réinstaller et serrer les deux vis situées au sommet de lafaçade du tiroir (une à gauche et une à droite). Style avant 3 1. Retirer les glissières de tiroir du compartiment ...
Page 61 - FICHE DE DONNÉES DE PERFORMANCE; Système
61 FICHE DE DONNÉES DE PERFORMANCE Système de filtration de l’eau Modèle W11569863 (PID), W11569861 (sans PID) Numéros de modèles de l’élément de remplacement : EDRARXD1/EDRARXD1B/W11536439/WHRARXD1/ WHRARXD1B/KADARXD1/KADARXD1B/MAYARSD1B/MAYARXD1B /W11486187 Capacité de 200 gal. (757 L) avec PID W1...
Page 66 - NOTES