Page 3 - SAVE THESE INSTRUCTIONS
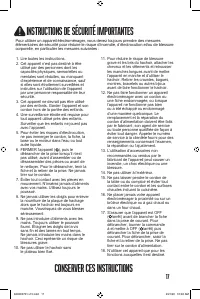
3 20. Grinding blade is sharp. Handle carefully. 21. CAUTION! In order to avoid a hazard due to inadvertent resetting of the thermal cut-out, this appliance must not be supplied through an external switching device, such as a timer, or connected to a circuit that is regularly switched on and off by ...
Page 4 - PARTS AND FEATURES
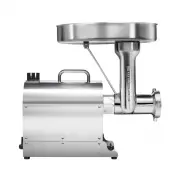
4 PARTS AND FEATURES Remove all parts from packaging material and check to be sure there are no missing parts. Before first use: After unpacking, wash everything except Grinder Motor Base Assembly in hot, soapy water. Rinse and dry thoroughly. Wipe base assembly with a damp cloth or sponge. 12 13 14...
Page 5 - COMPONENT LIST
5 COMPONENT LIST DIAGRAM NUMBER PART DESCRIPTION 1 FRONT RING NUT 2 4.5 MM GRINDER PLATE 3 7 MM GRINDER PLATE 4 GRINDING KNIFE 5 AUGER PIN 6 AUGER 7 AUGER BEARING 8 STAINLESS STEEL HEAD 9 RUBBER FEET WITH NUTS (4) 10 HEAD-LOCKING KNOB 11 STAINLESS STEEL TRAY 12 AUGER GRABBING STOMPER 13 FUNNEL 40 MM...
Page 6 - GRINDER ASSEMBLY INSTRUCTIONS
6 1. Make sure Meat Grinder is unplugged. Insert the Head into the Gear Housing with the Feed Chute facing straight up. You will need to line up the slot in the Head with the Key inside the Gear Housing. Be sure the Head is seated fully into the Gear Housing (FIGURE 1) . 2. Tighten the Head-Locking ...
Page 7 - GRINDING INSTRUCTIONS
7 GRINDING INSTRUCTIONS w WARNING Entanglement Hazard. To avoid serious or fatal injury, never reach into grinder feed chute. Always use stomper. Never operate without tray in place. Secure long hair and loose clothing before use. Always read instructions. 1. Make sure Meat Grinder is unplugged. Fol...
Page 8 - GRINDING TIPS
8 PLEASE NOTE: This Grinder features an all-hardened steel gear transmission. This causes the Grinder to operate at a higher volume and temperature than other Grinders. This is normal and will not affect the Grinder’s performance. • DO NOT overtighten the Front Ring Nut. It should be firmly tight. •...
Page 9 - STANDARD STUFFER ASSEMBLY INSTRUCTIONS
9 STANDARD STUFFER ASSEMBLY INSTRUCTIONS 1. Make sure Meat Grinder is unplugged. Insert the Head into the Gear Housing with the feed chute of the Head facing straight up. You will need to line up the slot in the Head with the Key inside the Gear Housing. Be sure the Head is seated fully into the Gea...
Page 10 - HIGH-SPEED STUFFER ASSEMBLY INSTRUCTIONS
10 NOTE: The High-Speed Stuffing System is designed for use with the 10-mm Funnel ONLY. DO NOT attempt to use the High-Speed Plastic Auger with any other Funnels. SERIOUS DAMAGE to the Grinder Head and other components may occur. Follow the “Standard Stuffer Assembly Instructions” located in this ma...
Page 11 - STUFFING INSTRUCTIONS
11 STUFFING INSTRUCTIONS FIGURE 11 1. Make sure Meat Grinder is unplugged. After grinding the meat following the “Grinding Instructions,” mix the ground meat with the sausage seasonings. 2. Follow the “Standard Stuffer Assembly Instructions” on page 9 or the “High- Speed Stuffer Assembly Instruction...
Page 12 - REVERSE FUNCTION; CIRCUIT BREAKER INSTRUCTIONS
12 • Allow the Grinder Motor to come to a COMPLETE STOP before engaging into reverse “REV”. • Allow the Grinder Motor to come to a COMPLETE STOP before engaging in forward “FWD” after using the reverse function. • NEVER operate the Grinder in reverse for more than 5 seconds at a time. REVERSE FUNCTI...
Page 13 - AUGER GRABBING STOMPER INSTRUCTIONS
13 To use the Stomper to disassemble the head of the Meat Grinder, follow these instructions: 1. Unscrew the Front Ring Nut. 2. Make sure Meat Grinder is unplugged. 3. Attach the handle end of the Stomper onto the Auger Pin. The opening on the Stomper should completely secure around the groove in th...
Page 14 - CLEANING INSTRUCTIONS
14 CLEANING INSTRUCTIONS Before first use: After unpacking, wash everything except Grinder Motor Base Assembly in hot, soapy water. Dry thoroughly. Wipe Base Assembly with a damp cloth or sponge. 1. Unplug Meat Grinder from electrical outlet. 2. Remove the Head Assembly from the Grinder Motor. 3. Di...
Page 15 - SAUSAGE INFORMATION; MEAT SELECTION FOR SAUSAGE MAKING; CASING; STORAGE
15 SAUSAGE INFORMATION MEAT SELECTION FOR SAUSAGE MAKING Sausage making has evolved over many years and generations, and as a result there are countless types of sausage you can make using the basic ingredients of meat, fat and a few carefully blended spices. Following are a few simple guidelines th...
Page 16 - WESTON WARRANTY
16 FIVE-YEAR LIMITED WESTON WARRANTY This warranty applies to products purchased and used in the U.S. and Canada. This is the only express warranty for this product and is in lieu of any other any other warranty or condition. This product is warranted to be free from defects in material and workmans...
Page 18 - CONSERVER CES INSTRUCTIONS
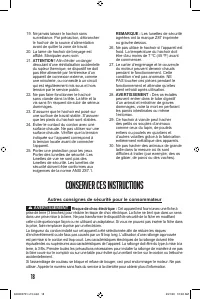
18 19. Ne jamais laisser le hachoir sans surveillance. Par précaution, débrancher le hachoir de la source d’alimentation avant de quitter la zone de travail. 20. La lame de hachoir de broyage est affûté. Manipuler avec soin. 21. ATTENTION ! Afin d’éviter un danger découlant d’une réinitialisation ac...
Page 19 - PIÈCES ET CARACTÉRISTIQUES
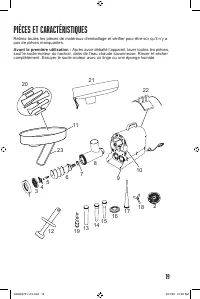
19 PIÈCES ET CARACTÉRISTIQUES Retirez toutes les pièces de matériaux d’emballage et vérifier pour être sûr qu’il n’y a pas de pièces manquantes. Avant la première utilisation : Après avoir déballé l’appareil, laver toutes les pièces, sauf le socle-moteur du hachoir, dans de l’eau chaude savonneuse. ...
Page 20 - LISTE DES COMPOSANTS
20 LISTE DES COMPOSANTS NO DU SCHÉMA DESCRIPTION DE LA PIÈCE 1 ÉCROU ANNULAIRE AVANT 2 PLAQUE DE HACHAGE 4,5 MM 3 PLAQUE DE HACHAGE 7 MM 4 COUTEAU DE BROYAGE 5 GOUPILLE DE VIS SANS FIN 6 VIS SANS FIN 7 ROULEMENT DE VIS SANS FIN 8 TÊTE EN ACIER INOXYDABLE 9 PIEDS EN CAOUTCHOUC AVEC ÉCROUS (4) 10 BOUT...
Page 21 - INSTRUCTIONS POUR LE MONTAGE D’UN HACHOIR
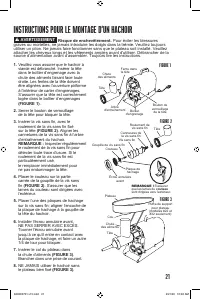
21 1. Veuillez vous assurer que le hachoir à viande est débranché. Insérer la tête dans le boîtier d’engrenage avec la chute des aliments faisant face toute droite. Les fentes de la tête doivent être alignées avec l’ouverture piriforme à l’intérieur de carter d’engrenages. S’assurer que la tête est ...
Page 22 - INSTRUCTIONS POUR HACHER
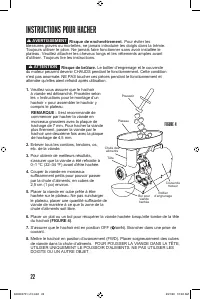
22 INSTRUCTIONS POUR HACHER w AVERTISSEMENT Risque de enchevêtrement. Pour éviter les blessures graves ou mortelles, ne jamais introduire les doigts dans la trémie. Toujours utiliser le pilon. Ne jamais faire fonctionner sans avoir installée le plateau. Veuillez attacher les cheveux longs et les vêt...
Page 23 - CONSEILS POUR HACHER LA VIANDE
23 REMARQUE IMPORTANTE : Ce hachoir dispose d’une transmission par engrenage entièrement en acier trempé. En conséquence, le hachoir fonctionne à des vitesses et des températures supérieures aux autres hachoirs. Ce phénomène est normal et n’a aucune incidence sur la performance du hachoir. • NE PAS ...
Page 24 - INSTRUCTIONS D’ASSEMBLAGE D’UN REMPLISSEUR STANDARD
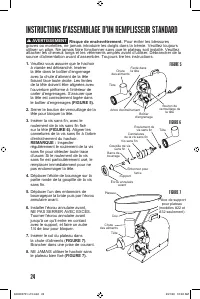
24 INSTRUCTIONS D’ASSEMBLAGE D’UN REMPLISSEUR STANDARD 1. Veuillez vous assurer que le hachoir à viande est débranché. Insérer la tête dans le boîtier d’engrenage avec la chute d’aliment de la tête faisant face toute droite. Les fentes de la tête doivent être alignées avec l’ouverture piriforme à l’...
Page 25 - INSTRUCTIONS D’ASSEMBLAGE D’UN REMPLISSEUR HAUTE VITESSE
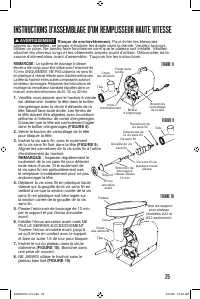
25 REMARQUE : Le système de bourrage à vitesse élevée a été conçu pour être utilisé avec l’entonnoir de 10 mm UNIQUEMENT. NE PAS utiliser la vis sans fin en plastique à vitesse élevée avec d’autres entonnoirs. La tête du hachoir et les autres composants subiront de sérieux dommages. Respecter les In...
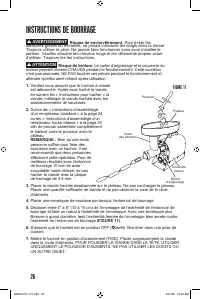
Page 26 - INSTRUCTIONS DE BOURRAGE
26 INSTRUCTIONS DE BOURRAGE FIGURE 11 1. Veuillez vous assurer que le hachoir à viande est débranché. Après avoir haché la viande en suivant les « Instructions pour hacher » la viande, mélanger la viande hachée avec les assaisonnements de saucisses. 2. Suivre les « Instructions d’assemblage d’un rem...
Page 27 - FONCTION DE MARCHE ARRIÈRE; INSTRUCTIONS RELATIVES AU DISJONCTEUR
27 • Attendre que le moteur du hachoir est atteint un ARRÊT COMPLET avant de passer à la marche arrière (soit REV). • Attendre que le moteur du hachoir est atteint un ARRÊT COMPLET avant de passer à la fonction d’avance (soit FWD) après avoir utilisé la marche arrière. • NE JAMAIS utiliser le hachoi...
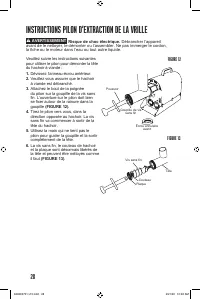
Page 28 - INSTRUCTIONS PILON D’EXTRACTION DE LA VRILLE
28 INSTRUCTIONS PILON D’EXTRACTION DE LA VRILLE w AVERTISSEMENT Risque de choc électrique. Débrancher l’appareil avant de le nettoyer, le démonter ou l’assembler. Ne pas immerger le cordon, la fiche ou le moteur dans l’eau ou tout autre liquide. FIGURE 12 Veuillez suivre les instructions suivantes p...
Page 29 - INSTRUCTIONS DE NETTOYAGE
29 INSTRUCTIONS DE NETTOYAGE Avant la première utilisation : Après avoir déballé l’appareil, laver toutes les pièces, sauf le socle-moteur du hachoir, dans de l’eau chaude savonneuse. Rincer et sécher complètement. Essuyer le socle-moteur avec un linge ou une éponge humide. 1. Débrancher le hachoir ...
Page 30 - INFORMATIONS SUR LES SAUCISSES; CHOIX DE VIANDE POUR LA FABRICATION DE SAUCISSE; SAUMURAGE; TYPES DE SAUCISSE
30 INFORMATIONS SUR LES SAUCISSES CHOIX DE VIANDE POUR LA FABRICATION DE SAUCISSE La fabrication de saucisse s’est développée au cours des nombreuses années et générations, et il en résulte qu’un nombre incalculable de type de saucisses peuvent être fabriquées en utilisant les ingrédients de base de...
Page 31 - INFORMATION SUR LA GARANTIE DE WESTON
31 INFORMATION SUR LA GARANTIE DE WESTON CONSERVEZ CETTE INFORMATION SUR LA GARANTIE POUR VOS DOSSIERS! La présente garantie s’applique aux produits, achetés et utilisés aux États-Unis et au Canada. La présente garantie est la seule garantie expresse pour ce produit et remplace toute autre garantie ...
Page 32 - REMARQUES
32 REMARQUES 840303701 v15.indd 32 2/21/20 10:26 AM
Page 34 - GUARDE ESTAS INSTRUCCIONES
34 22. ¡PRECAUCIÓN! A fin de evitar un riesgo debido a la reconfiguración inadvertida de la protección térmica, este artefacto no debe recibir suministro mediante un dispositivo de derivación externo, como un temporizador, o conectarse a un circuito que la empresa de servicio regularmente activa y d...
Page 35 - PIEZAS Y CARACTERÍSTICAS
35 PIEZAS Y CARACTERÍSTICAS Retire todas las partes del material de empaque y verifique que no falte ninguna. Antes del primer uso: Después de desempacar la unidad, lave todo en agua caliente jabonosa con excepción del montaje de la base del motor del molino. Enjuague y seque bien. Limpie el montaje...
Page 36 - LISTA DE COMPONENTES
36 LISTA DE COMPONENTES NÚMERO DE DIAGRAMA DESCRIPCIÓN DE LA PIEZA 1 TUERCA DEL ANILLO FRONTAL 2 PLACA DEL MOLINO DE 4.5 MM 3 PLACA DEL MOLINO DE 7 MM 4 NAVAJA DEL MOLINO 5 PERNO DEL TORNILLO SINFÍN 6 TORNILLO SINFÍN 7 COJINETE DEL TORNILLO SINFÍN 8 CABEZAL DE ACERO INOXIDABLE 9 PATA DE CAUCHO CON T...
Page 37 - INSTRUCCIONES DE ENSAMBLE DEL MOLINO
37 1. Asegúrese de que el molino de carne esté desenchufado. Inserte el cabezal en el gabinete de engranajes con la tolva de alimentación hacia arriba. Usted tendrá que alinear la ranura del cabezal con la llave ubicada dentro de la carcasa de engranajes. Asegúrese de que el cabezal esté totalmente ...
Page 38 - INSTRUCCIONES PARA MOLER
38 INSTRUCCIONES PARA MOLER 1. Asegúrese de que el molino de carne esté desenchufado. Siga las “Instrucciones de ensamble del molino” para ensamblar completamente el molino incluida la charola. NOTA: Es mejor moler la carne utilizando primero la placa del molino gruesa de 7 mm. Si se desea un molido...
Page 39 - CONSEJOS PARA EL MOLIDO
39 POR FAVOR TOME NOTA: Este molino tiene todos los engranajes de la transmisión en acero endurecido. Esto hace que el molino funcione a un volumen y temperatura mayor de otros molinos. Esto es normal y no afecta el desempeño del molino. • NO apriete demasiado la tuerca del anillo frontal. Debe esta...
Page 40 - RELLENADOR ESTÁNDAR INSTRUCCIONES DE ENSAMBLADO
40 RELLENADOR ESTÁNDAR INSTRUCCIONES DE ENSAMBLADO 1. Asegúrese de que el molino de carne esté desenchufado. Inserte el cabezal en el gabinete de engranajes con la tolva de alimentación del cabezal hacia arriba. Usted tendrá que alinear la ranura del cabezal con la llave ubicada dentro de la carcasa...
Page 41 - ALTA VELOCIDAD DE INSTRUCCIONES DE MONTAJE EMBUTIDORA
41 NOTA: El sistema de rellenado de alta velocidad está diseñado para utilizarlo ÚNICAMENTE con el embudo de 10 mm. NO trate de utilizar el tornillo sinfín plástico de alta velocidad con ningún otro embudo. Pueden ocurrir DAÑOS GRAVES en el cabezal del molino y otros componentes. Siga las “Rellenado...
Page 42 - INSTRUCCIONES DE RELLENADO
42 INSTRUCCIONES DE RELLENADO 1. Asegúrese de que el molino de carne esté desenchufado. Después de moler la carne siguiendo las “Instrucciones para moler”, mezcle la carne molida con los condimentos para salchichas. 2. Siga las “Rellenador estándar instrucciones de ensamblado” de la página 40 o las ...
Page 44 - INSTRUCCIONES PARA EL PRENSADOR RETIRA EL SINFÍN
44 INSTRUCCIONES PARA EL PRENSADOR RETIRA EL SINFÍN w ADVERTENCIA Riesgo de descarga eléctrica. Desconecte la energía antes de limpiar, desmontar o montar la unidad. No sumerja el cable, el enchufe o el motor en agua o en otro líquido. Siga las instrucciones a continuación para desarmar el cabezal d...
Page 45 - INSTRUCCIONES DE LIMPIEZA
45 INSTRUCCIONES DE LIMPIEZA Antes del primer uso: Después de desempacar la unidad, lave todo en agua caliente jabonosa con excepción del montaje de la base del motor del molino. Enjuague y seque bien. Limpie el montaje de la base con un paño o esponja húmedos. 1. Desenchufe el molino de carne del t...
Page 46 - INFORMACIÓN DE LA SALCHICHA; SELECCIÓN DE CARNE PARA HACER SALCHICHAS; TIPOS DE SALCHICHAS
46 INFORMACIÓN DE LA SALCHICHA SELECCIÓN DE CARNE PARA HACER SALCHICHAS La elaboración de salchichas ha evolucionado a lo largo de muchos años y generaciones, y como resultado, hay un sinnúmero de tipos de salchichas que puede hacer usando los ingredientes básicos como carne, grasa y algunas especia...