Page 2 - WARNING; DISCLAIMERS; ALL RIGHTS RESERVED; DANGER; UPDATES; For Your Records
2 | English TABLE OF CONTENTS Introduction .............................................................................................................................................................................2-3 Safety ............................................................................
Page 3 - INTRODUCTION; NEVER; NOTICE; ALWAYS
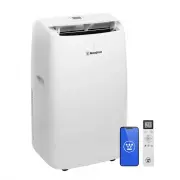
English | 3 INTRODUCTION SPECIFICATIONS (WPac14000s) Power Supply ................................................ 115V~/60HzMode..................................................................... CoolingCooling Capacity ............................................. 8150 Btu/hInput Power ............
Page 4 - SAFETY; SAFETY SYMBOLS; Symbol; SAFETY DEFINITIONS
4 | English SAFETY SAFETY SYMBOLS Follow all safety information contained in this user’s manual as well as the information on the product labeling. Symbol Description Safety Alert Symbol Electrical Shock Hazard Fire Hazard Read Manufacturer’s Instructions Do Not Operate in Wet Conditions Ground. Con...
Page 5 - IMPORTANT SAFEGUARDS
English | 5 SAFETY IMPORTANT SAFEGUARDS SAVE THESE INSTRUCTIONS WARNING To reduce the risk of injury, the user must read and understand the instructions before using this product. WARNING When using this product, basic, precautions should always be followed, including the following: NOTICE This herm...
Page 6 - AVERTISSEMENT; FCC CAUTION
6 | English SAFETY WARNING • Do not attempt to accelerate the de- frosting process or to clean, other than those recommended by the manufac- turer. • The appliance shall be stored in a room without con- tinuously operating ignition sources (for example: open flames, an operating gas appliance or an ...
Page 7 - ELECTRICAL; GROUNDING; AC MOTOR; a nominal 120V/60Hz AC power supply; LEAKAGE DETECTION DEVICE; CAUTION
English | 7 ELECTRICAL GROUNDING This product must be grounded. Grounding creates a path of least resistance for electrical current in the case of a malfunction or breakdown which reduces the risk of electric shock. This appliance comes with an electrical cord that has an equipment-grounding conduct...
Page 8 - COMPONENTS
8 | English COMPONENTS UNDERSTANDING YOUR APPLIANCE See Figure 2. To reduce the risk of injury and product failure, read and understand the information in this user’s manual as well as the information on the product labeling. CASTERS The casters make it easy to move the air conditioner from one loca...
Page 9 - ASSEMBLY; REMOVING CARTON CONTENTS; INCLUDED LIST; If any parts are missing, contact our service team; ATTACHING THE EXHAUST HOSE
English | 9 ASSEMBLY REMOVING CARTON CONTENTS WARNING This product requires assembly. Do not attempt to operate this product if any items in the INCLUDED LIST are already assembled when you remove the carton contents. These items are not assembled by the manufacturer and should require customer asse...
Page 10 - INSTALLING THE WINDOW VENT KIT; Do not
10 | English ASSEMBLY A - Hose Outlet B - Exhaust Hose A - Hose Inlet B - Exhaust Hose C - Groove A - Fixed Panel B - Sliding Panel C - Opening l Place the hose outlet on the end of the exhaust hose and turn clockwise to secure. l Slide the hose inlet into the grooves on either side of the exhaust d...
Page 11 - NOTE
English | 11 ASSEMBLY l The window vent kit can be modified to fit different sized windows that open vertically or horizontally up to 39.9 in. • If the window opening is less than 20.5 in., use a saw to cut the fixed panel to the appropriate size. • If the window opening is larger than the fixed pan...
Page 12 - OPERATION; SELECTING A SUITABLE LOCATION; Use the following guidelines to select a location for
12 | English OPERATION WARNING Do not alter or modify this product unless instructed to so in this manual or by the manufacturer. Do not use attachments or accessories that are not recommended for use with this product. Making unauthorized modifications and using incompatible accessories can damage ...
Page 13 - OPERATING THE AIR CONDITIONER; USING THE CONTROL PANEL
English | 13 OPERATION OPERATING THE AIR CONDITIONER See Figures 20 - 21. l Place the air conditioner in a suitable location. l Plug the air conditioner into a grounded outlet. NOTE: The power supply should be 120 V, AC only (normal household current), 60 Hz. l Use the control panel or remote contro...
Page 15 - ADDING/REPLACING REMOTE BATTERIES
English | 15 OPERATION NOTE: The Timer ON function can be cancelled by pressing the TIMER button ( ) after the timer has been set. If the function is cancelled, the timer LED will turn off. Timer OFF • While the appliance is running, press the TIMER but- ton ( ) and wait for the display to flash. • ...
Page 17 - CONNECTING YOUR APPLIANCE TO A; TIPS FOR BEST USE
English | 17 OPERATION A - Wi-Fi LED B - Smart Phone FIG. 26 A Agree Disagree User Agreement and Privacy Policy Your privacy is of great importance, thus we have updated our Privacy Policy according to the latest laws and regulations to keep you fully informed. Before you consent to use our services...
Page 18 - CARE AND MAINTENANCE; CLEANING THE HOUSING AND GRILLES; DO NOT; CLEANING THE AIR FILTERS; CLEANING THE EXHAUST DUCT
18 | English FIG. 27 FIG. 28 CARE AND MAINTENANCE WARNING ALWAYS turn the air conditioner off and unplug it before performing maintenance. To prolong the life of this product, follow the care and maintenance instructions in this section. Contact customer service before servicing any recall or warran...
Page 19 - DRAINING COLLECTED WATER; Manual draining in cool and dry modes:
English | 19 CARE AND MAINTENANCE DRAINING COLLECTED WATER See Figures 29 - 30 WARNING Be careful not to spill drain water and make sure the drain plug is completley in place before resuming operation. Liquid spilling or leaking from the unit could result in electric shock, a slippery surface, or pr...
Page 20 - TROUBLESHOOTING; PROBLEM
20 | English CARE AND MAINTENANCE Maintenance parts can be purchased directly from the factory. A partial list of maintenance parts is below. For a complete list of maintenance parts or for additional information email us at [email protected] or call 1-855-944-3571 . Air Filter (Upper) ................
Page 21 - WARRANTY
English | 21 WARRANTY WESTINGHOUSE OUTDOOR POWER EQUIPMENT’S RESPONSIBILITY Westinghouse Outdoor Power Equipment warrants to the original purchaser that its Westinghouse Outdoor Power Equipment line of portable air conditioners will be free from defects in material and workmanship. Under normal use ...
Page 22 - NO DEVUELVA ESTE PRODUCTO A LA TIENDA; ESPAÑOL; TABLA DE CONTENIDO; ADVERTENCIA; EXENCIONES DE RESPONSABILIDAD; RESERVADOS TODOS LOS DERECHOS; PELIGRO; ACTUALIZACIONES; ACONDICIONADOR DE AIRE PORTÁTIL
2 | Español NO DEVUELVA ESTE PRODUCTO A LA TIENDA Si tiene preguntas o necesita ayuda, llame al servicio de atención al cliente al 855-944-3571. ESPAÑOL MANUAL DE USUARIO TABLA DE CONTENIDO Introducción ....................................................................................................
Page 23 - INTRODUCCIÓN; REGISTRACIÓN DEL PRODUCTO; AVISO
Español | 3 ESPECIFICACIONES (WPac14000s) Fuente de alimentación ........................................... 115V~/60Hz Modo...................................................................... Refrigeración Capacidad de refrigeración ....................................... 8150 Btu/h Potencia de e...
Page 24 - SEGURIDAD; SÍMBOLOS DE SEGURIDAD
4 | Español SEGURIDAD SÍMBOLOS DE SEGURIDAD Siga toda la información de seguridad contenida en este manual del usuario, así como la información en la etiqueta del producto. Símbolo Descripción Símbolo de alerta de seguridad Peligro de descarga eléctrica Peligro de incendio Lea las instrucciones del ...
Page 25 - CONSIDERACIONES IMPORTANTES
Español | 5 SEGURIDAD CONSIDERACIONES IMPORTANTES GUARDA ESTAS INSTRUCCIONES ADVERTENCIA Para reducir el riesgo de lesiones, el usuario debe leer y comprender las instrucciones antes de usar este producto. ADVERTENCIA Al usar este producto, siempre se deben seguir las precauciones básicas, incluidas...
Page 26 - PRECAUCIÓN DE LA FCC
6 | Español SEGURIDAD ADVERTENCIA • No intente acelerar el proceso de de- scongelación o limpieza, excepto los recomendados por el fabricante. • El aparato deberá almacenarse en un local sin fuentes de ignición que funcionen continua- mente (por ejemplo: llamas abiertas, un aparato de gas en funcion...
Page 27 - ELÉCTRICO; TOMA DE TIERRA; MOTOR DE CA; DISPOSITIVO DE DETECCIÓN DE FUGAS; PRECAUCIÓN
Español | 7 A - Botón de PRUEBA (“TEST”) B - Botón de REINICIO (“RESET”) FIG. 1 A B ELÉCTRICO TOMA DE TIERRA Este producto debe estar conectado a tierra. La conexión a tierra crea un camino de menor resistencia para la corriente eléctrica en caso de mal funcionamiento o avería, lo que reduce el ries...
Page 28 - COMPONENTES
8 | Español COMPONENTES ENTENDIENDO SU APARATO Vea la figura 2. Para reducir el riesgo de lesiones y fallas del producto, lea y comprenda la información de este manual del usuario, así como la información de la etiqueta del producto. RUEDAS Las ruedas facilitan mover el aire acondicionado de un luga...
Page 29 - MONTAJE; EXTRACCIÓN DEL CONTENIDO DE LA CAJA; LISTA INCLUIDA; CONEXIÓN DE LA MANGUERA DE
Español | 9 MONTAJE EXTRACCIÓN DEL CONTENIDO DE LA CAJA ADVERTENCIA Este producto requiere montaje. No intente operar este producto si alguno de los elementos de la LISTA INCLUIDA ya está ensamblado cuando retira el contenido de la caja. Estos artículos no son ensamblados por el fabricante y deben r...
Page 30 - INSTALACIÓN DEL KIT DE VENTILACIÓN
10 | Español MONTAJE A - Salida de manguera B - Manguera de escape A - Entrada de manguera B - Manguera de escape C - Ranura A - Panel fijo B - Panel deslizante C - Apertura l Coloque la salida de la manguera en el extremo de la manguera de escape y gire en el sentido de las agujas del reloj para as...
Page 32 - OPERACIÓN; SELECCIONANDO UNA UBICACIÓN
12 | Español OPERACIÓN ADVERTENCIA No altere ni modifique este producto a menos que así se indique en este manual o por el fabricante. No utilice acceso-rios o accesorios que no se recomiende para su uso con este producto. Realizar modificaciones no autorizadas y utilizar accesorios incompatibles pu...
Page 33 - FUNCIONAMIENTO DEL AIRE; UTILIZANDO EL PANEL DE CONTROL
Español | 13 OPERACIÓN FUNCIONAMIENTO DEL AIRE ACONDICIONADO Vea la figuras 20 y 21. l Coloque el aire acondicionado en un lugar adecuado. l Enchufe el aire acondicionado en una toma de corriente. NOTA: La fuente de alimentación debe ser de 120 V, solo CA (corriente doméstica normal), 60 Hz. l Utili...
Page 35 - AGREGAR/REEMPLAZAR LAS BATERÍAS
Español | 15 OPERACIÓN • Apague el aparato.• Presione el botón TEMPORIZADOR ( ) y espere a que la pantalla parpadee. • Utilice el botón ARRIBA ( ) o ABAJO ( ) para ajustar la hora antes de que se inicie el dispositivo. El tempori- zador se puede ajustar en incrementos de 30 minu-tos hasta 24 horas. ...
Page 36 - BAJO; FRÍO SECO VENTILADOR
16 | Español FIG. 25 OPERACIÓN A - Icono frío B - Icono seco C - Icono de ventilador D - Icono inteligente E - Unidad de temperatura F - Icono de bloqueo para niños G - Icono de oscilación H - Icono de Sígueme I - Icono Turbo J - Iconos de velocidad del ventilador (alta, baja, automática) K - Icono ...
Page 37 - CONEXIÓN DEL DISPOSITIVO A UN; CONSEJOS PARA EL MEJOR USO
Español | 17 OPERACIÓN A - LED de Wi-Fi B - Teléfono inteligente FIG. 26 A Agree Disagree User Agreement and Privacy Policy Your privacy is of great importance, thus we have updated our Privacy Policy according to the latest laws and regulations to keep you fully informed. Before you consent to use ...
Page 38 - CUIDADO Y MANTENIMIENTO; LIMPIEZA DE LA CARCASA Y LAS
18 | Español FIG. 27 FIG. 28 CUIDADO Y MANTENIMIENTO ADVERTENCIA SIEMPRE apague el aire acondicionado y desenchúfelo antes de realizar el mantenimiento. Para prolongar la vida útil de este producto, siga las instrucciones de cuidado y mantenimiento de esta sección. Póngase en contacto con el servici...
Page 39 - LIMPIEZA DEL CONDUCTO DE ESCAPE
Español | 19 FIG. 29 FIG. 30 CUIDADO Y MANTENIMIENTO A - Tapón de drenaje inferior A - Tapón de drenaje superior B - Conexión de la manguera de drenaje LIMPIEZA DEL CONDUCTO DE ESCAPE l Desenchufe el aire acondicionado. l Retire el conducto de escape del aire acondicionado y del panel de la ventana,...
Page 40 - SOLUCIÓN DE PROBLEMAS; PROBLEMA
20 | Español CUIDADO Y MANTENIMIENTO Las piezas de mantenimiento se pueden comprar directamente de fábrica. A continuación se incluye una lista parcial de las piezas de mantenimiento. Para obtener una lista completa de las piezas de mantenimiento o para obtener información adicional, envíenos un cor...
Page 41 - GARANTÍA
Español | 21 GARANTÍA RESPONSABILIDAD DE WESTINGHOUSE OUTDOOR POWER EQUIPMENT Westinghouse Outdoor Power Equipment garantiza al comprador original que su línea Westinghouse Outdoor Power Equipment de acondicionadores de aire portátiles estará libre de defectos de material y mano de obra. Bajo uso y ...
Page 42 - CLIMATISEUR PORTATIF; NE PAS RETOURNER CE PRODUIT AU MAGASIN; FRANÇAIS; TABLE DES MATIÈRES; AVIS DE NON-RESPONSABILITÉ; TOUS LES DROITS SONT RÉSERVÉS; MISES À JOUR
2 | Français WPac14000s/WPac14000h CLIMATISEUR PORTATIF NE PAS RETOURNER CE PRODUIT AU MAGASIN Si vous avez des questions ou avez besoin d’aide, veuillez appeler le service client au 855-944-3571. FRANÇAIS MANUEL DE L’UTILISATEUR TABLE DES MATIÈRES Introduction .........................................
Page 43 - AVIS; ENREGISTREMENT DU PRODUIT; Pour vos dossiers
Français | 3 INTRODUCTION CARACTÉRISTIQUES (WPac14000s) Alimentation électrique ........................................115V~/60HzMode............................................................. RefroidissementCapacité de refroidis-sement................................. 8150 Btu/hPuissance d’entré...
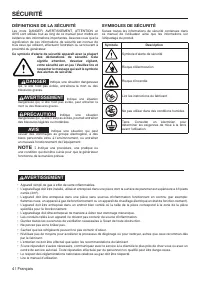
Page 44 - SÉCURITÉ; SYMBOLES DE SÉCURITÉ; PRÉCAUTION
4 | Français SÉCURITÉ SYMBOLES DE SÉCURITÉ Suivez toutes les informations de sécurité contenues dans ce manuel de l’utilisateur ainsi que les informations sur l’étiquetage du produit. Symbole Description Symbole d’alerte de sécurité Risque d’électrocution Risque d’incendie Lire les instructions du f...
Page 45 - MESURES DE SÉCURITÉ IMPORTANTES
Français | 5 SÉCURITÉ MESURES DE SÉCURITÉ IMPORTANTES CONSERVEZ CES INSTRUCTIONS AVERTISSEMENT Pour réduire le risque de blessure, l’utilisateur doit lire et comprendre les instructions avant d’utiliser ce produit. AVERTISSEMENT Lors de l’utilisation de ce produit, les précautions de base doivent to...
Page 46 - IC WARNING
6 | Français SÉCURITÉ AVERTISSEMENT • N’essayez pas d’accélérer le processus de dégivrage ou de nettoyer autre que ceux recommandés par le fabricant. • L’appareil doit être stocké dans une pièce sans sources d’allumage en fonctionnement continu (par exemple : flammes nues, appareil à gaz en fonction...
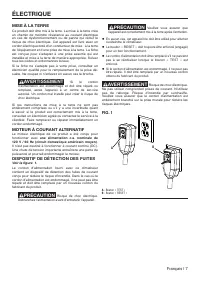
Page 47 - ÉLECTRIQUE; MISE À LA TERRE; MOTEUR À COURANT ALTERNATIF
Français | 7 ÉLECTRIQUE MISE À LA TERRE Ce produit doit être mis à la terre. La mise à la terre crée un chemin de moindre résistance au courant électrique en cas de dysfonctionnement ou de panne qui réduit le risque de choc électrique. Cet appareil est livré avec un cordon électrique doté d’un condu...
Page 48 - COMPOSANTS
8 | Français COMPOSANTS COMPRENDRE VOTRE APPAREIL Voir la figure 2. Pour réduire le risque de blessure et de défaillance du produit, lisez et comprenez les informations contenues dans ce manuel d’utilisation ainsi que les informations sur l’étiquetage du produit. ROULETTES Les roulettes facilitent l...
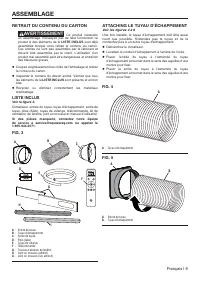
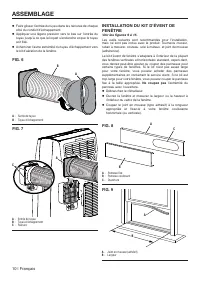
Page 49 - ASSEMBLAGE; RETRAIT DU CONTENU DU CARTON; LISTE INCLUS
Français | 9 ASSEMBLAGE RETRAIT DU CONTENU DU CARTON AVERTISSEMENT Ce produit nécessite un assemblage. N’essayez pas de faire fonctionner ce produit si des éléments de la LISTE INCLUS sont déjà assemblés lorsque vous retirez le contenu du carton. Ces articles ne sont pas assemblés par le fabricant e...
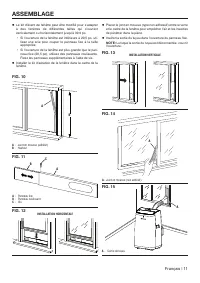
Page 50 - INSTALLATION DU KIT D’ÉVENT DE
10 | Français ASSEMBLAGE A - Sortie de tuyau B - Tuyau d’échappement A - Entrée de tuyau B - Tuyau d’échappement C - Rainure A - Panneau fixe B - Panneau coulissant C - Ouverture l Faire glisser l’entrée du tuyau dans les rainures de chaque côté du conduit d’échappement. l Appliquer une légère press...
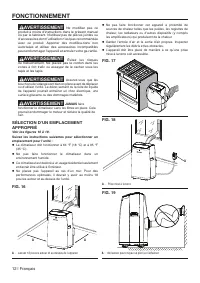
Page 52 - FONCTIONNEMENT; SÉLECTION D’UN EMPLACEMENT
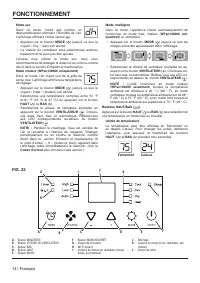
12 | Français FONCTIONNEMENT AVERTISSEMENT Ne modifiez pas ce produit à moins d’instructions dans le présent manuel ou par le fabricant. N’utilisez pas de pièces jointes ou d’accessoires dont l’utilisation n’est pas recommandée avec ce produit. Apporter des modifica-tions non autorisées et utiliser ...
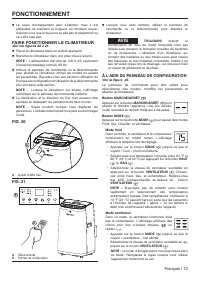
Page 53 - FAIRE FONCTIONNER LE CLIMATISEUR; À L’AIDE DU PANNEAU DE CONFIGURATION
Français | 13 FONCTIONNEMENT l Le tuyau d’échappement peut s’étendre, mais il est préférable de maintenir la longueur au minimum requis. Assurez-vous que le tuyau ne se plie pas brusquement ou ne s’affa rase pas. FAIRE FONCTIONNER LE CLIMATISEUR Voir les figures 20 à 21. l Placer le climatiseur dans...
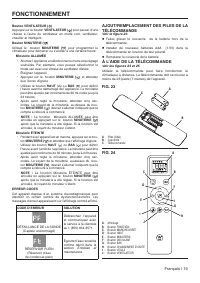
Page 55 - AJOUT/REMPLACEMENT DES PILES DE LA
Français | 15 FONCTIONNEMENT Bouton VENTILATEUR ( ) Appuyez sur le bouton VENTILATEUR ( ) pour passer d’une vitesse à l’autre du ventilateur en mode cool, ventilateur, chauffer et intelligent. Bouton MINUTERIE ( ) Utilisez le bouton MINUTERIE ( ) pour programmer le climatiseur pour démarrer ou s’arr...
Page 56 - FAIBLE; FROID SEC VENTILATEUR; INTELLIGENT
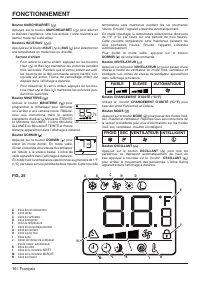
16 | Français FIG. 25 FONCTIONNEMENT A - Icône de refroidissement B - Icône sèche C - Icône du ventilateur D - Icône Intelligente E - Unité de température F - Icône de verrouillage parental G - Icône de oscillant H - Icône suivez-moi I - Icône turbo J - Icônes de vitesse du ventilateur (haute, basse...
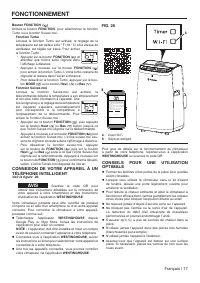
Page 57 - CONNEXION DE VOTRE APPAREIL À UN; CONSEILS POUR UNE UTILISATION
Français | 17 FONCTIONNEMENT A - Voyant Wi-Fi B - Téléphone intelligent FIG. 26 Bouton FONCTION ( ) Utilisez le bouton FONCTION pour sélectionner la fonction Turbo ou la fonction Suivez-moi. Fonction Turbo Lorsque la fonction Turbo est activée, le réglage de la température est par défaut à 64 ° F (1...
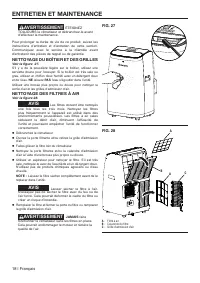
Page 58 - ENTRETIEN ET MAINTENANCE; NETTOYAGE DU BOÎTIER ET DES GRILLES; NETTOYAGE DES FILTRES À AIR
18 | Français FIG. 27 FIG. 28 ENTRETIEN ET MAINTENANCE AVERTISSEMENT ÉTEIGNEZ TOUJOURS le climatiseur et débranchez-le avant d’effectuer la maintenance. Pour prolonger la durée de vie de ce produit, suivez les instructions d’entretien et d’entretien de cette section. Communiquez avec le service à la...
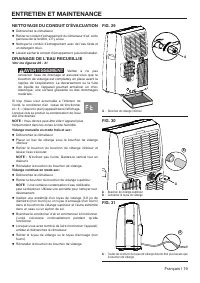
Page 59 - NETTOYAGE DU CONDUIT D’ÉVACUATION
Français | 19 ENTRETIEN ET MAINTENANCE NETTOYAGE DU CONDUIT D’ÉVACUATION l Débranchez le climatiseur. l Retirer le conduit d’échappement du climatiseur d’air et du panneau de la fenêtre, s’il y a lieu. l Nettoyez le conduit d’échappement avec de l’eau tiède et un détergent doux. l Laisser sécher le ...
Page 60 - DÉPANNAGE; PROBLÈME
20 | Français ENTRETIEN ET MAINTENANCE Les pièces de maintenance peuvent être achetées directement à l’usine. Une liste partielle des pièces de maintenance est ci-dessous. Pour une liste complète des pièces de maintenance ou pour des informations supplémentaires, écrivez-nous à [email protected] ou ...
Page 61 - GARANTIE
Français | 21 GARANTIE RESPONSABILITÉ DE WESTINGHOUSE OUTDOOR POWER EQUIPMENT Westinghouse Outdoor Power Equipment garantit à l’acheteur d’origine que sa gamme de climatiseurs portatifs Westinghouse Outdoor Power Equipment sera exempte de défauts de matériaux et de fabrication. En vertu de l’utilisa...