Page 9 - УСТАНОВКА ВСТРОЕННОГО ДУХОВОГО ШКАФА
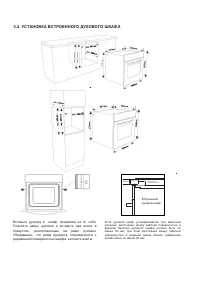
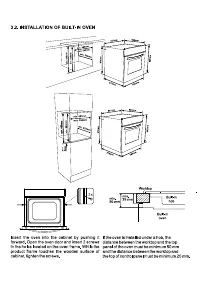
3.2. УСТАНОВКА ВСТРОЕННОГО ДУХОВОГО ШКАФА Встроенная варочная панель Вставьте духовку в шкаф, продвигая ее от себя. Откройте дверь духовки и вставьте два винта в отверстия, расположенные на раме духовки. Убедившись, что рама продукта соприкасается с деревянной поверхностью шкафа, затяните винты. Есл...
Page 12 - Òóðáîâåíòèëÿòîð; Функция
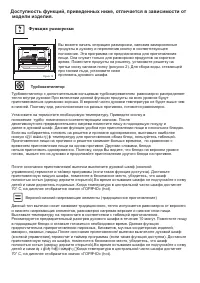
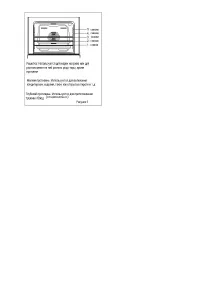
Âû ìîæåòå íà÷àòü îïåðàöèþ ðàçìîðîçêè , çàëîæèâ çàìîðîæåííûå ïðîäóêòû â äóõîâêó è ïåðåêëþ÷èâ êíîïêó â ñîîòâåòñòâóþùåå ïîëîæåíèå . Ýòà ïðîãðàììà íå ïðåäíàçíà÷åíà äëÿ ïðèãîòîâëåíèÿ ïèùè . Îíà ñëóæèò òîëüêî äëÿ ðàçìîðîçêè ïðîäóêòîâ çà êîðîòêîå âðåìÿ . Ïîìåñòèòå ïðîäóêòû íà ðåøåòêó , óñòàíîâèòå ðåøåòêó í...
Page 13 - на
11 # !- ! 4 #+ !& ", " * H , + ; ! ( &). + !. * , & ; &, ! ! " # & 10 . ; "!; #, & . )! #+! & " ! &. ; ! . . &! !/ & & " # ( !), ( ! #+! ). ) ; #, , , & # ( + * ). # # ! ! % %. $ % ! " 70° , # " «()*+-)» (hot). (% )! ! !...
Page 14 - дверцу
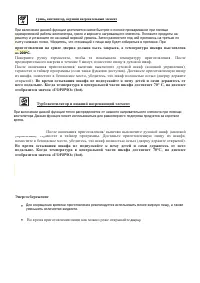
12 (% # )! ! ! . ; ! ! " &Z ", * & . ; ! , & ; ; * ! . % , 200° . & , & !. & 5 , ; " #. &! !/ & & " # ( !), ( ! #+! ). ) ; #, , , & # ( + * ). # # ! ! % %. $ % ! " 70° , # " «()*+-)» (hot). & # ! ! 4 a+! ! * ; H " ! ! ;. ! "...
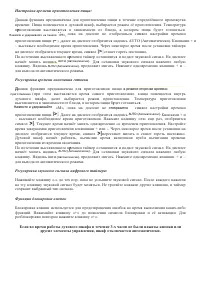
Page 16 - режиме; приготовления; Нажмите; Автоматически; Автоматически
14 : )! #+! & ! ! ; & Z * . ; ; ! " #, ! * Z !. ! ! ! , ; !. <* «[», ! ! ; . ) ! AUTO (Автоматически) . ( + – " ! !. ! ! ; !, !. & ! . < &Z «& ». )! * . < «& » * . <* + – ! " & *. )! #+! & ! ! ; Z * ( H ! ! ! !). ; ; ! " #, ! * !. ! ! ! , ;...
Page 24 - – По возможности готовьте несколько блюд одновременно.
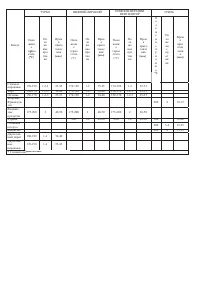
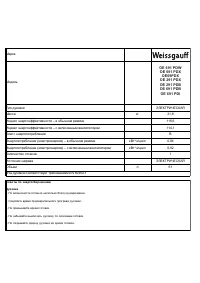
Марка Модель Тип духовки ЭЛЕКТРИЧЕСКАЯ Масса кг 31,8 Индекс энергоэффективности – в обычном режиме 116,6 Индекс энергоэффективности – с включенным вентилятором 114,1 Класс энергопотребления B Энергопотребление (электроэнергия) – в обычном режиме кВт*ч/цикл 0,9 4 Энергопотребление (электроэнергия) – ...
Page 28 - Contents
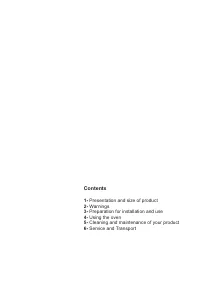
1 Contents 1- Presentation and size of product 2- Warnings 3- Preparation for installation and use 4- Using the oven 5- Cleaning and maintenance of your product 6- Service and Transport
Page 29 - PART 1: PRESENTATION AND SIZE OF PRODUCT
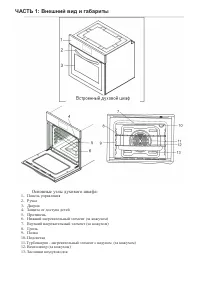
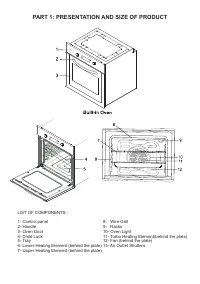
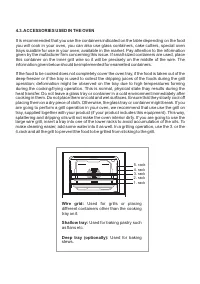
2 PART 1: PRESENTATION AND SIZE OF PRODUCT LIST OF COMPONENTS : 1- Control panel 2- Handle3- Oven Door4- Child Lock 5- Tray6- Lower Heating Element (behind the plate)7- Upper Heating Element (behind the plate) 8- Wire Grill9- Racks10- Oven Light11- Turbo Heating Element(behind the plate)12- Fan (beh...
Page 30 - General Safety Warnings
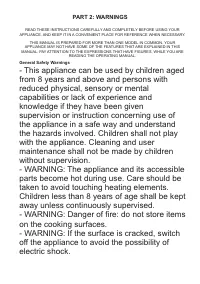
3 PART 2: WARNINGS READ THESE INSTRUCTIONS CAREFULLY AND COMPLETELY BEFORE USING YOUR APPLIANCE, AND KEEP IT IN A CONVENIENT PLACE FOR REFERENCE WHEN NECESSARY. THIS MANUAL IS PREPARED FOR MORE THAN ONE MODEL IN COMMON. YOUR APPLIANCE MAY NOT HAVE SOME OF THE FEATURES THAT ARE EXPLAINED IN THIS MANU...
Page 33 - PART 3: PREPARATION FOR INSTALLATION AND USE; more than room temperature
6 PART 3: PREPARATION FOR INSTALLATION AND USE When choosing a place for the oven, attention should be paid that there are no flammable or combustible materials in the close vicinity, such as curtains, oil, cloth etc. which quickly catch fire. Furnitures surrounding the oven must be made of material...
Page 35 - The supply cable should not contact the product’s hot surface.
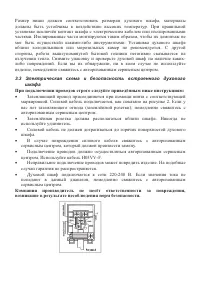
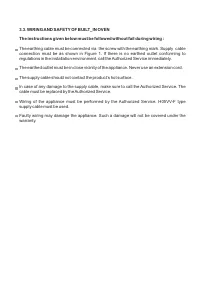
3.3. WIRING AND SAFETY OF BUILT_IN OVEN The instructions given below must be followed without fail during wiring : The earthing cable must be connected via the screw with the earthing mark. Supply cable connection must be as shown in Figure 1. If there is no earthed outlet conforming to regulations ...
Page 36 - for using with plug; Unplug your appliance when it is not in use.
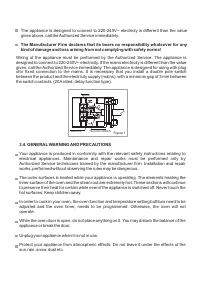
8 Wiring of the appliance must be performed by the Authorized Service. The appliance is designed to connect to 220-240V~ electricity. If the mains electricity is different than the value given, call the Authorized Service immediately. The appliance is designed for using with plug o for fixed connect...
Page 37 - Table 1; The oven’s thermostat and warning lights,; PART 4: USING THE OVEN
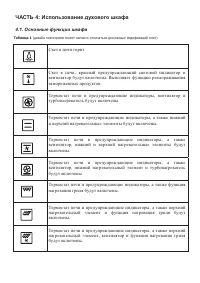
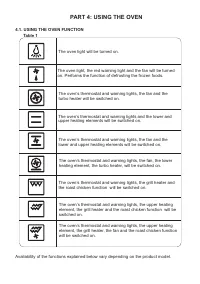
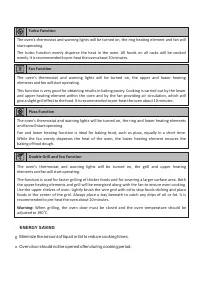
9 Table 1 The oven light, the red warning light and the fan will be turnedon. Performs the function of defrosting the frozen foods. The oven’s thermostat and warning lights, the fan and the turbo heater will be switched on. The oven’s thermostat and warning lights, the fan and the lower and upper he...
Page 39 - Minimi; ENERGY SAVING
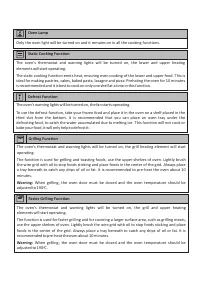
Turbo Function Fan Function The oven lights will be turned on, the ring heating element and fan will start operating. The turbo function evenly disperse the heat in the oven. All foods on all racks will be cooked evenly. It is recommended to pre-heat the oven about 10 minutes. 's thermostat and warn...
Page 40 - HOW TO USE
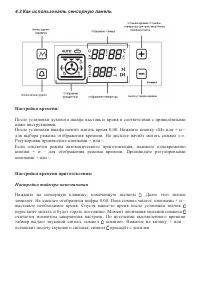
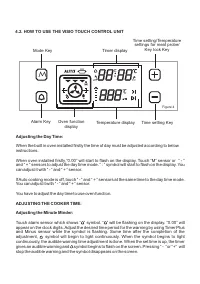
Figure 4 4.2. HOW TO USE THE VISIO TOUCH CONTROL UNIT Adjusting the Day Time: When the built in oven installed firstly the time of day must be adjusted according to belowinstructions. When oven installed firstly,“0.00” will start to flash on the display. Touch “M“ sensor or “ - “ and “ + “ sensors t...
Page 42 - TURBO
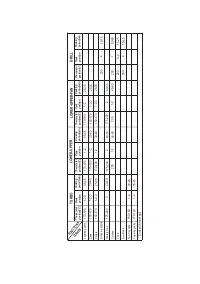
14 DISHES FUNCTIONS TURBO LOWER-UPPER LOWER-UPPER-F AN GRILL Layered pastry 170-190 170-190 170-190 170-190 170-190 1-2-3 1-2 1-2 1-2 1-2 35-45 35-45 25-35 30-40 30-40 30-40 40-50 30-40 35-45 40-50 45-60 45-60 10-15 15-25 15-25 50-60 25-35 1-2-3 1-2-3 2 1-4 1-4 2 1-2 1-2 4 3-4 4 * 150-170 150-170 25...
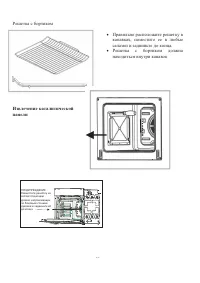
Page 44 - Removal of wire shelf
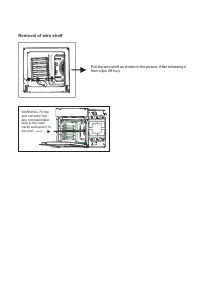
16 Removal of wire shelf 1 2 Pull the wire shelf as shown in the picture . After releasing it from clips, lift it up. WARNING- Fit the grid correctly into any correspondent rack in the oven cavity and push it to the end.
Page 45 - PART 5: CLEANING AND MAINTENANCE OF YOUR OVEN; Cleaning the interior of the oven; which you will find at
17 PART 5: CLEANING AND MAINTENANCE OF YOUR OVEN 5.1. CLEANING Before starting to clean your oven, be sure that all control buttons are off and your appliance is cooled off. Unplug the appliance. Do not use cleaning materials containing particles that might scratch the enamelled andpainted parts of ...
Page 46 - PART 6: SERVICE AND TRANSPORT; REQUIREMENTS BEFORE CONTAINING TO SERVICE; The heat may be not adjusted with oven’s heater control switch.; If the interior lighting lamp does not light :; If you need any transport :; If does not have the original case :
18 PART 6: SERVICE AND TRANSPORT 6.1. REQUIREMENTS BEFORE CONTAINING TO SERVICE If the oven does not operate : The oven may be plugged off, there has been a black out. On models fitted with a timer, time may not be regulated. If the oven does not heat : The heat may be not adjusted with oven’s heate...